Monday, February 28, 2022

Spellbinders Be Bold Color Block Collection


Happy Monday, crafty friends!
I wanted to sneak in and share a quick Slimline Card today made using the Spellbinders Be Bold Color Block Congrats Etched Dies from the Be Bold Color Block Collection.  I am in LOVE with the eye-catching sentiment designs in this collection, which are perfect for expressing yourself in a big way!

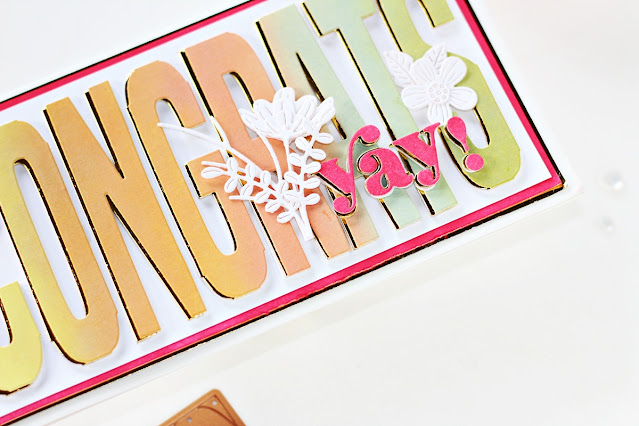
I used the Be Bold Color Block Congrats Etched Dies to create this bright and fun card with some vivid ink blending and a little gold shadow. I really like how this turned out!

To create my card, I trimmed a piece of Snowdrift Cardstock to 3.25” x 6.25” and blended Mustard Seed, Scattered StrawSpiced MarmaladeDried Marigold, and Peeled Paint Distress Oxide inks on the panel using an ink blending tool to create a springtime background. Next, I die-cut the ink-blended panel with the Congrats die from the Be Bold Color Block Congrats Die Set. Once that was done, I die-cut Brush Gold Cardstock with the 'Congrats' and 'Yay' dies from the Be Bold Color Block Congrats Die Set. I adhered the ink blended “congrats” letters on top of the gold letters with Craft Glue, allowing the gold layer to peak out to the left side for depth.

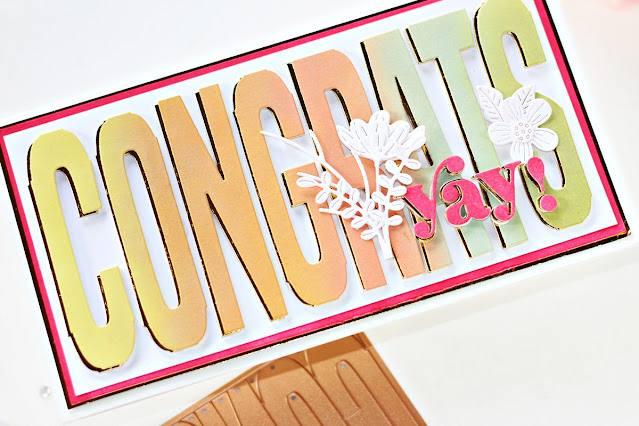
Next, I die-cut Wild Berry Cardstock with the 'Yay!' die from the Be Bold Color Block Congrats Die Set and adhered it on top of the gold die-cut sentiment piece with Craft Glue, allowing the gold layer to peak out to the left side for depth. Then, I die-cut  Snowdrift Cardstock using the various flower and foliage dies in the Be Bold Blooms Etched Dies and adhered them around the die-cut letters with foam squares. Then, I trimmed a piece of Snowdrift Cardstock to 3.25” x 6.375” and adhered the large letters onto the card front with foam squares

Next, I mat the card panel with layers of Wild Berry and Brush Gold Cardstock and then adhered it it on top of a 3.50” x 6.425” -sized top-folding white card base. This was so simple and easy to put together!

Limited Period Offer
Don't miss the BOGO (Buy One Get One) Die Cutting Sale going on over at Spellbinders now. Be sure to take advantage of the sale and stock up on your favourite die sets!
    

That’s it for me today! I hope you liked my take on the die set! If you like what you've seen from me, please give me a follow over on my Instagram (@hussena_cal) and/or subscribe to my blog if you haven't already.
Have a great day ahead!

Friday, February 25, 2022

Spellbinders Embossing Folder of the Month | Sketched Floral


Hello, crafty friends!
I am back today to share a Mini Slimline Card using the Embossing Folder of the Month by Spellbinders - Sketched Floral.  

You can join the Spellbinders Embossing Folder of the Month and receive an expertly designed die set each month along with membership-only savings! If you join between now and February 24th, you will receive this gorgeous “Sketched Floral” Embossing Folder.  There is no commitment and you can cancel at any time. Click HERE for more information.

The Embossing Folder adds texture and dimension to any project. The embossing folder is a whopping 5 1/2 x 8 1/2″and can be used to make slimline, 5″ x 7″, and a variety of sized projects. It’s a simple and pretty design and oversized dimensions make it super versatile.

I created a Mini Slimline Card in springtime colours using the Sketched Floral Embossing Folder along with the Be Bold Blooms Etched Dies and the Fluted Classics Square Etched Dies.

To create my card, I die-cut Snowdrift Cardstock using the Layer 2 Die from the Precision Layering A2 B Etched Dies in my Platinum 6 Die Cutting Machine. Next, I embossed the card panel using the Sketched Floral Embossing Folder. Then, to add some visual interest, I applied Spiced Marmalade and Mustard Seed Distress Oxide inks on the panel using an ink blending tool to highlight and bring out the raised areas more.  

Once that was done, I die-cut Snowdrift Cardstock using the Small Square Outer Rim and Insert dies from the Fluted Classics Square Etched Dies. Then, I die-cut Snowdrift Cardstock using the Small Inner Rim Die from the Fluted Classics Square Etched Dies and stamped a sentiment from the Garden Favorites Sentiments Clear Stamp Set in the centre of the panel using Versafine Onyx Black ink. Once that was done, I affixed the die-cut pieces on my embossed panel using foam squares for dimension.

Next, to embellish my card, I die-cut Snowdrift and Peridot Cardstock using the various flower and foliage dies in the Be Bold Blooms Etched Dies. I lightly blended Worn Lipstick Distress Oxide ink over top of each die-cut piece using a sponge dauber to add a hint of colour. I assembled the flowers first, arranged them on my card, and adhered them to with both Craft Glue and foam squares

Next, I die-cut Snowdrift Cardstock using the Layer 1 Die from the Precision Layering A2 A Etched Dies and applied Worn Lipstick Distress Oxide ink over the entire panel using a blending brush. I mat my embossed panel with this custom-colored background panel before adhering it to a side-folding Mini Slimline White Card Base using tape runner. I finished the card with some Gold Mix Color Essentials Gems to embellish my panel.

The Embossing Folder of the Month is available exclusively at Spellbinders Paper Arts during February 2022. You can get the Sketched Floral” Embossing Folder at the special Cub Kit price, along with other membership perks.

You can subscribe to any of the Spellbinders Clubs between the 1st - 24th of each month and never miss a fun kit like this again!
  

Limited Period Offer
Don't miss the BOGO (Buy One Get One) Die Cutting Sale going on over at Spellbinders from now until Sunday. Be sure to take advantage of the sale and stock up on your favourite die sets!
    

That’s it for me today! I hope you liked my take on the die set! If you like what you've seen from me, please give me a follow over on my Instagram (@hussena_cal) and/or subscribe to my blog if you haven't already.
Have a great day ahead!

Wednesday, February 23, 2022

Amazing Paper Grace Die of the Month | February 2022


Hello, crafty friends!
I have an ornate layered card to share today featuring the Spellbinders & Amazing Paper Grace February 2022 Die of the Month Set. This month's "Marvelous Medallion" Set is perfect for making gorgeous layered cards, tags, gift boxes, gift baskets, gift card holders, mini albums, and more. This die set features 13 dies.

This month’s set comes with 13 dies that can be used to cut decorative background panels, flowers, and banners.  The die set includes a split doily or split medallion that allows you to lay in any sentiment that you desire.  The banner shape is versatile and can be filled with filigree or left solid. There are also two flower dies included in the set, which you can arrange in a cross to create a flower. It's so simple and easy!

My card is 5" inches squared and I used the split medallion dies with the background panel dies to add depth and layers on my card design.

To create my card, I first die-cut AlabasterMirror Gold Cardstock, and Pink Sand Cardstock using the Split Medallion Dies included in the Marvelous Medallion Set. I affixed the detailed swallowtail mirror gold die cut onto base swallowtail label and then adhered the detailed die cut layers together using Craft Glue. Next, I adhered the base layers together, offsetting the gold mirror die cut to create a shadow.

Next, I die-cut Alabaster Cardstock using the intricate Banner Die included in the set. I die cut the layers a total of four times in order to help me create a background panel using the strips. Once I had all the die-cut layers, I adhered the strips down on my card panel using  Craft Glue. Next, I die-cut Mirror Gold Cardstock and Pink Sand Cardstock using the Nestabilities Classic Ovals (Large) Etched Die Set. Next, I adhered the layers together, offsetting the gold mirror die cut to create a shadow, and stamped a sentiment from the Embroidery Flowers Set using Versafine Onyx Black ink in the centre of the die-cut piece.

Next, it was time to embellish my card. I die-cut Pink Sand, Peridot, and Mirror Gold Cardstock using the flower and leafy branch dies included in the Marvelous Medallion Die Set. Once that was done, I used a medium pink Copic Marker to flick some colour out from the center to add some quick colour to the flowers. Then, I embossed each die-cut piece with a Ball Stylus and added white pearls to the flower centres for a bit of interest. Then, I tucked in a white satin ribbon bow near the sentiment for interest and adhered the floral spray down on my panel using Hot Glue. Next, I matted my panel with layers of Pink Sand and Mirror Gold Cardstock before adhering it to a top-folding square-sized white card base with tape runner. I finished the card by adding some green pearls all over my card panel for visual interest.


The Amazing Paper Grace Die of the Month is available exclusively at Spellbinders Paper Arts during February 2022. You can get the Marvelous Medallion Die Set at the special Cub Kit price, along with other membership perks.


If you'd like to see some more project inspiration using the Marvelous Medallion Die Set, check out the Spellbinders Blog where Becca shares some stunning project samples using it.  
 

Limited Period Offer
Don't miss the BOGO (Buy One Get One) Die Cutting Sale going on over at Spellbinders from now until Sunday. Be sure to take advantage of the sale and stock up on your favourite die sets!
    

That’s it for me today! I hope you liked my take on the die set! If you like what you've seen from me, please give me a follow over on my Instagram (@hussena_cal) and/or subscribe to my blog if you haven't already.

Monday, February 21, 2022

Spellbinders February 2022 Clear Stamp & Die Club Kit | Old School Notes


Hello, crafty friends!
Hope your Monday is off to a great start! I have a Birthday Card to share today made using the Spellbinders Clear Stamp & Die of the Month  Old School Notes.

The Spellbinders Clear Stamp of the Month features a cute typewriter with stamped details inside, several types of flowers, and darling sentiments, which you can mix and match with the other Club Kits for February Kits such as the Large Die of the Month Kit for endless possibilities! This is a 17-piece clear photopolymer 4 x 6 stamp set perfect for many cardmaking projects and lots of occasions. This “Old School Notes” stamp set features made in the USA stamps from high-quality photo-polymer for clear, crisp impressions. 

There is also a Spellbinders Clear Stamp Club Kit without the die set, which you can opt for if you don't wish to receive the coordinating dies.

 You may notice a theme from my last post - Typewriters. I’m having such a blast creating with these this month! I decided to create a watercolored Birthday Card using the Old School Notes Stamp set along with the Typing Class Die Set and the Nestabilities Hemstitch Rectangles Etched Dies.

To create my card, I first stamped a number of the images from the  Old School Notes Stamp set on to Snowdrift Cardstock using Versafine Onyx Black ink. Next, I colored the images using the Jane Davenport Watercolors Neutrals Set. Once the images were all colored and dry, I die cut the images using the coordinating dies

Next, I die-cut Beeswax, DahliaRainforest, and Teal Topaz Cardstock using the flower and leaf dies included in the Typing Class Die Set. Then, I went ahead and stamped some additional solid leaves from the stamp set on to Snowdrift Cardstock using Electric Lime ink and cut them out using the  coordinating dies to use as foliage. Next, I die-cut Snowdrift Cardstock using the typewriter message die included in the Clear Stamp & Die of the Month Club and stamped a sentiment on it using Versafine Onyx Black ink and popped it on my panel using foam adhesive

Next, to create my card background, I die-cut Snowdrift Cardstock using the Extra Large Frame Die from the Hemstitch Rectangles Etched Die Set. Then, I wet my panel with water and used Tumbled Glass, Peacock Feathers, and Cracked Pistachio Distress Inks with a Water Brush in a dabbing motion, allowing the colors to mix slightly. I let the panel dry and then added some grey and teal paint splatters for interest. Then, I stamped one of the sentiment pieces from the Old School Notes Stamp set using Pumice Stone Distress Oxide ink randomly all over the panel to create a vintage letter look. I really love how it adds a little something to the background. 

Once that was done, I adhered the stamped images to the background panel using foam adhesive. Then, I matted the panel with layers of Silver Glitter and Silver Fox Cardstock before adhering it to a top-folding white card base with tape runner. 


I hope you liked my card and thank you so much for stopping by today. You can subscribe to any of the Spellbinders Clubs between the 1st - 24th of each month and never miss a fun kit like this again!
  

Don't miss out on the Be our Valentine Sale that is currently going on at Spellbinders. You can SAVE $25 Off $100+ on your orders on the Spellbinders website. This is a cart-level discount that will be applied to all orders with a subtotal of $100+, clubs are not eligible for this promotion.


 If you like what you've seen from me, please give me a follow over on my Instagram (@hussena_cal) and/or subscribe to my blog if you haven't already.
Wishing you a great day ahead!

Sunday, February 20, 2022

Spellbinders Large Die of the Month | February 2022

Hello, crafty friends!
I hope you're having a great weekend so far! I have a spring-time card to share today featuring the Spellbinders Large Die of the Month Kit. This month’s Large Die of the Month Kit, “Typing Class“, is a huge set of 22 dies that can be used to cut a beautiful typewriter, several sentiments, and a big bouquet of leaves and flowers. 

You can join the Spellbinders Large Die of the Month Kit and receive an expertly designed die set each month along with membership-only savings! If you join between now and February 24th, you will receive this gorgeous “Typing Class” Die Set.  There is no commitment and you can cancel at any time. Click HERE for more information.

This month's die set create a detailed typewriter that when stacked together creates a fun dimensional look that fits easily into an 5″x7″ envelope. I used most of the dies included in the kit to create this 5″ x 7″ card for creating a springtime thank-you card.

To create my card, I first die-cut Snowdrift, Pink Sand, and Silver Glitter Cardstock using the main typewriter design, keyboard, the key strips, knob, and the backer dies. I assembled the different pieces following the Video Tutorial on the Spellbinders YouTube channel, which you can check out HERE. This was rather easy to put together and super fun as well! Next, I die-cut Snowdrift and Silver Glitter Cardstock using one of the sentiment dies included in the set. I adhered the white die-cut sentiment on top of the silver die-cut with Craft Glue, and then ink blended Picked Raspberry ink to the bottom three-quarters of the sentiment die-cut piece for more depth. I used 3D Foam Adhesive Tape to adhere my sentiment piece on the typewriter, giving it some extra dimension. 

Next, to embellish my card, I die-cut Wild BerryBeeswaxRainforest, and Teal Topaz Cardstock using the flower and leaf dies included in the set. Once I had the desired number of die-cut pieces, I adhered them on my card front using a combination of foam adhesive and Craft Glue. Next, I die-cut Snowdrift Cardstock using the typewriter message die included in the Clear Stamp & Die of the Month Club. Then, I stamped a sentiment from the Old School Notes Set and popped it on my panel using foam adhesive

Then, to create my card background, I embossed a piece of Onyx Cardstock using the Sketched Floral Embossing Folder of the Month Set. and lightly distressed the raised areas using a Distressing Tool to add texture and dimension. I matted this panel with a piece of Pink Sand Cardstock before adhering it to a top-folding 5"X7" card base with tape runner. I popped the typewriter up on top and added a few Prism AB Color Essentials Gems to embellish.

 
If you'd like to see some more project inspiration using the Large Die of the Month Kit, check out the Spellbinders Blog where you can find some stunning project samples using it.  
 

Limited Period Offer
SAVE $25 Off $100+ orders on the Spellbinders website. This is a cart-level discount that will be applied to all orders with a subtotal of $100+, clubs are not eligible for this promotion.

 That’s it for me today! I hope you liked my take on the die set! If you like what you've seen from me, please give me a follow over on my Instagram (@hussena_cal) and/or subscribe to my blog if you haven't already.

Thursday, February 17, 2022

Altenew Dreamy Bouquet Fabric Release Blog Hop + Giveaway ($300 in total prizes)


Hello, crafty friends!
I'm delighted and honoured to be joining Altenew for the Dreamy Bouquet Fabric Bundle Blog Hop today. Altenew is releasing their FIRST-EVER Fabric Bundle and I am so thrilled to have had the opportunity to create a few projects using it! The bundle contains 5 pieces of 18"x22" fabric (fat quarter - common size for quilters) featuring Altenew motifs. The fabric is quilting weight cotton making it a versatile choice for crafting, quilting, and more!

If you arrived here from the incredible Michelle Short's Blog, then you are on the right track. If this is your first stop, then you will want to start at the beginning, the Altenew Card Blog. We've got tons of inspiration and giveaways for you on the hop today, so keep reading till the end of this post for more information.


My first project for today is a Slimline Card created using the Dreamy Bouquet Fabric Bundle. I combined a few stamp and die sets from Altenew to create this thank-you card for a friend. If you enjoy making your own home décor or sewing/quilting, these designs really give you a lot of bang for your buck because you can use them in so many different projects. The prints and colours are super pretty too and there's so much you can do with them!

To create my card, I first die-cut the Dreamy Bouquet Fabric Bundle using the Caps Bold Alphabet Die Set to spell the word 'Thanks'. I love that with the Caps Bold Alphabet Die Set, I can create my own fun custom sentiments! Next, I die cut Neenah Classic Crest Solar White Cardstock and White Foam using the alphabet dies and adhered the pieces one on top of the other for dimension. The fabric prints were such a delight to die cut and I thoroughly enjoyed working with them. 

Next, I trimmed a piece of Neenah Classic Crest Solar White Cardstock to  3" x 8" and used the Altenew Watercolor 36 Pan Set to do a light watercolor wash on my panel. I wet my card panel with water and used Cotton Candy and Coral Berry paints with a Water Brush in a dabbing motion, allowing the colors to mix slightly. I let the panel dry and then added some black and metallic gold paint splatters for interest. Next, I stamped the hand-drawn foliage foliage and mini flower elements from the Doodle Blooms Stamp Set in opposite corners of the panel using Obsidian Ink. This set is such an oldie, but a goldie. I still reach for it very often in my stash. :-)

Next, I die cut the Dreamy Bouquet Fabric Bundle and Gold Mirror Cardstock using the mini bloom and leaf dies included in the Doodle Blooms Die Set. I assembled the pieces on my card panel and adhered them down using the 2 in 1 Precision Glue Pen. Next, I stamped my sentiment from the Just Because Stamp Set on to some Neenah Classic Crest Solar White Cardstock Cardstock with Versafine Onyx Black ink and cut out the piece using a banner die. Then, I die-cut the banner from Gold Mirror Cardstock to mat the sentiment piece and affixed it down on my panel using foam adhesive. To finish, I mat my card panel with Gold Mirror Cardstock before adhering it down to a top-folding white slimline card base using tape runner.


My next card features the Dreamy Bouquet  along with the Fantasy Florals 3D Die Set. This is one of my favorite die sets from Altenew and I was so thrilled to have the opportunity to play with it again.

For my card, I first die cut Neenah Classic Crest Solar White Cardstock using the Dotted Scales Deobssing Cover Die. (This die is currently on sale, so it's a good time to snag it! I have incorporated this cover die in so many projects in the past and still reach for it every now and then. It's super versatile and easily one of my favorite dies of all time!)  Next, I wet my card panel with water and used Warm Sunshine paint to create a nice watercolored background. I applied the paint around the centre of the panel and drug the color out loosely with water. Then, I let the panel dry and then added some black and grey paint splatters for interest.

Next, I die cut Gradient Cardstock Set - Red Cosmos and Green Meadows using the various flower and leaf dies from the Fantasy Florals 3D Die Set. I assembled the pieces together using Craft Glue and adhered the die cut pieces down on my panel to create a bouquet. Then, in order to complement the floral spray, I die cut the Dreamy Bouquet Fabric Bundle using the Halftone Circles Nesting Die Set and popped them on my panel using foam adhesive for dimension. I love the hint of colour and texture provided by these circles! I wanted to add a bit of sparkle and shine to the bouquet, so I die cut Glitter Cardstock Set - Dazzling Diamond using the foliage dies included in the Create-A-Wreath Die Set and adhered down the pieces to my floral arrangement using Craft Glue

Next, I stamped my sentiment from the Just Because Stamp Set on to some Neenah Classic Crest Solar White Cardstock with Versafine Onyx Black ink and cut out the piece using a banner die. Then, for interest, I trimmed a strip of Dazzling Diamond Cardstock and adhered it down on the sentiment banner using Craft Glue and popped the piece on my panel using foam adhesive. 
Then, to complete, I mat my card panel with a layer of Dazzling Diamond Cardstock before adhering it down to a top-folding A2-size white card base using tape runner.  I finished the design with some sparkling silver sequins around the bouquet to embellish.


Giveaway Prizes:
$300 in total prizes! To celebrate this release, Altenew is giving away a $50 gift certificate to 2 lucky winners and a $25 gift certificate to 8 winners! Please leave a comment on the Altenew Card Blog and/or each designer’s blog post on the blog hop list below by 02/23/2022 for a chance to win. Altenew will draw 10 random winners from the comments left on each stop of this blog hop and announce the winners on the Altenew Winners Page on 02/25/2022.


Blog Hop Order:

Next Stop on this Blog Hop is the incredibly talented, Jaycee Gaspar's blog. Just in case you lose your place along the way, here is the complete list of participants so that you can find your way back:

                            Hussena Calcuttawala (You are HERE)

Well, that’s all for my projects today! I’ve been busy creating a few more projects that I’ll share in a few days. In the meantime, I hope you’ll take a peek at the February 2022 All Things Handmade Release! Thanks so much for reading, and have a marvelous day!


If you like what you've seen from me, please give me a follow over on my Instagram (@hussena_cal) and/or subscribe to my blog if you haven't already

Sunday, February 13, 2022

Guest Post using Spellbinders Into The Wilderness Collection

Hello everyone!
I am so thrilled to be guest designing on the Spellbinders blog today highlighting the NEW Into The Wilderness Collection by Sushma Hegde. This beautiful collection features an array of floral and nature-inspired images that can be used in a number of ways.


My first card features the Birthday Bouquet Clear Stamp Set along with the Fluted Classics Ovals Etched Dies, and the Mini Sincere Sentiments Glimmer Hot Foil Plate. I wanted to create the look of a loose watercoloured painting on my card front and this set was simply perfect for it. The stamp set has so many beautiful possibilities and I was very excited to play with it!

To create my card, I started by stamping the floral bouquet from the Birthday Bouquet Clear Stamp Set in Antique Linen Distress ink onto a piece of Canson Montval Watercolour Paper. The colouring was quite simple from there - I used my Watercolors Set Neutrals Set to apply the darkest shade in the center of the image, then pulled the color out a bit with the lighter shade, and then pulled the lighter shade out to the edges with a clean water brush. Once the image was completely dry, I went in and added some highlights to the images using Zig Markers. I wanted the flowers and the overall look of the card to be softer, so I avoided stamping with black ink. 

Once my colouring was finished, I applied a thin line of blueberry paint around the entire image and drug the color out loosely with water for a soft, watercolored background. I then flicked some gold metallic paint on my panel using a paint brush for a fun splatter effect. Next, I die cut Alabaster Cardstock using the Large Oval Outer Rim, Insert, and Inner Rim Dies from the Fluted Classics Ovals Etched Dies. Then, I die cut Alabaster Cardstock using the Outer Die from the Enchantment Tall Flip and Gatefold Card Die Set. I snipped-off the four corners of the die cut piece and adhered them down on my panel using the Bearly Art Original Precision Craft Glue

 Next, I used Gold Hot Foil to foil Onyx Cardstock using one of the sentiments from the Mini Sincere Sentiments Glimmer Hot Foil Plate and cut it out using the coordinating die. I adhered the piece onto my panel using foam squares for a raised effect. Then, to complete, I mat my background panel with Mirror Gold Cardstock before adhering it to a side-folding white card base with tape runner. I finished the design with some sparkling gold sequins around the bouquet to embellish.


My next card features the Layered Anemones Clear Stamp Set. I paired it with the Diamond Floral Frame Glimmer Hot Foil Plate & Die Set and one of the sentiments from the Birthday Bouquet Clear Stamp Set to create this soft watercolour card. 

To make my card, I stamped the layered flower images from the Layered Anemones Clear Stamp Set on to Snowdrift Cardstock using Frayed Burlap Distress Oxide ink and Rusty Hinge Distress Oxide ink for the blooms and Frayed Burlap Distress Oxide ink for the flower centres. Next, I stamped the Bud D with stem stamp images on to Snowdrift Cardstock using Worn Lipstick Distress Oxide ink and Frayed Burlap Distress Oxide ink. Then, I die cut Snowdrift Cardstock using the 3 Leaf Frond die from the Diamond Floral Frame Glimmer Hot Foil Plate & Die Set. I watercolored the pieces using Watercolors Set Neutrals Set and added some highlights with Prisamacolor Pencils for depth. Next, I fussy-cut the stamped pieces with a pair of scissors, leaving a small white border around the images.

Once that was done, I trimmed a piece of Snowdrift Cardstock to size and added a light watercolour wash to the panel using the Jane Davenport Watercolour Set - Brights. I applied colours from the Watercolour Set to the wet area using a Waterbrush Pen in a dabbing motion, allowing the colors to mix slightly.  Once dry, I stamped the sentiment from the Birthday Bouquet Clear Stamp Set on top of the watercolor background using Versafine Onyx Black ink. Next, I added some metallic gold paint splatters to the background using the leftover paint from my palette.

I die cut Mirror Gold Cardstock and White Foam using the Outer and Inner Diamond Dies included in the Diamond Floral Frame Glimmer Hot Foil Plate & Die Set to create a frame for my card front. I adhered it down on to the background using the Bearly Art Original Precision Craft Glue and then arranged my flowers and leaves around the frame. Next, I die cut some additional foliage using the sprig die included in the Flourished Fleurit Die Set and tucked them in-between the floral arrangement for interest. The stamped and die-cut images were then adhered down using a combination of foam squares and Bearly Art Original Precision Craft Glue.  Next, I die cut Mirror Gold Cardstock using the Layer 1 Die from the Precision Layering A2 A Etched Dies and adhered it down using liquid adhesive to my background panel. I then matted the card panel with Snowdrift Cardstock and attached it to an top-folding pink card base made out of Pink Sand Cardstock using tape runner. I finished the card with a few sparkling gold sequins for some shimmer and shine.


My last card for today features the Being Around You Wreath Clear Stamp Set, the Fluted Classics Circle Etched Dies, and the Fluted Classics Rectangle Etched Dies. This card would be simply perfect to send to a friend for a sweet springtime hello! 

To create my card, I started by adding a generous amount of water to a piece of Canson Montval Watercolor Paper, which I taped down onto a hard board as I wanted to watercolor the background. Next, I applied a few “shots” of Olive Green Color Burst powder onto it and set it aside to let it dry. I then flicked some gold metallic paint and black acrylic paint on my panel using a paint brush for a fun splatter effect. 

Once the panel had dried, it was time to begin stamping! I wanted the focus to be on the gorgeous Being Around You Wreath Clear Stamp Set, so I stamped the half-circle wreath image and the additional floral motifs in Versafine Onyx Black ink on to a piece of Snowdrift Cardstock to create the centrepiece for my card. Next, I coloured in the images using the Watercolors Set Neutrals Set and a water brush. I let the images dry and then went in and painted the centres of the flowers using Gold Metallic Paint for some shimmer and shine. Once that was done, I fussy-cut the images out with a pair of scissors. 

Next, I die cut Mirror Gold Cardstock and White Foam using the Medium and Small Inner Rim Dies included in the Fluted Classics Circle Etched Dies to create a frame for my card front. I then adhered them down using the Bearly Art Original Precision Craft Glue on my watercolored background. Next, I popped up the stamped images on the card front using foam squares for dimension. Then, I used Gold Hot Foil to foil Onyx Cardstock using one of the sentiments from the Mini Sincere Sentiments Glimmer Hot Foil Plate and cut it out using the coordinating die. I adhered the piece onto my panel using foam squares for a raised effect. Then, to complete, I die cut Alabaster Cardstock using the Large Rectangle Outer Rim and Inner Rim Dies from the Fluted Classics Ovals Etched Dies. Once that was done, I adhered it down on my card panel with Precision Craft Glue, matted the panel with some Mirror Gold Cardstock, and adhered it to a top-folding white card base with tape runner. Then, as a finishing touch, I adhered a few Prism AB Color Essentials Gems around my floral wreath. I love the beautiful iridescent sheen of the gems! 


SPELLBINDERS SUPPLIES:
CS-005, CS-024, CS-027, CS-030, SCS-118, SCS-160, SCS-171, GLF-014, GLP-253, GLP-288, STP-068, STP-075, STP-085, S4-1150, S5-474, S5-487,DOMAPG-FEB19, DOMAPG-OCT21, AD-0084, JD-043, JD-044, PCGO4E, PE-100, T-021, TD055990, TD056164, TD056362

OTHER SUPPLIES:
Neenah Solar White Cardstock, Canson Montval Watercolor Paper, Versafine Onyx Black Ink, Ken Oliver Colour Burst - Olive Green, Heat Tool, MISTI Stamping Tool, Black Acrylic Paint, Heidi Swapp Gold Lame Mist, Tape Runner.

That’s it for today’s post! I hope you enjoyed it and have been inspired to create with these gorgeous stamps from the Into The Wilderness Collection. Thank you so much for stopping by!
You can find more inspiration over at my Instagram page