Thursday, November 19, 2020

Pinkfresh Studio | Floral Gratitude Card


Hello crafty friends!
I hope you're having a great week so far! 
I have a gratitude card to share today on the Pinkfresh Studio Blog using an assortment of some old and new products from Pinkfresh. 


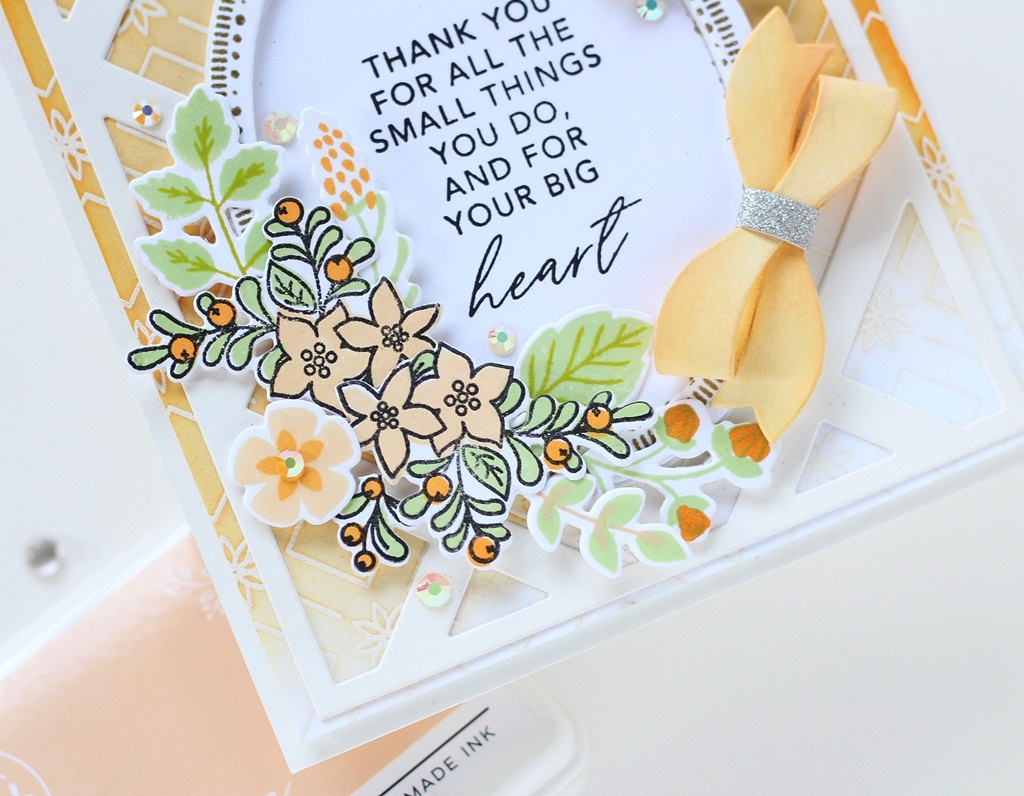
To create my card, I first stamped the layering floral bunch from the Merry and Bright Frame Stamp on Neenah Classic Crest Solar White Cardstock (110 LBS) using my MISTI Stamping Tool. I stamped the bunch a couple of times because I intended to use them to create the focal for my card. The Merry and Bright Stamp set comprises of a blend of outline florals and leaves as well as a layering floral bunch (along with the gorgeous oval frame and holiday sentiments), and so, you have quite a few different options on how you'd like to use the set. I decided to go with the layering bunch as I love the look of layered stamping! I used Peach Fuzz for stamping the flowers, Fresh Pear for the leaves, and Apricot for the little berries. Then, I stamped the last layer of the image using Detail Black Ink. Once my stamping was complete, I die cut everything using the coordinating Die Set and set the images aside to work on the other components of my card. 

I stamped the oval frame from the Merry and Bright Frame Stamp using Versamark Watermark Stamp Pad and then gold heat embossed it using Super Fine Gold Embossing Powder. I die cut the frame using the coordinating Die Set and arranged my florals and foliage around it. Next, I stamped a couple of blossoms and leafy greenery from the Lovely Blossoms Stamp to accentuate my floral spray. I used the same ink colours as before (Peach Fuzz, Apricot, and Fresh Pear) in order to have a cohesive colour palette. I then cut out the images using the coordinating Die Set.

Then, I die cut the oval frame from the Merry and Bright Frame Die Set from White Fun Foam and adhered it to the heat embossed frame for dimension. I used the leftover oval die cut to stamp my sentiment. It is from the Incredibly Grateful Stamp Set and I stamped it using Detail Black Ink

To create my card background, I took a panel of White Cardstock and heat embossed the Floral Diamond Background Cling Stamp in White using Super Fine White Embossing Powder. I ink blended the panel using Peach Fuzz and Apricot in ombré style. Once that was done, I die cut the Simply Diamonds Die from White Cardstock and adhered it over the embossed panel and foam mounted it on a white A2 card base. 

I adhered the stamped flowers, leaves, foliage, and the heat embossed oval frame to my card panel using foam squares. To finish, I added a die cut bow from the Artistic Bows Die Set. I cut it out from a panel of White Cardstock which was coloured using Peach Fuzz and Apricot. I assembled the bow together and added it to my panel using glue dots. I also accented my card with a few scattered White Jewels.


I hope you enjoyed looking at my card today! I would love to hear what you think of it. Thank you so much for stopping by! 
Have a great day ahead!

Thursday, November 12, 2020

25 Days of Christmas Tags 2020 – Pinkfresh Studio


Hello, crafty friends!
I am so excited to be a part of the 25 Days of Christmas Tags event hosted by Tracey McNeely. I'm a big fan of this yearly event, so I'm thrilled to be participating today with some of the other Pinkfresh Studio designers! There are tons of inspiration during this event and also lots of prizes to win! You can find all the details on Tracey’s main post of the 25 Days of Christmas Tags!
Pinkfresh Studio is one of the sponsors this year and today the Pinkfresh team is sharing some Christmas Tags on Tracey McNeely’s blog to inspire you!


I have made FOUR Gift Tags for this event, so without further ado, let's dive right into it!

My first two tags were made using the same set of supplies, but I used two different colours for variation. To begin, I die cut the tags using the Essentials: Shaker Tags die set. Next, I used the Basic Plaid Layering Stencil Set to stencil on the tag backgrounds. This is a two-step layering stencil, but I used only one ink colour for both the layers. I first went in and lightly applied the Coral Reef Ink and then for the stencil second layer, I used the same ink pad, but added much more ink colour, to achieve a more saturated colour. This is a great way to stretch your supplies and get more from your ink pads! I did the same for the other tag and used Mint Ink for it.

Once the stenciling was done, I die cut some snowflakes from the Layered Snowflakes Die Set from Silver Glitter Cardstock and White Cardstock. I coloured the snowflakes using the same ink colours to match with the stenciled backgrounds of each tag. I then layered the snowflakes together and adhered them to the tags using white fun foam.

The sentiment is from the Merry and Bright Stamp Set. I stamped it on White Cardstock using Berrylicious Ink and then die cut it using the coordinating die. As the finishing touch, I added a die cut bow to the tag. I used the Artistic Bows Die Set for creating the bow from Vellum and Silver Glitter Cardstock. Don't you think it's just the perfect tag topper!?


Onto my next two tags! 
I used the same bunch of supplies for these too, but I changed the colour of the houses on the tags for more interest. I first die cut the tags from White Cardstock and then white heat embossed the little wintry accessories from the Our Home To Yours Stamp Set on the tags. I ink blended the circles using Sapphire ink, so that the white embossed elements would pop out. Next, I die cut some hill slopes from White Cardstock and stamped a couple of little Christmas trees, fences, and the trail from the Our Home To Yours Stamp Set for my card design. 

Next, I stamped the houses from the stamp set using Berrylicious and Mint and cut them using the coordinating dies. I popped them on my tag using foam squares for dimension. The sentiment is from the Tree Trimmings Stamp Set and I stamped it on the tags using Black Hybrid ink. 

I deliberately kept the design super simple, so that it can be easily re-created and mass-produced for the upcoming Holiday season. It would be wonderful to attach to gifts for friends and family and also can be created in a jiffy! Isn't that a win-win situation?!


That’s it from me! Hope I was able to inspire you with my tags! Please don’t forget to check out and participate in Tracey's 25 Days of Christmas Tags!

Pinkfresh Studio is giving away a $50 gift card to one lucky winner!

 If you like what you've seen from me, please give me a follow over on my Instagram (@hussena_cal) and/or conisder subscribing to my blog if you haven't already.

Thank you so much for stopping by!
Have a great day!

Wednesday, November 11, 2020

Spellbinders + Amazing Paper Grace Die of the Month | November 2020


Hello, crafty friends!
Hope you are doing well and are keeping healthy!
I have a Card to share today featuring the Spellbinders + Amazing Paper Grace November Die of the Month. This month's "Pop Up 3D Vignette Sleigh" Set is perfect for making exquisite cards, table setting favors, 3D sleigh pieces filled with goodies, and more.

If you want to find out more about the Club – prices, how you sign up and what’s included, please look ——–> HERE. These dies are only available through the Club and are limited to the month of November, so hurry before they are sold out. If there are any leftovers, they are added to the Spellbinders store for sale at full price. You can see all of the past Dies of the Month HERE.


I have created a 2D Card Front using the Pop Up 3D Vignette Sleigh Set.

The die set consists of 21 dies to help you create a realistic 3D Pop Up Vignette Sleigh, Table Center Piece, Table Setting Favor, Sleigh pieces filled with Candy and Goodies, Part of a Wonderland Menagerie, a Flat 2D on the front of a card and much more. This die, like all the other 3D Vignettes dies, collapses flat to be sent in a regular envelope. Isn't that so cool!?

To create my card, I first die cut the different components of the sleigh from Butter Cream Cardstock, Gold Foil Cardstock, and Baby Pink Cardstock. I ran all the pieces through my Platinum 6" Die Cutting and Embossing Machine and then segregated them to make the process of assembly easy and quick. I assembled it together following THIS video. I wanted to use this sleigh for my card front, so I didn't die cut the vignette tabs and crossbars for creating a 3D piece. The flowers and leaves were die cut from Whip Cream Cardstock, while the decorative swirls were die cut from Baby Pink and Gold Foil Cardstock

Once my sleigh was ready, I started working on my floral arrangement. I lightly colored the die cut petals using Rustic Rose Ink and the centres with Sweet Pear. The evergreen leaves were colored using Sweet Pear as well. I also die cut some berries and colored them using Rustic Rose Ink. The die cut flowers had nice, embossed grooves on them, so I decided to keep it simple and just layer the poinsettias together in clusters. Once I had inked all the petals, I added glitzy gems to the flower centres and then adhered them to my card panel along with the leaves and berries. The sleigh was attached to my card front using foam squares for dimension. 

I die cut a sentiment tag from Gold Foil Cardstock using the gift/decorative end die in the set. I chopped off the bottom of the piece so that it'd work as a sentiment tag on my card. I stamped my sentiment on a piece of Butter Cream Cardstock and then adhered it to my panel using foam dots. 

Then, I die cut a decorative card panel using the frame die from the October 2018 Large Die of the Month Set from Spellbinders. I cut a piece of Baby Pink Cardstock and added it to the back of the frame to create a more sturdy panel. Then, I trimmed a piece of foiled patterned paper from the DCWV Blush 12" X 12" Paper Pad and adhered it to a mat layer of Gold Foil Cardstock. This was then mounted to a 6" X 6" card base made from Butter Cream Cardstock.


If you haven't had a chance to look at the Spellbinders Club Kits yet, do check them out. You can find more information about them HERE.

If you would like to see more project inspiration using the Amazing Paper Grace Die of the Month, visit the Spellbinders blog to see the project samples created using it. There is also a super helpful YouTube video which you can see HERE which shows you how to use the die set in a creative way!

The Club dies are absolutely great value for money and the cost of the kit includes shipping cost within USA. So, what are you waiting for? Sign up as soon as possible!
Amazing Paper Grace Die of the Month Membership


 If you like what you've seen from me, please give me a follow over on my Instagram (@hussena_cal) and/or subscribing to my blog if you haven't already.

Thank you so much for your visit to my blog today!

Thursday, November 5, 2020

Spellbinders November 2020 Card Kit | Merry Wishes + Exciting News!


Hello, crafty friends!
It's the start of a new month which means it's time for a NEW Card Kit from Spellbinders. I have a bunch of cards to share today featuring the November 2020 Card Kit by Spellbinders - Merry Wishes. If you haven't heard about the Monthly Card Kits by Spellbinders or don't know how to subscribe to one, you can go over to the Spellbinders website and/or blog and read more about them HERE


This "Merry Wishes" Kit, like all their other Card Kits, gives you everything you need to create 10 unique cards and even more. You now also get better goodies, including a 40 sheet paper pad, clear stamps, an adorable die set, tons of embellishments, and more!

I have FIVE Card ideas to share with you today using this kit, so let's get started!


Card #1
My card uses the Merry Wishes Paper Pad, and the Merry Wishes Die Cut Shapes Set.

To create my card, I first picked out a woodgrain patterned paper design from the Merry Wishes Paper Pad and trimmed it to size. Next, I took a sheet of Gold Mirror Cardstock and layered the patterned paper over it to give it a framed look.

Then, I die cut a decorative frame to add to the centre of the panel. To embellish my card front, I used some die cuts from the Merry Wishes Die Cut Shapes Set. I also added some additional die cut foliage to give it more interest. I adhered the die cut shapes using foam dots and the foliage with Craft Glue. Aren't those watercolored poinsettias so beautiful?! I love how they look paired up against the patterned paper!

I used a combination of 3D Chipboard Stickers and Die Cut Shapes for my sentiment, which are included in the contents of the Card Kit. To finish, I added some gold sequins. This was simple and quick to create and I am quite pleased with how it turned out.


Card #2
My card uses the Merry Wishes Paper PadMerry Wishes Die Cut Shapes Set, and the exclusive dies in this month's Card Kit.

This month’s kit is all about the Christmas Season that will soon be upon us! I had so much fun creating these bright and festive cards. It's also perfect for getting your Holiday Cards a good head start! 
For my card, I first die cut a panel from a foiled patterned paper design from the Merry Wishes Paper Pad. I adhered this to a panel of White Cardstock and then onto a panel of Red Cardstock to mat an A2-sized white card base.

I used one of the die cut pieces from the Merry Wishes Die Cut Shapes Set to create my card focal. I added a scalloped circle cut from Gold Mirror Cardstock atop the wreath die cut and then adhered another die cut piece over it to resemble the look of a Christmas ornament. Next, I die cut a mini wreath and some flowers and leaves using the dies from the Card Kit to embellish the circle and adhered the pieces down using Craft Glue. I added sequins in the centres of the flowers for added interest.

To complete the card, I die cut the body of the lamp post from Gold Mirror Cardstock and snipped it to look like the string of a bauble. I added a chipboard sticker shaped like a bow to accentuate the design. Finally, I adhered some die cut red stars for a festive touch. 


Card #3
My card uses the Merry Wishes Paper PadMerry Wishes Die Cut Shapes Set, and the exclusive dies in this month's Card Kit.

This card comprises predominantly of die cut shapes, so it was really quick to put together. To begin, I chose a patterned paper print from the Merry Wishes Paper Pad and trimmed it to size to adhere to my A2-sized white card base. 

Next, I pulled out some die cuts from the Merry Wishes Die Cut Shapes Set and adhered them to my card panel using foam squares. Then, I die cut the body of the lamp post from Gold Mirror Cardstock and trimmed it to look like the strings of the baubles. I adhered them to the panel and added some additional die cut foliage to give the design a more cohesive look. To finish, I added some Puffy Sticker Stars and a sentiment circle. 


Card #4
My card uses the Merry Wishes Paper PadMerry Wishes Die Cut Shapes Set, Merry Wishes Stamp Set, and the exclusive dies in this month's Card Kit.

To create my card, I first trimmed a patterned paper design from the Merry Wishes Paper Pad to size and adhered it over my A2-sized white card base. Next, I took a piece of White Cardstock and stamped snowflakes on the top half of the panel using one of the stamps from the Merry Wishes Stamp Set. I used Pool Play ink for stamping the snowflakes. Next, I die cut a circle from regular White Cardstock and placed it on the right hand side of the paper to act as a temporary mask while I lightly ink blended the panel again using Pool Play ink. 

I wanted to create a Winter scene on my card front, so I stamped a bunch of trees in the middle of the panel and did some partial ink blending on the bottom to create the look of various layers of snow. The tress are from the Merry Wishes Stamp Set and were stamped using Sweet Pear ink.  

To create my card focal, I die cut different components of the lamp post from a variety of Cardstock sheets. I then assembled it together and added it to my card panel using Craft Glue. I also added a little die cut wreath and bow to the lamp post to accentuate the design. Next, I adhered a polar bear die cut from the Merry Wishes Die Cut Shapes Set. The sentiment is also from the same Die Cut Shapes Set and was matted to Black Cardstock and then popped on to the panel using foam tape. 

To finish, I added some die cut and coloured snow banks to the bottom of the lamp post. I also used Ranger Stickles Glitter Glue in Diamond to create the effect of snow on the trees. I also used it along the various layers of the snow banks for some shimmer and shine. 


Card #5
My card uses the Merry Wishes Paper Pad, and the Merry Wishes Die Cut Shapes Set.

This card too didn't take me much time to put together. To begin, I picked out a foiled patterned paper print from the Merry Wishes Paper Pad and trimmed it at an angle to fit my card panel. I adhered this over a panel of White Cardstock to mat an A2-sized white card base.

Next, to embellish my card front, I used some die cuts from the Merry Wishes Die Cut Shapes Set and Chipboard Stickers from the Card Kit.  I adhered everything to my panel using foam squares for dimension. I love how the die cut packs always include so many different options. They really help one to create a multitude of cards in a jiffy! To complete my card, I adhered the sentiment banners to my panel, which are also die cuts from the Merry Wishes Die Cut Shapes Set.


Now, for the EXCITING NEWS!
Spellbinders has made changes to delivery options! They now offer NEW affordable International Shipping options for Spellbinders Clubs. Isn't that so exciting?! Be sure to pop over to the Spellbinders Website to read more. 


Spellbinders has also a NEW Clear Stamp of the Month Club. Here's a look at this month's Set. Isn't it so beautiful?! You can find more details for it HERE.

Limited Period Offer
Enjoy $25 off on your next $100 purchase + Free Shipping within USA! Click HERE to SHOP! This cart level discount automatically applies a additional $25 discount at checkout for orders over $100 after all other coupons and discounts, before tax. The offer is now live and will be available until Sunday 11/08/2020.


If you want to find out more about the Club – prices, how you sign up and what’s included, please look ——–> HERE
 The Card Kits for Spellbinders Monthly Clubs are exclusive to Spellbinders and you won't find them anywhere else, so be sure to gets yours before it gets sold out! If there are any leftovers, they are added to the Spellbinders store for sale at full price after a few months. You can see all of the past Card Kits HERE.
Card Kit of the Month Membership
If you'd like to see some more project inspiration using the Card Kit, check out THIS super helpful YouTube video that has some awesome card ideas using the Card Kit. 

That's it from me for today! I hope you liked my cards. Let me know if you have any favourite(s)! I would love to hear from you.

 If you like what you've seen from me, please give me a follow over on my Instagram (@hussena_cal) and/or subscribing to my blog if you haven't already.

Thank you so much for your visit to my blog today!

Wednesday, November 4, 2020

Pinkfresh Studio | Watercolored Floral Slimline Cards


Hello crafty friends!
It's my turn to post on the Pinkfresh Studio Card Blog today, and I have two Slimline Cards to share which I created using several products from the October 2020 Release by Pinkfresh Studio. I am so in love with the new slimline supplies and can't really have enough of them!

My first Card for today features the You Are My Favorite stamp and die set along with the Argyle Layering Stencil Set.

I have used the outline floral cluster from the You Are My Favorite stamp to create my card panel. The stamp set comes with three coordinating stencils to colour the different layers, but I heat embossed my flowers and foliage instead of using the stencils. 

To begin, I stamped the outline floral cluster using Clear Embossing Ink on a piece of Canson Montval Watercolor paper. I used Super Fine Gold Embossing Powder to heat set the image and then die cut the image using the coordinating You Are My Favorite Die. Once that was done, I watercolored the florals using Pinkfresh Studio Liquid Watercolours. I used Bubble Gum and Aquamarine to colour the flowers and Key Lime for the leaves. The watercolours are very concentrated in nature, so I diluted them with water for a soft, ethereal look. 

Next, I started working on my card background. I used the Argyle Layering Stencil Set to stencil on my panel using Pinkfresh inks. This is a two-step layering stencil, so I used Mint for the first layer and Misty Coast for the second layer. I love the end result as it looks really soft and dreamy! I adhered this ink blended piece to a panel of Gold Mirror Cardstock, and then to my white slimline card base.  

It was now time to assemble the card together. I fussy cut some of the smaller flowers and leaves from the watercolored image, so that I could play around with my card design. I arranged the different pieces to my panel and adhered them down using foam squares for dimension. Next, I die cut a square frame from White Cardstock using one of the window dies from the Essentials: Shaker Tags Die Set. I wanted it to fit in well with my card design, so I tweaked it a bit and then adhered it to my panel. I also die cut an outer frame from Gold Mirror Cardstock to give it a more defined look. 

Next, I stamped my sentiment in the centre of the panel. It is from the You Are My Favorite Stamp Set and was stamped using Detail Black Ink. The florals and leaves were then adhered around the sentiment piece. To finish, I added some White Jewels and Metallic Gold Paint Splatters on the card. 


My second Card for today features the You Are Amazing StampStencil Set, along with the Days of of Splendor Ephemera Pack and Leafy Squares Stencil

I started off by stamping the leafy outline illutration from the You Are Amazing Stamp using Fresh Pear on a piece of Canson Montval Watercolour Paper to do no-line colouring. I then used the coordinating three-piece Stencil Set to colour the stamped panel. I used Mint for the first layer, Fresh Pear for the second layer, and finally, Misty Coast for the third layer. I chose to use very light ink colours for a soft, watercolored look, but you can always use any colours you like. If you are someone who does not like to spend hours colouring things, then the Stencil Set is just the perfect thing for you. It can be used in multiple ways and always gives great results with minimum time and effort involved!

Next, for my card focal, I die cut a panel using the Diagonal Stitched Rectangles Die Set. I then placed the Leafy Squares Stencil on it and used Mint ink to create my background. Next, I die cut a circle from the centre of this piece using the Essentials: Braided Circle Die Set. I foam mounted this to my card panel for a raised look.

Then, to embellish my card front, I used a couple of die cut pieces from the Days of of Splendor Ephemera Pack. I used some floral pieces along with leaves and foliage to create my floral cluster. I went in and added some glitter accents using Stickles Diamond Glitter Glue on top of the flowers and leaves for added interest.

Next, I adhered the card background to a layer of Pearlescent Green Cardstock, and then onto my White slimline card base. The sentiment was cut using one of the dies from the Thin Words: Everyday Script Die Set, which is a set designed by Pinkfresh exclusively for Scrapbook.com. I cut it once from Red Cardstock and twice from White Fun Foam. I layered them all together and added it to the card using liquid adhesive. Finally, I added some Green Jewels to complete my card.


Hope you enjoyed looking at my cards today! I would love to hear what you think it!
Thank you so much for stopping by!