Showing posts with label Ribbon. Show all posts

Wednesday, February 23, 2022

Amazing Paper Grace Die of the Month | February 2022


Hello, crafty friends!
I have an ornate layered card to share today featuring the Spellbinders & Amazing Paper Grace February 2022 Die of the Month Set. This month's "Marvelous Medallion" Set is perfect for making gorgeous layered cards, tags, gift boxes, gift baskets, gift card holders, mini albums, and more. This die set features 13 dies.

This month’s set comes with 13 dies that can be used to cut decorative background panels, flowers, and banners.  The die set includes a split doily or split medallion that allows you to lay in any sentiment that you desire.  The banner shape is versatile and can be filled with filigree or left solid. There are also two flower dies included in the set, which you can arrange in a cross to create a flower. It's so simple and easy!

My card is 5" inches squared and I used the split medallion dies with the background panel dies to add depth and layers on my card design.

To create my card, I first die-cut AlabasterMirror Gold Cardstock, and Pink Sand Cardstock using the Split Medallion Dies included in the Marvelous Medallion Set. I affixed the detailed swallowtail mirror gold die cut onto base swallowtail label and then adhered the detailed die cut layers together using Craft Glue. Next, I adhered the base layers together, offsetting the gold mirror die cut to create a shadow.

Next, I die-cut Alabaster Cardstock using the intricate Banner Die included in the set. I die cut the layers a total of four times in order to help me create a background panel using the strips. Once I had all the die-cut layers, I adhered the strips down on my card panel using  Craft Glue. Next, I die-cut Mirror Gold Cardstock and Pink Sand Cardstock using the Nestabilities Classic Ovals (Large) Etched Die Set. Next, I adhered the layers together, offsetting the gold mirror die cut to create a shadow, and stamped a sentiment from the Embroidery Flowers Set using Versafine Onyx Black ink in the centre of the die-cut piece.

Next, it was time to embellish my card. I die-cut Pink Sand, Peridot, and Mirror Gold Cardstock using the flower and leafy branch dies included in the Marvelous Medallion Die Set. Once that was done, I used a medium pink Copic Marker to flick some colour out from the center to add some quick colour to the flowers. Then, I embossed each die-cut piece with a Ball Stylus and added white pearls to the flower centres for a bit of interest. Then, I tucked in a white satin ribbon bow near the sentiment for interest and adhered the floral spray down on my panel using Hot Glue. Next, I matted my panel with layers of Pink Sand and Mirror Gold Cardstock before adhering it to a top-folding square-sized white card base with tape runner. I finished the card by adding some green pearls all over my card panel for visual interest.


The Amazing Paper Grace Die of the Month is available exclusively at Spellbinders Paper Arts during February 2022. You can get the Marvelous Medallion Die Set at the special Cub Kit price, along with other membership perks.


If you'd like to see some more project inspiration using the Marvelous Medallion Die Set, check out the Spellbinders Blog where Becca shares some stunning project samples using it.  
 

Limited Period Offer
Don't miss the BOGO (Buy One Get One) Die Cutting Sale going on over at Spellbinders from now until Sunday. Be sure to take advantage of the sale and stock up on your favourite die sets!
    

That’s it for me today! I hope you liked my take on the die set! If you like what you've seen from me, please give me a follow over on my Instagram (@hussena_cal) and/or subscribe to my blog if you haven't already.

Thursday, January 20, 2022

Amazing Paper Grace Die of the Month | January 2022


Hello, crafty friends!
I have a sweet friendship card to share today featuring the Spellbinders & Amazing Paper Grace January 2022 Die of the Month Set. This month's "Pop Up Vignette Coffee Tea or Me" Set is perfect for making gorgeous layered cards, tags, gift boxes, gift baskets, gift card holders, mini albums, and more. This die set features 21 dies.

The Pop Up Vignette Coffee Tea or Me Die of the Month Set is a new addition to the Amazing Paper Grace 3D Vignettes Collection and features a cup that can be cut as a solid or filigree along with mirrored cup handles that look good from both sides. The cups also come with a rounded top that lets you see the back dimension and even a die that when cut from a different color makes it look like your cup is full of liquid.  I also includes a number of embellishments – There are regular flowers as well as heart flowers with stems.  Lastly, there are a host of words, and words can be made from the individual letter dropouts. As with other Vignettes, you can make a 3D item or use it flat on a card.

This month's die set is truly one-of-a-kind and I love that it was designed to accommodate both tea and coffee drinkers! I used the intricate layered teacup die to create the centrepiece for my card and embellished it with the flowers and the tea-bag die included in the set to create an ornate Friendship/Encouragement Card.

To create my card, I started by die-cutting Alabaster, Mirror Gold Cardstockand White Fun Foam using the tea-cup, cup handles, and the rounded top die in the Pop Up Vignette Coffee Tea or Me Set. Next, I adhered the detailed die cut layers together, offsetting the mirror gold to create a shadow using liquid adhesive. Next, I die-cut Alabaster, Mirror Gold, and Pink Sand Cardstock using the large triangular flower petal and leaf dies in the set. I used a medium Pink Copic Marker to flick some colour on the base of the petals to add some quick colour to the pieces, while the leaves were coloured using Mermaid Markers. Once that was done, I staggered the petals together using using liquid adhesive

Then, I die-cut Snowdrift Cardstock using the small rounded petal flower and leaf dies in the set. I used a medium Pink Copic Marker to add some quick colour to the petals and then used a stylus tool to cup the petals. I coloured the leaves using Mermaid Markers and adhered the pieces together using liquid adhesive, staggering the petals and added pearl adhesives as flower centers.  Next, I die-cut Pink Sand and Mirror Gold Cardstock using the sentiment strip dies in the set and adhered the pieces one on top of the other using liquid glue. Once that was done, I tucked in a white satin ribbon bow near the tea-cup handle for interest.

Next, I die-cut Snowdrift Cardstock using the tea bag die in the set and stamped a sentiment on the piece using Versafine Onyx Black ink. Next, I blended Abandoned Coral Distress ink over the bottom of the piece using a blending brush for a hint of colour and then used some Gold Baker's Twine to attach it to the front of the tea-cup with some foam adhesive. Then, for my card background, I trimmed a piece of  Snowdrift Cardstock to size and and ink blended the bottom three-quarters of the panel using Worn Lipstick and Abandoned Coral Distress inks, concentrating the darker shade towards the bottom. I then flicked some leftover paint from my palette to the panel using a paint brush for a fun splatter effect. Next, I matted my panel with a piece of Mirror Gold Cardstock and adhered the panel to a side-folding A5-sized white card base with tape runner.


The Amazing Paper Grace Die of the Month is available exclusively at Spellbinders Paper Arts during December 2021. You can get the Pop Up Vignette Coffee Tea or Me Die Set at the special Cub Kit price, along with other membership perks.

If you'd like to see some more project inspiration using the Amazing Paper Grace Die of the Month, check out the Spellbinders Blog where Becca shares some stunning project samples using it.  
 

Limited Period Offer
Get a FREE Pen Gift Set will all qualifying orders of $100+ at the Spellbinders store. Offer valid till supplies last. No code needed.
 

That’s it for me today! I hope you liked my take on the die set! If you like what you've seen from me, please give me a follow over on my Instagram (@hussena_cal) and/or subscribe to my blog if you haven't already.

Sunday, December 12, 2021

Spellbinders & Amazing Paper Grace Die of the Month | December 2021


Hello, crafty friends!
I have a soft and feminine friendship card to share today featuring the Spellbinders & Amazing Paper Grace December 2021 Die of the Month Set. This month's "Enchanting Pocket Card & Envelope" Set is perfect for making gorgeous layered cards, tags, gift boxes, gift baskets, gift card holders, mini albums, and more. This die set features 14 dies.

 The Enchanting Pocket Card, Tag, and Envelope Set for the Amazing Paper Grace December 2021 Die of the Month is so many things wrapped up in one. It’s a gift card holder, it’s a tag, it’s a pocket card and an enclosure card all rolled up into one sweet package. I always love it when a die set can be used in more ways than one!

I have created a Friendship/Encouragement Card using this month's Enchanting Pocket Card & Envelope Die Set. I especially love the decorative tag pocket die and the floral pieces that are included in the set. There's so many ways to use it, but I chose to use it as a focal piece for my card front today. This is a multipurpose die that has a very specific function, but is also quite pretty when used for decoration.

To create my card, I first die cut Snowdrift Cardstock using the Envelope Insert Die included in the Enchanting Pocket Card & Envelope Die Set. I then flipped the paper over and die cut the insert one more time to create a label for my card front. Next, I die cut Raindrop and Brushed Gold Cardstock using the Notecard Die from the same set. I repeated the same process as before and then adhered the light blue die-cut piece on top of the gold die-cut with liquid glue, offsetting them a bit to form a shadow. 

Next, to embellish my card, I die cut Snowdrift Cardstock using the small blossom and leaf dies included in the Enchanting Pocket Card & Envelope Die Set. I embossed the individual petals with a Ball Stylus and added micro-fine gold glitter balls to the flower centres for a bit of pizzazz. Similarly, the leaves were coloured using Bundled Sage Distress ink and then shaped using the Small Ball Tip from the Ultimate Tool Kit. Next, I used 5/8" smooth satin ribbon to tie a bow around the front of my die cut pieces to accentuate the design.

Once that was done, I die cut Raindrop Cardstock using the Large Rectangle Outer Rim and Insert dies from the Fluted Classics Rectangles Etched Dies. I mat the panel with layers of Alabaster and Mirror Gold Cardstock and then adhered the decorative centrepiece and the floral spray to the front of my panel using Liquid Glue. To finish, I used Gold Hot Foil to foil Onyx Cardstock using one of the sentiments from the Mini Sincere Sentiments Glimmer Hot Foil Plate and cut it out using the coordinating die. I adhered the piece down onto my panel using foam tape for a raised effect. Then, to complete, I adhered the background panel to a side-folding Raindrop card base measuring 3.5″ x 8.5″ with tape runner.


The Amazing Paper Grace Die of the Month is available exclusively at Spellbinders Paper Arts during December 2021. You can get the Enchanting Pocket Card & Envelope Die Set at the special Cub Kit price, along with other membership perks.

If you'd like to see some more project inspiration using the Amazing Paper Grace Die of the Month, check out the Spellbinders Blog where Becca shares some stunning project samples using it.  
 

Merry Member Appreciation
Spellbinders are offering a free gift in December Clubs. Gifts vary by club. Total Package Members receive the best value as they will receive all the clubs and all the free gifts!
 

That’s it for me today! I hope you liked my take on the die set! If you like what you've seen from me, please give me a follow over on my Instagram (@hussena_cal) and/or subscribe to my blog if you haven't already.

Wednesday, November 6, 2019

Spellbinders Guest Post | Candlewick Classics Collection by Becca Feeken

Hello, everyone!
I am excited and honoured to be guest designing on the Spellbinders blog today! I am here to share some projects that I’ve made with the absolutely delightful Candlewick Classics Collection by Becca Feeken.

The Candlewick Classics Collection is a perfect addition to the Candlewick Sampler Collection by Becca Feeken. Mix and match between the two for an amazing collaboration! The inspiration comes from the Candlewick embroidery design, a type of elegant white-on-white embroidery with its hints of dotted motifs and knots. Add them to your etched die collection! 

I have three cards to share with you today using the Candlewick Classics collection, so let's get started!


The gorgeous doily was my inspiration behind creating this card. I wanted to design my card in such a way that the doily remains the highlight of my design. I die cut the Nestabilities Doily Round Etched Dies using my  
Platinum 6 Die Cutting and Embossing Machine from White Cardstock. I did not pierce out all the intricate bits from the doily and let them be as is because I found the doily looked pretty even this way. I adhered this doily on a circle die cut from patterned paper.

The doily added a nice, feminine touch to my card, and I did not want to use too many embellishments which would cover up the design, so I simply die cut a circle from the Nestabilities Candlewick Circles Etched Dies and adhered it over the doily using foam dots for dimension. I stamped my sentiment in the centre of this circle and added white pearls all around the circle frame for added interest. 

For embellishing my card, I used a pink poppy flower along with coordinating rose buds, mini roses, and fillers. I used the Candlewick Rosebud Etched Dies to add foliage to my card. 

I added some bows of white satin ribbon to this arrangement and mounted the panel to a foiled patterned paper, which was then adhered to a top-folding card base made from Pearlescent White Cardstock. 


The doily border is such an elegant die design and I decided to use it to create the background for my card. I die cut the Shapeabilities Doily Border Etched Dies twice from Gold Mirror Cardstock and twice from White Cardstock. I adhered them all on my card panel using the Journey Craft Glue.  Next, I die cut the delicate squares from the Nestabilities Candlewick Squares Etched Dies from White Cardstock and layered them to create a frame. 

I stamped my sentiment on another square die cut to create the focal for my card. I created a rose using the Candlewick Rosebud Etched Dies and also die cut the leaves and foliage from the same die set. The flower petals were coloured using the Bubble Gum True Color Fusion Ink Pad while the leaves were coloured using the Sweet Pear True Color Fusion Ink Pad. I added some additional flowers and fillers to complete my arrangement. I mounted this panel to a top-folding blush card base. 


This card has tons of layering and I really enjoyed creating it. I started by die cutting the rounded corners from Gold Mirror Cardstock and Cream Cardstock along with White Fun Foam. I adhered the die cuts in a way that the gold would peek through from the sides giving it a regal look. Then, I die cut a circle from another piece of Cream Cardstock using the Nestabilities Candlewick Circles Etched Dies. I adhered another die cut in the centre to create the focal for my card. 

Once the basic framework of the card was done, I started working on the embellishments for my card. I added a pink anemone and several small filler flowers and foliage to create my floral cluster. I also tucked in some die cut vines, mini roses, and rose buds to complete my arrangement. I added a small sentiment tag below this arrangement and popped it on the panel using foam dots.

I matted this panel to another panel of Gold Mirror Cardstock, then a patterned paper, and lastly, Cream Cardstock. This was then adhered to a top-folding card base.

Other Supplies: 
Neenah Solar White 110 LB cardstock, Cream Linen Textured 12 x 12 Cardstock, Light Pink 12 X 12 Cardstock, White Pearlescent 12 X 12 Cardstock, Iris 270 GSM Cardstock, White Fun Foam; Pattern Papers: Papericious 'The Wedding' Collection, DCWV Blush Collection; Inks: Versafine Onyx Black Ink Pad; Adhesive: Scrapbook Adhesives 3D Foam Squares, Tombow Mono Multi Liquid Glue, Double Sided Foam Tape, Mini Glue Gun; McGill Inc. Paper Blossoms Tool kit, Micro Roses, Pollens, Rose Buds, White Satin Ribbon, Pearls.


I hope you loved the Candlewick Classics Collection and my cards using them! These dies are truly exquisite and a must have in your stash. If you would like to see more of my work using Spellbinders dies, do follow my Instagram page.
Thank you for stopping by, and wishing you a lovely day!

Monday, August 26, 2019

Spellbinders Becca Feeken Holiday 2019 Blog Hop + Giveaway


Hello, crafty friends! 
I'm beyond thrilled and honoured to be joining Spellbinders for their Blog Hop today featuring the 3D Holiday Vignettes & Glistening Holiday Collections by Amazing Paper Grace. You should have arrived here from the super talented and amazing, Becca Feeken's Blog.
 We've got tons of inspiration and giveaways for you on the hop today, so keep reading till the end of this post for more information.


For my first card, I used the Merry Filigree Quatrefoil Glimmer Hot Foil PlateNestabilities Hemstitch Squares Etched Dies, and the Shapeabilities Flourished Square Etched Dies.

The Glistening Holiday Glimmer Plates designed by Becca are so beautiful that they make every project made with it look so elegant. For my card, I started by foiling the square filigree frame from the Merry Filigree Quatrefoil Glimmer Hot Foil Plate using the Glimmer Hot Foil Roll - Gold.

While my Glimmer Hot Foil System was out, I also foiled the sentiment from the Merry Filigree Quatrefoil Glimmer Hot Foil Plate using the Glimmer Hot Foil Roll - Rose Gold. I die cut the filigree frame using the Nestabilities Hemstitch Squares Etched Dies, and the sentiment using the Nestabilities Standard Circles LG Etched Dies

I wanted to add some layering to the background so that the foiled pieces would remain the main focal of my card. I die cut the flourished square frame die from the Shapeabilities Flourished Square Etched Dies using Gold Mirror Cardstock.

It was now time to start adhering the various components of the cards together. I first adhered a light pink patterned paper to my card base, and then added layers of White & Mirror Gold Cardstock to give it a finished look. Next, I adhered the flourished square frame and the foiled pieces. I used White Fun Foam while adhering the foiled pieces to give it some added dimension.

To embellish my card, I used a faux Silk flower, some mulberry flowers and rose buds, as well as some leaves. I also added white satin bows below my floral arrangement to complete the card design.


My second and last card for today features the Shapeabilities Grand Christmas Lattice Arch Etched DiesShapeabilities Nativity Layering Set Etched Dies, and the Shapeabilities Cinch and Go Poinsettia Etched Dies.

For my card, I first started by die cutting the lattice arch frame die from the Shapeabilities Grand Christmas Lattice Arch Etched Dies using Neenah Classic Crest Solar White 110 LBS Cardstock. I also die cut the arch inlay die and the sentiment die from the same set.

I used Chipped Sapphire and Mermaid Lagoon Distress inks to colour the background of the arch inlay to depict the Nativity scene. Next, I die cut the silhouette images and the insert for the outer frames from the Shapeabilities Nativity Layering Set Etched Dies using White Cardstock & Gold Mirror Cardstock. I adhered these die cuts together on my card panel.

To embellish my card, I die cut some poinsettias from the Shapeabilities Cinch and Go Poinsettia Etched Dies Etched Dies using White heavy weight Cardstock. I embossed the centres using an Embossing Ball Tool and added golden stamens to the centres for a richer look.

To complement the flowers, I die cut some holly leaves from the Shapeabilities Grand Snow Globe Etched Dies using Gold Mirror Cardstock. I adhered these around my poinsettias and my card was almost complete. I matted this panel to my card base and my card was finished.

If you would like to see more inspiration using the 3D Holiday Vignettes Collection, you can check out THIS post on my blog or on the Spellbinders Blog.
Disclosure:
Where available, I use compensated affiliate links which means if you make a purchase I receive a small commission at no extra cost to you. Thank you so much for your support!

Giveaway:
To celebrate this release, Spellbinders is giving away a $50 gift certificate to one lucky blog reader – selected from the comments across all of the blogs in the hop. Giveaway closes on Sunday, September 1st, 11:59 pm EDT. The winner will be announced in the blog hop post the following Tuesday. The winner is responsible for shipping cost, duties and taxes.

Blog Hop Order:
Next Stop on this Blog Hop is, Bibi Cameron's blog.
Just in case, you lose your place along the way, here is the complete list of participants so that you can find your way back.
                           Hussena Calcuttawala (You are HERE!)


Thank you so much for your stopping by and reading this blog post. I hope you liked the cards I made! I would love to hear if you have a favourite!

Have a wonderful day!

Wednesday, December 19, 2018

Spellbinders December 19th Blog Hop

Hello, friends!
I'm so excited to be a part of the Spellbinders December Blog Hop today. I have THREE projects to share using several dies from the Exquisite Splendor Collection by Marisa Job.

You should have arrived from Desiree Kuemmerle's blog. Today, we are celebrating and featuring the following collections: 

Projects

First up, I have this card to share featuring the Square Medallion Tiles Dies. This is an absolutely gorgeous tile die set, and is simply versatile. There's so much one can do with this die set. Here's how I used it on my card:

This card was really simple to put together! I started by die-cutting the Square Medallion Tiles Dies from Neenah Classic Crest Solar White #110 LBS cardstock. Then, I coloured the die cut using three shades of Alcohol Markers by Altenew. This did not take much time at all, and was fairly simple to colour. 

Next, I matted the tile die cut on to some dark blue paper, and then gold foil cardstock. I also matted the centres of the die cut with gold foil cardstock to give it a more complete look. Finally, I stamped a sentiment directly on my card base, and it was done! :)


Next up, I have a Gift Box to share using the Square Medallion Tiles Dies and Blooming Floral Wreath Dies. I am sure most of you know by now, how much I adore making them! Here's one I created using these two die sets. 

I created the basic gift box using the Heart Flower Box Dies. This box die is simply amazing; I love it for the finish it gives, and the way it makes work so much more easier. :)

I used the Square Medallion Tiles Dies for creating the intricate background on the lid of the box. Next, I used the tiny flower dies from the Blooming Floral Wreath Die Set to create the floral cluster. I used three different sizes of the same flower die to create the flowers. I coloured them using Dye inks from Altenew and shaped them using embossing tools. I also added pollens to the centres to give the flowers a complete look. 

Here's a close-up of the flowers. I have tried to achieve an ombre effect on them!

The leaves were die cut using the wreath die from the Blooming Floral Wreath Die Set. I snipped off the leaves from the wreath, and inked the leaves using two different green dye inks to create the perfect foliage for my box. I love how this one came together. What do you think?

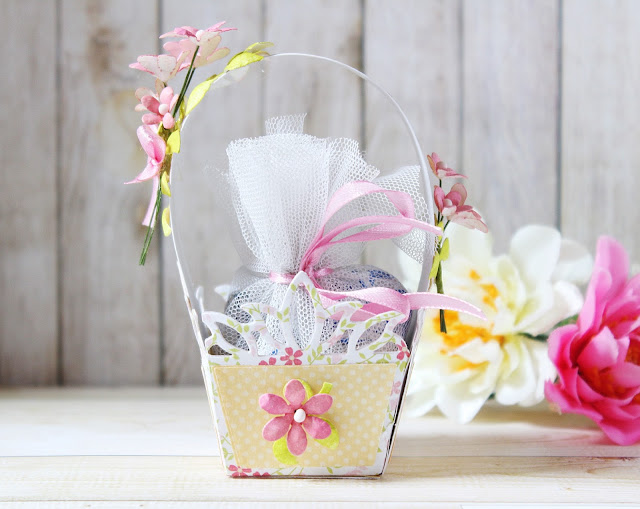
Lastly, I have a Gift Basket to share, which I made using the Tulip Flower Box Etched Dies. This is such an adorable die set for creating gift baskets. Here's a look at the one I have created:

This gift basket again took no time to put together. I started by die cutting the main square base die from White cardstock. Once my base was die cut, I went ahead and die cut the tulip box sides and the tulip box side inserts. Once everything was assembled, I die cut the coordinating inserts from patterned papers. This die is fairly easy to use and so well thought of, with the base dies and the insert dies combined together perfectly. The big plus point about this set is that, you can add as many layers or as many sides as you wish to, to create the basket of your choice.I have created a four sided basket, but a hexagonal basket is just as easy to create using this die.

I used the flower dies from the Blooming Floral Wreath Die Set to create tiny little clusters on either side of the handle. I die cut the flowers from White cardstock, inked them, and then adhered them in bunches on the handle.

I did the same thing on the other side of the gift basket. I made a slightly smaller bunch on this side to give the basket a balanced look.

The leaves are from the Blooming Floral Wreath Die Set. I inked them in green to go along with the mini flowers. I have added a bunch of chocolates inside the basket to show you how many chocolates can be fit in one small basket like mine. I hoe you like the idea. :)

Giveaway:
To celebrate this release, Spellbinders are giving away a $50 gift certificate to one blog reader – selected from the comments across all of the blogs in the hop. Giveaway closes on Sunday, December 23rd at 11:59 pm EDT. The winner will be announced on the Spellbinders Blog Hop post the following Monday. Winner is responsible for shipping cost, duties and taxes.

Blog Hop List:
Next, on the hop is Jennifer Snyder's blog. I have also included the full blog hop list so that you don't you get lost.

                         Hussena Calcuttawala (You are HERE)

Thank you so much for stopping by my blog. I would love to hear your views on my projects.
Have a great day!