Saturday, October 22, 2016

Shabby Chic Floral Card | Photo Tutorial

Hello, bloggy friends!
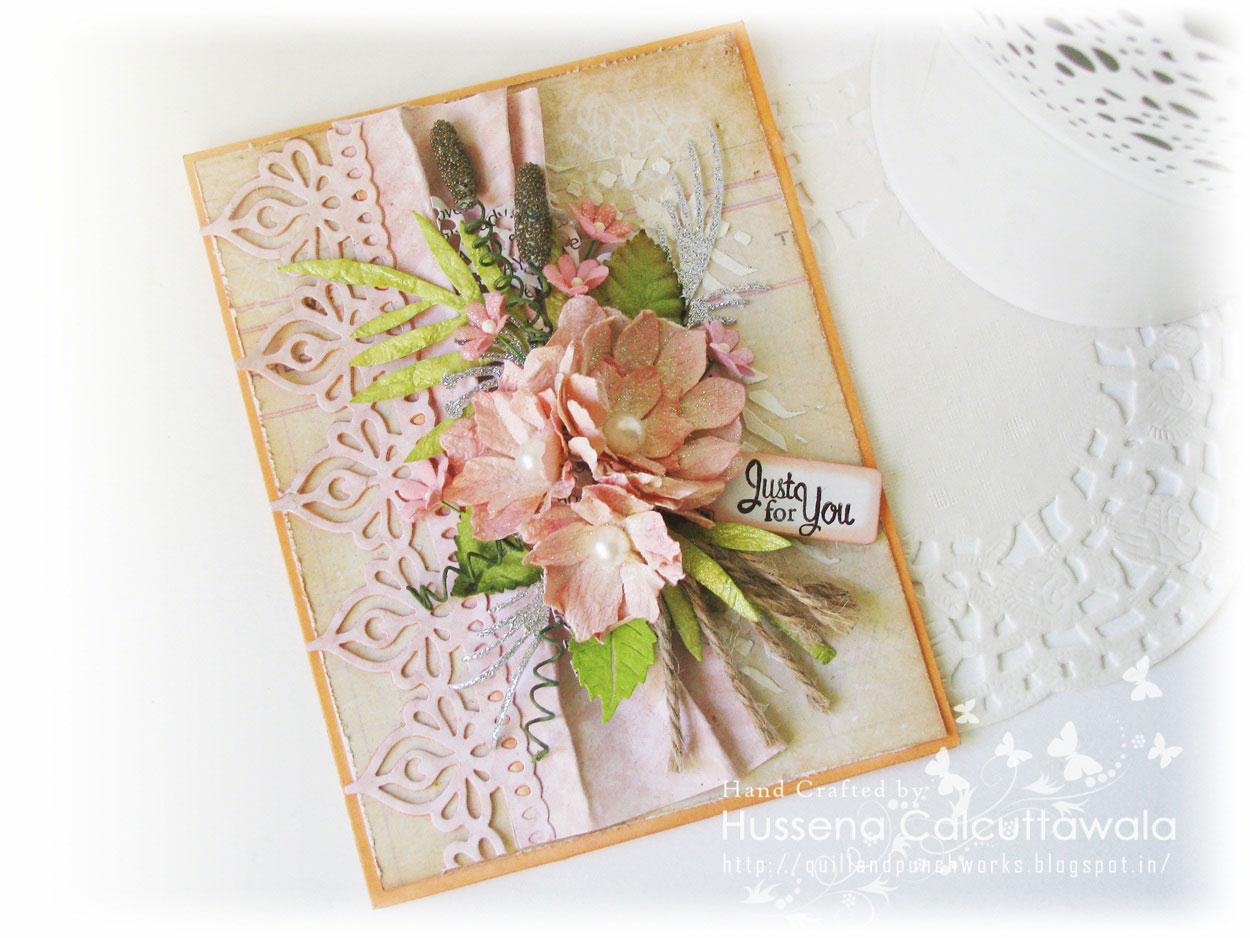
I am sharing a shabby-chic card after a very long time. My current love is making stamped cards, but I do like to make layered cards from time to time. I made this for my Guest Post at Itsy Bitsy. You can check it out HERE, if you haven't already.

Here's a look at my card first :


- - - - - - - - - - - - - - - - - - -

I also have a small tutorial to share on how I created the background for my card and the products used.

Step 1 - I have used a peach colored card base which was sent to me in the kit along with a piece of pattern paper which I have distressed using a pair of scissors & colored the edges using two different shades of Distress inks.

Step 2 - After distressing, I glued the pattern paper to the cardbase & then using a stencil from Itsy Bitsy (Floral) and some Modelling Paste, I did some stenciling using a Spatula to add some texture. I also added a bit of Distress ink to the Modelling Paste to give it a hint of colour.

Here is how it looks once the stenciling is done!

Step 3 - This is what I have used for embellishing my card. The Pattern papers that you see on the left were the ones I have worked with & the little flower embellishments were created using flowers from this set. I absolutely love the Glitter Paper from Itsy Bitsy & I have used it for die-cutting my leaf & foliage. Also used some dies for embellishing my card.

This border die by Spellbinders is absolutely regal & so intricate. I absolutely love using this.


I'm linking my card to the Simon Says Stamp - Use Pink, Happy Little Stampers- Mixed Media Challenge (Nature), Fab n Funky - Fabulous Flowers, Fusion - I'm going with the inspiration picture this time. (I'm inspired by the colours of the florals) and Cards 4 Galz- Use atleast one die.


I hope you like this card of mine. I would love to hear your comments/suggestions regarding it.

Have a nice day everyone!

Wednesday, October 19, 2016

Florals & some stamping!

Hello, friends!
I am sharing a card today which is totally stamped. I have used Mudra sets for this one! Here's a look at my card :


To create this card :
I first took a 4 1/4 inch by 5 1/2 inch card panel & stamped the word 'happy day' all over the card front using my MISTI and the Brushed Alphas set. This background took some time to create as each alphabet had to be stamped individually since this font is in cursive, but as you can see the end result is quite striking. 
Once I had stamped the background, I die-cut a semi-circle from the side of the card front using a Spellbinders circle die. Then I stamped the Gerberas & leaves using various colours of Altenew inks, and fussy-cut them & arranged it on the card panel.This card panel was foam mounted on to a plain white cardstock and the semi-circle space that was left after die-cutting has been distressed using Tumbled Glass Distress ink to add a bit of colour. I've added some flowers & foliage from a previously released set called Botanical Blooms. Finally added some Pretty Pink Posh sequins to finish off my card.

I'm linking my card to these challenges :
The Flower Challenge, Crafting with Dragonflies- Let's go floral, The Crazy challenge - Use Red, Use Your Stuff - Use two or more stamps ( I have used 3 different sets), and Make My Monday - I have used the colours black, red and white predominantly in my card.


I hope you like this attempt of mine! Do leave me your comments below :) Would love to hear from you!

Monday, October 17, 2016

Thanks Card | Photo Tutorial

Hi, bloggy friends!
I have a card to share today I made using various stamps & dies from Altenew. Here's a look at what I created :


- - - - - - - - - - - - - - - -

Here’s a tutorial on how I made it :

Step 1 : I first die-cut a card panel for my base then using the Altenew Die – Thanks, I die-cut a sentiment using the Crate Paper Craft Market 6 X 6″ Paper pad & ran it through my Big Shot machine.

Step 2 : Then, I die-cut the word from my card panel base also & inlaid the previously cut die-cut from the pattern paper into the card base.

Step 3 : I stamped some flowers & leaves using the Altenew Floral Motifs stamp and colored it using Heidi Swapp Color Shine Mists.  I fussy-cut the images & popped them on foam dots.

Step 4 - Lastly,  I added few black acrylic paint spatters and sequins in gold to finish off my card :)


Entering my card in the Creative with Stamps - Sentiment, Happy Little Stampers - Anything Goes with Dies, Crafting by Designs- Add a sentiment, Create & Makes - Anything goes/Use of Die and STAMPlorations- Monthly Sketch.


I hope you liked my card & tutorial. If you have any questions regarding any of the products/techniques used, please leave them in the comments below. I would love to hear your comments/suggestions regarding it !

Have a nice day everyone!

Friday, October 14, 2016

Sending you loads of love | Card

Hi, crafty friends!
I have a card to share today I made for the Mudra October Challenge inspiration. I had a lot of fun creating it. Here's a look at my card :


I have used the Mudra Daisy Blooms set for the flowers which have been heat-embossed in white & fussy-cut, and Mudra Raksha Bandhan Sketches set for the sentiment. Added a gold glitter die-cut frame for some sparkle and shine to the card. The background has been stenciled using a Heidi Swapp stencil. Also, I added few clear droplets to finish off my card :)

Linking my card to Paru's Card Making Challenges - Add a hint of Gold, Lulupu - Bling ding with a stamping twist, Just Add ink - Add 'G' ( I have used a Gold Glitter frame) & Simon Says Stamp - Totally Resistible


Have a good day everyone!

Wednesday, October 12, 2016

Bunny Wishes | Card

Hi, friends!
I have a very adorable card to share today which I made using the stamp set designed by a good friend of mine, Ruchi of Ruchi's Crafeteria. She designed this adorable 'Playful Bunnies' set & I was so excited to use them. Here's my card using the set  :


A close-up of the bunnies :

This set has some of the most adorable images to create a scene and that's what I did on my card :)

I first die-cut a small panel around 3 by 4 inches in size using the faux stitched die by Gina Marie Designs, then die-cut the circles using another die by Pretty Pink Posh called the Stitched Duo 2. I stamped the bunnies using Versafine Onyx Black ink on some Neenah Solar White cardstock & coloured it using Distress inks. I fussy-cut the bunnies and popped them using foam dots in the die-cut circle frame I had cut earlier, and arranged them so that they would peek out of the circular windows.
I die-cut the grass border & colored it using Distress inks, then I stamped some flowers & leaves from the same set, colored again using Distress inks & fussy-cut them before placing it on the grass. I stamped the sentiment on a piece of cardstock & placed it one of the windows along with some hearts which are also from this set. I layered this panel onto another die-cut panel was distressed using inks from PTI. Finally added the layered panels on the card base. To add some shine to the card, I've added Ranger Stickles on the grass border & around the sentiment banner.

Linking it to Inky Chicks - Animals, Happy Little Stampers - Anything goes with Dies, Cutie Pie Challenge - Cute + 5 flowers, Get Creatives Challenge - Stitching and Cupcake Inspirations - Inspired by the soft pastel colours.


So, how did you like it ? Do let me know in the comments below :) I look forward to hearing from you.


Have a good day everyone!

Saturday, October 8, 2016

Guest Post for Itsy Bitsy!

Hi friends!
I am so excited to let you all know that I am Guest Designing for the Itsy Bitsy blog. Itsy Bitsy is one of my most favourite craft stores by far, and I was so thrilled when they invited me to their blog for a Guest Post. I'm sharing three cards there with a short tutorial. Here's a small sneak peek for you :


Please do visit the Itsy Bitsy blog to view the complete projects & don't forget to leave me a comment there :)

Have a nice day everyone!

Thursday, October 6, 2016

Best Wishes | Card

Hi everyone!
I'm back to share a card I made for my DT post at Pretty Paper Studio. I have also shared a step by step tutorial below on how I created it. Here'a look at my card :


Here’s a tutorial on how I created it :

Step 1 : I first started by die-cutting a card panel for my base and then using the Prima Tuberoses Stencil and some texture paste. I did some wet embossing on the panel and I added a hint of color to the texture paste by rubbing in some Mango Smoothie ink from Altenew. 

Step 2 : Once the embossing was dry, I started to stamp and die-cut the elements of my cards. I have used Altenew Doddle Blooms stamp and die set to stamp my flowers and foliage. I used the Tim Holtz Distress Speciality Paper to stamp all my images before die cutting them. 

Step 3 : Once the images  were stamped and die cut, I watercolored them using different shades of Altenew inks along with a waterbrush. I have done some simple watercoloring to my images.

Step 4 : Once my flowers and leaves were ready, I stamped and die-cut a frame using stamp and dies from the Lawn Fawn Flirty Frames set.

Step 5 : Once the frame was stamped and die-cut, I did some fussy cutting in the centre of the frame and cut out the centre part of the frame completely leaving only the outline of the frame. This frame was then placed as the focal in the centre of my card.

Step 6 : Once the frame was adhered to my card,  I started assembling my flowers and leaves around the frame using some foam squares. Then die-cut my sentiment using a word die and the Tim Holtz Kraft Core Cardstock – Nostalgic.  


And this is how the final card looks like.

I hope you like my card. I would love to hear your views regarding it :)

Linking my card to Virginia's View Challenge - Focal Point, Cards in Envy- Frame, Make My Monday- No patterned paper & Fusion. (I have flipped the sketch as well as used the colours)


Tuesday, October 4, 2016

Happy Wishes!

Hi, friends!
Sharing another card I made recently for my post at Mudra. This one is quite different from my usual style and it has very bright & bold colours. Here's a look :


To create this card :
I first die-cut a card panel using an A2 sized die from one of my favorites, Gina Marie Designs. I have die-cut this panel using Canson Watercolour paper. I then distressed the entire panel using three different shades of Distress inks in shades of yellow.Added some white splatters using Picket Fence Distress Stain Spray, pink splatters using Picked Raspberry Distress ink and some golden splatters using Inka Gold.  I then added some texture using a stencil by MFT and Texture paste and sprinkled some Ranger Dry Glitter while the paste was wet to add some really amazing shine to it.

I die-cut a frame using black cardstock and clear embossed it thrice to give it a glossy effect using  Ranger Super Fine Clear embossing powder and Versamark ink.
I stamped the butterfly using Versamark embossing ink and embossed it using Ranger Gold Glitter Embossing powder from Ranger and heat set it.

I colored the butterfly using Picked Raspberry Distress ink. I then stamped the "Birthday" sentiment from the Butterflies set and added the "Wishes" part from another stamp from the previous release - Sentiment EssentialsI then colored the sentiment banner using Picked Raspberry Distress ink and foam mounted it. Finally added two black enamel dots on the sides of the sentiment banner to finish off my card.

I'm entering my card in the Simon Says Stamp- Anything Goes, Cards in Envy - Frame, Dream Valley - Embossing, Incy Wincy- All that Glitters (Have used glitter embossing powder on the butterfly & sentiment as well as white glitter on the stenciled background), and Love to Create- Anything Goes/ Mixed Media.

I hope you like this card of mine. Do leave me your comments/suggestions regarding it. I love to hear from you :)

Have a nice day everyone!