Thursday, March 31, 2022

Guest Post using Spellbinders Paint The World Collection by Vicky P.


Hello everyone!
I am so excited and honoured to be guest designing on the Spellbinders blog today highlighting the NEW Paint The World Collection by Vicky Papaioannou. The whimsical and fun paintbrush-themed designs, palettes, natural elements, and the set of clear stamps included in the collection are just perfect for creating a wide variety of projects for artists and crafters alike!


My first card features the Painted Blooms Etched Dies and the Paint Your World Sentiments Clear Stamp Set. I made the card in 3.5" x 8.5", so as to not crowd the the oversized brush in the Painted Blooms Etched Dies. I added a watercolored background and layers of flower to this slimline card, perfect for sending to an artist friend or crafter.

I started by wetting a piece of Snowdrift Cardstock with clean water in the rough shape of what I wanted the final watercolor background to look like. Then, I applied color from the Worn Lipstick Distress Oxide Ink and Tattered Rose Distress Oxide Ink to the wet area with a large brush, allowing the colors to mix slightly. Once I was happy with the way it looked, I dried it using a Heat Tool. I then flicked some gold metallic paint and black acrylic paint on my panel using a paint brush for a fun splatter effect. I then flicked some gold metallic paint and pink acrylic paint on my panel using a paint brush for a fun splatter effect. 

Next, I die-cut the handle of the brush from the Artful Brushes Etched Dies and the Painted Blooms Etched Dies out of Snowdrift CardstockSilver Glitter Cardstock, Mirror Gold Cardstock, and White Foam and the bristles out of Snowdrift Cardstock and Mirror Gold Cardstock. I blended Scattered Straw Distress Oxide Ink on the handle and Worn Lipstick Distress Oxide Ink and Tattered Rose Distress Oxide Ink on the bristles. Next, I assembled the different parts of the brush with Craft Glue.

Once that was done, I die-cut DahliaVellum, and Mirror Gold Cardstock using the flower and leaf dies from the Painted Blooms Etched Dies and the Artful Tulip Etched Dies. I lightly embossed the petals using the small ball tip in Susan’s Garden Ultimate Tool Kit and adhered the layers together with liquid glue. Next, I assembled the flowers, arranged them on my card, and adhered them down with both Craft Glue and foam squares.

Next, I stamped a sentiment from the Paint Your World Sentiments Clear Stamp Set onto Snowdrift Cardstock and cut it out using the Circle #2 Die from the Nestabilities Large Standard Circles Die Set. Then, I die-cut Mirror Gold Cardstock using the Circle #2 Die and I adhered the pieces together using Craft Glue, offsetting the gold mirror die cut to create a shadow, before adding it to my card front using foam squares. I then mat the card panel with layers of Silver Glitter Cardstock before adhering it to a top-folding white card base using tape runner. I finished the design with Icicle Stickles Glitter Glue for some sparkle and shine.


My next card features the Painter's Palette Etched Dies and the Butterfly Burst Etched Dies. I love the oversized paint palette in the set and wanted to use it to create the look of an upcycled mixed media palette on my card. I used spring colours along with the fun art supplies in this set to create a card for a friend.

To start, I die-cut Snowdrift Cardstock using the palette die from the Painter's Palette Etched Dies and lay the Geometric Butterfly Stencil on top using the Best Ever Craft Tape. I then applied Modelling paste mixed with Cool Pool True Color Fusion Re-Inker on top to create a geometric stenciled background pattern. Next, I added washes of Broken China Distress Oxide Ink around the stenciled pattern to add some interest to the design. I then flicked some red and blue paint on my panel using a paint brush for a fun splatter effect.

Then, I die-cut Snowdrift Cardstock, Mirror Gold Cardstock, Timber Cardstock, and White Foam using the paint brush die in the Painter's Palette Etched Die Set. Next, I added washes of Worn Lipstick Distress Oxide Ink to the die-cut pieces with a Water Brush. Once that was done, I die-cut Snowdrift Cardstock using the flower and leaf dies from the Painted Blooms Etched Dies and the Artful Tulip Etched Dies. I lightly embossed the pieces using the small ball stylus tip in Susan’s Garden Ultimate Tool Kit and watercoloured the petals and the foliage using Jane Davenport Mermaid Markers. I also added some thread pollens to the flower centres to give them a more fuller look. 

I also die-cut Snowdrift Cardstock and Mirror Gold Cardstock using the paintbrush and butterfly dies in the Butterfly Burst Etched Dies. I blended Tattered Rose Distress Oxide Ink on the bristles using a blending brush and adhered it down on the panel using Craft Glue. The butterflies were again coloured using the Jane Davenport Mermaid Markers and I adhered down the bodies to the pieces using liquid adhesive.  

I assembled the different elements of the card together and adhered them down on the palette using foam squares. Next, I stamped a sentiment from the Paint Your World Sentiments Clear Stamp Set onto Snowdrift Cardstock and trimmed it down to adhere over the panel. Then, to finish, I die-cut Snowdrift Cardstock using the largest square die in the Vintage Stitched Squares Etched Die Set and added a light watercolor wash of Broken China Distress Oxide Ink around the left-hand side of the card. Finally, to complete, I adhered the panel to a top-folding 6" X 6'' white card base using tape runner. Then, as a finishing touch, I adhered a few Teal Color Essentials Gems around my paint palette. I love the beautiful sparkle of the gems! 


My third and final card for today features the Artful Brushes Etched Dies, the Butterfly Burst Etched Dies, and the Mini Blooms and Sprigs Etched Dies. I made this into a Slimline Card so as not to crowd the three colourful and airy paint brushes.


I began with die cutting Snowdrift Cardstock and White Foam using the paint brush and handles dies in the Artful Brushes Etched Dies.  Once I had all the paintbrush pieces die-cut and assembled, I die-cut Citrine Cardstock using the brush ferrule die in the Artful Brushes Etched Die Set and adhered them to the paintbrushes using Craft Glue. Then, I die cut the bristle and paint blob dies out of Snowdrift Cardstock and blended Cracked Pistachio, Squeezed Lemonade, and Worn Lipstick Distress Oxide Inks on the respective pieces using a sponge dauber. I adhered the bristles near to the ferrule of the brush first, then the paint blobs to the back. Once that was done, I trimmed off the handle of the paintbrushes, so that they could fit on my card panel. 

Next, I die-cut Snowdrift Cardstock using the butterfly and flower dies in the Butterfly Burst Etched Dies and the Mini Blooms and Sprigs Etched Dies and blended a little Cracked Pistachio, Squeezed Lemonade, and Worn Lipstick Distress Oxide Inks on the pieces with a blending brush. Next, I die-cut the tiny leaves from the Mini Blooms and Sprigs Etched Dies out of Snowdrift Cardstock and coloured them using Twisted Citron Distress Oxide Ink. Once that was done, I die-cut the body of the butterflies and the flower centres out of Citrine Cardstock and adhered them to my pieces using Craft Glue

 Then, I cut three long strips out of Snowdrift Cardstock and layered them on top of a piece of Snowdrift Cardstock to create the background panel of the card. I also trimmed a thin strip of Citrine Cardstock to adhere in between the pieces. The pieces were again coloured using the same combination of inks - Cracked Pistachio, Squeezed Lemonade, and Worn Lipstick Distress Oxide Inks. 

It was now time to assemble everything together - I adhered the paintbrushes to my card front using foam adhesive and then adhered the mini blooms and butterflies to the panel to create a splash of colour using Craft Glue. Next, I stamped a sentiment from the Paint Your World Sentiments Clear Stamp Set onto Snowdrift Cardstock and trimmed it down to adhere over the panel using using foam squares. Finally, to complete, I adhered the panel to a top-folding 3.5" x 8.5" white card base using tape runner

SPELLBINDERS SUPPLIES:
CS-004, CS-025, CS-027, S2-314, S3-440, S3-439, S3-441,  S4-114, S5-497, S5-504, SCS-118, SCS-123, SCS-148, SCS-151, SCS-160, STN-007,  ST-0147, STP-104, JD-041, PE-100, PCGO4E,  RI-0073, T-021, TD056362, TD056294, TD055846, AD-0084

OTHER SUPPLIES:
Neenah Solar White Cardstock, Canson Montval Watercolor Paper, Citrine Glitter Cardstock, Cracked Pistachio, Squeezed Lemonade Distress Oxide inks, Versafine Onyx Black Ink, Heat Tool, MISTI Stamping Tool, Black and Blue Acrylic Paints, Heidi Swapp Gold Lame Mist, Tape Runner.

That’s it for today’s post! I hope you enjoyed it and have been inspired to create with these stunning dies and stamp from the Paint The World Collection. Thank you so much for stopping by!
You can find more inspiration over at my Instagram page

Friday, March 25, 2022

Altenew March 2022 Whimsical Fairy Tale Collection Release Blog Hop + Giveaway ($300 in total prizes)


Hello, crafty friends!
I am excited to be joining  Altenew for their March 2022 Standalone Embossing Folder & Stencil Release: Whimsical Fairy Tale! This release features so many beautiful new 3D embossing folders and stencils!

If you arrived here from, Terri Koszler's Blog, then you are on the right track. If this is your first stop, then you will want to start at the beginning, the Altenew Card Blog. We've got tons of inspiration and giveaways for you on the hop today, so keep reading till the end of this post for more information.


My first card only required a few card making supplies. I used the Checkered Diamonds 3D Embossing Folder to make my dramatic background and used the NEW Peony Sunshine 3D Embossing Folder on some of Altenew’s Watercolor Paper to create a watercolored embossed image.  The huge embossed image covers the majority of the A2 card front and was so fun to colour!

I began my project by embossing the new Peony Sunshine 3D Embossing Folder on some of Altenew’s Watercolor Paper. This lightly textured paper looks beautiful when embossed alone, like fancy letterpress. Next, I used the Tropical Fiesta Brush Markers to add some watercolor to each of the petals. I worked on it in different sections and ensured that the watercolored petals had dried before going back and working on the petals next to the newly-dry petals. Once the watercolored image had dried completely, I fussy-cut it out using a pair of scissorss. Then, I used the Antique Gold Metallic Spray to add some shiny, shimmery gold splatters to the peony to make it extra artsy!

Next, I embossed a piece of Neenah Classic Crest Solar White Cardstock using the Checkered Diamonds 3D Embossing Folder, then watercolored the panel with Jet Black, Moon Rock, and Industrial Diamond paints in an ombré fashion, adding a few splatters of Antique Gold Metallic Spray and Jet Black Ink Spray to create the dramatic look. Then, I die-cut Neenah Classic Crest Solar White Cardstock using the leaf dies in the Build-A-Flower: Sakura Blossom Layering Stamp & Die Set and coloured them using the Tropical Fiesta Brush Markers. Next, I used the Antique Gold Metallic Spray to add some gold splatters to the leaves to make them shimmer!

Once my watercoloring had been completed, I used the Hello and Hugs Die Set to die-cut my sentiment from Black Glitter Cardstock. I love the contrast of the pretty, feminine watercolored floral peony with the bold black sentiment. I stamped the accompanying sentiment onto a strip of White Cardstock using Obsidian Ink and popped it up on my panel using foam squares. Then, to finish, I adhered the layers together with Craft Glue, before adhering it to a top-folding A2-sized white card base using tape runner.


My second card features the Double Rainbow Stencil, which is one of my absolute favourites from this release. I just had to create a vibrant rainbow card with this stencil and I am so happy with the way it has turned out! This card would just not be great to send to a friend or dear one, but serves as a great reminder to one's self too. I am thinking of recreating this design on a vertical frame and hanging it in my craft room. I think the quote would definitely help brighten up my spirits when I am feeling low or demotivated. 


I began by trimming a piece of Neenah Classic Crest Solar White Cardstock to 4.25″ x 5.5″ and lay the Double Rainbow Stencil on top using the Best Ever Craft Tape. Next, I used my Blending Brushes to blend a bright rainbow of dye ink across the front of the card. This stencil is super fine, so I recommend using Craft Tape or a temporary spray adhesive to overlay onto your cardstock, so that it doesn't shift while blending. I used Warm Sunshine, Parrot, Mint Choc, Rubellite, Orange Cream, and Grass Field inks to create the rainbow on my card front. Doesn't it look so beautiful? Once that was done, I spritzed the panel with some Jet Black Ink Spray to create an artsy look. 

Next, I debossed the card panel using the Double Rainbow Stencil in my Platinum 6" Die Cutting Machine (I positioned my Platform Standard; Stencil UP with Cardstock Inside; Embossing Mat; XL Embossing Plate and then ran this through my die cut machine as I would an embossing folder. The stencil pressed into the paper leaving a lovely impression).  

Once that was done, I die-cut Neenah Classic Crest Solar White Cardstock and Citrine Cardstock using the flower and foliage dies in the Layered Floral Elements Die Set. I blended the same ink colours (Warm SunshineParrotMint ChocRubelliteOrange Cream, and Grass Field) over the pieces using Blending Brushes. After die cutting the foreground elements, I arranged them on top of my embossed and ink blended background using Craft Glue and foam squares.

Next, for my sentiment, I die-cut Citrine, Emerald, and Razzleberry Cardstock using the 'You' die included in the Dynamic Blossoms Die Set, and adhered the layers together with Craft Glue, allowing the gold glitter paper to peak out to the left side for depth. Then, I stamped the rest of the sentiment onto a strip of White Cardstock using Obsidian Ink. Lastly, to finish, I adhered the pieces together with Craft Glue, before adhering it to a top-folding A2-sized white card base using tape runner.


Giveaway Prizes:
$300 in total prizes! To celebrate this release, Altenew is giving away a $50 gift certificate to 2 lucky winners and a $25 gift certificate to 8 winners! Please leave a comment on the Altenew Card Blog and/or each designer’s blog post on the blog hop list below by 03/31/2022 for a chance to win. Altenew will draw 10 random winners from the comments left on each stop of this blog hop and announce the winners on the Altenew Winners Page on 04/02/2022.

Blog Hop Order:
Next Stop on this Blog Hop is the wonderful, Emily Midgett's blog. Just in case you lose your place along the way, here is the complete list of participants so that you can find your way back:

Altenew Blog

Jennifer McGuire

Jaycee Gaspar

Cheryl Espie

Jenny Colacicco

Colleen Balija

Terri Koszler

                             Hussena Calcuttawala (You are HERE)

Emily Midgett

LauraJane

Nathalie DeSousa

Linda Westfall

Virginia Lu

Teresa Litchfield

Tenia Nelson

Nenette S. Madero

Amy Hill

Reiko Tsuchida

Nandini Karmarkar

Bridget Casey

Katrina Howe

SathyaKala Sankaran

Natasha Davies

Sande Woodson

Rosie Neustaedter

Nichol Spohr

Preeti Chandran

Daniel Diaz

Mindy Eggen


Well, that’s all for my projects today! Thanks so much for stopping by and reading. I hope you have a wonderful day!

If you like what you've seen from me, please give me a follow over on my Instagram (@hussena_cal) and/or subscribe to my blog if you haven't already.

Thursday, March 24, 2022

Altenew Celebrating Parents Card Drive Blog Hop + Giveaway 2022


Hello, crafty friends!
I'm so happy to be joining Altenew for an inspirational hop today, as a part of the annual Celebrating Parents Card Drive! Mother’s Day and Father’s Day are approaching and this can be a difficult time for seniors who are in nursing homes or shelters. We want these important people to feel loved, celebrated, and honored — and that’s where the annual Card Drive comes in!

Maybe you have a little bit of extra time in the next few weeks to create a few Mother’s or Father’s Day cards to send in for the drive. It doesn’t take much! 

If you arrived here from the remarkable, Jaycee Gaspar's Blog, then you are on the right track. If this is your first stop, then you will want to start at the beginning, the Altenew Card Blog. We've got tons of inspiration and giveaways for you on the hop today, so keep reading till the end of this post for more information.

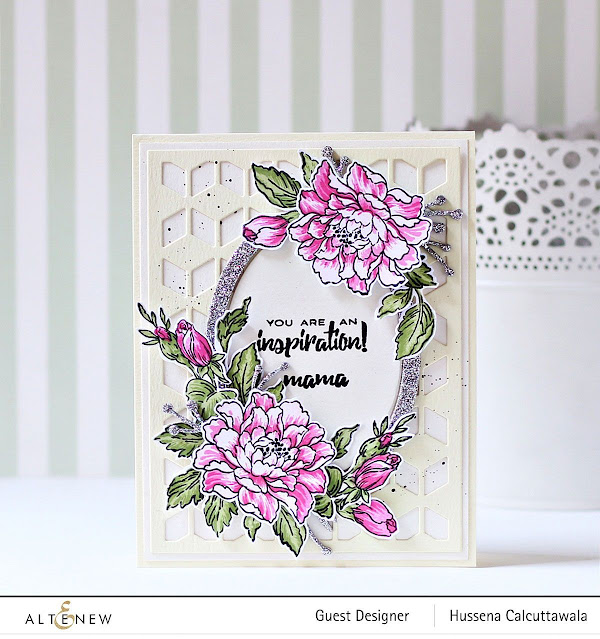
I used the Remember This Stamp Set along with a couple of my older favourites from Altenew to create this bright and cheery Mother's Day card.

To create my card, I stamped the layered flowers from the Remember This Stamp Set onto Neenah Classic Crest Solar White Cardstock using Obsidian, Rubellite, Pinkalicious, and Pink Diamond inks with the help of my MISTI Stamping Tool. I stamped the images twice so that I had enough number of pieces for my design. Next, I stamped the leaf layers using Evergreen,  Forest Glades, and Jet Black inks from the Green Fields Crisp Dye Ink Oval Set. Once that was done, I fussy-cut all of the images using a pair of scissors.

Next, I die-cut Beeswax Cardstock using the Cube Cover Die to add some interest to my background panel. I also added a die-cut oval and some greenery from the Create-A-Wreath Die Set, cut from Dazzling Diamond Cardstock, and adhered it down on my panel using foam adhesive to ‘ground’ the flowers. Next, I stamped my sentiment from the Extra Special Stamp Set onto the oval die-cut piece using Obsidian Ink

I assembled the different elements on my panel and adhered down the pieces using foam squares. Then, to finish, I adhered the panels together with Craft Glue, before adhering it to a top-folding A2-sized white card base using tape runner. Finally, to complete, I added some black paint splatters for interest.


 Altenew has chosen a few products that are great for your Mother’s Day and Father’s Day cards (and other year-round projects)! 

Altenew will donate $1 with every order of the below stamp sets from 3/6/2021 until 5/31/2021 to the Food Bank of Central New York to support seniors in need. For details on the drive, click HERE.


  • Beautiful Lady Stamp Set

  • Extra Special Stamp Set

  • Family Matters Extras Stamp Set

  • Family Matters Stamp Set

  • Mother's Love Stamp Set

  • Penned Rose Stamp Set

  • Precious Moments stamp set

  • Simply the Best Stamp Set

  • Thanks Around the World Stamp Set

  • Thanks, Dad Stamp Set

  • Travel Boots Stamp Set

  • Wild Hibiscus Stamp Set

  • World's Best Dad Stamp SetYou Are Everything Stamp Set

  • Paint-A-Flower: Lotus Outline Stamp Set

  • Paint-A-Flower: African Daisy Outline Stamp Set

  • Say Yes Stamp Set

  • Tufted Chair Stamp Set

  • Modern Eucalyptus Stamp Set

  • Cuddly Bear Stamp Set

  • Bold Heels Stamp Set

  • Doodled Triangles Stamp Set

  • Sweet Cake Stamp Set

  • Inky Lily Stamp Set

  • Modern Alphabet Stamp Set


Giveaway Prizes:
$300 in total prizes! To celebrate this release, Altenew is giving away a $50 gift certificate to 2 lucky winners and a $20 gift certificate to 5winners! Please leave a comment on the Altenew Card Blog and/or each designer’s blog post on the blog hop list below by 03/30/2022 for a chance to win. Altenew will draw 7 random winners from the comments left on each stop of this blog hop and announce the winners on the Altenew Winners Page on 04/01/2022.

Blog Hop Order:
Next Stop on this Blog Hop is the wonderful, Tenia Nelson's blog. Just in case you lose your place along the way, here is the complete list of participants so that you can find your way back:

Well, that’s all for my project today! Thanks so much for stopping by and reading. I hope you have a wonderful day!

If you like what you've seen from me, please give me a follow over on my Instagram (@hussena_cal) and/or subscribe to my blog if you haven't already