Monday, October 20, 2014

Sparkle with Prima Lulupu Blog Hop!

Hello everyone!
Welcome to the Lulupu Sparkle with Prima blog hop!
You should have come here from the very talented, Nikita's blog.
If not, here's a link to follow the complete hop list starting from the Lulupu blog.

Today is the Day 8 of the Blog hop and I hope you all have been enjoying all the gorgeous inspiration that the Lulupu team and the Guest Designers have been sharing up to now. We also hope you're hopping along each of the blogs and leaving us some love as they are lot of prizes to be won this month! Not only that, we have a month long challenge this month where we are asking you to use your Prima products to create a 'sparkly' project for this festive season. We not only are giving prize to to the Winner, but also to do the Top 3 this time. You really don't want to miss this opportunity :)

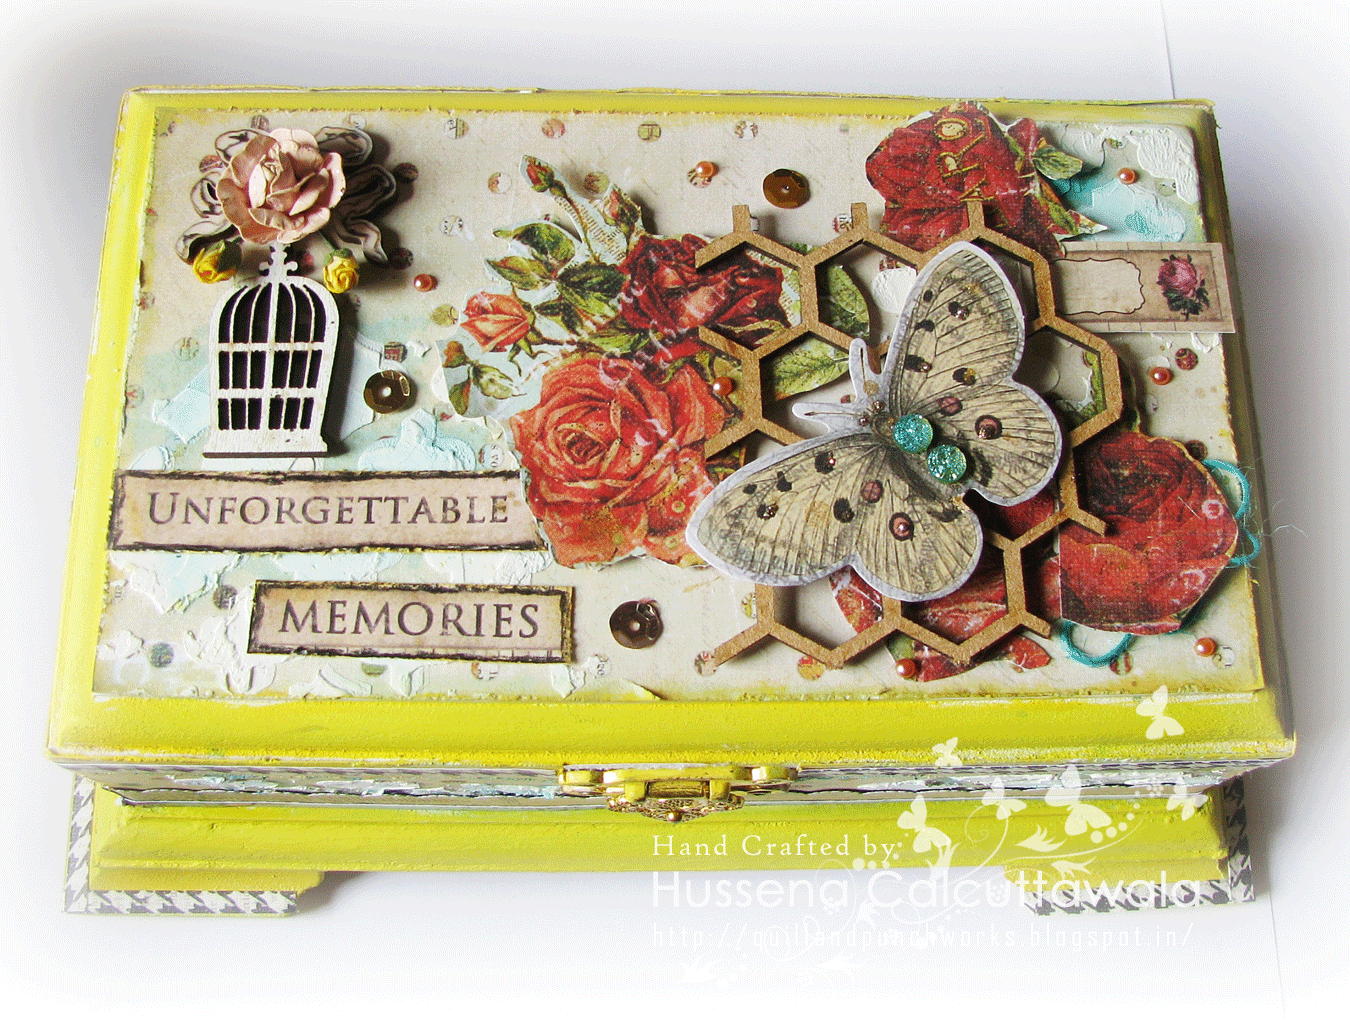
Now, coming to my project, I have an altered MDF box to share with a step-by-step tutorial. 


 The insides of the box which I have covered with a pattern paper from the Prima A4 Cigar Box paper pad.

Now, for the tutorial part :

Step 1- Paint the MDF box with White Gesso entirely. This will help in the paint coverage as Gesso gives tooth to your projects and so it takes colours very well.

 Step 2- Measure and cut the pattern papers you're going to use. I've used Prima A4 Cigar box paper collection entirely for my box right from the base paper to ALL the embellishments as well.
Distress your papers after cutting them either with a Distressing tool or with the help of a small pair of scissors and ink the edges using Distress inks of your choice. I have used Scattered Straw thought it is totally optional.

 Step 3- Before sticking the papers to your box, paint the box using paints of your choice. I have used Acrylic paints from Camlin- Chromium Yellow and Cobalt Blue.
Then, I have done stenciling using modelling paste from Sakura and a art knife and ofcourse a stencil of your choice.Mine is from My Favorite Things.

Step 4 - I've done stenciling on the top and all four sides. Then, added blue splatters using Heidi Swapp- Tropicana Teal mist and Heidi Swapp- Gold Lame mist. (This step is optional)

After these steps, I painted the insides of the box as well with Gesso and Blue paint and layered the Prima pattern paper inside as well. This is from the Prima Cigar Box paper pad too!
To embellish my box on the top, I've paper pieced the flowers from the Cigar Box paper pad again, mounted it on foam and adhered it to the top of the Honeycomb MDF piece.
The butterfly die-cut, the wooden cage and the bow are all from the Prima Epiphany collection- Wood icons and Ephemera pack.
I have used the Prima Coffee Break Crystals on the butterfly and also some gold sequins from the Epiphany Ephemera pack. The sentiment and the small tag n the right hand side are from a discontinued collection of Prima now, called Prima Romance Novel paper pad. I have liberally used Ranger Platinum Stickles on the butterfly and flowers though it does'nt seem to show in the photograph. :(

Hope you like my project. Do leave me your comments and views regarding it. 
You next stop on the hop is another incredible crafter, Mallika Kejriwal

Have a nice day everyone!

Thursday, October 9, 2014

Pattern Play -You are awesome

Hi friends,
In the series of my WCMD frenzy, here is another card I created based on Pattern play with Shay at the W & W blog. They are running a couple of challenges till Saturday for the WCMD. How fun is that ?
Here's a look at what I have created :
To make this card, I just played around with my Bo Bunny stamp set and my Hero Arts shadow inks.The stamp set  has a lot of geometric shapes and I was leaning more towards creating hexagons and arrows for my background but after trying out various combo's, I finally settled with the black stripes and triangles ..Actually, it was the feather die cut which clinched the deal for me :) It just sat so beautifully against all that stamped triangles ...But I have to confess, it was really hard for me to use this diecut. I have been hoarding it for like ages now  and now finally got a chance to use it ..Sigh !! A few sequins and pearls finished the card. On the bottom of the feather, I did some detailing using Platinum Stickles and I was all done.
Please do forgive my stamping Boo boo's. I am not very good with stamping yet and have quite a bit of shaky hands :( I seem to have messed up my bottom triangle !..Argh !!

View of the card while laying down :

Well that's it from my end ..Hope you like my card and do let me know your views. Would love to have your feed back regarding it.
Supplies used :
Cardstock- Fabriano Elle Erre.
Stamps- Winnie & Walter - The Big, Bold and You, Bo Bunny Stamps -To the Point.
Inks- Hero Arts Fresh Peach Mid-tone shadow ink, Hero Arts Tide Pool, Soft Blossom and Butter bar Shadow ink pads, Versafine Onyx Black ink pad.
Accessories- Feather die-cut, Ranger Platinum Stickles and Sequins.

Challenges entered :
Crafting when we can- No designer paper Made it to Top 3 )
Sentimental Sundays - Bling it up ( I have used stickles, gemstones on the feather and sequins) Winner!
Addicted to Stamps and More : Anything goes

Monday, October 6, 2014

Peach|Gold|Blush

Hello friends!
I am back again to share my second take for the WCMD challenge at Winnie and Walter. I told you, I was really excited about them, right ? :D
Here's a look at my card, first :
I've played along Gayatri's color combination challenge on W & W blog which was to use the color palette of using Peach, gold and blush. I really loved these colours but it was very challenging to create a card only with these colours. After a lot of false start, I decided to stamp and colour my flowers and leaves using a combination of Hero Arts Fresh Peach Mid-Tone Shadow ink and heat-embossing the leaves and the flower outline with Ranger Super Fine Gold Embossing powder. The background I have created using a stencil and Distress ink- Spun Sugar to give that blush touch to my card. 

Th sentiment is a combination of a die and sentiment stamp from Winnie and Walter. I die-cut the 'thanks' die-cut with gold glitter washi tape and it really sparkles in real life. Unfortunately, not able to capture it on camera. :( Those sequins you see scattered around were actually a gift from Winnie and Walter. :)

Supplies used :
Cardstock- Fabriano white cardstock.
Dies- Simon Says Stamp' Thanks' die
Stamps -Penny Black Petal Power stamp set, Winnie and Walter 'The Big, The Bold and You' stamp set.
Inks- Hero Arts Fresh Peach Mid-Tone Shadow ink, Distress Ink Spun Sugar, Versamark stamp pad.
Accessories- Heidi Swapp Polka Dots stencil, Ranger Super Fine Gold Embossing powder, Sequins, Gold glitter tape (Used for die-cutting).

Challenges entered :
Addicted to CAS -Stencil
Crafty Boots- Gold
House of Cards- Punches and Dies -I have used the 'Thanks' die from SSS.
Inspired by Stamping- Gold
Stamploration : stamping and Embossing

Thanks for dropping by! Hope you like my card. Would love to hear your views on it.

Sunday, October 5, 2014

World Card Making Day - Camera trend !

Hi Friends,
Wishing you all a very happy card making day. I know I am a day late but hey, it's  still 4th of October somewhere in the globe :)
My whole dashboard is filled with WCMD fun and exciting challenges and activities.and I just HAD to participate in a few of those challenges. :D
Winnie & Walter are hosting a set of six challenges which will run throughout the week and I have picked up the camera trend challenge hosted by the incredibly talented, Lea Lawson to play along.
Here's a look at my take on the challenge :

I found a totally fabulous tutorial on Pinterest on how to create a camera using the WRMK Envelope Punch Board and using the basic premise of that, I created this camera embellishment on my card. Then, using some Hero Arts Shadow Inks- Butter Bar and Soft Granite, I stamped the Pink Paislee Hello Sunshine camera from the set to create my border background. The sentiment is from Lawn Fawn Harolds ABC stamp set. I have used some Studio Calico Stars Wood Veneers which have been coated with some Platinum Stickles and some black thread to create the loop.

Supplies used :
Card base- Fabriano Elle Erre.
Pattern papers- My Minds Eye On the Bright side paper pad.
Stamps -Pink Paislee Hello Sunshine stamp and die set, Lawn Fawn Harolds ABC stamp set.
Inks- Versafine Onyx Black ink pad, Hero Arts Shadow Inks- Butter Bar and Soft Granite.
Punches- Various sizes of circle punches and 3 in 1 heart punch. These are all from a company called Jef.
Splatters are created using dark blue acrylic paint, Studio Calico Stars Wood Veneers.

Challenge entered :
Thats Crafty! Challenge blog -Keep it simple
The Crafter's Cafe -Uses punches/die cuts. I have used three different sizes of circle punches to make the camera and the hearts are punch outs too.
Little Red Wagon -In stitches ( I have used faux stitching) - Featured fave!
Fan-Tastic Tuesday- Use Camera/ Spotlighting- Made it to the Top 3 !

Well that's it from me ...Hope you like my card ..Do let me know your views regarding it :)
Have a nice day everyone !!