Wednesday, April 21, 2021

Mr. & Mrs. Wedding Card | Amazing Paper Grace Die of the Month


Hello, crafty friends!
I hope you're doing well and are safe and healthy! 
Today I am sharing a card featuring the Spellbinders & Amazing Paper Grace April 2021 Die of the Month Set. This month's "Dahlia Dimensional Doily" Set is perfect for making gorgeous cards, gift boxes, gift bags, and more in no time! This die set features 11 dies.

I created a layered, dimensional card in pastel colours using the Dahlia Dimensional Doily Set. I have also used the Wedded Bliss Scene Etched Dies for my card and love how all of Becca's dies coordinate so well with each other! In case you missed, it I shared a Card on my blog a few days ago using this month's "Dahlia Dimensional Doily" Set, which you can check out HERE.

For my card, I started by die cutting Pink Sand Cardstock with the filigree panel die from the Dahlia Dimensional Doily. I die cut it twice, so as to create an A2-sized panel for my card front. I also die cut the die from Gold Mirror Cardstock and slightly offset it to the back of the pink die-cut before adhering for visual interest and dimension. 

Next, I die cut the dahlia pieces from White Cardstock and followed Becca Fekeen's Video Tutorial to create a dahlia dimensional  doily. This was a bit time-consuming to make, but it was very fun to work on as well! I also die cut the doily lace quadrants from Pink Sand Cardstock and inserted them in all four quadrants of the circle. 

For the roses, I die cut the spiral flower dies from White Foamiran. I coloured all the petals with Pool Play ink using a sponge dauber and then used a slotted quilling tool to create my rolled roses. The leaves were die cut from White Foamiran as well and coloured with Electric Lime ink using a sponge dauber. I lightly shaped the die cut leaves using the scoring tip from the Tool N' One.

Next, I die cut the gazebo, the bride and groom, and the sentiment from White CardstockPink Sand Cardstock, and Gold Mirror Cardstock using the Wedded Bliss Scene Etched Dies. I also die cut the gazebo from Gold Mirror Cardstock and adhered it to the back of the White Cardstock piece, peaking out just a bit. The sentiment was adhered to the card front using a combination of liquid glue and foam adhesive. 

I adhered the roses and the foliage on my card front using Craft Glue. I mounted the panel to a mat layer of White Cardstock followed by a panel of Gold Mirror Cardstock. I then attached it to a top-folding white card base made from White Cardstock and my card was complete.


The Amazing Paper Grace Die of the Month is available exclusively at Spellbinders Paper Arts during April 2021. You can get the Dahlia Dimensional Doily Set at the special Cub Kit price, along with other membership perks.

If you'd like to see some more project inspiration using the Amazing Paper Grace Die of the Month, check out the Spellbinders Blog where Becca shares some stunning project samples using it.  
Amazing Paper Grace Die of the Month Membership

That’s it for me today! I hope you liked my take on the die set! If you like what you've seen from me, please give me a follow over on my Instagram (@hussena_cal) and/or subscribe to my blog if you haven't already.

Thank you so much for your visit to my blog today!

Tuesday, April 13, 2021

Spellbinders Guest Design Post | Spring Flora by Susan's Garden


Hello, crafty friends!
I am so honoured to be guest designing on the Spellbinders blog and have four card projects to share which I created using the exquisite Spring Flora Collection by Susan Tierney Cockburn. The entire collection is a treat for all flower makers and will help you create realistic and natural spring flowers. 


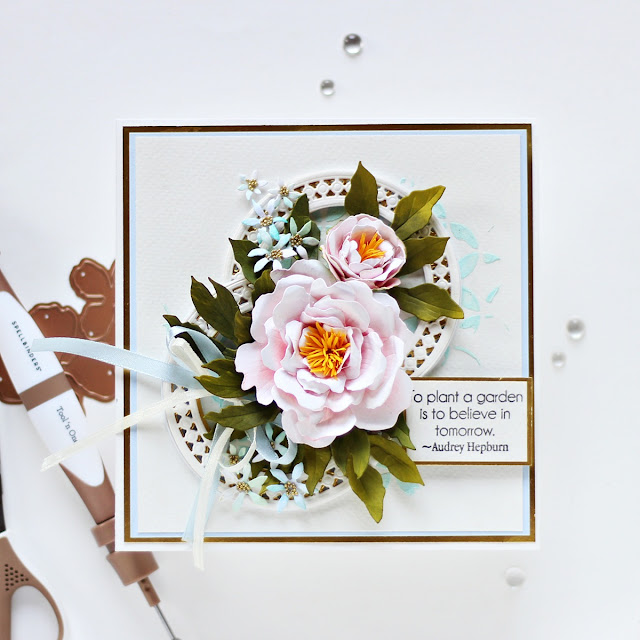
My first card features the Double & Single Peonies Etched Dies, Kerria Japonica Etched Dies, Lily of the Valley Etched Dies. I love peonies and had to start out by making a card featuring them in their full glory!

To create my flowers, I die cut the Double & Single Peonies Etched Dies out of Susan's Specialty Cardstock using my Spellbinders Platinum Machine. I die cut the medium and large layers twice from Specialty Cardstock, while the smallest layer was die cut thrice. Once all my pieces were die cut, I added some colour to the centres of the flowers using a foam blending tool. Then, I embossed the individual petals using the stylus tips from the Susan's Garden Ultimate Tool Kit

The stamens were die cut out of Lemon Drop Cardstock using the Double & Single Peonies Etched Dies. Once they were die cut, I simply rolled them up using a pair of tweezers and added them to the centre of the peonies using Craft Glue. The filler flowers were die cut out using the Kerria Japonica Etched Dies from Susan's Specialty Cardstock. I added some colour to the centres of the flowers using a foam blending tool and then embossed and shaped the petals using the stylus tips from the Susan's Garden Ultimate Tool Kit. Then, I added some mirco glitter balls to the flower centres for visual interest. 

The leaves were die cut from Fern Cardstock using the Lily of the Valley Etched DiesI lightly embossed them and added some detail to the die cuts using the various stylus tips (ball stylus tips, loop tools) included in the Susan's Garden Ultimate Tool Kit. Then, for my card background, I trimmed a piece of Watercolor Cardstock and used some coloured Embossing Paste to create a stenciled pattern on the panel.

Next, I die cut the Candlewick Circle Etched Dies from White Cardstock and Gold Mirror Cardstock and slightly offset the two frames to create an illusion of depth without excessive bulk. I arranged my floral spray over it and adhered it down to my panel using Craft Glue. The sentiment from the Spring Quotes Clear Stamp Set was stamped on a piece of White Cardstock using Black Licorice ink. I added a mat layer of Gold Mirror Cardstock to give it a more finished look and adhered it to my panel using foam squares

I matted my panel with Light Blue Cardstock, then Gold Mirror Cardstock, and finally adhered it to a top-folding white card base


My next card features the Parrot Tulip Etched DiesKerria Japonica Etched Dies, and the Lily of the Valley Etched Dies. I truly enjoyed creating these flowers for my card and have kept the background on this card very simple to keep the attention on the blooms. 

I die cut the flowers from the Parrot Tulip Etched Dies out of Susan's Specialty Cardstock. I coloured the sides and the centres of the petals using two different shades of Distress Oxides and then embossed and shaped them using the loop tool stylus tips from the Susan's Garden Ultimate Tool Kit. I really love how this tool kit includes everything to help you create realistic flowers and leaves, right from the ball stylus tips to the leaf tool tip, to the foam pads, tweezers and more. If you're passionate about flower making, this is one tool kit that you should definitely invest in. It has all the required tools in one place and is great value for money!

The filler flowers were die cut from Susan's Specialty Cardstock. I used Spun Sugar Distress ink to colour each of the petals using using a foam blending tool and then lightly shaped them using the 2mm ball stylus tip. Once they were all coloured and dry, I added micro glitter balls to the centres for visual interest. The leaves were  cut from Fern Cardstock using the Lily of the Valley Etched DiesI lightly embossed them and added some detail to the die cuts using the various stylus tips (leaf veiner, loop tools) included in the Susan's Garden Ultimate Tool Kit

I die cut the square pattern from the Fleur de lis Grandeur Fold Over out of White Cardstock and Gold Mirror Cardstock and slightly offset the two frames to create an illusion of depth. I foam mounted it to my panel and adhered the floral spray on it using Craft Glue. I stamped the sentiment from the Spring Quotes Clear Stamp Set using Black Licorice ink on the negative die cut piece of the Fleur de lis Grandeur Fold Over. I foam mounted it for dimension and then mounted the panel to a piece of Gold Mirror Cardstock. I mat the panel with a layer of Alabaster Cardstock and finally adhered it to a top-folding cream card base


My next card features the Hyacinth Etched Dies and the Lily of the Valley Etched Dies. This card took me a while to make simply because I had to die cut, colour, and emboss a large number of hyacinths to create my card design, but it was really fun at the same time!

I started by die cutting the Hyacinth Etched Dies out of Susan's Specialty Cardstock. I cut out multiples of them, so that I had extras on hand. This helps save a lot of time and effort when you're working on your projects. I used three different shades of Distress inks to colour each of the hyacinths. This was slightly time consuming, however if you want to do this quickly, you can use coloured cardstock or even paints/sprays to colour your die cuts. Once I finished colouring all the petals, I embossed them using the 2mm embossing stylus tip from Susan's Garden Ultimate Tool Kit. I used the foam mat included in the kit while embossing the flowers and it came in very handy. 

Then, I adhered each of the die cut pieces together using Craft Glue to create my hyacinths. The leaves were die cut using the Lily of the Valley Etched Dies out of Fern Cardstock. I used Peeled Paint Distress ink to colour the sides of the leaves using a foam blending tool for some definition and interest. I then lightly embossed them and added some detail to the die cuts using the various stylus tips (leaf veiner, loop tools) included in the Susan's Garden Ultimate Tool Kit

I trimmed a piece of White Cardstock to size and used a Moroccan Lattice stencil to create a soft, stenciled background design using a sponge dauber and Broken China Distress ink. Next, I die cut the large lace frame in the Floral Lace Frame Die Set from White Cardstock and Gold Mirror Cardstock and slightly offset the two frames for interest. 
Then, I die cut several panels of the Shapeabilities Vintage Stitched Squares Etched Dies out of White Cardstock and Gold Mirror Cardstock and adhered them one on top of the other to create the illusion of a frame. The large lace frame was foam mounted on this piece and the hyacinths were attached to the panel using Craft Glue. To finish, I adhered my card panel to a top-folding cream card base


My final card for today features the Lily of the Valley Etched Dies. This is such a dainty yet elegant die set and I wanted to create a card featuring the flowers and leaves together. It also complements the sentiment quite well. 

To begin, I die cut the flowers out of Susan's Specialty Cardstock. Once I had a sizable number of die cut flowers, I I used Spun Sugar Distress ink to colour each of the petals using using a foam blending tool and then lightly shaped them using the 2mm ball stylus tip. Next, I die cut the stem in the Lily of the Valley Etched Dies from Limeade Splash Cardstock. I lightly embossed it using the 2mm embossing  stylus tip included in the Susan's Garden Ultimate Tool Kit.

Then, I adhered each of the petals through the nodes of the stem. The leaves were die cut out of Fern Cardstock using the Lily of the Valley Etched Dies. I lightly embossed the centre of the leaves using the 5mm embossing stylus tip and drew some veins on the die cuts using the leaf veiner tool in the Susan's Garden Ultimate Tool Kit

Once my floral spray was complete, I die cut the Elegant Twist Ovals Etched Dies from Gold Mirror Cardstock. The  leftover negative die cut piece was coloured with Broken China Distress ink using a blending brush and I added some black paint splatters for visual interest. I also stamped a sentiment from the Spring Quotes Clear Stamp Set using Black Licorice ink on a small oval frame die cut from the Twist Ovals Etched Dies. Both the die cut pieces were foam mounted to the panel for dimension.  

Next, I took a piece of White Cardstock and trimmed it to size. I used the Snip It Flowers Die Set to emboss the panel using a rubber embossing pad in my die cutting sandwich. Then, I added some black paint splatters to the panel for interest. I matted this to a panel of Gold Mirror Cardstock and then adhered it to a side-folding cream card base

Other Supplies: Distress Inks - Broken China, Peeled Paint, Spun Sugar, Distress Oxides- Peeled Paint, Squeezed Lemonade, Tattered Rose; White Fun Foam, Watercolour Paper; Stencils, White Texture Paste; Embellishments: Ribbons, Mirco Glitter Balls, Black Acrylic Paint

I hope you enjoyed looking at my spring floral cards and thanks so much for stopping by today. You can find more inspiration over on my Instagram page @hussena_cal.
Thank you for stopping by!

Saturday, April 10, 2021

Spellbinders & Amazing Paper Grace Die of the Month | April 2021


Hello, crafty friends!
Hope you are doing well and staying safe!
I have a card to share today featuring the Spellbinders & Amazing Paper Grace April 2021 Die of the Month Set. This month's "Dahlia Dimensional Doily" Set is perfect for making gorgeous cards, gift boxes, gift bags, and more in no time! This die set features 11 dies.

I created a wedding card in pastel colours using the Dahlia Dimensional Doily Set. This die set is a mini collection of options, all together in one set. I have used the filigree panel die in the set along with the spiral flower dies for my card, but you can also use the Dahlia Doily die if you'd like.

I love the sweet, romantic rolled flower dies in this set and I was so happy to create them after a long time. The dies include a score line, so that you could bend the edges over easily while making them. You can control the overall size by how tightly you wind them, so you can make flowers in any size you'd like.

For my card, I started by die cutting Pink Sand Cardstock with the filigree panel die from the Dahlia Dimensional Doily. I die cut it twice, so as to create an A2-sized panel for my card front. I also die cut the die from Fun Foam, so that I could layer the two pieces, one on top of the other, for dimension and interest. 

Next, I die cut White Cardstock with the spiral flower dies from the set. I coloured the die cut pieces using watercolor half-pans for a soft, muted look. Then, to create the roses, I used the scoring tip from the Tool N' One to burnish the scored lines from the back of the die cut. Then, from the front, I bent back the scored edges. Next, I placed the thinnest end of the flower into my Quilled Creations Slotted Quilling Tool and turned it, so that the flower wrapped around the quilling tip with the rose edges bending outward. I added glue to the rounded base of the flower and my rose was ready! These are probably the easiest flowers you'll ever make, so if you've been thinking of trying your hands at flower making, this is just the perfect die set for you! 

The leaves and foliage were die cut from White Cardstock and Vellum using the Simply Layered Blooms Etched Dies. I coloured the die cuts with Electric Lime ink using a sponge dauber. Next, for my focal element, I die cut a circle out of Vellum using the Nestabilities Standard Circles LG Etched Dies and then die cut the doily lace insert from the Dahlia Dimensional Doily twice from White Cardstock. I also die cut a circle from Gold Mirror Cardstock and a scalloped circle from Pink Sand Cardstock. The sentiment was stamped using Black Licorice ink on a circle die cut. I adhered all of these together using a mix of foam adhesive and Craft Glue.

I adhered the roses and the foliage on my card front using Craft Glue. I mounted the panel to a mat layer of Gold Mirror Cardstock, followed by a panel of Pink Sand Cardstock. I then attached it to a top-folding white card base made from White Cardstock and my card was complete.


The Amazing Paper Grace Die of the Month is available exclusively at Spellbinders Paper Arts during April 2021. You can get the Dahlia Dimensional Doily Set at the special Cub Kit price, along with other membership perks.

If you'd like to see some more project inspiration using the Amazing Paper Grace Die of the Month, check out the Spellbinders Blog where Becca shares some stunning project samples using it.  
Amazing Paper Grace Die of the Month Membership

That’s it for me today! I hope you liked my take on the die set! If you like what you've seen from me, please give me a follow over on my Instagram (@hussena_cal) and/or subscribe to my blog if you haven't already.

Thank you so much for your visit to my blog today!

Thursday, April 8, 2021

Spellbinders | Watercolor Florals by Sushma Hegde


Hello, crafty friends!
Happy Thursday and welcome to my blog! I have a card and bookmark set to share today using the Layered Wildflowers Clear Stamp Set which is a part of the Watercolor Florals Collection by Sushma Hegde. This is such a beautiful collection of floral stamps that can be used with many different techniques to create easy watercolored projects in no time.

I have used the Layered Wildflowers Clear Stamp Set for my projects today. Layered Wildflowers is part of the Watercolor Florals Collection by Sushma Hegde. The set of 10 clear Photopolymer stamps is designed to work with an acrylic block, and made in the U.S.A. Each image when layered on top of each other creates shadows and dimension of a one-layer wildflower. Stamp one or a bunch for a lovely field of florals!

For my card, I first ink blended Tumbled Glass and Twisted Citron Distress inks over a panel of Canson Montval Watercolor Paper using a blender brush. Then, I stamped the layering florals and foliage from the Layered Wildflowers Clear Stamp Set using a variety of dye inks. Once that was complete, I splattered the flowers with black acrylic paint and let dry.

Then, I wrapped some natural hemp around my card panel for interest. I die cut the tag from last month's Amazing Paper Grace Club Kit from a scrap piece of White Cardstock and stamped a sentiment from the Wonderful Spring Stamp set on it using brown dye ink. I then popped it on the panel using foam adhesive. 

I matted my card panel with Gold Mirror Cardstock before adhering it to a top-folding white card base. I love how this card came together in no time! 


Next, I have this bookmark to share featuring the same stamp set. I went with a very artsy, loose watercolored look on this one.

To create my bookmark, I first trimmed a piece of White Cardstock to 2 X 5.5 inches and stamped the flower and the foliage from the Layered Wildflowers Clear Stamp Set using various dye inks. Then, I used my watercolor half-pans to loosely paint the background to add some depth and character to the stamped design. Once I was happy with the way it looked, I went ahead and added some paint splatters with black acrylic paint and let dry.

All that was needed to complete my bookmark was a sentiment, so I went ahead and stamped a quote from the Spring Quotes Stamp Set using Licorice Black ink. I adhered a tag hole reinforcer and attached a handmade tassel and some beads to finish my bookmark. 


I hope you enjoyed looking at my projects today and I hope they inspire you as you create with these gorgeous new products. I would love to hear what you think of them. 

 If you like what you've seen from me, please give me a follow over on my Instagram (@hussena_cal) and/or subscribe to my blog if you haven't already.
Thank you so much for stopping by!

Wednesday, April 7, 2021

Spellbinders April 2021 Clear Stamp of the Month | Around The Bend


Hello, crafty friends!
Happy April and welcome to my blog! I have a set of spring-themed cards to share today featuring the Spellbinders Clear Stamp Set of the Month - Around The Bend. If you haven't heard about the Clear Stamp of the Month Club by Spellbinders, you can go over to the Spellbinders blog and read more about it HERE.

The Spellbinders Clear Stamp for April includes 10 different stamps, with images and sentiments perfect for a variety of occasions. The stamp set coordinates with the April 2021 Large Die of the Month and Glimmer Hot Foil Kit of the Month, so you can mix and match your supplies to create different projects. This “Around The Bend” stamp set features made in the USA stamps from high-quality photo-polymer for clear, crisp impressions. 
Here are my cards using this stamp set:


For my first card, I went with a clean and simple design. To begin, I took a piece of 4.25" X 5.5" White Cardstock and stamped the leafy stamp image using Brown color ink all over the panel. The task of stamping the rows in (almost) perfect distances is made easier with a stamp positioner like a MISTI. If you don't have one, you can always use an acrylic block, though that is a more time-taking process. Next, I stamped the flower stamp images included in the set using two different ink colours. 

I didn't want to take the focus away from the stamped panel, so I kept the rest of the elements simple. I used the Nestabilities Standard Circles LG and the Hemstitch Circles Etched Dies to die cut the circles from Gold Mirror Cardstock and Vellum Cardstock respectively. I adhered this to a scalloped circle die cut which was cut from Blue Cardstock. Then, I die cut a circle from the Nestabilities Standard Circles LG and stamped the sentiment on it using Licorice Black ink. I popped the circle using foam squares for dimension. 


I die cut the flowers from BeeswaxHaystack, and Raindrop Cardstock using the Mini Blooms and Sprigs Etched Dies. I adhered them around the circle using Craft Glue. The leaves were die cut from White Cardstock and then adhered down on the circles using Craft Glue. I matted this layer to a panel of Gold Mirror Cardstock, then Raindrop Cardstock, and finally to a top-folding A2-sized white card base. 


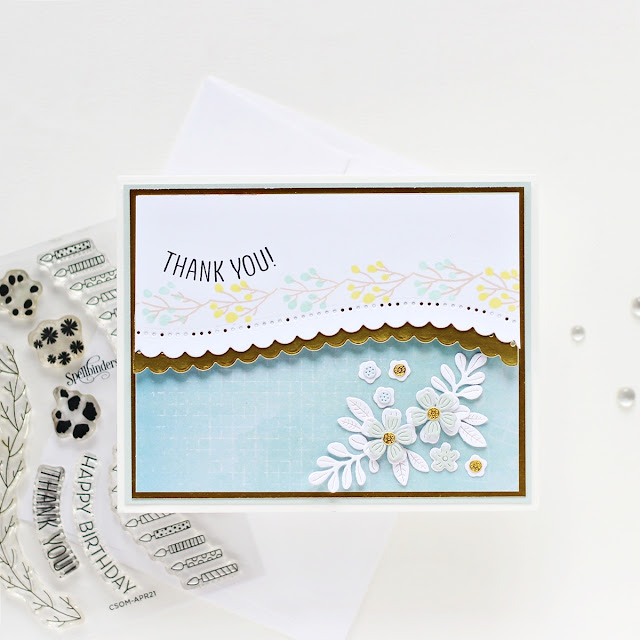
For my next card, I went with a different card orientation. To start, I took a piece of 4.25" X 5.5" White Cardstock and stamped the floral vine image using Brown color ink all over the panel. Next, I stamped the flower stamp images included in the set using two different ink colours. Then, I stamped a sentiment on the panel in Licorice Black ink above and die cut them just beneath with pierced and scalloped curved border dies. I also went ahead and die cut the scalloped border from Gold Mirror Cardstock and adhered it below the stamped panel for interest. 

I liked how this grid patterned paper from my stash complemented the colors on this panel, so I trimmed it to size and adhered it on a panel of Gold Mirror Cardstock. I die cut a few flowers and leaves from the Mini Blooms and Sprigs Etched Dies from Raindrop Cardstock, Gold Mirror Cardstock, and White Cardstock . I then them adhered down on the bottom right corner of my card using Craft Glue and foam squares.

I matted this panel over a layer of Raindrop Cardstock and then adhered it down to a top-folding card base. I like how this turned out!


The Around The Bend Set is available exclusively at Spellbinders Paper Arts during April 2021. You can get the Clear Stamp Set of the Month at the special Club Kit price, along with other membership perks.

I hope you enjoyed looking at my cards today! I would love to hear what you think of them. 

 If you like what you've seen from me, please give me a follow over on my Instagram (@hussena_cal) and/or subscribe to my blog if you haven't already.
Thank you so much for stopping by!