Showing posts with label Spellbinder stamps. Show all posts

Sunday, February 13, 2022

Guest Post using Spellbinders Into The Wilderness Collection

Hello everyone!
I am so thrilled to be guest designing on the Spellbinders blog today highlighting the NEW Into The Wilderness Collection by Sushma Hegde. This beautiful collection features an array of floral and nature-inspired images that can be used in a number of ways.


My first card features the Birthday Bouquet Clear Stamp Set along with the Fluted Classics Ovals Etched Dies, and the Mini Sincere Sentiments Glimmer Hot Foil Plate. I wanted to create the look of a loose watercoloured painting on my card front and this set was simply perfect for it. The stamp set has so many beautiful possibilities and I was very excited to play with it!

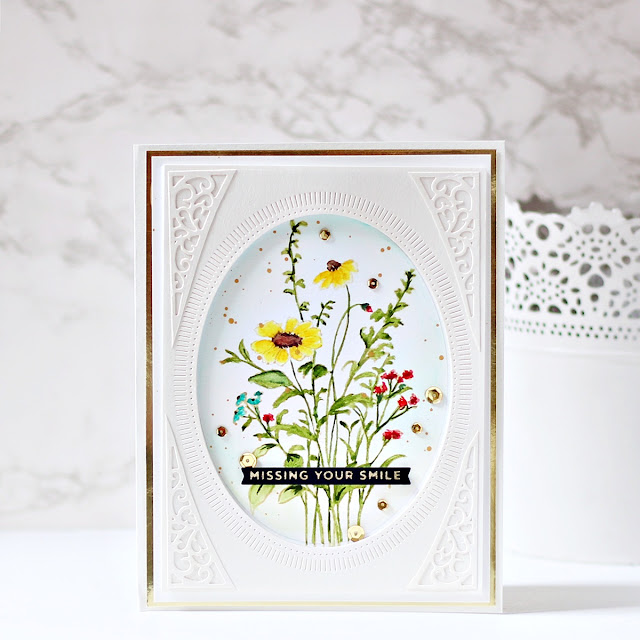
To create my card, I started by stamping the floral bouquet from the Birthday Bouquet Clear Stamp Set in Antique Linen Distress ink onto a piece of Canson Montval Watercolour Paper. The colouring was quite simple from there - I used my Watercolors Set Neutrals Set to apply the darkest shade in the center of the image, then pulled the color out a bit with the lighter shade, and then pulled the lighter shade out to the edges with a clean water brush. Once the image was completely dry, I went in and added some highlights to the images using Zig Markers. I wanted the flowers and the overall look of the card to be softer, so I avoided stamping with black ink. 

Once my colouring was finished, I applied a thin line of blueberry paint around the entire image and drug the color out loosely with water for a soft, watercolored background. I then flicked some gold metallic paint on my panel using a paint brush for a fun splatter effect. Next, I die cut Alabaster Cardstock using the Large Oval Outer Rim, Insert, and Inner Rim Dies from the Fluted Classics Ovals Etched Dies. Then, I die cut Alabaster Cardstock using the Outer Die from the Enchantment Tall Flip and Gatefold Card Die Set. I snipped-off the four corners of the die cut piece and adhered them down on my panel using the Bearly Art Original Precision Craft Glue

 Next, I used Gold Hot Foil to foil Onyx Cardstock using one of the sentiments from the Mini Sincere Sentiments Glimmer Hot Foil Plate and cut it out using the coordinating die. I adhered the piece onto my panel using foam squares for a raised effect. Then, to complete, I mat my background panel with Mirror Gold Cardstock before adhering it to a side-folding white card base with tape runner. I finished the design with some sparkling gold sequins around the bouquet to embellish.


My next card features the Layered Anemones Clear Stamp Set. I paired it with the Diamond Floral Frame Glimmer Hot Foil Plate & Die Set and one of the sentiments from the Birthday Bouquet Clear Stamp Set to create this soft watercolour card. 

To make my card, I stamped the layered flower images from the Layered Anemones Clear Stamp Set on to Snowdrift Cardstock using Frayed Burlap Distress Oxide ink and Rusty Hinge Distress Oxide ink for the blooms and Frayed Burlap Distress Oxide ink for the flower centres. Next, I stamped the Bud D with stem stamp images on to Snowdrift Cardstock using Worn Lipstick Distress Oxide ink and Frayed Burlap Distress Oxide ink. Then, I die cut Snowdrift Cardstock using the 3 Leaf Frond die from the Diamond Floral Frame Glimmer Hot Foil Plate & Die Set. I watercolored the pieces using Watercolors Set Neutrals Set and added some highlights with Prisamacolor Pencils for depth. Next, I fussy-cut the stamped pieces with a pair of scissors, leaving a small white border around the images.

Once that was done, I trimmed a piece of Snowdrift Cardstock to size and added a light watercolour wash to the panel using the Jane Davenport Watercolour Set - Brights. I applied colours from the Watercolour Set to the wet area using a Waterbrush Pen in a dabbing motion, allowing the colors to mix slightly.  Once dry, I stamped the sentiment from the Birthday Bouquet Clear Stamp Set on top of the watercolor background using Versafine Onyx Black ink. Next, I added some metallic gold paint splatters to the background using the leftover paint from my palette.

I die cut Mirror Gold Cardstock and White Foam using the Outer and Inner Diamond Dies included in the Diamond Floral Frame Glimmer Hot Foil Plate & Die Set to create a frame for my card front. I adhered it down on to the background using the Bearly Art Original Precision Craft Glue and then arranged my flowers and leaves around the frame. Next, I die cut some additional foliage using the sprig die included in the Flourished Fleurit Die Set and tucked them in-between the floral arrangement for interest. The stamped and die-cut images were then adhered down using a combination of foam squares and Bearly Art Original Precision Craft Glue.  Next, I die cut Mirror Gold Cardstock using the Layer 1 Die from the Precision Layering A2 A Etched Dies and adhered it down using liquid adhesive to my background panel. I then matted the card panel with Snowdrift Cardstock and attached it to an top-folding pink card base made out of Pink Sand Cardstock using tape runner. I finished the card with a few sparkling gold sequins for some shimmer and shine.


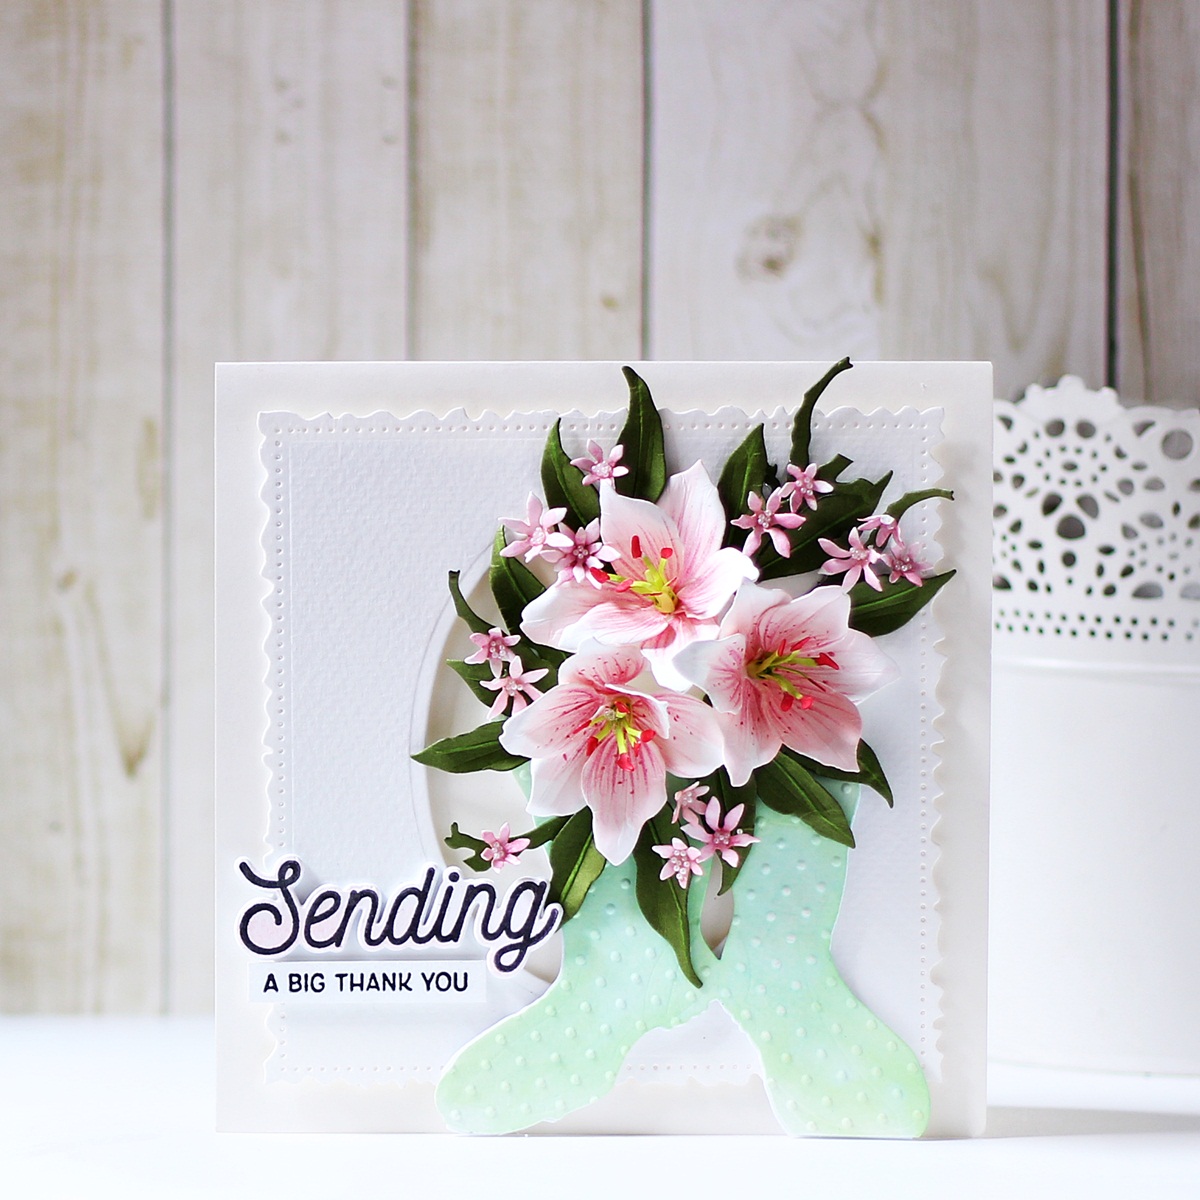
My last card for today features the Being Around You Wreath Clear Stamp Set, the Fluted Classics Circle Etched Dies, and the Fluted Classics Rectangle Etched Dies. This card would be simply perfect to send to a friend for a sweet springtime hello! 

To create my card, I started by adding a generous amount of water to a piece of Canson Montval Watercolor Paper, which I taped down onto a hard board as I wanted to watercolor the background. Next, I applied a few “shots” of Olive Green Color Burst powder onto it and set it aside to let it dry. I then flicked some gold metallic paint and black acrylic paint on my panel using a paint brush for a fun splatter effect. 

Once the panel had dried, it was time to begin stamping! I wanted the focus to be on the gorgeous Being Around You Wreath Clear Stamp Set, so I stamped the half-circle wreath image and the additional floral motifs in Versafine Onyx Black ink on to a piece of Snowdrift Cardstock to create the centrepiece for my card. Next, I coloured in the images using the Watercolors Set Neutrals Set and a water brush. I let the images dry and then went in and painted the centres of the flowers using Gold Metallic Paint for some shimmer and shine. Once that was done, I fussy-cut the images out with a pair of scissors. 

Next, I die cut Mirror Gold Cardstock and White Foam using the Medium and Small Inner Rim Dies included in the Fluted Classics Circle Etched Dies to create a frame for my card front. I then adhered them down using the Bearly Art Original Precision Craft Glue on my watercolored background. Next, I popped up the stamped images on the card front using foam squares for dimension. Then, I used Gold Hot Foil to foil Onyx Cardstock using one of the sentiments from the Mini Sincere Sentiments Glimmer Hot Foil Plate and cut it out using the coordinating die. I adhered the piece onto my panel using foam squares for a raised effect. Then, to complete, I die cut Alabaster Cardstock using the Large Rectangle Outer Rim and Inner Rim Dies from the Fluted Classics Ovals Etched Dies. Once that was done, I adhered it down on my card panel with Precision Craft Glue, matted the panel with some Mirror Gold Cardstock, and adhered it to a top-folding white card base with tape runner. Then, as a finishing touch, I adhered a few Prism AB Color Essentials Gems around my floral wreath. I love the beautiful iridescent sheen of the gems! 


SPELLBINDERS SUPPLIES:
CS-005, CS-024, CS-027, CS-030, SCS-118, SCS-160, SCS-171, GLF-014, GLP-253, GLP-288, STP-068, STP-075, STP-085, S4-1150, S5-474, S5-487,DOMAPG-FEB19, DOMAPG-OCT21, AD-0084, JD-043, JD-044, PCGO4E, PE-100, T-021, TD055990, TD056164, TD056362

OTHER SUPPLIES:
Neenah Solar White Cardstock, Canson Montval Watercolor Paper, Versafine Onyx Black Ink, Ken Oliver Colour Burst - Olive Green, Heat Tool, MISTI Stamping Tool, Black Acrylic Paint, Heidi Swapp Gold Lame Mist, Tape Runner.

That’s it for today’s post! I hope you enjoyed it and have been inspired to create with these gorgeous stamps from the Into The Wilderness Collection. Thank you so much for stopping by!
You can find more inspiration over at my Instagram page

Tuesday, January 18, 2022

Spellbinders Guest Design Post | Precision Layering Basics Collection

Hello, crafty friends!
 I’m so thrilled to be guest designing on the Spellbinders blog using the new Precision Layering Basics Collection. Basic nesting dies are a staple in every crafter's stash and there are so many things one can do with them. The dies in the Precision Layering Basics Collection are designed to cut perfectly spaced layers of 1/8-inch, and when combined with the B Sets, help you achieve a 1/16-inch border. This means no more measuring, as the work is done for you. I used the various dies in this collection to create three easy and fun cards for a variety of occasions. 


My first card features the Precision Layering A2 A Etched DiesPrecision Layering A2 B Etched Dies, and the Precision Layering Mini Slimline A Etched DiesPrecision Layering Mini Slimline B Etched Dies. I kept this card simple to go with the modern look of the die set. I used various colors of cardstock from my stash to make the colour block background and adhered bunches of pink and blue flowers around the sentiment.

To create my card, I first cut Snowdrift, Pink Sand, and Brushed Silver Cardstock using different layering dies from the Precision Layering A2 A Etched Die Set and arranged the pieces together to create my background. This is a great technique to use existing scraps in your stash and utilizing them for creating card backgrounds! Next, I die cut Brush Gold Cardstock using the Layer 1 Die from the Precision Layering A2 A Etched Dies and adhered it down using liquid adhesive to my background panel. I then matted the card panel with Pink Sand Cardstock and attached it to an top-folding white card base using tape runner. 

Next, I die cut Brush Gold Cardstock and White Fun Foam using the Layer 3 and Layer 4 Dies from the Precision Layering Mini Slimline A Etched Dies to create a die cut frame for my card front. I used two different nesting dies to create the frame, but you can stick to one if you'd like. I adhered the pieces one on top of the other using liquid adhesive

Next, I die cut Snowdrift Cardstock using various flowers and foliage dies from the Mini Blooms and Sprigs Etched Dies and Layered Blooms Etched Dies. I coloured the die cut pieces using Jane Davenport's Watercolour Brush Markers and then foam-mounted them to the panel for dimension. Once that was done, I used Gold Hot Foil to foil Onyx Cardstock using one of the sentiments from the Mini Sincere Sentiments Glimmer Hot Foil Plate and cut it out using the coordinating die. Then, to finish, I adhered the pieces onto my panel using foam tape for a raised effect. 


My second card features the Precision Layering Mini Slimline A Etched DiesPrecision Layering Mini Slimline B Etched Dies, and the Primrose Heart Façade Etched Dies. I have long been a fan of Slimline cards, so I was absolutely thrilled to know that Spellbinders now offers Mini Slimline dies as well. These are such a fun alternative to standard A2-sized cards and I love working with this size. The idea for this card was to create a floral design on a dark background, surrounding a foiled sentiment frame and the Precision Layering Mini Slimline A Etched Dies made it such a breeze to create my card design. 

To create my card, I first die cut Brush Gold Cardstock using the Layer 1 Die from the Precision Layering Mini Slimline A Etched Dies to create a die-cut frame for my card front. Next, I die cut Navy Blue Cardstock using the coordinating Layer 2 Die from the Precision Layering Mini Slimline B Etched Dies. Then, I die cut Brush Gold Cardstock using the the Layer 4 Die from the Precision Layering Mini Slimline A Etched Dies. I adhered the layers together using liquid adhesive to create my background panel.

Next, I die-cut Snowdrift Cardstock using various flower and foliage dies from the Mini Blooms and Sprigs Etched Dies and Layered Blooms Etched Dies. I used a combination of Jane Davenport's Watercolour Brush Markers and Copic Markers to colour and shade the die-cut pieces, but you can also cut out the pieces from colored cardstock and assemble them together, or use any colouring medium of your choice. 

Next, I die cut Brush Gold and Snowdrift Cardstock using the Layer 11 Dies from the Precision Layering Mini Slimline A Etched Dies and Precision Layering Mini Slimline B Etched Dies. I stamped my sentiment from the All Occasion Sentiments Stamp and Die Set in Versafine Onyx Black ink and adhered the layers together using liquid glue and then foam-mounted them to the panel for dimension. Then, to finish, I attached my card background to an top-folding navy card base using tape runner. I really liked working with a dark background for this card, I think it helps the pale pink and coral flowers pop. 


My final card for today features the Precision Layering A2 A Etched DiesPrecision Layering A2 B Etched Dies, and the Butterfly Bliss Garden Shutters 5 x 7" Card Base Etched Dies. I love stretching my supplies to get more out of them and the background for this card was so fun to create using just nesting dies. With a few butterflies and a big, pretty sentiment, this card came together easily.

To make my card, I first die cut a piece of Brush Gold Cardstock using the Layer 1 Die from the Precision Layering A2 B Etched Dies and Snowdrift Cardstock using the coordinating Layer 2 Die from the Precision Layering A2 A Etched Dies. I mat the white panel with the foiled card panel using tape runner and then attached it to a top-folding white card base made from Snowdrift Cardstock.

Next, I die cut Snowdrift and Gold Glitter Cardstock using various nesting dies included in the Precision Layering A2 A Etched Dies. I coloured the pieces using Copic markers, but you can use Distress Oxides or inks as well if you like. Next, I assembled the pieces down on my panel and adhered them using liquid adhesive. I trimmed the overhanging pieces using a paper trimmer and used the leftover die-cut pieces on the other side of the panel to create a continuous background design. This is a great technique to get more out of your basic shape dies. One can create a multitude of die cut or embossed background for your cards using simple techniques like such. 

Then, to embellish my card, front I die cut Snowdrift Cardstock using the butterfly dies from the Butterfly Bliss Garden Shutters 5 x 7" Card Base Etched Die Set. I used Copic Markers to colour and shade the die-cut pieces, but you can also cut out the pieces from colored cardstock and assemble them together. I also die cut the body of the butterflies from Gold Glitter Cardstock for interest. Next, I stamped the sentiment from Sending You stamp set in Versafine Onyx Black ink onto Snowdrift Cardstock and cut out with one of the coordinating dies. I popped in on to my panel using foam adhesive for dimension. Once that was done, I stamped the accompanying sentiment from the same stamp set on to a strip of Snowdrift Cardstock using Versafine Onyx Black ink and popped it on to my panel using foam adhesive too. I really love how easy and fun this was to make!


SPELLBINDERS SUPPLIES:
CS-005, CS-024, CS-027, CS-030, SCS-116,  SCS-160, SDS-166, SDS-167, S2-314, S4-1091, S4-1158, S4-1166,  S5-484, S5-487, S5-494, S6-183, CSOM-OCT21, GLF-014, GLP-288, GLS-003CW, JD-041, PCGO4E, PE-100, T-021

OTHER SUPPLIES:
Neenah Solar White Cardstock, Navy Blue Cardstock, Copic Markers, Versafine Onyx Black Ink, MISTI Stamping Tool, Tape Runner, Foam Adhesive, Gold Glitter Cardstock.

I hope you enjoyed this trio of floral cards featuring the Precision Layering Basics Collection. The dies in the collection are truly versatile and would be a great addition to your craft room! Thank you so much for stopping by today! You can find more inspiration over at my Instagram page

Friday, December 10, 2021

Spellbinders Cardmaker II Collection | Guest Post


Hello, crafty friends!
 I’m so thrilled to be guest designing on the Spellbinders blog using the new Cardmaker II Stamp Collection. The beautifully illustrated images in this collection inspired me to create three easy and fun cards for a variety of occasions. 


My first project features the Love Never Fails Stamp Set and the New Start Stamp Set. I fell in love with the floral images in the Love Never Fails Stamp Set and had to use them right away for my Slimline Card. This set comprises of 20 clear photopolymer stamps and one can create a wonderful bouquet of flowers to a field of blooms using it. It's very versatile!

To create my card, I first stamped the various images from the Love Never Fails onto Snowdrift Cardstock using Pink Diamond and Rubellite inks for the blooms and Bamboo and Fresh Leaf inks for the leaves and foliage. Once I had all my images stamped, I fussy-cut them out using a pair of scissors. 

Next, I stamped the butterflies from the New Start Stamp Set using Versamark Embossing ink onto Snowdrift Cardstock and used the Journey Gold Embossing Powder to heat-emboss the images with the help of a Heat Tool. I coloured the wings of the butterflies using the Jane Davenport Mermaid Markers and fussy-cut the images using  a pair of scissors, leaving a small white border. Then, I die cut Vellum using the Circle 2 Die from the Nestabilities Hemstitch Circles Etched Dies. Once that was done, I die cut Snowdrift Cardstock using the Medium Circle Outer Rim, Insert, and Inner Rim Dies from the Fluted Classics Circle Etched Dies

Next, I die cut Snowdrift Cardstock using the Large Rectangle Rim and Insert Dies from the the Hemstitch Slimline Etched Dies and embossed the panel using the Diagonal Stripes Slimline Embossing Folder. I then flicked some Gold and Black Acrylic Paint on my panel using a paint brush for a fun splatter effect. 

Then to assemble my card, I adhered the stamped and die cut images down on my panel using foam adhesive for dimension. The butterflies were adhered down in the centre of the panel using Liquid Glue and I added some pink rhinestones to the body for interest. Next, I used Gold Hot Foil to foil Onyx Cardstock using one of the sentiments from the Mini Sincere Sentiments Glimmer Hot Foil Plate and cut it out using the coordinating die. I adhered the piece onto my panel using foam tape for a raised effect. Then, to complete, I mat my background panel with Pink Sand Cardstock before adhering it to a side-folding white card base measuring 3.5″ x 8.5″ with tape runner.


My next card features the Embroidery Flowers Clear Stamp Set. The beautiful flowers and leaves in the set can be used for so many different occasions. I combined them with the Essential Duo Lines Glimmer Squares and added them to an embossed background for this bright and cheery card.

To create my card, I first stamped the floral images from the Embroidery Flowers Clear Stamp Set onto Snowdrift Cardstock using Velvet ink. Next, I stamped the various leaf and foliage images from the Love Never Fails and Embroidery Flowers Stamp Sets onto Snowdrift Cardstock using Hazelnut ink. Once I had all my images stamped, I fussy-cut them out using a pair of scissors, leaving a tiny white border. 

Next, to create the diamond frames for the centre of my card, I die cut Snowdrift Cardstock using the Large Square Outer Rim and Insert Dies from the Fluted Classics Square Etched Dies. I then applied Gold Hot Foil to the die-cut piece using the Square Two Glimmer Plate from the Essential Duo Lines Glimmer Squares Glimmer Hot Foil Plate. Next, I die cut Snowdrift Cardstock using the Small Square Die from the Fluted Classics Square Etched Dies and applied Gold Hot Foil to the die-cut piece using the Square Six Glimmer Plate from the Essential Duo Lines Glimmer Squares Glimmer Hot Foil Plate. Then, to create my sentiment panel, I die cut Snowdrift Cardstock using the coordinating Small Square Die from the Fluted Classics Square Etched Dies and stamped a sentiment from the Embroidery Flowers Set using Versafine Onyx Black ink.

Once that was done, I trimmed a piece of Snowdrift Cardstock to size and embossed the card panel using the Scallops Embossing Folder. I really love the subtle texture it adds to the background! Next, I adhered down the foiled frames, the sentiment piece, and my floral arrangement to my panel using a combination of foam adhesive and Liquid Glue. All that was left to do now was to mat my card background using Mirror Gold Cardstock before adhering it down to a top-folding white card base with tape runner.


My last card for today features the Embroidery Flowers Clear Stamp Set again. I adhered a couple of die cut pieces around the sweet stamped image for an encouragement card.

This one was very simple and straight-forward to put together. To begin, I stamped the floral image from the Embroidery Flowers Set onto Snowdrift Cardstock using Volcano Lake ink. Next, I masked the image with a Post-It Note and stamped the leaf and foliage images from the stamp set using Olive ink. Then, I stamped the smallest flower to the right using Mountain Mist ink. 

Next, I die cut the image using the Large Oval Insert Outer Rim and Insert Dies from the Fluted Classics Ovals Die Set. Then, I centered my Glimmer Plate and applied Gold Hot Foil to my piece using the Oval Three Plate from the Essential Duo Lines Glimmer Ovals Glimmer Hot Foil Plate.

Next, I used the Circular Stitch Outline die to cut the background panel out of Snowdrift Cardstock. Then, to add some visual interest, I die cut the Large Rectangle Outer Rim and Insert Die together from the Fluted Classics Rectangles Etched Dies out of Snowdrift Cardstock. I affixed the panels together using Liquid Glue and adhered down my stamped piece on it using foam adhesive for dimension.   Next, I applied Gold Hot Foil to Onyx Cardstock using one of the sentiments from the Mini Sincere Sentiments Glimmer Hot Foil Plate and cut it out using the coordinating die. I adhered the piece onto my panel using foam tape for a raised effect. I then added a spray of blue rhinestones to embellish my panel. Finally, to complete, I mat my background panel with Waterfall Cardstock before adhering it to a top-folding white card base with tape runner. 


OTHER SUPPLIES:
Neenah Solar White Cardstock, Versafine Onyx Black Ink, Versamark Embossing Ink, Heat Tool, MISTI Stamping Tool, Tape Runner, Foam Adhesive, Heidi Swapp Color Shine Spray- Lame Gold, Camlin Artist Acrylic Colour Tube - Black 016, Paintbrush, Crystal Jewels, Rhinestones, White Fun Foam Sheets

I hope you enjoyed this set of stamped floral cards featuring the Cardmaker II Stamp Collection and are inspired to give it a try. Thank you so much for stopping by today!

You can find more inspiration over at my Instagram page

Thursday, October 21, 2021

Spellbinders Susan's Garden Club Collection


Hello everyone!
I am back today to share a couple of cards featuring dies from the NEW Susan's Garden Club by Spellbinders. This is an exquisite collection comprising a variety of realistic florals which will help you add classic garden blooms into your creations. If you're a botanist or a flower enthusiast, you will certainly enjoy creating with the dies in this collection!


I think all flowers are beautiful, but there is something about a rose that makes it a prize to receive, to grow and to create using paper. My first card HAD to feature them in one of my all-time favorite colors - Pink! The tea pot and the lovely foliage made designing this card so much easy and fun!

To create my card, I first die cut Susan's Specialty Cardstock using the flower dies from the Hybrid Tea Rose and Tea Pot Die Set using my Spellbinders Platinum 6" Machine. I die cut quite a number of pieces, as I wanted to create a bunch of four flowers in total for my card. I coloured the die cut pieces using watercolor half-pans in the shades - Cotton Candy and Coral Berry and shaped the petals using the loop tool and tweezers from Susan’s Garden Ultimate Tool Kit. Next, I die cut Fern Cardstock using the leaf and fern dies from the Hybrid Tea Rose and Tea Pot Die Set and Ferns & Ivy Etched Dies. I added striations and veins to the die cut pieces using the leaf tool from Susan’s Garden Ultimate Tool Kit and blended Aged Mahogany Distress Oxide around the centres using a sponge dauber for interest. 

Next, I die cut Watercolor Sheets and Brush Gold Cardstock using the teapot die included in the Hybrid Tea Rose and Tea Pot Die Set. I watercoloured the piece using Mountain Mist paint and adhered the gold die cut pieces along the bottom of the teapot and the handle. Once that was done, I went ahead and die cut Snowdrift Cardstock and Brush Gold Cardstock using the mosaic pattern die from the Mosaic Bracket Card Builder Etched Dies and slightly offset the two pieces to create an illusion of depth. I adhered it to my card panel using foam adhesive and then assembled the rest of the card together. I then stamped the sentiment from the Sending You Stamp Set onto Snowdrift Cardstock using Versafine Onyx Black Ink and then die cut out the images using the coordinating dies. I popped them on to my card panel using foam tape for dimension.

 I matted my card panel to Pink Sand Cardstock and adhered it to a side-folding white square card base with tape runner. Then, to finish, I added a row of white pearls to the bottom of the tea cup and around my background panel, which were coloured using a Sharpie Metallic Marker in Gold. 


To begin, I die cut Susan's Specialty Cardstock using the flower dies from the Cactus Dahlia and Ornamental Garden Pottery Die Set using my Spellbinders Platinum 6" Machine. I die cut a large number of petals to help me create three large and a couple of other smaller flowers. I love Pink Dahlias, so I tried to create them using paper on my card here. I coloured the pieces using watercolor half-pans in Rubellite, Coral Berry, and Cotton Candy, and shaped the petals using the loop tool and tweezers from Susan’s Garden Ultimate Tool Kit. Next, I die cut Fern Cardstock using the leaf, fern, and ivy dies included in the Cactus Dahlia and Ornamental Garden Pottery Die Set and Ferns & Ivy Etched Dies. I added striations and veins to the die cut pieces using the leaf tool from Susan’s Garden Ultimate Tool Kit and blended Aged Mahogany Distress Oxide to the centres using a sponge dauber. I must also mention here that I have followed Susan's method of colouring and shaping the flowers as demonstrated in her videos on the Spellbinders YouTube channel, so if you would like to learn how to create such realistic-looking flowers, I highly recommend following her videos. 

Next, I trimmed a piece of patterned paper from Papericious's The Date Night Collection to a 5.75" square, mat it to a panel of Brushed Silver Cardstock, and then adhered it to a top-folding white square card base with tape runner. Next, I die cut Portobello Cardstock using the Pottery Die from the Cactus Dahlia and Ornamental Garden Pottery Die Set. I blended Aged Mahogany Distress Ink around the edges of the die-cut to add dimension. I popped the blooms, foliage, and the pot on to my card panel using a mix of liquid adhesive and foam squares.

 The sentiment from the Sending You Stamp Set was stamped on to Snowdrift Cardstock using Versafine Onyx Black Ink and then die cut out using the coordinating die. I trimmed out the secondary part of the sentiment 'Lots of Love' using my scissors and popped the pieces to my card background using foam adhesive. Then, to complete my design, I adhered a few Crystal Clear Droplets in varying sizes. 


Moving on to my third card for the day, which features the Geranium and Antique Wooden Bucket Die Set and the Ferns & Ivy Etched Dies. I decided to incorporate some stenciling on this card for texture and dimension. 

For my card, I first die cut Susan's Specialty Cardstock using the flower dies from the Geranium and Antique Wooden Bucket Die Set using my Spellbinders Platinum 6" Machine. I die cut quite a large number of flowers, since I wanted to create a bucket overflowing with handmade flowers. I blended two shades of orange (Sunkissed and Orange Cream) to colour the die cut pieces and shaped the petals using the loop tool and tweezers from Susan’s Garden Ultimate Tool Kit. I added White Micro Pearl Beads to the centres of each flower for interest and kept them aside to work on my other card elements.

Next, I die cut Fern Cardstock using the leaf and ivy dies included in the Geranium and Antique Wooden Bucket Die Set and Ferns & Ivy Etched Dies. I added striations and veins to the die cut pieces using the leaf tool from Susan’s Garden Ultimate Tool Kit and blended Aged Mahogany Distress Oxide around the edges of the pieces using a sponge dauber for definition. Next, I die cut Graphite Cardstock using the Antique Wooden Bucket Die from the Geranium and Antique Wooden Bucket Die Set. I also die cut Silver Mirror Cardstock using the Bucket Bail Die and Timber Cardstock using the Bucket Bail Handle Die. I assembled the piece together using liquid adhesive and kept it aside to work on my stenciled background. 

Next, I secured the Cubist Cube Stencil on a sheet of Watercolor Paper to stencil over the background using Modelling Paste mixed with Silver Lake ink. Once the panel was dry, I lightly watercolored the bottom of it with Paper Bag Ink as a way to ground the images. I also watercolored the upper two-thirds of the panel using Mountain Mist ink to help bring the colours together. I then adhered the geraniums and the bucket together on my stenciled card background using a mix of liquid adhesive and foam tape. The sentiment was stamped using Versafine Onyx Black onto a panel of Snowdrift Cardstock and then cut out using a Mini Tag Die. I matted my card background to a custom-colored panel, which was watercolored using Sunkissed and Orange Cream inks, and then adhered it to a top-folding white card base with tape runner. 


My last card for today features the Oriental Lily and Wellies Die Set, Kerria Japonica Etched Dies, Shapeabilities Vintage Stitched Squares Etched Dies, and the Sending You Stamp & Die Set. The cute rain boots included in the Oriental Lily and Wellies Die Set are very hard to resist, so I combined it with a bouquet of handmade lilies blooms for a cheerful thank you card.

To create my card, I first die cut Susan's Specialty Cardstock using the flower dies from the Oriental Lily and Wellies Die Set using my Spellbinders Platinum 6" Machine. I die cut a sizable number of petals to help me create three flowers for my card. I colored the centre of the petals using Pink Diamond and Cotton Candy watercolor half-pans and shaped the petals using the loop tool and tweezers from Susan’s Garden Ultimate Tool Kit. The tips of the stamens were coloured using Festive Berries Distress ink, while the base was coloured using Twisted Citron Distress ink. I also added some dot and line details with Alcohol Markers on the petals to help make the lilies look very realistic. 

Next, I die cut Fern Cardstock using the leaf and branch dies included in the Oriental Lily and Wellies Die Set and Kerria Japonica Etched Dies. I added striations and veins to the die cut pieces using the leaf tool and small ball stylus from Susan’s Garden Ultimate Tool Kit. I also die cut Snowdrift Cardstock using the Medium and Small Flower dies included in the Kerria Japonica Etched Die Set. I coloured the pieces using the Cotton Candy Paint Pan and shaped the petals using the loop tool and tweezers from Susan’s Garden Ultimate Tool Kit. I added White Micro Pearl Beads to the centres of each flower for interest and kept them aside to work on my other card elements.

I die cut Watercolor Paper using the Wellies die included in the Oriental Lily and Wellies Die Set. I watercolored the piece using Frayed Leaf and Mountain Mist half-pans and then embossed the panel using the Swiss Dots Embossing Folder. Next, I die cut Watercolor Paper using the Square 2 Die in the Shapeabilities Vintage Stitched Squares Etched Dies. Then, I cut an aperture in the centre of the panel using the Nestabilities Classic Ovals (Large) Etched Dies. Next, I stamped my sentiment from the Sending You Stamp Set on to Snowdrift Cardstock using Versafine Onyx Black Ink and then cut it out using the coordinating die. I trimmed out the secondary part of the sentiment 'A Big Thank You' using my scissors and popped the pieces to my card background using foam adhesive. I lightly inked the die cut sentiment using Cotton Candy ink for interest. 

The card panel was foam mounted to a top-folding white square card base for dimension. I assembled the wellies, the lilies, and the sentiment on my die cut panel and popped them to my panel using foam adhesive. Then, to finish, I popped the sentiment strip up on the bottom of the card with foam adhesive.


I hope you enjoyed this set of floral cards and thank you so much for stopping by today. Be sure to check out the Susan's Garden Club Collection on the Spellbinders website for more inspiration and details! The possibilities are truly endless!


If you like what you've seen from me, please give me a follow over on my Instagram (@hussena_cal) and/or subscribe to my blog if you haven't already.