Thursday, April 25, 2019

Altenew April 2019 Washi Tape/Embossing Paste Release Blog Hop + Giveaway


Hello, crafty friends!
I am so excited and honoured to be joining Altenew for their NEW April 2019 Washi Tape/Embossing Paste Release Blog Hop! Today we are showcasing the new Washi Tapes and Embossing Paste from Altenew. If you arrived here from the talented Erum Tasneem's blog, then you are on the right track. If you arrived here on your own, then you will want to start at the beginning, the Altenew Card Blog so that you don’t miss a thing! Join the inspirational blog hop for lots of giveaways and for taking a closer look at the new products.

I have made 3 projects today featuring the new products. Without further ado, let's get started!


To make this card, I started by creating a stenciled background using the Altenew Embossing Paste and Beveled Squares Stencil. Next, I die cut a heart shape from the middle of this panel. Then, on another card panel, I adhered the Gold String Washi Tape. This Washi Tape design is so elegant and classic, that I felt I had to create a monochromatic card in shades of white and gold, in order to highlight its beauty!

I adhered the panel with the Washi Tape on my card base, and then adhered the stenciled panel on top of it. Next, I started working on the focal of my card. I used the Rose Flurries 3D Die Set to die cut the roses and leaves from gold mirror cardstock, vellum, and white cardstock. I layered them together to create some beautiful roses and arranged them on my card panel. I really liked the look of the roses against the stenciled background and felt it gave an elegant touch to the card. 

The Altenew Embossing Paste is super creamy in texture and was an absolute delight to work with! It has such a wonderful consistency to it and is really moist and good to use. Here is a shot showing you the stenciled background closely.

I used the Altenew Celebrations Stamp set for the sentiment. It was heat embossed using Super Fine Gold Glitter Powder. I also added a panel with gold mirror cardstock behind my stenciled panel to bring all the elements together. And this was done!


My second card features the Botanical Rhapsody Washi Tape, Golden Trim Washi Tape, Halftone Stencil, and Embossing Paste.

If you have not yet seen the Botanical Rhapsody Washi Tape, you must! It's such a gorgeous Washi Tape and the width of this tape is really mind blowing! I adhered this Washi Tape to a piece of white cardstock, so that I could colour the flowers and leaves using the Altenew Artist Markers (Set A). Once they were coloured, I fussy cut them out and popped them on my card panel using foam dots.

I wanted to add some subtle texture to my card panel, so I used the Altenew Halftone Stencil and Embossing Paste to stencil my background. I mixed the Embossing paste with  the Volcano Lake dye ink to get a nice blue colour. 

The sentiment was heat embossed in white on a strip of black cardstock. I added a strip of the Golden Trim Washi Tape on it to accentuate the look. Finally, I added some patterned paper behind my card panel, and my card was done!


My third and final card features the Teal Shadow Washi Tape, Misty Meadows Washi Tape, Dotted Washi TapeGolden Trim Washi TapeLeaf Burst Stencil, and Embossing Paste.

This card has a Washi overload! :D To create it, I started by fussy cutting the flowers from the Teal Shadow Washi Tape, and the leaves from the Misty Meadows Washi Tape. I adhered both these Washi Tapes to pieces of white cardstock before fussy cutting them so that it would give it some thickness and make fussy cutting the elements easier. I also added a touch of stenciling to the background using the Leaf Burst Stencil and Embossing Paste

I then added a strip of the Dotted Washi Tape and the Golden Trim Washi Tape to the left of my card to help balance the card design. I also added a gold heat embossed sentiment strip over the florals.

I added a light blue watercolor wash over the stenciled panel and few black ink splatters to complete my card. This one took some time to put together, but I am happy with the end result. Let me know what you think!

Prizes:
To celebrate this release, Altenew is giving away a $30 gift certificate to 6 lucky winners! Please leave a comment on the Altenew Card Blog and/or Altenew Scrapbook Blog by 5/1/2019 for a chance to win.

Additional Giveaway
Altenew will also draw a winner to receive a $15 gift certificate from the comments left on each designer’s blog on the blog hop list below. All winners will be announced on the Altenew Card Blog on 5/4/2019.


Blog Hop Order:
Next stop on this Blog Hop is Sandra Dietrich's blog.
Just in case you lose your place along the way, here is the complete list of participants so that you can find your way back:
                            Hussena Calcuttawala (You are HERE)

I hope you liked my cards! I would love to know what you think of them and if you have any favourites!
I appreciate you stopping by today. Have a great day ahead!

Friday, April 19, 2019

Spellbinders + Amazing Paper Grace Die of the Month | April 2019


Hello, friends!
It might seem that I am on a roll these days and it's actually true. I have been crafting almost every day this week, which is a first for me. Today, I'm happy to share a project which I have never tried making in the past. This is an interactive card made using the Amazing Paper Grace Die of the Month -  Elegant Swivel & Sashay Card Die Set. If you haven't seen Becca Feeken's project samples using it yet, you must check them out. Her cards are incredibly stunning!

Now, onto my card, using this die set. I chose pastel tones for this card so as to not take away the focus from the intricacy of the die cuts. If you are like me, and aren't very good at figuring out measurements yourself, but want to know how to assemble this card in an quick and easy way, do watch Becca's tutorial on YouTube. It will really help you with creating the basic structure of your card. Here is a look at my card:

I have used patterned papers from the DCWV Scripts and Music Notes Premium Stack for this card. As you can see, there is a lot of layering on this card! I have used almost all the dies from this die set to put my card together. The flowers and leaves have been cut from Foamiran sheets and lightly embossed to give it a 3D look. 

I have added some foliage and mulberry rose buds to complete the floral arrangement.  

This is how the Twist and Fold effect looks like once opened. Who wouldn't love to receive such a card with such beautiful die cuts? I have used the same Foamiran flower here too and added the die cut words 'Thank You' which were cut from Vellum and Gold Mirror Cardstock respectively.  

Another look at the Pop and Twist part of the card. The card folds flat and can be mailed, albeit you will need to add a magnet or a belly band to secure it. 

A look at the pop-up panels. I have used the same patterned papers throughout to maintain the continuity of the colour tones and design.


And here is how it looks once closed. It's a bit bulky because of the layers and, I think, I will add tiny magnets on the inside to help it fold flat. 

And here is a look at the die set from Spellbinders. So many dies are included in one set. I find it real value for money!
If you are still on the fence about the Amazing Paper Grace Die of the Month Membership, do check out the other project samples created using it on the Spellbinders blog. The dies are total value for money and the cost of the kit includes shipping cost within USA. Isn't that awesome?!

I hope you liked my card using it! If you did, please do leave a comment below letting me know.
Thank you so much for stopping by!
Have a great day ahead!

Thursday, April 18, 2019

Guest Post for Spellbinders | Vintage Treasures Collection by Amazing Paper Grace

Hello, friends!
 I am beyond thrilled and honoured to say, that I am a guest blogger on the Spellbinders blog. I am here to share five projects that I’ve made with the absolutely glorious, Vintage Treasures Collection by Becca Feeken. It’s an absolute joy to work with this collection - The die designs are so ingenious and make creating projects a breeze! I can't wait to show you my projects using this collection.

Vintage Treasures Collection by Becca Feeken brings classic circular motifs and elegant flourishes to life. A perfect addition to her other Spellbinders collections for making beautiful projects!

My first project is a Circle shaped Card made using the Tiffany Lavaliere Etched Dies, the Brillante Rondelle Etched Dies, and the Cinch and Go V Etched Dies.

I love creating shaped cards, and when I saw these particular dies in the collection, I knew I had to make one! To create my card, I first die cut the large circle from the Tiffany Lavaliere Etched Dies. Next, I embossed the circle using the inner rim die from the same collection to give my card some dimension. Once that was done, I die cut the intricate circle die from the Brillante Rondelle Etched Dies using gold mirror cardstock. I layered this circle with another intricate die cut which was cut from pale blue textured cardstock, and then finally added the label pattern and label rim die cuts. This card is all about layers and you may want to use a lesser number of die cuts if you don't want it to become bulky. 

I stamped my sentiment in the centre of the die cut and then started working on my embellishments. I used the Cinch and Go V Etched Dies to create my flowers and leaves. I die cut them from white cardstock and coloured the tips of the flowers using light pink dye ink. Once that was done, I embossed them using Embossing Ball Tools and added pollens to the centres of the flowers. The leaves were also die cut from white cardstock and coloured using green dye ink and slightly embossed. 

Here's a closer look at the floral arrangement. I also added some mulberry rose buds and filler flowers to compliment my handmade flowers.

And here's a look again at my finished card. 


This gift box was really lovely to put together! I wanted to make the Delicate Tendril Border Etched Dies the star of my project, and what better than using it as a framed border across a gift box! I die cut the border pattern and outer rim from white cardstock and gold mirror cardstock respectively and adhered them on top of the other to create an inlay effect. I think it looks really pretty and can be used in so many different ways!


For the lid, I used a variety of dies to embellish it. I first die cut the inner frame from the Nobel Chatelaine Etched Dies from gold mirror cardstock. Then, I used the inner frame from the Brillante Rondelle Etched Dies and die cut it from white cardstock. I also went ahead and stamped my sentiment in the centre of this die cut. I also added some delicate flourishes die cut from gold mirror cardstock on all four sides of the box. The flourish die is a part of the Delicate Tendril Border Etched Die Set.


The flowers are made using the Cinch and Go V Etched Dies. I used light yellow and peach Foamiran sheets to create them. The leaves are also die cut from Green Foamiran. I even added some glitter pollens and small daisy flowers to complete my floral bunch.


And here's how the sides of the bos look like. The gift box has quite a lot of space to include jewelry pieces, trinkets, chocolates, or even some special souvenirs in it. 


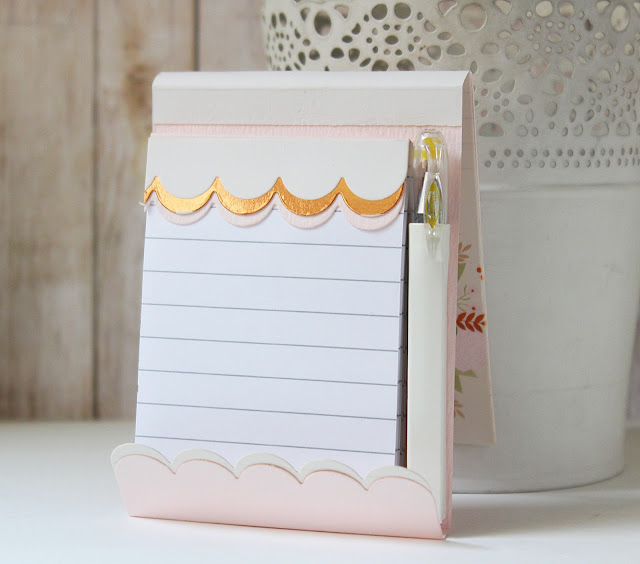
My third project is a lil' Note Pad Holder made using the Adorned Notepad Etched Dies. This is an ingenious die which allows you to create your very own notepad holders and is such a delight to work with!


To create this notepad, I followed THIS video tutorial from Becca Feeken to assemble it. This is really simple to put together and hardly takes time. Once I assembled the basic structure of the notepad, it was time to work on the embellishments. I matted gold mirror cardstock on the base, and then added another layer of patterned paper over it. I also used the inner frame from the Brillante Rondelle Etched Dies to further embellish it. I also added a little sentiment tab 'For My Record' inside the frame. I admit, I did go a bit overboard with gold mirror cardstock on this project as evident in the project photographs. :D

I wanted to keep the floral embellishments to a minimal and therefore only used the tiny flowers from the Adorned Notepad Etched Die Set. I die cut them from peach Foamiran sheets and added around four-five cream pollens to the centres. The leaves were hand cut from green Foamiran. The four corners are die cut using the accent piece included in the Marquise Diamond Pendant Etched Dies. I split the accent piece in half so that I could use them as corners. Another great way to get more out of your dies than their intended use!

I used gold mirror cardstock to create the pen holder and added a little pen inside it. I also added some additional scallops on the bottom to give it a more elegant look. I really love this die set and cannot wait to create more notepad holders using it. :)


My fourth project is again another Notepad Holder. I am obsessed with this die set and have already made three different notepads using it so far! Trust me, this is really addictive and you won't be able to stop at one.

I kept the colour tones for this project very soft and muted which is also my personal favourite! I used a gorgeous patterned paper to create the flap of the note pad holder. The patterned paper did all the work for me! I just added the die cut word' Notes'  and the sentiment sticker 'For the Record' to the notepad.

I die cut the word 'Notes' from pink and copper foil cardstock and slightly offset it. This word die is a part of the Adorned Notepad Etched Die Set.

Here's how the inside of the holder looks like.

I have added small magnets for the closure of my notepad. You may leave it as is if you don't want to use magnets. 


And my final project for today is a Card made using the Floral Tiara Topper Etched DiesBrillante Rondelle Etched Dies, and the Cinch and Go V Etched Dies.

I know, the colours look pretty faded out in the picture, but it is not so in real life.  I had a hard time capturing the real colours on this card.

For creating this card, I first started by die cutting the borders from the Floral Tiara Topper Etched Dies using light pink textured cardstock and gold mirror cardstock. While adhering them, I offset them a little so that it would add some interest to my card design. I did this twice so that the borders would serve as an elegant oval frame. I adhered them on the top and bottom of my card panel and then started working on the focal of my card.

I used the intricate frame die from Brillante Rondelle Etched Dies to die cut the center piece from cream cardstock. Once that was done, I stamped my sentiment on it. I used a pretty bold font so that it would bring focus to the card centre.

The flowers were made using the Cinch and Go V Etched Dies. I die cut them from pink cardstock, lightly embossed and shaped them, and added pollens to the centres to give them a fuller look. The leaves were die cut using the leaf die included in this set. I did not add any flowers fillers on this card and kept it fairly simple.

Spellbinders Supplies:

Other Supplies: Neenah Solar White 110 LB cardstock, Cream Linen Textured 12 x 12 Cardstock, Pale Pink Textured Cardstock, Pale Blue Textured Cardstock, American Crafts Colored 12×12 cardstock, Gold Mirror Cardstock, White Fun Foam; Adhesive: Scrapbook Adhesives 3D Foam Squares, Tombow Mono Multi Liquid Glue, Double Sided Foam Tape, Glue Gun; Stamps: Fun Stampers Journey Inside & Out Stamp Set, Altenew Faithful Feather Stamp Set; Foamiran Sheets (Light Yellow, Peach, Green, and Pink), McGill Inc. Paper Blossoms Tool kit, Pollens, Micro Rose Buds, Filler Flowers.

If you managed to bear with me till the end of this post, thank you! I hope you liked my creations. If you did, please let me know which one is your favourite! :) To see more of my work with Spellbinders products, do visit me on my Instagram or subscribe to my Blog.

Have a wonderful day ahead!

Monday, April 15, 2019

Spellbinders April 2019 Card Kit - Night Out


Hello there, everyone!
I have an exciting post to share today featuring the April Card Kit from Spellbinders. Incase, you are not aware about the Card Kits by Spellbinders or don't know how to subscribe to one, you can go over to the Spellbinders website and/or blog and read more about them HERE. This month's kit “Night Out”, like all other of their Card Kits, gives you everything you need to create 10 unique cards and even more. You now also get better goodies, including a 40 sheet paper pad, clear stamps, an adorable die set, tons of embellishments, and more!

I created FOUR Cards using this wonderful Card Kit, so without further ado, let's get started!

My first card is made using the Night Out Paper Pad, Night Out Foiled Foam Stickers, and the dies included in the Card Kit. I have also used the Fun Stampers Journey Love Stripes Embossing Folder to emboss the black cardstock panel. I used the Spellbinders Classic Ovals and Scalloped Ovals dies to die cut the scalloped oval out of Silver Foil Cardstock. 

The party dress was made using the dies included in the kit. I die cut the skirt from the Night Out Paper Pad and ruffled it a bit to give it a more feminine look. I also lined the bottom of the skirt using vellum to add some interest to it. The sentiment is a foam sticker from the Night Out Foiled Foam Stickers on which I have added some Clear Wink of Stella. The sequins are from my stash, but you can also use the silver sequins included with the Card Kit. 


My next card primarily uses the Night Out Die Cut Shapes Set. I mixed and matched several die cuts to come up with this fun card. Some of the die cut pieces were also pre-foiled which made it easier to add some glitz and glam to my card. :)

I also die cut the ends of the ribbon die to use as additional foliage behind my die cuts. I again used the Fun Stampers Journey Love Stripes Embossing Folder to add some depth to my card panel. I really love how the embossed panel adds a little something to the otherwise one-layer card front. 

The Card Kit provide you with enormous supplies to create a minimum of 10 cards and more. It's such a joy working with it and creating quick and easy cards using it!


My third card is my personal favourite! This card uses a variety of supplies and I am really happy with the way it turned out! To create this one, I started by adhering my choice of patterned paper from the Night Out Paper Pad to the card base. Then, I added another die cut panel over it which had an oval aperture in the centre. I stamped the dancing ballerina girl in the centre of the oval die cut using the Night Out Clear Stamp Set and Black ink. I used some tulle to make her skirt and also stamped another part of her skirt in the background. 

The flower is a foam sticker from the Night Out Foiled Foam Stickers. I really love the elegant look of it! I also added some foiled die cuts to this bunch.

And here is a closer look at the skirt. I added some white pearls to her skirt to make it look more fancy. The sentiment was created using a mix of die cuts and stamping. I added few clear sequins to complete my card. 


And finally, my fourth card is a fairly simple one made with the Night Out Foiled Foam Stickers and the Night Out Die Cut Shapes Set. The cake is a foam sticker which I have lightly coloured with Alcohol Markers. The butterfly and the sentiment banner are die cuts which I have adhered to my card base. 

I have also used two patterned papers from the Night Out Paper Pad. I really love the vibrant prints and colours in this pad!

Here is a closer look at the cake. It is seriously such a pretty sticker! I added a row of white pearls to it to add some glam to it.


Also, before you go, let me show you the contents of the Card kit. It is chock full of gorgeousness! I highly recommend checking it out. Here is a direct link for the April Card Kit of the Month. You get a set of 10 dies, a 6" X 6" paper pad with 40 sheets, a pack of 80+ die cuts, a pack of foam stickers, a stamp set, 7 sheets of 8.5" X 11" cardstock and more! 

Here is a video showing you the full unboxing of the kit by Spellbinders. Do watch this to have a more closer look at the kit contents. 


That's it from me today! I hope you liked my cards using the Spellbinders April Card Kit of the Month. If you have a favourite, please do let me know. I would love to hear from you! :)

Thank you so much for stopping by!
Have a great day ahead.