Saturday, September 30, 2017

Leading Lady | Post Four

Hello everyone,
Today is my final post as a Leading Lady this month on the Winnie and Walter blog. I am really honoured to have been given this opportunity and I had so much fun working with their old and new releases to create cards and other projects. Today, I have two cards to share and I've gone floral all the way :D


For my first card, I have used the flower from the In Bloom : Elsa's Flora set. I lightly coloured it using Peacock Feathers Distress ink and did my shading using Prismacolor pencils.

The leaves, berries and the entire foliage is also from the In Bloom: Elsa's Flora stamp set. I wanted to go with a monochromatic look by highlighting only the colour of the flowers against the grey background so I coloured my leaves and other foliage in grey. 

I also added a pop of colour here and there by adding the stamped and fussy-cut berries. If you see closely, I have also done some light yellow stenciling using the Do You See What I See Creative Screening.  The sentiment banner is from the The Big, the Bold and the Extras stamp and die set. I finished off the card by adding few black paint splatters and silver sequins. 


Moving on to my second and last project.

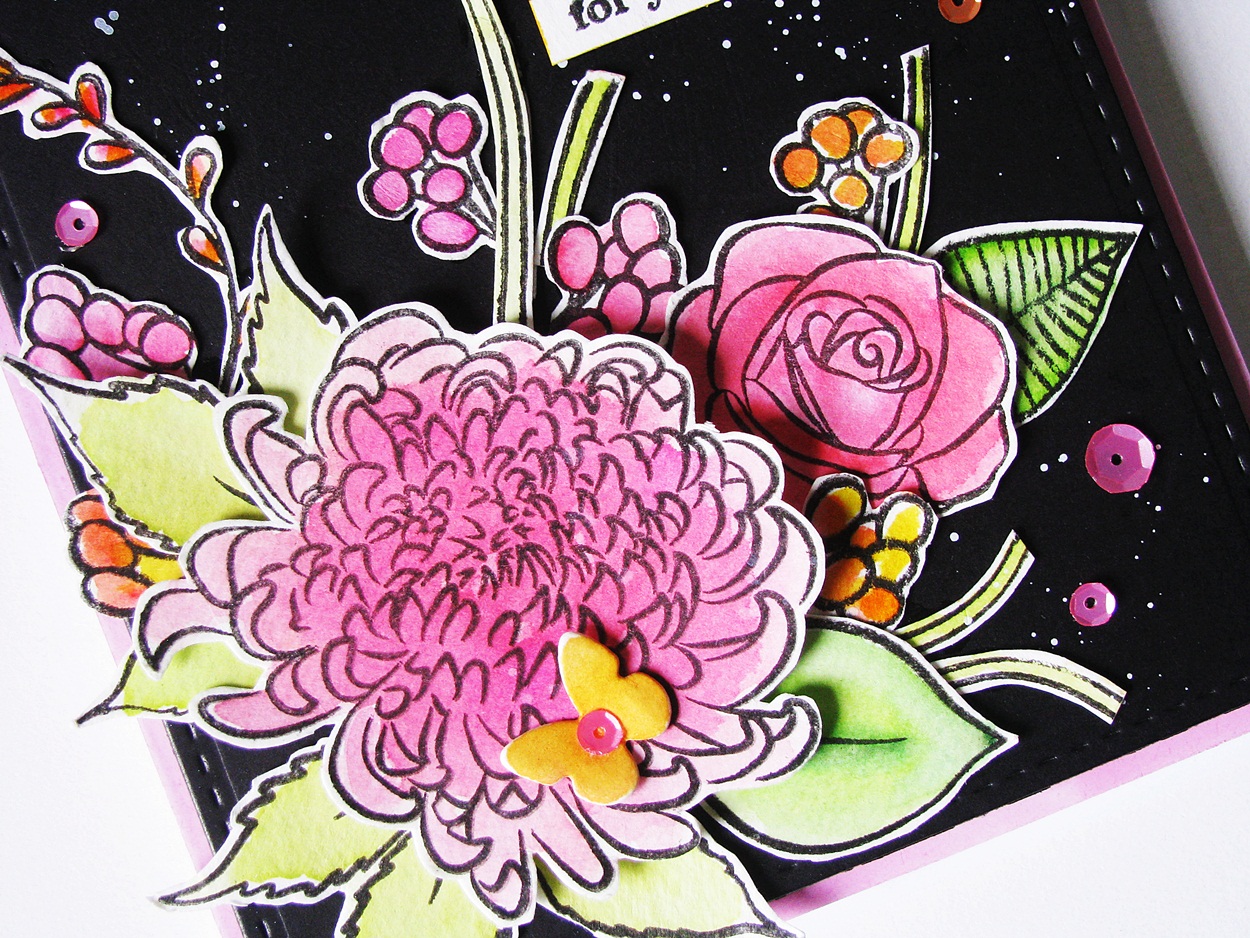
This card has a riot of things going on. Haha :) It's a rather full design and I tried to do something different. I love the way the colours pop against the black background!
I have used the flowers and leaves from the In Bloom: Anna's Flora and In Bloom: Renee's Leaves. I stamped the images on watercolour cardstock using Versafine Onyx Black ink and did loose watercolouring using various shades of Distress inks. I fussy-cut the images and have popped some using foam-dots while others are stuck directly on the card  panel.

For the sentiment, I have heat embossed the word 'thankful' from the Happiest of Holidays stamp set and the 'for your friendship'  is also from the same set. The butterflies have been die-cut using the Audrey's Cutaways die set and watercoloured. The sequins are from Pretty Pink Posh.

I added some white paint splatters to make the look more bold and dramatic :)

So with that, we come to an end to this post. I had a wonderful time sharing my projects and hope you liked them too. I would love to hear what you think of today's cards :)

Thank you so much for dropping by! I have a $30 gift card to give away to the w and w store.

Have a nice day everyone!

Saturday, September 23, 2017

Winnie & Walter Leading Lady | Post Three

Hello everyone,
Today's my third post as the Leading Lady this month and I have some gifting ideas to share at the w & w blog. I am sharing some gift tags and candy boxes today which were made mainly using two sets - Ring in the Celebration and In Bloom: Shirley's Blooms stamp and co-ordinating die sets. I have also used two of their older sets - The Big, the bold and Party and In Bloom : Hollie's Festive Florals along with their new release.


Here's a look at the tags first :


And here are the individual pictures :


To make these tags, I first stamped the different circles from the Ring in the Celebration stamp using a variety of dye inks and Versafine Onyx Black ink. I die cut the circles with their coordinating dies to not only form the base of my tags, but also to embellish them.
If you have a look at this set, you will find that it has many layering circles which fit into each other very beautifully. I took advantage of this fact to not only create frames and my centre images, but also for my sentiments.


On the floral tags, I have used a combination of the Ring in the Celebration stamp + coordinating die set, In Bloom : Shirley's Blooms stamp + coordinating die set and In Bloom : Hollies Festive Florals. The sentiments are from The Big, the Bold and Party set which were heat embossed with white embossing powder on a strip of black cardstock and foam mounted on the frames. I did have a lot of fun creating these and mixing and matching the various stamped images.

Next up I have a very fun way to use the Ring in the Celebration set to create candy boxes for either party favours or just for gifting.

Here's a look at them :


To make these boxes, I took a piece of white cardstock measuring 7 inches by 7 inches and stamped several of the smaller images from the Ring in the Celebration set using various colored dye inks. Then, using a Candy Box Punch Board I created the box. I die cut a window using the dies from the same set and added some acetate behind. I did a very light color wash using a watercolor brush and Distress inks.

I hope you enjoyed seeing what I have created and you find these ideas useful. I am definitely crushing on the Ring in the Celebration stamp and die set big time and definitely feel it's a very good buy :)

I would love to hear what you think of them. Don't forget to comment on my blog post for a chance to win the $30 gift certificate to the Winnie & Walter store. Winner will be announced on my blog, at the end of the month.


Have a nice day everyone!

Saturday, September 16, 2017

Winnie & Walter Leading Lady | Post 2

Hello everyone!
I am back with my second post at the w & w blog. Today I will be sharing cards I made using products from the new August release.


Again, I am starting out with a floral card first :
To make this card, I stamped and die-cut some flowers and leaves from the In Bloom: Shirley's Blooms stamp and die set. For the flowers, I have used two different colored dye inks for contrast between the inner and the outer petal. I also did some pencil shading using Prismas on the centres of the flowers.
I stamped the polka dot circles using stamps from the Ring in the Celebration set. I then die-cut the buds using the dies from Shirley's Blooms Cutaways.


To die-cut the frame, I first stamped the scalloped circle with Versafine Onyx Black ink and then die-cut it out using the coordinating dies from the Ring in the Celebration Cutaways.


I also die-cut a card panel using the largest rectangle scalloped frame die from the Audrey's Cutaways set. My background was created by randomly stamping the black rings from the Shirley's Blooms set. I also colored in these rings using Prismacolor pencils.  Finally I popped the flowers and leaves on foam dots. The sentiment is from an older set - The Big, the Bold and You.


For my second card I have created a fun shaker :)

I decided to work with some soft colours. I started by stamping my card panel with three tiny images from the Ring in the Celebration set. I used different shades of dye inks to stamp them.


The little cake in the centre of the card was stamped and die cut using the coordinating die from the same set. I also added two more stamped and die-cut circle frames, one with a sentiment around it and one a decorative frame. Both were popped on foam dots. The ribbon banner and the sentiment is again from a old set - The Big, the Bold and Extras. I finished off the card by adding a little bit of Clear Stickles to the stars, the cake and the centre of the gift bows.


I love how this came together really quick - the set is perfect for making birthday cards and pretty tags which I shall be sharing in my next post. The Ring in the Celebration set is really very versatile and I'm definitely going to be reaching for it soon.


I hope you liked my cards and are inspired to create your own. I would love to hear what you think of them. Don't forget to comment on my blog post for a chance to win a $30 gift certificate to the Winnie & Walter store. Winner will be announced on my blog, at the end of the month.


Have a great day ahead!

Saturday, September 9, 2017

Winnie and Walter | Leading Lady

Hello everyone,
I'm super excited to share that I am going to be the Leading Lady at Winnie & Walter for this whole month. It was such a sweet surprise when Shay invited me :)


I am sharing two cards today on the Winnie and Walter blog I made using some previously released stamp and die sets from w & w.

For my first card, I HAD to go with florals :) w & w has some of the most beautiful flower stamps, perfect for colouring and since watercolouring is so much in trend these days, these stamps worked perfectly for my design idea.


I stamped the flowers, leaves and the the little berries from the In Bloom : Anna's Flora, In Bloom : Elsa's Flora and In Bloom : Renee's Leaves stamp sets on some watercolour cardstock using Versafine Onyx Black ink and coloured them using my Zigs. I fussy-cut the images and kept them aside. My stenciling on the background was done with a very light hand using the w & w Creative Screening : Do You See What I See with Peacock Feathers Distress ink. I added some black acrylic paint splatters as I knew I was going to arrange my florals against them.


I popped up some flowers and leaves on foam dots and for few of the images, I directly adhered them to my card front. Finally I heat-embossed the sentiment from the The Big, Bold & Party using White embossing powder.


My second card which is very fun and perfect for a birthday party!

I have gone with the VIBGYOR colours on this one. To create this card, I first die-cut my card panel using the scalloped frame die from the w & w : Audrey's Cutaway die set. Then, I stamped the yummy cupcakes from the Sugar Rush stamp set using various shades of dye inks. I did some masking to give a clean and crisp look to the scalloped frame.

I then started working on the focal of my card. I used the Happy Cutaway and die-cut it using white cardstock and added some black cardstock behind the die-cut to give it a shadow effect. I coloured the white die-cut piece using various shades of Zig markers.
You can see the dimension on the die-cut as well as the glitter on the outlines in the picture below.


I then stamped the cupcake frosting and also filled in the remaining space in the background by stamping stars all over. The banner is also from the same set.


To add more interest and detail to my card, I stamped the entire background behind my card front by masking it with Washi Tape. I used the bottom of the small cupcake stamp to create the wavy chevron pattern you see. I think it really adds a lot more to my card :)


I hope you liked my cards and are inspired to create your own. I would love to hear what you think of them. I will be back next week with another set of cards using the new August release sets from w & w.
Don't forget to comment on my blog post for a chance to win the $30 gift certificate to the Winnie & Walter store. Winner will be announced on my blog, at the end of the month.


Have a great day ahead!

Friday, September 1, 2017

Altenew August Release 2017 Blog Hop Winner!

Hello everybody,
I'm here to share the winner from all the comments which were left on my Altenew August 2017 Release Blog Hop post. Thank you so much for being so encouraging and leaving such sweet comments. I loved reading each and every one :)


Now, for the winner.
.
.
.

It's you, Priya Sondhi

Big congratulations on your win! Please email winner@altenew.com with the subject line August 2017 Release Blog Hop Winner from Hussena's blog and they will set you up with a $30 gift card.


Thank you so much everyone once again. 
Have a great day ahead!