Showing posts with label Layering Dies. Show all posts

Saturday, April 2, 2022

Spellbinders Happy Dance Collection | Guest Post

Hello, crafty friends!
I am so thrilled and honoured to be guest designing on the Spellbinders blog today highlighting the NEW Happy Dance Collection. The die sets, Glimmer plates, and stamps in this collection are perfect for making Cards and Gift tags for Father’s Day/Mother’s Day Cards, and more!


My first card features the I Dance Etched DiesWe Dance Glimmer Sentiments Glimmer Hot Foil Plate & Die Set, and the Geo Foliage Glimmer Hot Foil Plate & Die Set. I love anything florals for thank you cards, so I reached for the I Dance Etched Dies first to create this bold and bright monochromatic card.


To start, I trimmed a piece of Navy Blue Cardstock to 4” x 5.25”. Next, I applied Silver Foil to Navy Blue Cardstock using the Thank You Glimmer Plate from the We Dance Glimmer Sentiments Glimmer Hot Foil Plate & Die Set and cut it out using the Geo Hex Inner Die from the Geo Foliage Glimmer Hot Foil Plate & Die Set.  Then, I die-cut Silver Glitter Cardstock and White Foam using the Geo Hex Outer Die from the same set and adhered the pieces together using Craft Glue.

Next, I die-cut WaterfallSilver Glitter, and Glacier Cardstock using the bloom and foliage dies in the I Dance Etched Dies. I arranged the pieces around the hexagonal frame and adhered them down on my panel using a mix of Craft Glue and foam adhesive. Next, to finish, I mat my card panel with Silver Glitter Cardstock before adhering it a top-folding A2 navy blue card base with tape runner. Then, as a finishing touch, I adhered a few Teal Color Essentials Gems around my floral arrangement. These gems are so sparkly and beautiful! 


My next card features the Let's Dance Etched Dies, We All Dance Sentiments Clear Stamp Set, and the Twinkle Lights Glimmer Hot Foil Plate. I love die sets that can be used in a ton of ways and the Let's Dance Etched Die Set is one of them. I used the beer dies included in this set to create a clean and simple congratulations card, but there are so many other wonderful dies in this set that can be used to create various different kinds of projects all round the year. 


To create my card, I applied Gold Hot Foil to Snowdrift Cardstock using the Twinkle Lights Glimmer Hot Foil Plate. Next,  I die-cut the mug three times across the center of the panel using the Mug Die from the Let's Dance Etched Dies and cut out the panel using the Large Rectangle Outer Rim and Insert dies from the Fluted Classics Rectangles Etched Dies. Next, I adhered a piece of acetate behind the foiled background panel using liquid glue. I covered the back of the panel with White Foam, ensuring that the area around the rectangle had no gaps for shaker bits to fall out. Then, I blended Squeezed Lemonade Distress Oxide ink on a piece of Snowdrift Cardstock and trimmed it to size to fit on my card base. I placed a a mix of clear sequins in the center portion of the card front and pressed the foiled panel down on top to seal the sequins in. Once that was done, I inlaid the leftover die-cut mug pieces back on my panel using Craft Glue. 
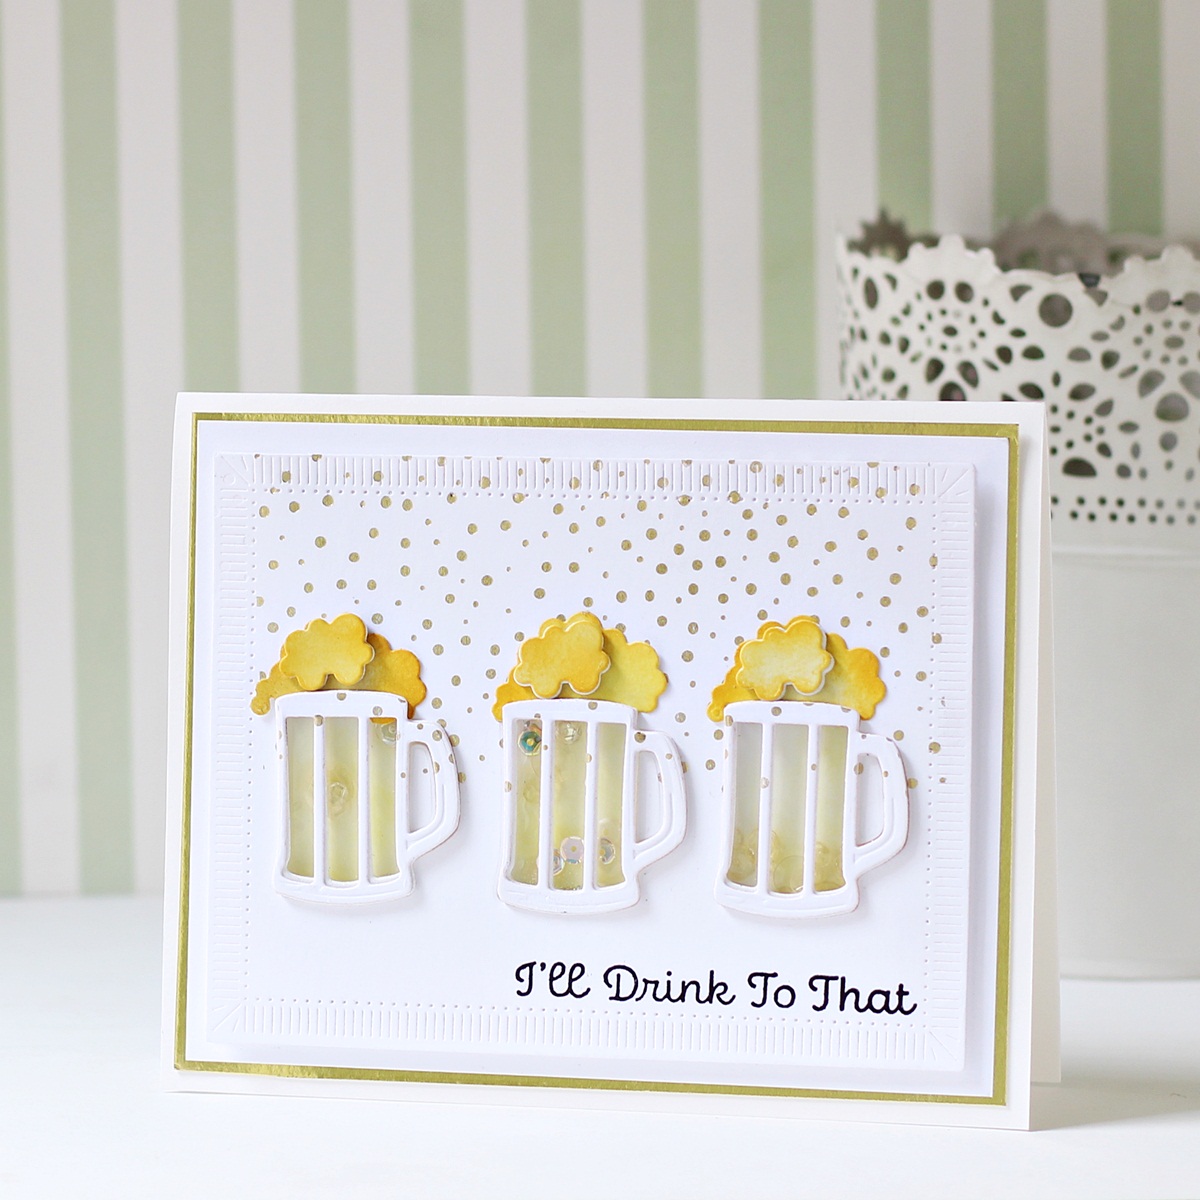

Next, I die-cut the foam layers from the same set using Snowdrift Cardstock and lightly blended Scattered Straw Distress Oxide ink around the edges and centers of the die-cut pieces. I adhered down the pieces on my panel using a mix of Craft Glue and foam adhesive. I then pulled out my MISTI to stamp my sentiment from the We All Dance Sentiments Clear Stamp Set on the panel using Versafine Onyx Black ink. Then, to complete, I mat my card panel with Mirror Gold Cardstock before adhering it to a top-folding white card base with tape runner.

Here's what the inside of the card looks like. I stamped another sentiment from the We All Dance Sentiments Clear Stamp Set using Versafine Onyx Black ink.


My last card for today features the I Dance Etched Dies and the Optical Arches Embossing Folder. I love all the pieces included in this die set that can make up into something so huge that the giver is hidden behind it! The set includes a coffee cup, a bottle of glue, a bouquet of flowers, but each of those items can also be their own element on a card, without the skirted lady holding them!

To make my card, I first die-cut Snowdrift Cardstock using the Large Rectangle Outer Rim and Insert dies from the Fluted Classics Rectangles Etched Dies.  Next, I embossed the panel using the Optical Arches Embossing Folder in my Platinum 6" Die Cutting Machine. Then, I dripped different colors of ink onto them with the Mermaid Markers. The colors mixed beautifully and when the panel dried, they reminded me of a spring garden. Once that was done, I spritzed the panel with some leftover ink colours from Mermaid Markers to create an artsy look. 

Next, I die-cut Wild BerryBarely PeachWaterfallFernSnowdrift, and Gold Glitter Cardstock using the various dies in the I Dance Etched Die Set and the Be Bold Blooms Etched Dies. I assembled the blooms and other pieces together using Craft Glue and popped them in the centre of my panel using foam adhesive. Next, I stamped a sentiment from the We All Dance Sentiments Clear Stamp Set onto Snowdrift Cardstock and cut it out using the coffee label die from the I Dance Etched Die Set. I adhered some foliage near the sentiment for visual interest using Craft Glue and popped the sentiment on my panel using foam adhesive for a raised effect. 


Then, to finish, I adhered the panel to a top-folding A2-sized white card base using foam adhesive.  I completed the card with some Gold Mix Color Essentials Gems to embellish my panel.
 
SPELLBINDERS SUPPLIES:

CS-003, CS-010, CS-011, CS-017, CS-020, CS-027, GLF-014, GLP-172, GLP-308, S4-1179, S4-1180, S5-475, S5-502, SCS-118,  SCS-148, ST-0147, SES-032, STP-082, MISTI, JD-041, PCGO4E, TD056188, SCS-129, SCS-160, PE-100, T-021, AD-0084

OTHER SUPPLIES:
Neenah Solar White Cardstock, Navy Blue Cardstock, Canson Montval Watercolor Paper, Citrine Glitter Cardstock, Squeezed Lemonade Distress Oxide inks, Scattered Straw Distress Oxide Ink Pad, Versafine Onyx Black Ink, MISTI Stamping Tool,  Tape Runner.

That’s it for today’s post! I hope you enjoyed it and have been inspired to create with these stunning dies and stamp from the Happy Dance Collection. Thank you so much for stopping by!
You can find more inspiration over at my Instagram page

Thursday, March 31, 2022

Guest Post using Spellbinders Paint The World Collection by Vicky P.


Hello everyone!
I am so excited and honoured to be guest designing on the Spellbinders blog today highlighting the NEW Paint The World Collection by Vicky Papaioannou. The whimsical and fun paintbrush-themed designs, palettes, natural elements, and the set of clear stamps included in the collection are just perfect for creating a wide variety of projects for artists and crafters alike!


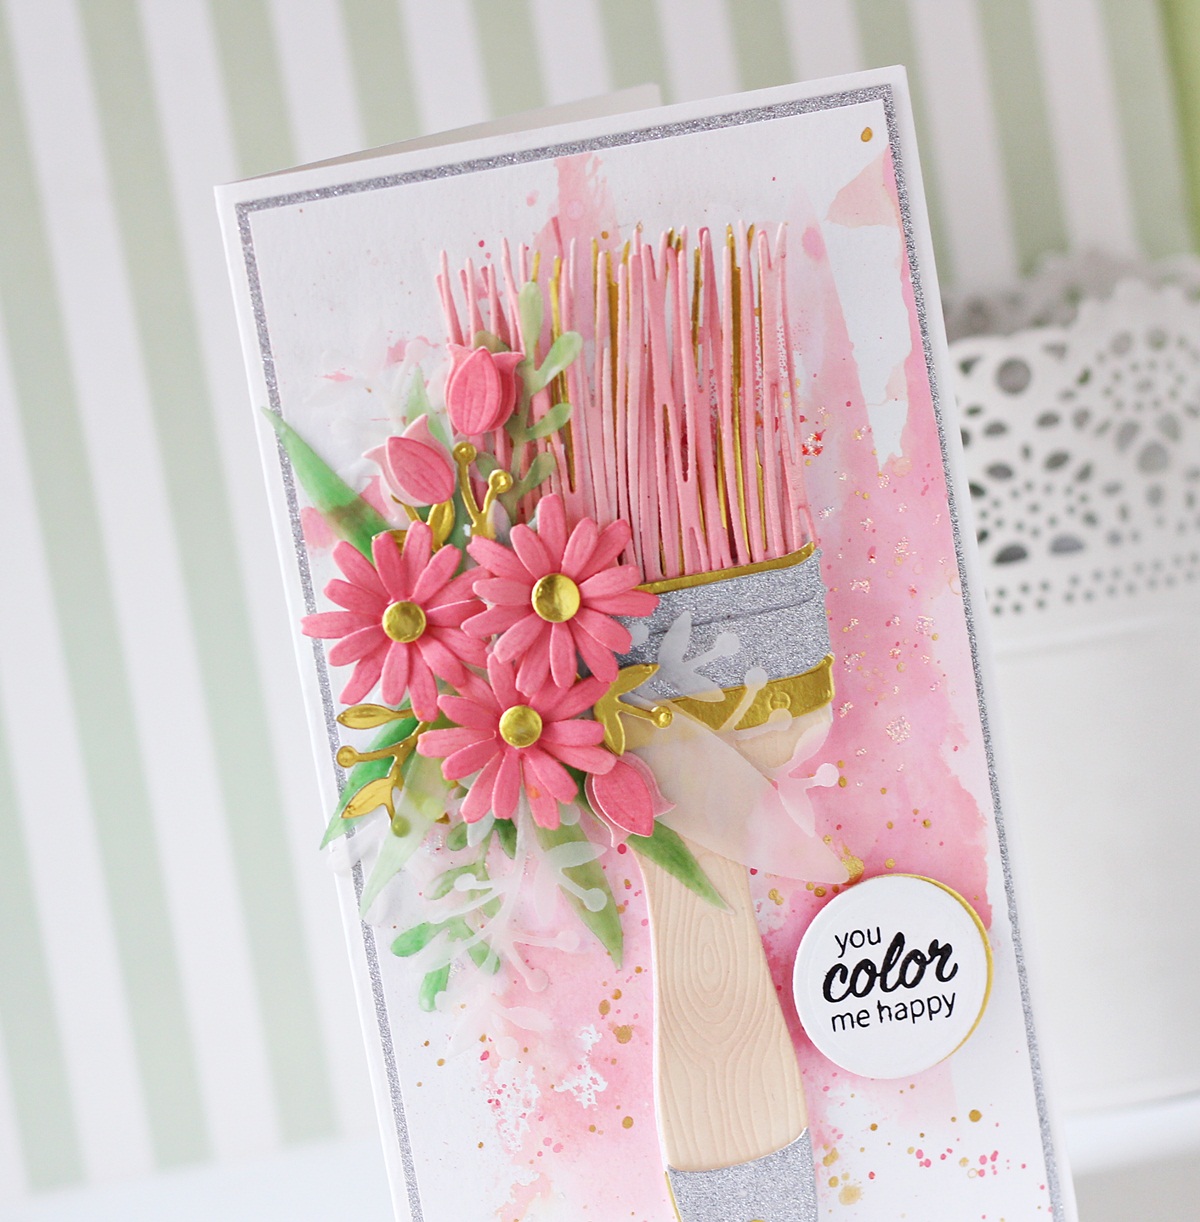
My first card features the Painted Blooms Etched Dies and the Paint Your World Sentiments Clear Stamp Set. I made the card in 3.5" x 8.5", so as to not crowd the the oversized brush in the Painted Blooms Etched Dies. I added a watercolored background and layers of flower to this slimline card, perfect for sending to an artist friend or crafter.

I started by wetting a piece of Snowdrift Cardstock with clean water in the rough shape of what I wanted the final watercolor background to look like. Then, I applied color from the Worn Lipstick Distress Oxide Ink and Tattered Rose Distress Oxide Ink to the wet area with a large brush, allowing the colors to mix slightly. Once I was happy with the way it looked, I dried it using a Heat Tool. I then flicked some gold metallic paint and black acrylic paint on my panel using a paint brush for a fun splatter effect. I then flicked some gold metallic paint and pink acrylic paint on my panel using a paint brush for a fun splatter effect. 

Next, I die-cut the handle of the brush from the Artful Brushes Etched Dies and the Painted Blooms Etched Dies out of Snowdrift CardstockSilver Glitter Cardstock, Mirror Gold Cardstock, and White Foam and the bristles out of Snowdrift Cardstock and Mirror Gold Cardstock. I blended Scattered Straw Distress Oxide Ink on the handle and Worn Lipstick Distress Oxide Ink and Tattered Rose Distress Oxide Ink on the bristles. Next, I assembled the different parts of the brush with Craft Glue.

Once that was done, I die-cut DahliaVellum, and Mirror Gold Cardstock using the flower and leaf dies from the Painted Blooms Etched Dies and the Artful Tulip Etched Dies. I lightly embossed the petals using the small ball tip in Susan’s Garden Ultimate Tool Kit and adhered the layers together with liquid glue. Next, I assembled the flowers, arranged them on my card, and adhered them down with both Craft Glue and foam squares.

Next, I stamped a sentiment from the Paint Your World Sentiments Clear Stamp Set onto Snowdrift Cardstock and cut it out using the Circle #2 Die from the Nestabilities Large Standard Circles Die Set. Then, I die-cut Mirror Gold Cardstock using the Circle #2 Die and I adhered the pieces together using Craft Glue, offsetting the gold mirror die cut to create a shadow, before adding it to my card front using foam squares. I then mat the card panel with layers of Silver Glitter Cardstock before adhering it to a top-folding white card base using tape runner. I finished the design with Icicle Stickles Glitter Glue for some sparkle and shine.


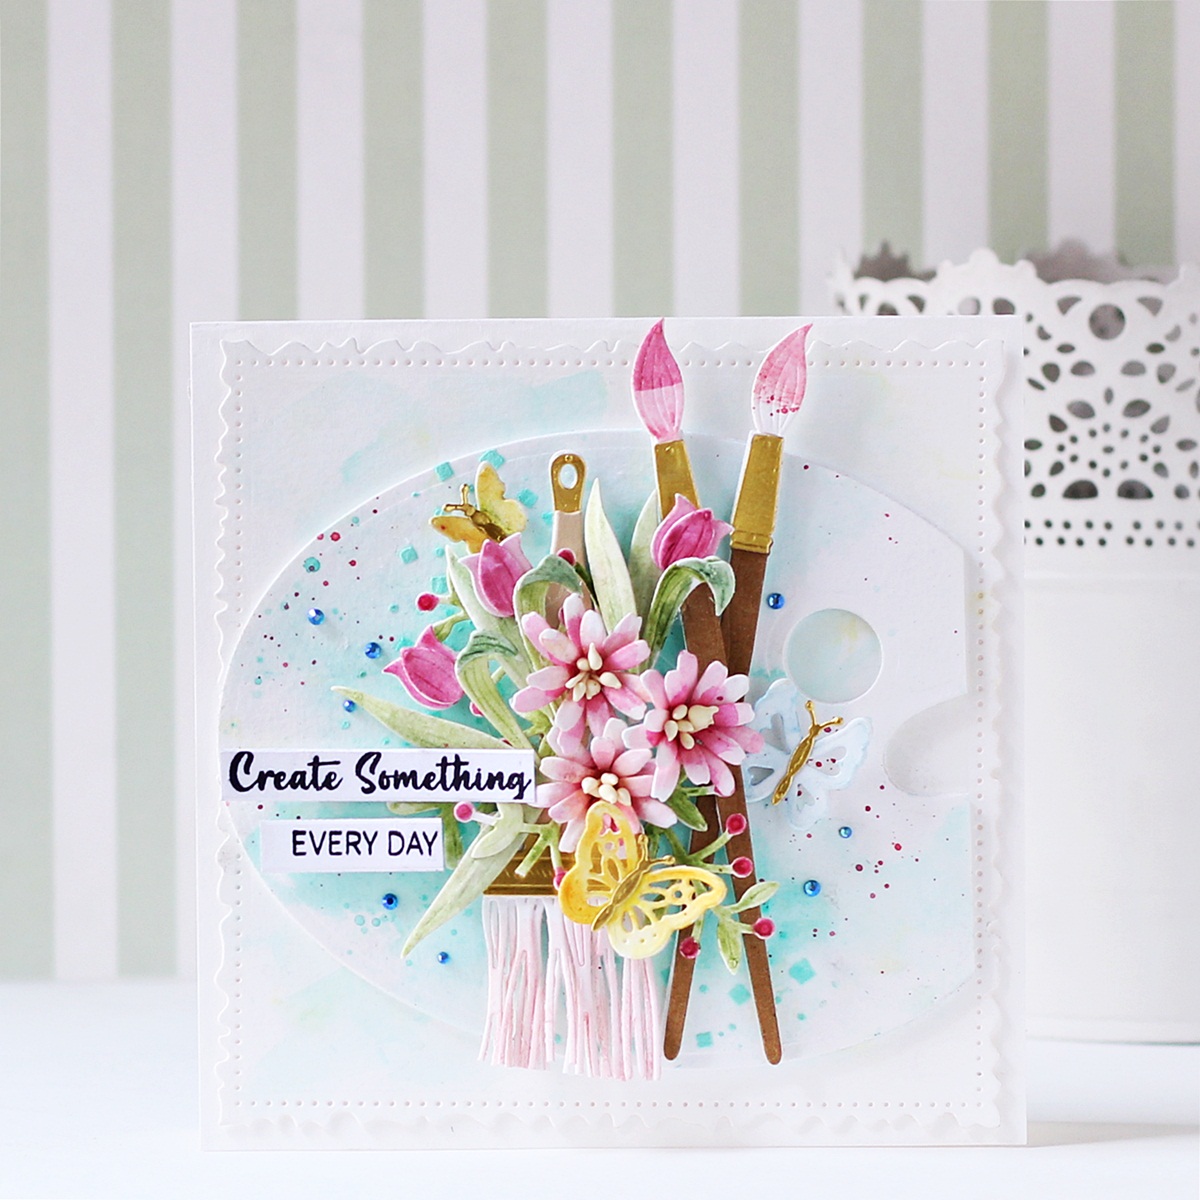
My next card features the Painter's Palette Etched Dies and the Butterfly Burst Etched Dies. I love the oversized paint palette in the set and wanted to use it to create the look of an upcycled mixed media palette on my card. I used spring colours along with the fun art supplies in this set to create a card for a friend.

To start, I die-cut Snowdrift Cardstock using the palette die from the Painter's Palette Etched Dies and lay the Geometric Butterfly Stencil on top using the Best Ever Craft Tape. I then applied Modelling paste mixed with Cool Pool True Color Fusion Re-Inker on top to create a geometric stenciled background pattern. Next, I added washes of Broken China Distress Oxide Ink around the stenciled pattern to add some interest to the design. I then flicked some red and blue paint on my panel using a paint brush for a fun splatter effect.

Then, I die-cut Snowdrift Cardstock, Mirror Gold Cardstock, Timber Cardstock, and White Foam using the paint brush die in the Painter's Palette Etched Die Set. Next, I added washes of Worn Lipstick Distress Oxide Ink to the die-cut pieces with a Water Brush. Once that was done, I die-cut Snowdrift Cardstock using the flower and leaf dies from the Painted Blooms Etched Dies and the Artful Tulip Etched Dies. I lightly embossed the pieces using the small ball stylus tip in Susan’s Garden Ultimate Tool Kit and watercoloured the petals and the foliage using Jane Davenport Mermaid Markers. I also added some thread pollens to the flower centres to give them a more fuller look. 

I also die-cut Snowdrift Cardstock and Mirror Gold Cardstock using the paintbrush and butterfly dies in the Butterfly Burst Etched Dies. I blended Tattered Rose Distress Oxide Ink on the bristles using a blending brush and adhered it down on the panel using Craft Glue. The butterflies were again coloured using the Jane Davenport Mermaid Markers and I adhered down the bodies to the pieces using liquid adhesive.  

I assembled the different elements of the card together and adhered them down on the palette using foam squares. Next, I stamped a sentiment from the Paint Your World Sentiments Clear Stamp Set onto Snowdrift Cardstock and trimmed it down to adhere over the panel. Then, to finish, I die-cut Snowdrift Cardstock using the largest square die in the Vintage Stitched Squares Etched Die Set and added a light watercolor wash of Broken China Distress Oxide Ink around the left-hand side of the card. Finally, to complete, I adhered the panel to a top-folding 6" X 6'' white card base using tape runner. Then, as a finishing touch, I adhered a few Teal Color Essentials Gems around my paint palette. I love the beautiful sparkle of the gems! 


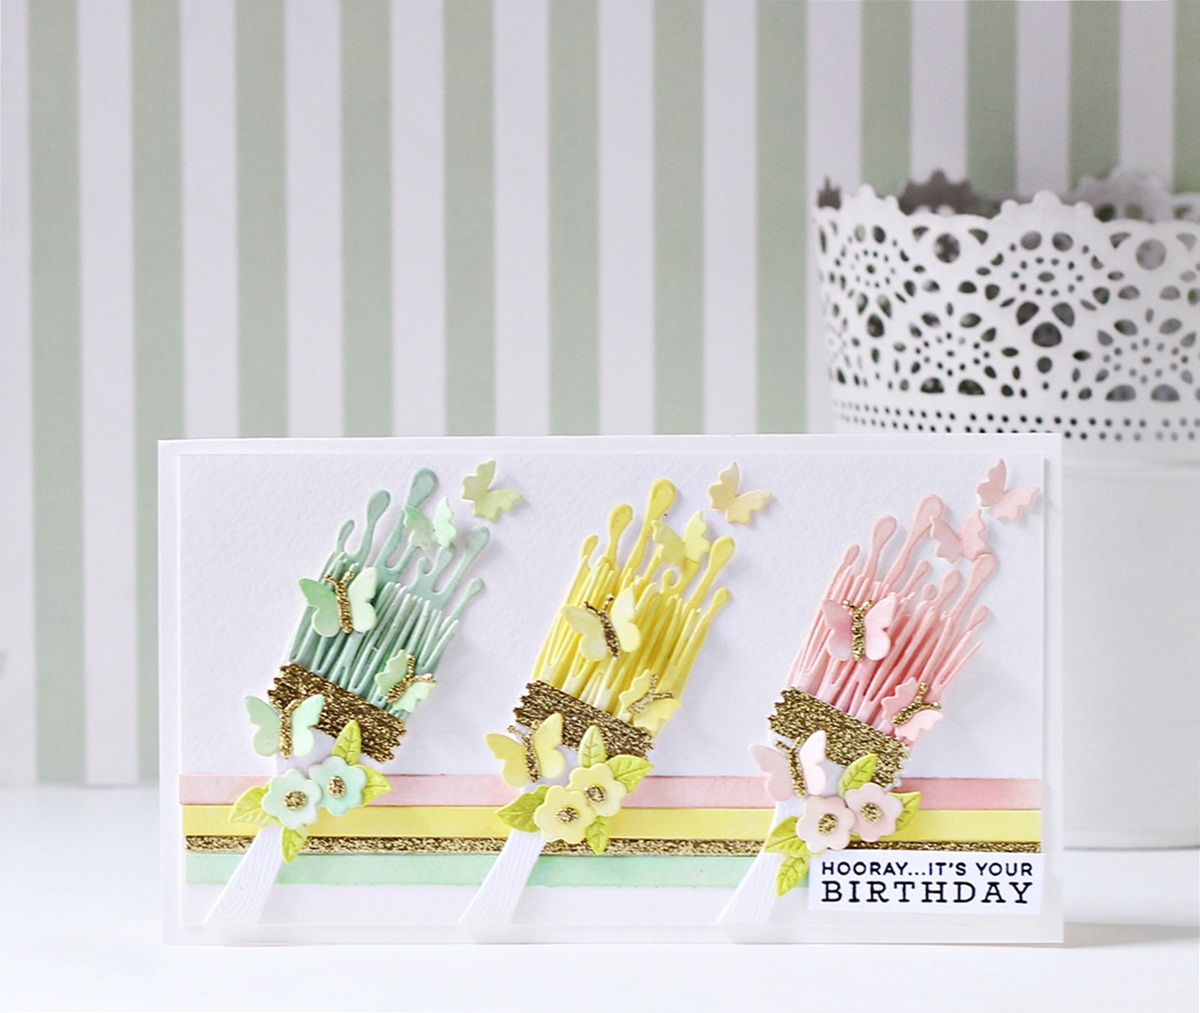
My third and final card for today features the Artful Brushes Etched Dies, the Butterfly Burst Etched Dies, and the Mini Blooms and Sprigs Etched Dies. I made this into a Slimline Card so as not to crowd the three colourful and airy paint brushes.


I began with die cutting Snowdrift Cardstock and White Foam using the paint brush and handles dies in the Artful Brushes Etched Dies.  Once I had all the paintbrush pieces die-cut and assembled, I die-cut Citrine Cardstock using the brush ferrule die in the Artful Brushes Etched Die Set and adhered them to the paintbrushes using Craft Glue. Then, I die cut the bristle and paint blob dies out of Snowdrift Cardstock and blended Cracked Pistachio, Squeezed Lemonade, and Worn Lipstick Distress Oxide Inks on the respective pieces using a sponge dauber. I adhered the bristles near to the ferrule of the brush first, then the paint blobs to the back. Once that was done, I trimmed off the handle of the paintbrushes, so that they could fit on my card panel. 

Next, I die-cut Snowdrift Cardstock using the butterfly and flower dies in the Butterfly Burst Etched Dies and the Mini Blooms and Sprigs Etched Dies and blended a little Cracked Pistachio, Squeezed Lemonade, and Worn Lipstick Distress Oxide Inks on the pieces with a blending brush. Next, I die-cut the tiny leaves from the Mini Blooms and Sprigs Etched Dies out of Snowdrift Cardstock and coloured them using Twisted Citron Distress Oxide Ink. Once that was done, I die-cut the body of the butterflies and the flower centres out of Citrine Cardstock and adhered them to my pieces using Craft Glue

 Then, I cut three long strips out of Snowdrift Cardstock and layered them on top of a piece of Snowdrift Cardstock to create the background panel of the card. I also trimmed a thin strip of Citrine Cardstock to adhere in between the pieces. The pieces were again coloured using the same combination of inks - Cracked Pistachio, Squeezed Lemonade, and Worn Lipstick Distress Oxide Inks. 

It was now time to assemble everything together - I adhered the paintbrushes to my card front using foam adhesive and then adhered the mini blooms and butterflies to the panel to create a splash of colour using Craft Glue. Next, I stamped a sentiment from the Paint Your World Sentiments Clear Stamp Set onto Snowdrift Cardstock and trimmed it down to adhere over the panel using using foam squares. Finally, to complete, I adhered the panel to a top-folding 3.5" x 8.5" white card base using tape runner

SPELLBINDERS SUPPLIES:
CS-004, CS-025, CS-027, S2-314, S3-440, S3-439, S3-441,  S4-114, S5-497, S5-504, SCS-118, SCS-123, SCS-148, SCS-151, SCS-160, STN-007,  ST-0147, STP-104, JD-041, PE-100, PCGO4E,  RI-0073, T-021, TD056362, TD056294, TD055846, AD-0084

OTHER SUPPLIES:
Neenah Solar White Cardstock, Canson Montval Watercolor Paper, Citrine Glitter Cardstock, Cracked Pistachio, Squeezed Lemonade Distress Oxide inks, Versafine Onyx Black Ink, Heat Tool, MISTI Stamping Tool, Black and Blue Acrylic Paints, Heidi Swapp Gold Lame Mist, Tape Runner.

That’s it for today’s post! I hope you enjoyed it and have been inspired to create with these stunning dies and stamp from the Paint The World Collection. Thank you so much for stopping by!
You can find more inspiration over at my Instagram page

Saturday, March 12, 2022

Altenew Craft Your Life Project Kit: Dynamic Blossoms Release Blog Hop + Giveaway ($300 in total prizes)


Hello, crafty friends!
I'm so happy and honoured to be joining Altenew for the Dynamic Blossoms Release Blog Hop today showcasing the next installment in their monthly Craft Your Life Project Kit: Dynamic Blossoms! Craft-Your-Life is a monthly subscription plan for their Dynamic Blossoms Project Kit. When signed up, you are guaranteed a spot in their monthly Project Kit releases and will receive a kit each month - at a specially discounted price! ($59.99 →$49.99)

If you arrived here from Colleen Balija's Blog, then you are on the right track. If this is your first stop, then you will want to start at the beginning, the Altenew Card Blog. We've got tons of inspiration and giveaways for you on the hop today, so keep reading till the end of this post for more information.


The Craft Your Life Project Kit, is an exciting monthly package that is sure to get the creative juices flowing! Featuring a 6x8 stamp set, coordinating die set, as well as a stencil set and embossing folder to fit the theme, this project kit has almost everything you need to start crafting. Just add ink and cardstock, and you'll be good to go!

This Project Kit contains the following exclusive products:

  • One 6" x 8" Clear Stamp Set containing 18 stamps made in the USA from high-quality photopolymer
  • Coordinating Die Set with 1 Coordinating Die
  • One simple Coloring/Mask Stencil Set containing 4 Stencils which coordinate with the Stamp Set
  • One 6x6 3D Embossing Folder

Note: These products are NOT sold separately. The stencils coordinate with the embossing folder.


The Dynamic Blossoms stamp set features a stunning inflorescence of bellflowers. The outline layer is drawn with beautiful details for coloring, stamped as is, or layered with the coloring layers. The stamp set includes two coloring layers for the flowers and one for the leaves. For extra diversity, we have separated the leaves at the base of the flowers so you can turn these bellflowers into a variation of daffodils!

 I have created two cards for today’s hop, in two different colour combinations. Let's take a look!

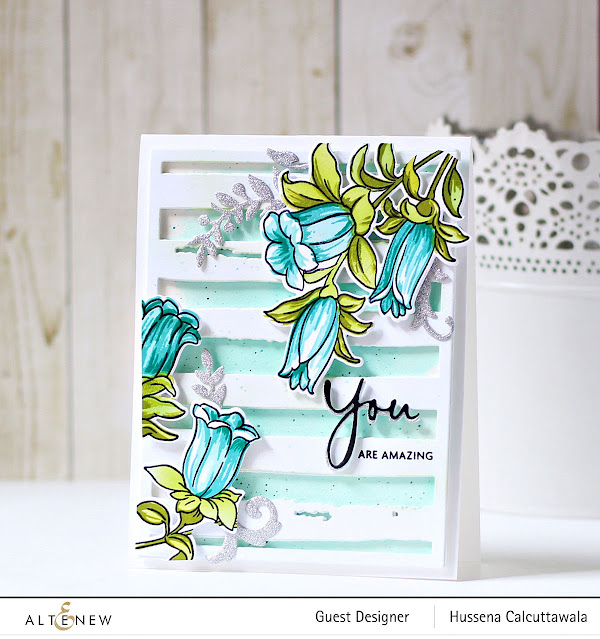
This first card is clean and simple so I wanted to be sure my background didn’t compete with those bright teal bellflowers.

To create my card, I stamped the large layered bellflower from the Dynamic Blossoms stamp set onto Neenah Classic Crest Solar White Cardstock using EmeraldLagoonVolcano Lake, and Mountain Mist inks with the help of my MISTI Stamping Tool.  I repeated the process with the second largest flower image. Next, I stamped the leaf layers using Olive and Parrot inks from the Tropical Forest dye ink set. Once that was done, I cut all of the images out using the coordinating dies.

Next, I die-cut Neenah Classic Crest Solar White Cardstock and White Foam using the Watercolor Stripes Cover Die and lightly ink blended Bamboo ink around the  the sides of the panel for some definition. Next, I trimmed a piece of Watercolor Paper to 4.25" X 5.25", wet my watercolor panel, and used Lagoon and Mountain Mist Inks with a Watercolor Brush in a dabbing motion, allowing the colors to mix slightly, to create a soft, watercolored background. I let the panel dry and then added some black and teal paint splatters for interest.

Next, for my sentiment, I die-cut Onyx and Dazzling Diamond Cardstock using the 'You' die included in the Dynamic Blossoms Die Set, and adhered the layers together with Craft Glue, allowing the silver glitter paper to peak out to the left side for depth. Then, I stamped the rest of the sentiment onto the die-cut panel using Obsidian Ink.

I assembled the different elements on my panel and adhered down the pieces using foam squares. Then, to finish, I adhered the panels together with Craft Glue, before adhering it to a top-folding A2-sized white card base using tape runner.


My second card features the Stencil Set which coordinates with the Dynamic Blossoms Stamp Set.

To create my card, I first trimmed a piece of Jet Black Cardstock to  4″ x 5.25″ and placed the Dynamic Blossoms Stencil 4 over the panel and applied Gold Glitter Paste (Tonic Studios Nuvo) with a spatula to create a raised glitter pattern.

Next, I die-cut the floral foliage die from the Dynamic Blossoms Die Set out of Neenah Classic Crest Solar White Cardstock and White Foam. I then coloured the die-cut pieces with the Altenew Cosmic Garden Artist Alcohol Markers Set A (I used Coral Berry, Ruby Red for the berries, and Forest Glades, Evergreen for the leaves) and adhered them over the stenciled panel using liquid adhesive. Next, I stamped my sentiment from the Dynamic Blossoms Stamp Set on Vellum in Clear Embossing Ink, then sprinkled some White Embossing Powder over the image, and melted the powder with a Heat Tool. I tore the sides of the vellum before folding it over the stenciled background piece. I secured on the back with tape and secured on the front with small pieces of foam tape hidden under the stenciled image.

Next, I die-cut Golden Beryl Cardstock and White Foam using the 'You' die included in the Dynamic Blossoms Die Set. I adhered the pieces together using the 2 in 1 Precision Glue Pen and then popped it onto the vellum panel. I then mat the card panel with layers of Golden Beryl and Ruby Red Cardstock before adhering it to a top-folding A2- black card base using tape runner. I finished the design with some sparkling Antique Gold - Sequins to embellish.


Giveaway Prizes:
$300 in total prizes! To celebrate this release, Altenew is giving away a $50 gift certificate to 2 lucky winners and a $20 gift certificate to 5 winners! Please leave a comment on the Altenew Card Blog and/or each designer’s blog post on the blog hop list below by 03/18/2022 for a chance to win. Altenew will draw 7 random winners from the comments left on each stop of this blog hop and announce the winners on the Altenew Winners Page on 03/20/2022.


Blog Hop Order:
Next Stop on this Blog Hop is the incredibly talented, Jaycee Gaspar's blog. Just in case you lose your place along the way, here is the complete list of participants so that you can find your way back:

Altenew Card Blog 

Michelle Short

Jenny Colacicco

Mindy Eggen

Nathalie DeSousa

Colleen Balija

                   Hussena Calcuttawala (You are HERE)

Jaycee Gaspar

LauraJane

Terri Koszler

Bridget Casey

Virginia Lu

Linda Westfall

Maryam Perez

Katrina Howe

Erum Tasneem

Reiko Tsuchida

Nandini Karmarkar

Emily Midgett

Amy Hill

Sande Woodson

Teresa Litchfield

SathyaKala Sankaran

Nenette S. Madero

Rosie Neustaedter

Preeti Chandran

Natasha Davies

Daniel Diaz


Well, that’s all for my projects today! Thanks so much for stopping by and reading. I hope you have a wonderful day!

If you like what you've seen from me, please give me a follow over on my Instagram (@hussena_cal) and/or subscribe to my blog if you haven't already

Thursday, February 17, 2022

Altenew Dreamy Bouquet Fabric Release Blog Hop + Giveaway ($300 in total prizes)


Hello, crafty friends!
I'm delighted and honoured to be joining Altenew for the Dreamy Bouquet Fabric Bundle Blog Hop today. Altenew is releasing their FIRST-EVER Fabric Bundle and I am so thrilled to have had the opportunity to create a few projects using it! The bundle contains 5 pieces of 18"x22" fabric (fat quarter - common size for quilters) featuring Altenew motifs. The fabric is quilting weight cotton making it a versatile choice for crafting, quilting, and more!

If you arrived here from the incredible Michelle Short's Blog, then you are on the right track. If this is your first stop, then you will want to start at the beginning, the Altenew Card Blog. We've got tons of inspiration and giveaways for you on the hop today, so keep reading till the end of this post for more information.


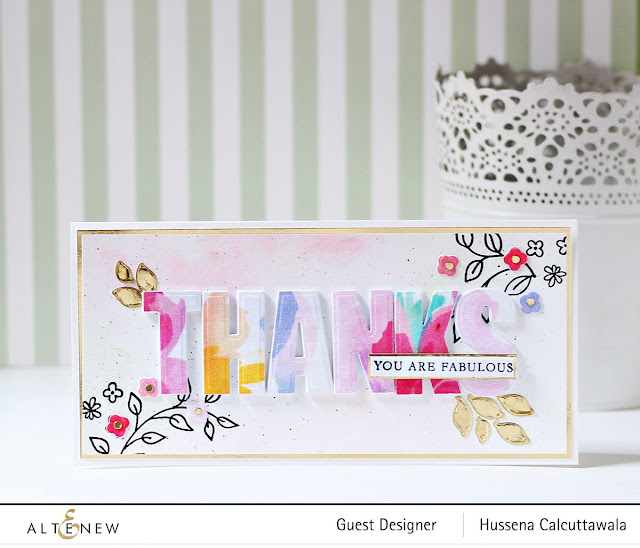
My first project for today is a Slimline Card created using the Dreamy Bouquet Fabric Bundle. I combined a few stamp and die sets from Altenew to create this thank-you card for a friend. If you enjoy making your own home décor or sewing/quilting, these designs really give you a lot of bang for your buck because you can use them in so many different projects. The prints and colours are super pretty too and there's so much you can do with them!

To create my card, I first die-cut the Dreamy Bouquet Fabric Bundle using the Caps Bold Alphabet Die Set to spell the word 'Thanks'. I love that with the Caps Bold Alphabet Die Set, I can create my own fun custom sentiments! Next, I die cut Neenah Classic Crest Solar White Cardstock and White Foam using the alphabet dies and adhered the pieces one on top of the other for dimension. The fabric prints were such a delight to die cut and I thoroughly enjoyed working with them. 

Next, I trimmed a piece of Neenah Classic Crest Solar White Cardstock to  3" x 8" and used the Altenew Watercolor 36 Pan Set to do a light watercolor wash on my panel. I wet my card panel with water and used Cotton Candy and Coral Berry paints with a Water Brush in a dabbing motion, allowing the colors to mix slightly. I let the panel dry and then added some black and metallic gold paint splatters for interest. Next, I stamped the hand-drawn foliage foliage and mini flower elements from the Doodle Blooms Stamp Set in opposite corners of the panel using Obsidian Ink. This set is such an oldie, but a goldie. I still reach for it very often in my stash. :-)

Next, I die cut the Dreamy Bouquet Fabric Bundle and Gold Mirror Cardstock using the mini bloom and leaf dies included in the Doodle Blooms Die Set. I assembled the pieces on my card panel and adhered them down using the 2 in 1 Precision Glue Pen. Next, I stamped my sentiment from the Just Because Stamp Set on to some Neenah Classic Crest Solar White Cardstock Cardstock with Versafine Onyx Black ink and cut out the piece using a banner die. Then, I die-cut the banner from Gold Mirror Cardstock to mat the sentiment piece and affixed it down on my panel using foam adhesive. To finish, I mat my card panel with Gold Mirror Cardstock before adhering it down to a top-folding white slimline card base using tape runner.


My next card features the Dreamy Bouquet  along with the Fantasy Florals 3D Die Set. This is one of my favorite die sets from Altenew and I was so thrilled to have the opportunity to play with it again.

For my card, I first die cut Neenah Classic Crest Solar White Cardstock using the Dotted Scales Deobssing Cover Die. (This die is currently on sale, so it's a good time to snag it! I have incorporated this cover die in so many projects in the past and still reach for it every now and then. It's super versatile and easily one of my favorite dies of all time!)  Next, I wet my card panel with water and used Warm Sunshine paint to create a nice watercolored background. I applied the paint around the centre of the panel and drug the color out loosely with water. Then, I let the panel dry and then added some black and grey paint splatters for interest.

Next, I die cut Gradient Cardstock Set - Red Cosmos and Green Meadows using the various flower and leaf dies from the Fantasy Florals 3D Die Set. I assembled the pieces together using Craft Glue and adhered the die cut pieces down on my panel to create a bouquet. Then, in order to complement the floral spray, I die cut the Dreamy Bouquet Fabric Bundle using the Halftone Circles Nesting Die Set and popped them on my panel using foam adhesive for dimension. I love the hint of colour and texture provided by these circles! I wanted to add a bit of sparkle and shine to the bouquet, so I die cut Glitter Cardstock Set - Dazzling Diamond using the foliage dies included in the Create-A-Wreath Die Set and adhered down the pieces to my floral arrangement using Craft Glue

Next, I stamped my sentiment from the Just Because Stamp Set on to some Neenah Classic Crest Solar White Cardstock with Versafine Onyx Black ink and cut out the piece using a banner die. Then, for interest, I trimmed a strip of Dazzling Diamond Cardstock and adhered it down on the sentiment banner using Craft Glue and popped the piece on my panel using foam adhesive. 
Then, to complete, I mat my card panel with a layer of Dazzling Diamond Cardstock before adhering it down to a top-folding A2-size white card base using tape runner.  I finished the design with some sparkling silver sequins around the bouquet to embellish.


Giveaway Prizes:
$300 in total prizes! To celebrate this release, Altenew is giving away a $50 gift certificate to 2 lucky winners and a $25 gift certificate to 8 winners! Please leave a comment on the Altenew Card Blog and/or each designer’s blog post on the blog hop list below by 02/23/2022 for a chance to win. Altenew will draw 10 random winners from the comments left on each stop of this blog hop and announce the winners on the Altenew Winners Page on 02/25/2022.


Blog Hop Order:

Next Stop on this Blog Hop is the incredibly talented, Jaycee Gaspar's blog. Just in case you lose your place along the way, here is the complete list of participants so that you can find your way back:

                            Hussena Calcuttawala (You are HERE)

Well, that’s all for my projects today! I’ve been busy creating a few more projects that I’ll share in a few days. In the meantime, I hope you’ll take a peek at the February 2022 All Things Handmade Release! Thanks so much for reading, and have a marvelous day!


If you like what you've seen from me, please give me a follow over on my Instagram (@hussena_cal) and/or subscribe to my blog if you haven't already