Monday, April 25, 2022

Altenew April 2022 Spring Garden Collection Release Blog Hop + Giveaway ($300 in total prizes)


Hello, crafty friends!
I am excited to be joining  Altenew for their April 2022 Standalone Dies/ Hot Foil Plates Release: Spring Garden! This release features so many beautiful new Dies and Hot Foil Plates along with other fabulous goodies for your crafty stash!

If you arrived here from, Amy Hill's Blog, then you are on the right track. If this is your first stop, then you will want to start at the beginning, the Altenew Card Blog. We've got tons of inspiration and giveaways for you on the hop today, so keep reading till the end of this post for more information.


Just when you thought you had everything, Altenew is bringing you the NEW Spring Garden Stamps, Stand-alone Dies, Stencils, & Hot Foil Plates Collection! You will find everything you might need to create your own warm spring garden! Here's a look at the products being released today: 


My first card features the Detailed Web Cover Die and the Itty Bitty Branches Die Set along with the Virginia Rose 3D Die Set and the Create-A-Wreath Die Set.

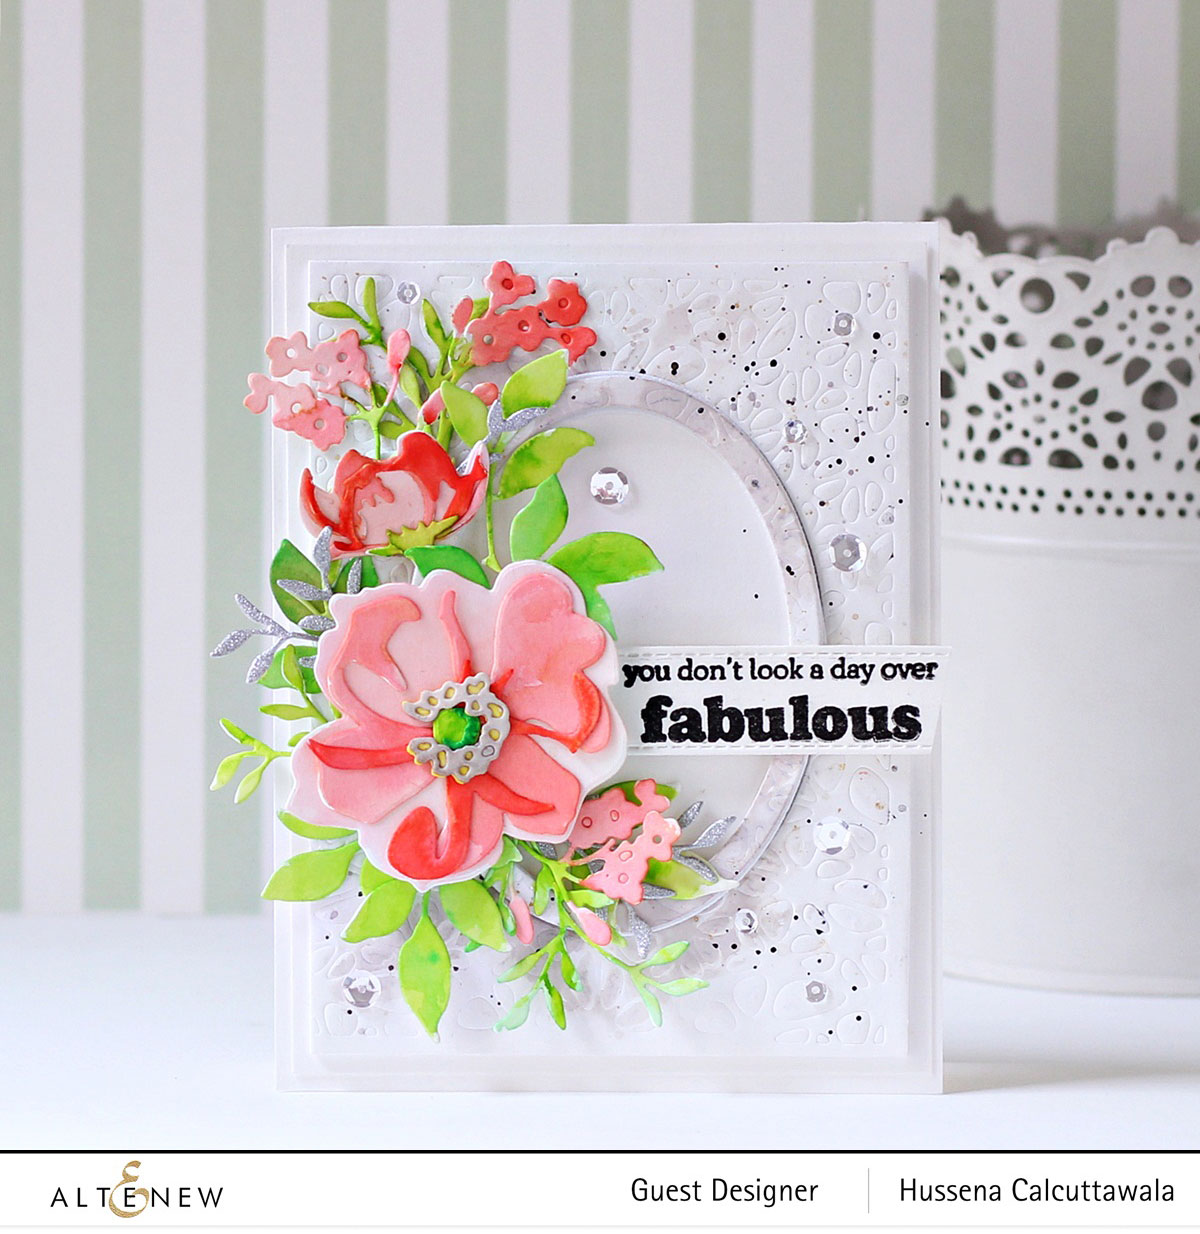
To start, I die-cut several of the flowers and leaves from Virginia Rose 3D Die Set and the Itty Bitty Branches Die Set using Altenew’s Watercolor Paper. Next, I pulled out my favourite Tropical Fiesta Brush Marker Set and used Crimson and Sweet Leaf, and Lime Brush Markers to colour my die-cut pieces in a variety of shades following the layering guide. Altenew's brush markers have a wonderful vibrancy and are available in a gorgeous range of colors! You can use the brush markers as is, or as liquid watercolors with your own paintbrush, which is what I did for my card today. It was very easy to get three different shades of the same colour from one marker and I think this is a great way of maximizing your stash. Once I had all the pieces coloured and dried, I spent some time just putting everything together with Craft Glue.

Next, I  trimmed a piece of Neenah Classic Crest Solar White Cardstock to 4.25" X 5.05" and debossed the card panel using the Detailed Web Cover Die in my Platinum 6" Die Cutting Machine (I positioned my Platform Standard; Die UP with Cardstock Inside; Embossing Mat; XL Embossing Plate and then ran this through my die cut machine as I would an embossing folder. The die pressed into the paper leaving a lovely impression). Once that was done, I die-cut an oval in the centre of the panel using the Oval Shape Medium Die from the Create-A-Wreath Die Set and lightly watercoloured the piece and the die-cut panel using the Lava Rock Brush Marker from the Tropical Fiesta Set

Next, I die-cut some additional foliage for my floral arrangement from the Itty Bitty Branches Die Set using Altenew’s Dazzling Diamond Cardstock and adhered it down on my card panel. Then, I stamped a sentiment from the Fragrant Florals Stamp Set onto a strip of Neenah Classic Crest Solar White Cardstock using Obsidian ink and adhered it down on my panel using foam adhesive for dimension. Once that was done, I mat my card panel with Neenah Classic Crest Solar White Cardstock before adhering it a top-folding A2 white card base using tape runner. As a finishing touch, I used the Jet Black Ink Spray to add a few paint splatters to my panel for an artsy look and adhered a few Sparkling Clear Sequins for some sparkle!


My second card is a bit softer and features some of the beautiful hot foil products from this release. I used the Vibrant Florals Hot Foil Plate & Stencil Bundle along with the Detailed Web Cover Die and the Itty Bitty Branches Die Set to create my card. 

I began by hot foiling the Vibrant Florals Hot Foil Plate onto some Glimmer Specialty Cardstock  using Gold Hot Foil with the help of my Glimmer Hot Foil System. I then used the coordinating Stencil Bundle from Altenew to add some soft peachy pink and pale greens to the image. I used Peach Perfect, Warm Sunshine, and Firefly inks to do my layered blending with the help of Blending Brushes, then fussy cut the finished image using a pair of sharp scissors. Once that was done, I used my Prismacolor Pencils to add some shading and depth to the flowers.

Next, I used the new Detailed Web Cover Die to die-cut a piece of Neenah Classic Crest Solar White Cardstock to create a beautiful intricate background for my daisies. Then, I die-cut some leaves and foliage for my floral arrangement from the Itty Bitty Branches Die Set using White Cardstock and coloured the pieces with Crimson and Sweet Leaf Brush Markers before adhering it down on my card panel using Craft Glue. Once that was done, I stamped a sentiment from the Fragrant Florals Stamp Set onto a strip of Neenah Classic Crest Solar White Cardstock using Obsidian ink and adhered it down on my panel using foam adhesive for dimension. 

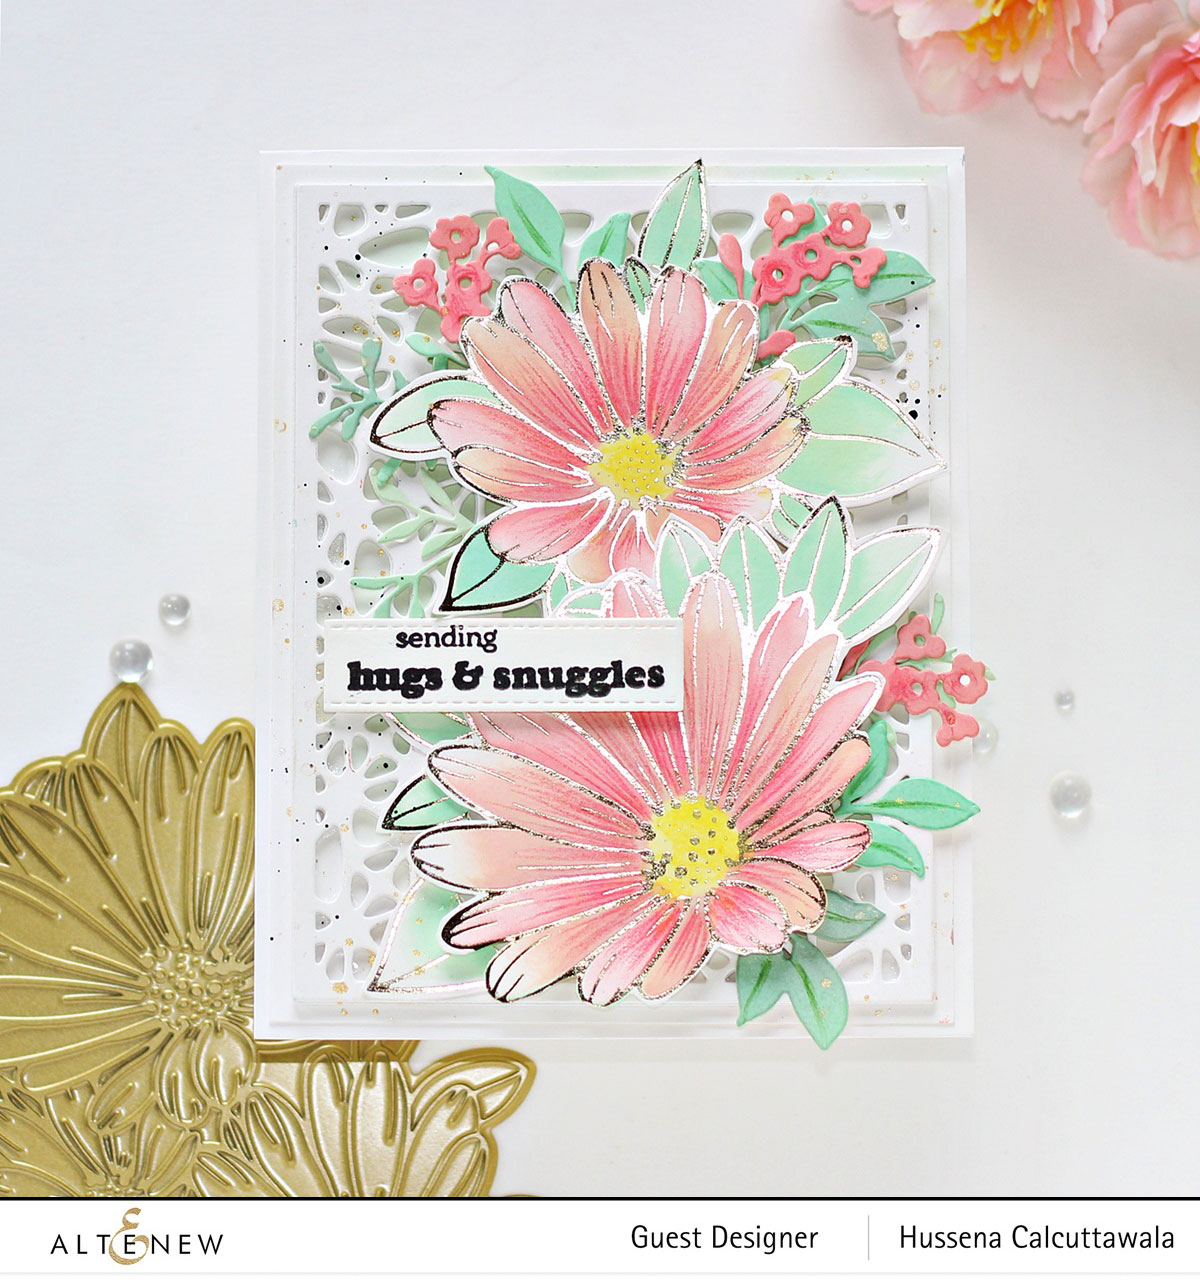
Then, to finish, I mat my card panel with Neenah Classic Crest Solar White Cardstock before adhering it a top-folding A2 white card base using tape runner. As a finishing touch, I used the Jet Black Ink Spray and the Antique Gold Metallic Spray to add some shiny, shimmery gold splatters to the panel for some glitz and glam!


My last card for today features the Morning Blooms Hot Foil Plate & Stencil Bundle. I really love that Altenew offers these new hot foiling sets with the coordinating stencils, as it provides a base for adding color and character to the images.

To create my card,  I first foiled the beautiful, glimmering bouquet and the hummingbird from the Morning Blooms Hot Foil Plate with some shiny Copper Hot Foil on an A2 panel of Glimmer Specialty Cardstock. The super smooth surface of the paper creates a perfect canvas for foiling this beautiful image and I love the results it gives each time. Next, I foiled the images again on another piece of Glimmer Specialty Cardstock and used the coordinating Stencil Set to colour the images using Altenew Dye Inks (Rubellite, Pinkalicious,Warm Sunshine, Orange Cream, Volcano Lake, and Just Green) with Blending Brushes before fussy cutting them out using a pair of scissors.  Once that was done, I used my Prismacolor Pencils to add some shading and depth to the flowers, and then layered the pieces over the foiled panel using foam adhesive for dimension. 

Then, for my card background, I used Lagoon and Mountain Mist Paints from the Watercolor 36 Pan Set and a Fine Watercolor Brush to carefully watercolor a very light halo around the image and the entire panel. I also splattered the card front with some of the metallic gold, pink, and blue paint from the Metallic Watercolor Set for a fun, artsy look. 

I also die cut a Handwritten Hello from the Dynamic Blossoms Die Set from some Jet Black Cardstock and White Foam and layered them together using Craft Glue to create a raised look on my card front. Next, I stamped the rest of the sentiment from the Extra Special Stamp Set on to the foiled panel using Obsidian Ink. Then, to complete, I adhered the panel to a top-folding A2-sized white card base using tape runner. As a finishing touch, I added a few metallic Gold Mix Gems to add a bit more sparkle!


Giveaway Prizes:
$300 in total prizes! To celebrate this release, Altenew is giving away a $50 gift certificate to 2 lucky winners and a $25 gift certificate to 8 winners! Please leave a comment on the Altenew Card Blog and/or each designer’s blog post on the blog hop list below by 03/31/2022 for a chance to win. Altenew will draw 10 random winners from the comments left on each stop of this blog hop and announce the winners on the Altenew Winners Page on 04/02/2022.

Blog Hop Order:
Next Stop on this Blog Hop is the wonderful, Nichol Spohr's blog. Just in case you lose your place along the way, here is the complete list of participants so that you can find your way back:

Altenew Blog

Jaycee Gaspar

Cheryl Espie

Terri Koszler

Mindy Eggen

Jenny Colacicco

Katrina Howe

Nathalie DeSousa

Nicole Watt

Virginia Lu

Carol Hintermeier

Laurie Willison

LauraJane

Keren Baker

Reiko Tsuchida ***Note: Due to strict regulations in Japan, you might not be able to leave a comment on her blog post. 

Preeti Chandran

Tenia Nelson

Nenette S. Madero

Agnieszka Małyszek

Colleen Balija 

Teresa Litchfield

Natasha Davies

Rosie Neustaedter

Ann Taylor 

Sande Woodson

Linda Westfall

Nandini Karmarkar

SathyaKala Sankaran

Susan Stagno

Bridget Casey

Eva Bussom

Amy Hill

                           Hussena Calcuttawala (You are HERE)

Nichol Spohr

Daniel Diaz 


Well, that’s all for my projects today! Thanks so much for stopping by and reading. I hope you have a wonderful day!

If you like what you've seen from me, please give me a follow over on my Instagram (@hussena_cal) and/or subscribe to my blog if you haven't already.

Sunday, April 24, 2022

Guest Post using Spellbinders Susan's Garden Through The Garden Gate


Hello everyone!
I am so excited to be back today to share a couple of projects using the Through the Garden Gate Collection by Susan Tierney-Cockburn. The GORGEOUS garden-themed dies and heartfelt greetings in this Collection inspired me to create a set of three cards perfect for sending to your friends and family! 


My first card features the Hollyhock Etched Dies, Forget-Me-Not and Ladybugs Etched Dies, and the Beeblossom Etched Dies. I paired it with the dies from the Fluted Classics Ovals Etched Dies and added a few tropical bunches to this cheerful thank-you card.

To create my card, I began by die cutting Susan's Garden Specialty Cardstock with the flower, stem, leaf, and stamen dies from the Hollyhock Etched Dies, Forget-Me-Not and Ladybugs Etched Dies, and the Beeblossom Etched Dies until I had enough pieces to form two blooms. I coloured the petals using Worn Lipstick, Tattered Rose, and Picked Raspberry Distress inks, and shaped them using the loop tool. Next, I coloured the stem and leaves using Mowed Lawn, Shabby Shutters, and Gathered Twigs Distress inks and shaped them with the leaf tool included in the Susan’s Garden Ultimate Tool Kit. Then, I coloured the stamens with Mustard Seed and Fossilized Amber Distress inks and added Yellow Flower Pollen to the lower tips with liquid glue. Once they dried, I rolled the pieces and adhered them down with liquid glue. Once that was done, I assembled the flowers with liquid glue.

Next, I colored the Beblossom petals using Picked Raspberry and Spun Sugar Distress inks and added a bit of light pink to the very center of all of the flower petal die-cuts using a Copic marker. Then, with a medium pink Copic marker, I flicked some colour out from the center to add some quick color to the flowers. Once that was done, I shaped the petals using the loop tool and bent the edges upward with tweezers. I coloured and shaped the stamens and leaves as done previously for the hollyhocks. 

I wanted to keep the focus on the flowers, so I kept of the design really simple.  I created the background pattern using the “ink smooshing” technique.  I pressed Tumbled Glass, Peacock Feathers, and Broken China Distress Inks onto different areas of my craft mat and spritzed them with water until they beaded up. I pressed a piece of watercolor cardstock into the droplets and dried it with a heat gun. Once I was happy with the background pattern, I used Antique Gold Metallic Spray and Jet Black Ink Spray to add some splatters to the background to make it extra artsy. I wanted the panel to have a framed look, so I debossed the Large Rectangle Outer Rim and Insert dies from the Fluted Classics Rectangles Etched Dies for a lovely thick impression on the paper. Then, I die-cut Snowdrift Cardstock, Mirror Gold Cardstock, and White Foam using the Medium Oval Rim and Insert and Small Inner Rim and Insert dies from the Fluted Classics Ovals Etched Dies. I adhered the layers together using liquid glue, allowing a bit of the gold to show as a shadow. 

I arranged the flowers and leaves on my panel and adhered them down using a Hot Glue Gun. Next, I applied Gold Hot Foil to Snowdrift Cardstock using the Sentiments for Everyday Glimmer Hot Foil Plate & Die Set and adhered it down on my panel using foam squares for a raised effect. I matted the panel with a layer of Mirror Gold Cardstock and adhered the panel down to a top-folding A2-sized white card base using tape runner. I added a few Gold Mix Color Essential Gems to embellish. 


My next card features the Gardenia Etched Dies and the Forget-Me-Not and Ladybugs Etched Dies. This is one of my favourite die sets from the Collection and i am quite pleased with how my card turned out. I love the contrast of the white gardenias against the black ink-blended background!

To make this card, I began by die cutting Susan's Garden Specialty Cardstock with the Petals and Leaf Dies from the Gardenia Etched Die Set and the Petals, Stem, and Stamen Dies from the Forget-Me-Not and Ladybugs Etched Die Set. Then, I shaded the centre of the gardenia petals with Mustard Seed and Squeezed Lemonade Distress inks and shaped the flower pieces with a loop tool and tweezers

Next, I coloured the flowers of the Forget-Me-Not and Ladybugs Die Set using Picked Raspberry, Worn Lipstick,  Abandoned Coral, and Mustard Seed Distress inks and shaped the flower petals with a ball stylus. Next, I coloured the stem using Picked Raspberry and Mustard Seed Distress inks and the leaves using Twisted Citron and Peeled Paint Distress inks and shaped them with the leaf tool and small ball stylus included in the Susan’s Garden Ultimate Tool Kit

Next, to add a bit of contrast, I die-cut a diamond in the middle of the background panel using the Inner Diamond Die from the Diamond Floral Frame Glimmer Hot Foil Plate & Die Set. Next, I die-cut Snowdrift Cardstock and White Foam using the coordinating Outer Diamond Die and Inner Diamond Die from the set and adhered it over the card panel for a raised effect. After I’d finished die-cutting the images, I used blending brushes to blend some Black Soot and Hickory Smoke inks on the left side the panel, sprinkling some water droplets on the blended area, then dabbing them with a paper towel to pull up the color. Once done, I dried the panel and added fine gold and pink paint splatters for a dramatic look. Then, I adhered down the flowers, stem, and foliage around the frame using Hot Glue. 

The sentiment was foiled in gold using one of the plates from the Be Bold Glimmer Sentiments Glimmer Hot Foil Plate & Die Set on Snowdrift Cardstock and popped up on top with foam adhesive. Next, I used Gold Hot Foil to foil Onyx Cardstock using one of the sentiments from the Mini Sincere Sentiments Glimmer Hot Foil Plate and cut it out using the coordinating die. I adhered the piece onto my panel using foam squares for a raised effect. Then, to complete, I mat my background panel with Snowdrift Cardstock before adhering it to a side-folding white card base with tape runner. I finished the design with some sparkling gold sequins around the bouquet to embellish.


My final project for today feature the Floribunda Rose Etched Dies and the Forget-Me-Not and Ladybugs Etched Dies. The Floribunda Rose is one of the most impressive-looking flower in the collection and I wanted to make sure I used a canvas large enough to really show off all of the layers and detail.

To create my card, I first die-cut Susan's Garden Specialty Cardstock with all of the Petals and Leaf Dies from the Floribunda Rose Die Set and the Petals and Stamen Dies from the Forget-Me-Not and Ladybugs Etched Die Set. I coloured the Color the flower centers with Dried Marigold and Wild Honey Distress inks and and used Squeezed Lemonade Distress ink to colour the tips. Next, I shaped each petal with the loop tool and tweezers from the Ultimate Tool Kit and cupped them with the large ball tip before adhering the layers of petals together with liquid glue. For the bud, I used Spiced Marmalade and Dried Marigold Distress inks to colour the pieces and shaped the smallest two layers with a large ball stylus before adhering together.

The leaves were coloured Peeled Paint, Shabby Shutters, and Gathered Twigs Distress inks and shaped with the leaf tool included in the Susan’s Garden Ultimate Tool Kit. Next, I coloured the flowers of the Forget-Me-Not and Ladybugs Die Set using Tumbled Glass and Broken China Distress Inks and the centres with Dried Marigold ink. 

I wanted the background to be clean and crisp, so I die-cut Snowdrift Cardstock with the Scallop Rim and Outer Lace Eyelet Dies from the Eyelet Lace Frame Etched Dies. I then die-cut the coordinating layers with the Rectangle Outline and Inner Eyelet Insert dies and Inner Rectangle Outline and Inner Eyelet Insert dies from the same set out of Snowdrift Cardstock and adhered it to the center of the card front with foam adhesive.

Next, I die cut Snowdrift Cardstock using the Inner Oval Outline Die from the Eyelet Lace Frame Etched Dies. I stamped a sentiment onto the piece in Versafine Onyx Black ink and popped it on the die-cut panel using foam adhesive for dimension. Then, to finish, I adhered all the flowers and leaves down to the left of my panel with liquid glue and adhered the background panel to a top-folding A7-sized card base using tape runner. 


SPELLBINDERS SUPPLIES:
CS-027, CS-030, S2-340, S3-445, S4-1190, S4-1191. S5-474, S5-475, S5-507, S6-184, SCS-118, SCS-122, SCS-129, SCS-160, GLF-014, GLP-253, GLP-288, GLP-299, GLP-305, PCGO4E, T-021, T4645, AD-0084, MISTI, PCGO4E, PE-100, T-021


OTHER SUPPLIES:
Neenah Solar White Cardstock, Copic Markers, Picked Raspberry, Worn Lipstick,  Abandoned Coral, Tattered Rose, Spun Sugar, Mowed Lawn, Twisted Citron, Peeled Paint, Shabby Shutters, Gathered Twigs, Peacock Feathers, Tumbled Glass, Broken China, Dried Marigold, Wild Honey, Spiced Marmalade, Dried Marigold, Mustard Seed, Fossilized Amber, Squeezed Lemonade, Black Soot, Hickory Smoke Distress inks, Versafine Onyx Black Ink, Sponge Daubers, Blending Brushes, MISTI Stamping Tool, Hot Glue Gun, Tape Runner, Antique Gold Metallic Spray and Jet Black Ink Spray.

I hope you enjoyed this set of layered floral cards featuring the Through the Garden Gate Collection and are inspired to give it a try. Thank you so much for stopping by today!

You can find more inspiration over at my Instagram page.

Friday, April 22, 2022

Altenew Paint-A-Flower: Gerbera Revolution Outline Stamp Set Release Blog Hop + Giveaway ($200 in Total Prizes)


Hello, crafty friends!
I'm so happy to be joining Altenew for the Gerbera Revolution Outline Stamp Set Release Blog Hop today showcasing the next installment in their monthly Paint-A-Flower series! You can purchase this fabulous set here individually for $15.99, or you can subscribe to receive the new Paint A Flower sets at a discount each month! When signed up, you are guaranteed a spot in their monthly their monthly Paint-A-Flower releases and will receive a set each month - at a specially discounted price! ($15.99 →$12.99)

If you arrived here from Daniel Diaz's Blog, then you are on the right track. If this is your first stop, then you will want to start at the beginning, the Altenew Card Blog. We've got tons of inspiration and giveaways for you on the hop today, so keep reading till the end of this post for more information.

These darling daisy-like flowers are so beautiful and cheerful, perfect for an encouragement card. Let’s get started with the details!


I began by stamping the main gerbera image from the Paint A Flower: Gerbera Revolution on some Altenew Cold-Pressed Watercolor Paper with Embossing Ink and heat embossed it using Antique Silver Super Fine Embossing Powder. I then used the Tropical Fiesta Watercolour Brush Markers Set to do some soft watercoloring on the images. Once my watercoloured images had dried, I dug out my long-neglected Prismacolor Pencils to add some shading and depth to the flowers.

Then, for my card background, I watercolored a panel of Altenew's Watercolor Paper using Lime and Sweet Leaf  Brush Markers and drug the color out loosely with water for a dreamy, watercolored background. Once it dried, I added dark green paint splatters all around the card panel for interest. 

Next, I die-cut Neenah Classic Crest Solar White Cardstock with some additional filler flower, leaf, and foliage dies from the Virginia Rose 3D Die Set, Garden Picks 3D Die Set, and the Craft-A-Flower: African Daisy Set. I coloured the die-cut pieces using Sweet Leaf, Lime, Purple Wine, and Turquoise Brush Markers from the Tropical Fiesta Set and assembled them using Craft Glue

Then, I stamped a sentiment from the Castle Garden Stamp Set onto a strip of Neenah Classic Crest Solar White Cardstock using Obsidian ink and adhered it on my panel using foam adhesive.

Then, to finish, I adhered the panel to a top-folding A2-sized white card base using tape runner


Giveaway Prizes:
$200 in total prizes! To celebrate this release, Altenew is giving away a $50 gift certificate to 2 lucky winners and a $20 gift certificate to 5 winners! Please leave a comment on the Altenew Card Blog and/or each designer’s blog post on the blog hop list below by 03/28/2022 for a chance to win. Altenew will draw 7 random winners from the comments left on each stop of this blog hop and announce the winners on the Altenew Winners Page on 04/30/2022.

Blog Hop Order:
Next Stop on this Blog Hop is, Eva Bussom's blog. Just in case you lose your place along the way, here is the complete list of participants so that you can find your way back:


Well, that’s all for my project today! Thanks so much for stopping by and reading. I hope you have a wonderful day!
If you like what you've seen from me, please give me a follow over on my Instagram (@hussena_cal) and/or subscribe to my blog if you haven't already.