Thursday, July 29, 2021

Spellbinders July 2021 Clear Stamp of the Month | Sending Floral Wishes

Hello everyone!
Welcome to my blog! I have a set of springtime cards to share today that I created using the Spellbinders Clear Stamp of the Month Kit - Sending Floral Wishes. My post has been severely delayed, but I still wanted to go ahead and share these cards with you. If you haven't heard about the Clear Stamp of the Month Club by Spellbinders, you can go over to the Spellbinders blog and read more about it HERE.

The Spellbinders Clear Stamp for July is a 9 piece stamp set, containing a large floral bouquet, a small flower sprig,  and sentiments perfect for a variety of occasions. Three of the sentiments in particular coordinate with the Decorative Mini Slimline Card Creator Dies set. The stamp set coordinates with the July 2021 Large Die of the Month, so you can mix and match your supplies to create different projects. This “Sending Floral Wishes” stamp set features made in the USA stamps from high-quality photo-polymer for clear, crisp impressions.  

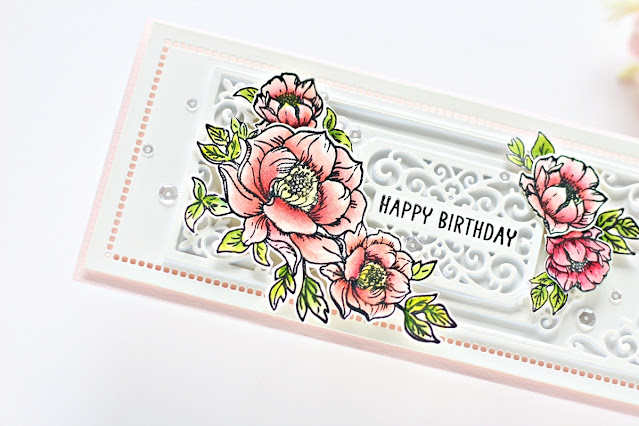
To make my card, I began by die cutting Alabaster Cardstock with the Large Rectangle Rim and Hemstitch Insert from the Hemstitch Slimline Etched Dies. Next, I die cut Alabaster Cardstock with the coordinating Medium Rim and Insert, the Tag, and the Sentiment Label Rim and Insert using the Victorian Splendor Slimline Die Set. I love how this month's stamp set coordinates so well with last month's Amazing Paper Grace Die Set. They look so elegant together! 

I stamped the large floral cluster and single stamp onto White Cardstock using Versafine Onyx Black ink and colored the images with Nuvo Alcohol Marker pens before fussy cutting them out with scissors. Once that was done, I stamped a sentiment from the Sending Floral Wishes in the centre of the sentiment label die with black ink. 

I adhered the background panels to a top-folding Pink Sand card base measuring 3.75” x 8.75” with foam adhesive. I then popped the floral images onto the card panel using foam adhesive. Then, to finish, I adhered Sparkling Clear Sequins in a variety of sizes for some sparkle and shine. 


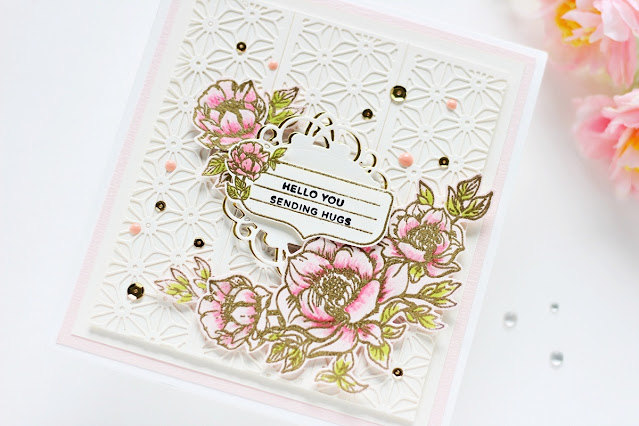
For my second card, I started by die-cutting Alabaster Cardstock with the Small Rectangle Rim and Insert dies. I used it to create a full background by simply die-cutting them in Alabaster Cardstock and getting rid of all the chads. It makes for a very quick and beautiful background panel.

Next, I stamped the large floral cluster and single stamp onto Watercolor Cardstock using Versamark Embossing ink and then heat embossed it using Super Fine Gold Embossing Powder. I colored the images with Zig Clean Clear Brush Markers before fussy cutting them out with scissors. I then die cut Alabaster Cardstock and Gold Mirror Cardstock with the Grand Dome 3D Card Etched Dies. Next, I adhered the gold die cut to the back of the white die cut as a shadow layer. 

Once that was done, I stamped and heat embossed the floral address stamp from the Sending Floral Wishes onto Watercolor Cardstock. I fussy cut it out using scissors and added it to my panel using foam adhesive. 

To assemble, I matted the die cut background panel with layers of Alabaster Cardstock and Pink Sand before adhering it to a top-folding A7-sized white card base. Next, I popped up the floral images with even more foam adhesive. Then, to complete my card, I added tons of gold sequins and peach enamel dots.

I hope you enjoyed these floral cards and thanks so much for stopping by today. You can subscribe to any of the Spellbinders Clubs between the 1st - 24th of each month and never miss a fun kit like this again! 
Don't miss the BOGO (Buy One Get One) Die Cutting Sale going on over at Spellbinders from now until Saturday, July 31st. Be sure to take advantage of the sale and stock up on your favourite die sets!

If you like what you've seen from me, please give me a follow over on my Instagram (@hussena_cal) and/or subscribe to my blog if you haven't already.
Wishing you a great day ahead!

Friday, July 23, 2021

Spellbinders Birdhouses Through the Seasons Collection


Hello everybody!
I hope you are keeping well. Today's post has been long overdue because the cards that I am sharing today were created and photographed back in May 2021. I got around editing the pictures today and am so happy to finally blog about my projects. 

My cards for today feature the Spellbinders Birdhouses Through the Seasons Collection by Vicky P. This whimsical and unique collection includes five die sets and a sentiment stamp set with which you can create bird and/or birdhouse-themed cards. You can use the products in a variety of different ways, no matter what the season!

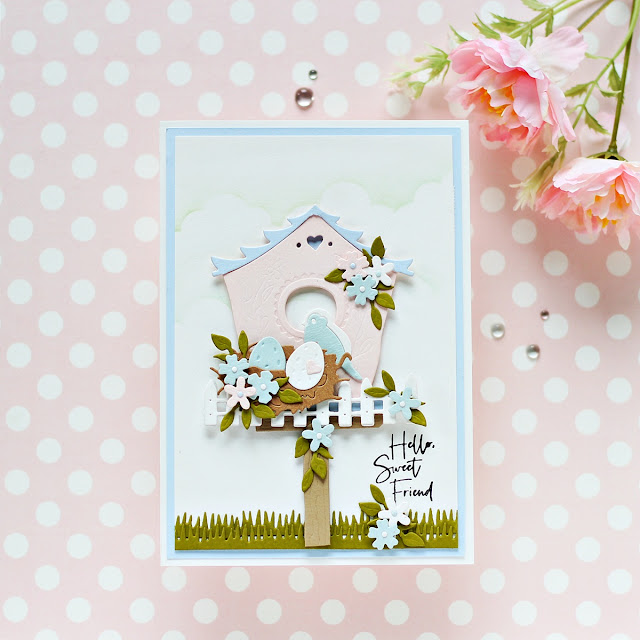
My first card features the Build a Spring Birdhouse Etched Die Set. I used the different elements from the die set to create a sweet floral spring card for a friend. 

To begin, I die cut Pink Sand and Raindrop Cardstock with the birdhouse die from the Build a Spring Birdhouse Etched Die Set. Next, I die cut SnowdriftPink SandRaindrop, and Fern Cardstock with the flower and leaf dies from the Build a Spring Birdhouse Etched Die Set.  Once that was done, I die cut Oatmeal Cookie Cardstock with the birdhouse stand die and the nest die included in the set. Then, to complete the birdhouse, I die cut Snowdrift Cardstock with the picket fence die and the egg die from the same set. I die cut everything using my Spellbinders Platinum 6" Machine and then kept the die cuts aside to work on my card panel. 

I trimmed a piece of Snowdrift Cardstock to size and used a Cloud Stencil with Green Olive ink to give the illusion of green skies. I then die cut some blades of grass from Fern Cardstock and adhered them along the bottom of the card. Next, I stamped my sentiment from the Borders and Sentiments Clear Stamp onto the panel with black ink.

It was now time to assemble my card together. I adhered the roof, the birdhouse, and the birdhouse stand on to my card panel using foam squares. I then added the bird to the opening of the house along with the nest, the egg, and the picket fence. I embellished the house with the various die cut flowers and leaves. Next, I added mini die cut circles to the centre of the flowers for interest. 

To finish, I trimmed a piece of Raindrop Cardstock to size and adhered it a side-folding 5" X 7" white card base.


My second card for today features the Build a Summer Birdhouse Etched Die Set. I paired the lighthouse birdhouse die with the Sun Burst Stencil from the Liberty Collection to create a bright and cheery slimline card that is perfect for sending a sunny hello.

To begin, I trimmed a piece of Snowdrift Cardstock to 4" X 7" and secured the Sun Burst Stencil on the top of the panel to blend Squeezed Lemonade Distress ink with a blending brush. I then removed the stencil from the panel and secured a DIY Cloud Stencil on the top to blend Tumbled Glass Distress ink on the panel with a blending brush to give the illusion of blue skies. 

Next, I die cut a few valleys to create the landscape of a beach on my card. I die cut them from Oatmeal Cookie and Raindrop Cardstock and adhered them to my panel using liquid adhesive. I blended Tumbled Glass Distress ink along the edge of the slope with a sponge dauber to add some definition and interest. Once that was done, I stamped a sentiment from the Borders and Sentiments Clear Stamp onto the panel with black ink. 

It was now time to create focal for my card. I die cut Snowdrift, Comsic Blue, Pomegranate, Portbello, and Timber Cardstock with the birdhouse die and the coordinating elements from the Build a Summer Birdhouse Etched Die Set. I also die cut Snowdrift Cardstock with the shell, starfish, and gull dies. I used Nuvo Alcohol Marker Pens to colour the shells and the starfish. I then added a coat of Diamond Stickles for some sparkle and shine.

I assembled the different components of the lighthouse together and adhered it to my card panel using foam squares. I also adhered the seagulls to my card panel using foam adhesive. Next, I adhered the lighthouse stand, the starfish, the anchors, and the sea shells on to my panel using foam squares for dimension. Then, to finish, I adhered the background panel to a 4.25" X 7.25" side-folding white card base. 


I hope you enjoyed this duo of nature-inspired cards. You can see Birdhouses Through the Seasons by Vicky P. HERE. It is truly marvelous and these die sets make creating so fun!


Thank you so much for your stopping by and reading this blog post. I hope you liked my projects! 

If you like what you've seen from me, please give me a follow over on my Instagram (@hussena_cal) and/or subscribe to my blog if you haven't already.
Wishing you a great day ahead!

Thursday, July 15, 2021

Spellbinders July'21 Blog Hop + Giveaway!

Hello, crafty friends!
I'm so happy to be joining Spellbinders for the July 2021 Clubs Inspiration Blog Hop today. Spellbinders is celebrating all their Club Kits in shop for July 2021.

If you arrived here from Kathy Clement's Blog, then you are on the right track. If this is your first stop, then you will want to start at the beginning, the Spellbinders Blog. We've got tons of inspiration and giveaways for you on the hop today, so keep reading till the end of this post for more information.

I have a layered card to share today for the hop today using the Amazing Paper Grace – July 2021 Die of the Month Set.

The Pop Up 3D Vignette Home Sweet Home is a gorgeous set of twenty one dies and it features a house as well as wonderful dimension, and folds flat like all of the 3D Vignettes, so that it can be easily sent through the mail.

I have used the Mini Vignette Die Set to create an A7 card, however the die set offers endless possibilities and can be used for 3D projects as well as for multiple card sizes, including Slimline cards. You can also use different parts of the die such as the facade for the leading layer of the house or the tiny flower and foliage dies in the set and create something completely new using them. The Mini Vignette house can hold your favorite pictures, a multipage note, or sweet nothings on the three panels that rest inside.

For my card, I first die cut all the different die pieces of the house in the Pop Up 3D Vignette Home Sweet Home from Cream Cardstock, Gold Mirror Cardstock, Waterfall Cardstock, and Oatmeal Cookie Cardstock using my Spellbinders Platinum 6" Machine. Then, I die cut Waterfall Cardstock using the Pattern Rectangle 1 Die from the Candlewick Classics Rectangles Etched Dies.  

I assembled the house together following Becca's How-To Video and adhered all the little pieces on the die cut rectangle piece using Journey Craft Glue and Foam Squares - Small.  The Die Set is designed to help you create a 3D Vignette Home, but you can use it to create a 2D piece for your card front as well. I always admire how Becca puts in so much thought behind her die designs. This one is no exception too!

The petite flowers and leaves were die cut from Alabaster and Fern Cardstock pieces. I embossed the die cut pieces using the small ball tip from the Ultimate Tool Kit and then added gold glitter balls to the centres of the flowers. I adhered them to my card front using Journey Craft Glue. The sentiment piece is a part of the Pop Up 3D Vignette Home Sweet Home die set and I adhered a strip of Gold Mirror Cardstock behind the message insert to help the letters shine. The decorative options are endless in this set to make it your home sweet home!

To assemble, I matted the die cut background panel with layers of Cream Cardstock, Oatmeal Cookie Cardstock, and Gold Mirror Cardstock before adhering it to a top-folding ivory card base with liquid adhesive. This month's Die Set really had me smiling from ear to ear. It's so darling and pretty! What do you think?


Giveaway:
To celebrate this release, Spellbinders is giving away a $50 gift certificate to 3 lucky blog readers – selected from the comments on our blog. Giveaway closes on Sunday, July 18th, 11:59 pm MST. The winner will be announced in this blog hop post the following Tuesday. The winner is responsible for shipping cost, duties and taxes.

Please note, store credit (gift certificate) cannot be applied to Club Subscriptions. Store credit can be applied to shop past Club products, Club extras and regular releases.


Blog Hop Order
Next Stop on this Blog Hop is, Jill Hilliard's blog.
Just in case you lose your place along the way, here is the complete list of participants so that you can find your way back:

                        Hussena Calcuttawala (You are HERE)

Thank you so much for your stopping by and reading this blog post. I hope you liked my project! 

If you like what you've seen from me, please give me a follow over on my Instagram (@hussena_cal) and/or subscribe to my blog if you haven't already.
Wishing you a great day ahead!