Showing posts with label Valentine Card. Show all posts

Monday, February 21, 2022

Spellbinders February 2022 Clear Stamp & Die Club Kit | Old School Notes


Hello, crafty friends!
Hope your Monday is off to a great start! I have a Birthday Card to share today made using the Spellbinders Clear Stamp & Die of the Month -  Old School Notes.

The Spellbinders Clear Stamp of the Month features a cute typewriter with stamped details inside, several types of flowers, and darling sentiments, which you can mix and match with the other Club Kits for February Kits such as the Large Die of the Month Kit for endless possibilities! This is a 17-piece clear photopolymer 4 x 6 stamp set perfect for many cardmaking projects and lots of occasions. This “Old School Notes” stamp set features made in the USA stamps from high-quality photo-polymer for clear, crisp impressions. 

There is also a Spellbinders Clear Stamp Club Kit without the die set, which you can opt for if you don't wish to receive the coordinating dies.

 You may notice a theme from my last post - Typewriters. I’m having such a blast creating with these this month! I decided to create a watercolored Birthday Card using the Old School Notes Stamp set along with the Typing Class Die Set and the Nestabilities Hemstitch Rectangles Etched Dies.

To create my card, I first stamped a number of the images from the  Old School Notes Stamp set on to Snowdrift Cardstock using Versafine Onyx Black ink. Next, I colored the images using the Jane Davenport Watercolors Neutrals Set. Once the images were all colored and dry, I die cut the images using the coordinating dies. 

Next, I die-cut Beeswax, Dahlia, Rainforest, and Teal Topaz Cardstock using the flower and leaf dies included in the Typing Class Die Set. Then, I went ahead and stamped some additional solid leaves from the stamp set on to Snowdrift Cardstock using Electric Lime ink and cut them out using the  coordinating dies to use as foliage. Next, I die-cut Snowdrift Cardstock using the typewriter message die included in the Clear Stamp & Die of the Month Club and stamped a sentiment on it using Versafine Onyx Black ink and popped it on my panel using foam adhesive. 

Next, to create my card background, I die-cut Snowdrift Cardstock using the Extra Large Frame Die from the Hemstitch Rectangles Etched Die Set. Then, I wet my panel with water and used Tumbled Glass, Peacock Feathers, and Cracked Pistachio Distress Inks with a Water Brush in a dabbing motion, allowing the colors to mix slightly. I let the panel dry and then added some grey and teal paint splatters for interest. Then, I stamped one of the sentiment pieces from the Old School Notes Stamp set using Pumice Stone Distress Oxide ink randomly all over the panel to create a vintage letter look. I really love how it adds a little something to the background. 

Once that was done, I adhered the stamped images to the background panel using foam adhesive. Then, I matted the panel with layers of Silver Glitter and Silver Fox Cardstock before adhering it to a top-folding white card base with tape runner. 


I hope you liked my card and thank you so much for stopping by today. You can subscribe to any of the Spellbinders Clubs between the 1st - 24th of each month and never miss a fun kit like this again!
  

Don't miss out on the Be our Valentine Sale that is currently going on at Spellbinders. You can SAVE $25 Off $100+ on your orders on the Spellbinders website. This is a cart-level discount that will be applied to all orders with a subtotal of $100+, clubs are not eligible for this promotion.


 If you like what you've seen from me, please give me a follow over on my Instagram (@hussena_cal) and/or subscribe to my blog if you haven't already.
Wishing you a great day ahead!

Saturday, January 22, 2022

Spellbinders January 2022 Clear Stamp & Die of the Month | One Love, One Heart


Hello, crafty friends!
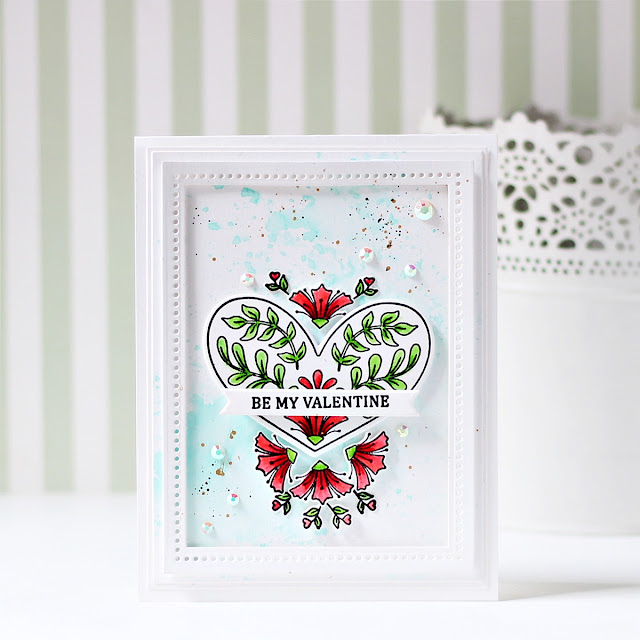
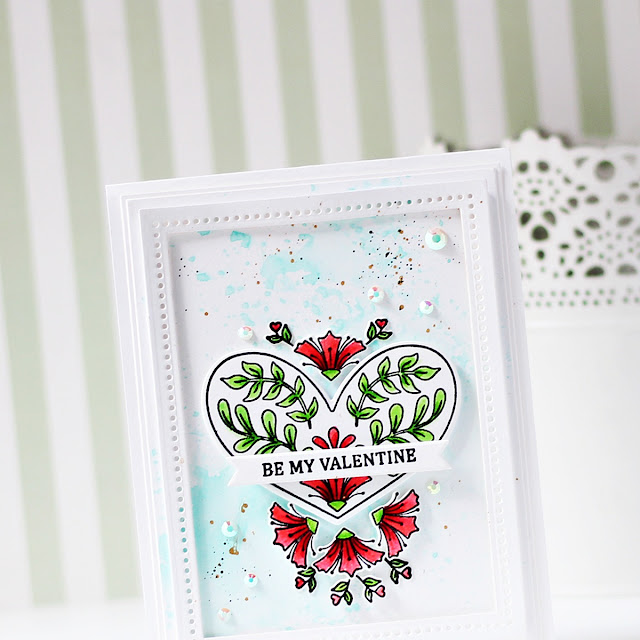
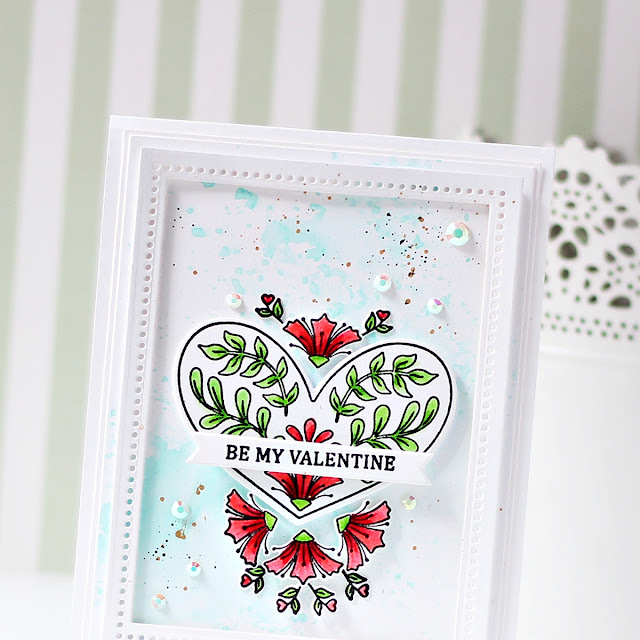
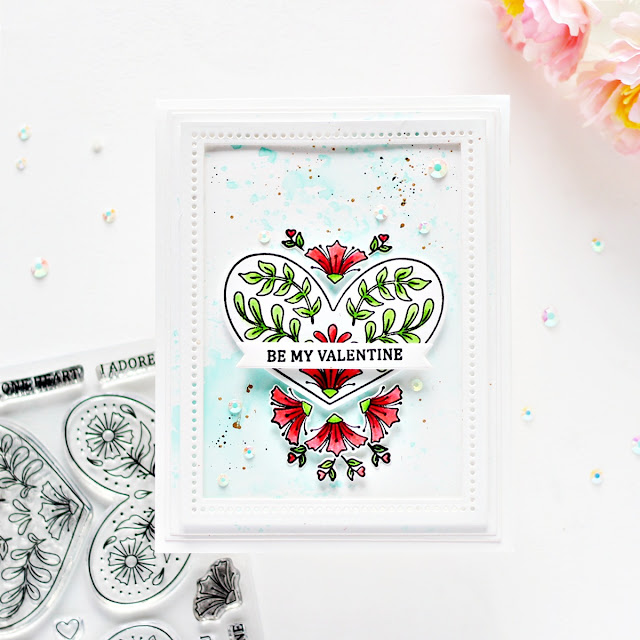
Hope your weekend is off to a great start! I have a Valentine's Day Card to share today made using the Spellbinders Clear Stamp & Die of the Month -  One Love, One Heart.

The Spellbinders Clear Stamp of the Month features three wonderful hearts with stamped details inside and beautiful sentiments, which you can mix and match with the other Club Kits for January Kits for endless possibilities! This is a 12-piece clear photopolymer 4 x 6 stamp set perfect for many cardmaking projects and lots of occasions. This “One Love, One Heart” stamp set features made in the USA stamps from high-quality photo-polymer for clear, crisp impressions. 

There is also a Spellbinders Clear Stamp Club Kit without the die set, which you can opt for if you don't wish to receive the coordinating dies.

 The pretty heart designs from the set inspired me to create this love-themed card, which would just perfect to gift to a loved one this Valentine's Day. I used the Clear Stamp and coordinating dies from the set along with the Nestabilities Hemstitch Rectangles Etched Dies for my design.

For my card, I started by trimming a piece of Snowdrift Cardstock to 4″ x 5.25″ and created the background pattern using the 'Ink Smooshing' technique. I just pressed Tumbled Glass and Salty Ocean Distress Inks onto different areas of my craft mat and spritzed them with water until they beaded up. I then pressed my piece of cardstock into the droplets and dried it with a Heat Gun. I continued pressing the cardstock into the ink droplets until I had look that I liked and was happy with.

Next, I I stamped one of the heart designs and the individual floral images from the One Love, One Heart Stamp Set onto Snowdrift Cardstock using Versafine Onyx Black Ink. I coloured the images using Zig Clean Colour Real Brush Markers and then cut them out with the coordinating dies (included if you subscribe to the Clear Stamp & Die of the Month Kit) and popped them up in the middle of the card using foam adhesive. Next, I stamped a sentiment from the same set onto a strip of Snowdrift Cardstock using Versafine Onyx Black Ink and used one of the banner dies included in the Kit to cut out the card sentiment and popped it down on my panel using  foam adhesive.

To accentuate my design, I die-cut Snowdrift Cardstock and White Fun Foam using the Extra Large Hemstitch Die from the Nestabilities Hemstitch Rectangles Etched Dies. I adhered down the frame to my panel using liquid adhesive and then mat the card panel with  Snowdrift Cardstock. Then, to finish, I adhered it to a top-folding A2-sized white card base with liquid adhesive. Lastly, I adhered a few Iridescent Crystal Gems around my stamped design to add some sparkle and shine to the panel. 


I hope you liked my card and thank you so much for stopping by today. You can subscribe to any of the Spellbinders Clubs between the 1st - 24th of each month and never miss a fun kit like this again!
  

Don't miss out on the Feel The Love Sale that is currently going on at Spellbinders with up to 40% off on a wide range of gorgeous dies, stamps, glimmer plates, tools, and more! There are so many AMAZING deals that you definitely shouldn't miss! 
 

 If you like what you've seen from me, please give me a follow over on my Instagram (@hussena_cal) and/or subscribe to my blog if you haven't already.
Wishing you a great day ahead!

Thursday, January 13, 2022

Spellbinders January 13th Clubs Blog Hop + Giveaway


Hello, crafty friends!
I'm delighted to be joining Spellbinders for the January 2022 Clubs Inspiration Blog Hop today. Spellbinders is celebrating all their Club Kits in shop for January 2022.

If you arrived here from Deborah Jenkins' Blog, then you are on the right track. If this is your first stop, then you will want to start at the beginning, the Spellbinders Blog. We've got tons of inspiration and giveaways for you on the hop today, so keep reading till the end of this post for more information.

I have an A2 Shaped Note Card cum Pocket to share for the hop today using the Spellbinders  – January 2022 Die of the Month Set. This month’s Large Die of the Month Kit, “A Pocket Full of Love“, is a large set of 11 dies that cuts a beautifully ornate pocket as well as a fun shaped note card to insert.  You can add the pocket to your cards and scrapbook pages or use it on its own for a gorgeous and unique love letter like I’ve done here. It all fits in an A2 envelope, which is perfect for Valentine’s Day, but could totally be used for other occasions throughout the year!

To create my card, I first Alabaster Cardstock using the Pocket Tab Dies from the A Pocket Full of Love Die Set. I die cut the layers twice, and then adhered them together using Craft Glue to create the pocket for my note-card. Next, I die-cut Alabaster Cardstock and White Foam using the Decorative Pocket Die from the set and layered the pieces atop the pocket using Craft Glue. Next, I die-cut Wild Berry, Pink Sand, Rainforest, Fern, Gold Glitter Cardstock, and White Foam using the Flower die included in the set. I layered the pieces together and adhered it down my pocket using Craft Glue for a strong hold. 


Once that was done, I die-cut Beeswax and Glacier Cardstock using the Note Card Insert Die in the A Pocket Full of Love Die Set. Next, I die-cut Alabaster Cardstock, Gold Glitter Cardstock, and White Foam Sheets using the Pull-Out Decorative Heart Die from the set and adhered the layers together with Craft Glue for a strong hold. I adhered the ivory die-cut piece on top of the gold glitter die-cut with liquid glue, offsetting them a bit to form a shadow. I also die-cut Wild Berry Cardstock and  White Foam using the Tiny Flower Die from the Set and layered them together for a raised effect. Next, I stamped a sentiment from the "One Heart, One Love" Clear Stamp of the Month Set on to a strip of Snowdrift Cardstock using Versafine Onyx Black and popped it on to my panel using foam squares for dimension.


Once that was done, I embossed Glacier Cardstock using the NEW "Spreading Love" Embossing Folder from Spellbinders. This Club has sold out for the month, but you can check back later in the 'Past Clubs' section on the website to get your hands on it.  Be sure to sign up for the Spellbinders Clubs right away on the 1st of the month not to miss out on any future designs! I trimmed the embossed panel to size to fit on my card base and then adhered down my card elements on it with liquid glue. Then, to finish, I mat my card panel with Mirror Gold Cardstock before adhering it a side-folding A2 Alabaster card base with tape runner. I didn't stamp a sentiment in the pocket letter, but if you wish, you could do that to personalize your card even further.


Giveaway:
To celebrate this release, Spellbinders is giving away a $50 gift certificate to 3 lucky blog readers – selected from the comments on our blog. Giveaway closes on Sunday, January 16th, 11:59 pm MST. The winners will be announced in this blog hop post the following Wednesday. The winner is responsible for shipping cost, duties and taxes.

Please note, store credit (gift certificate) cannot be applied to Club Subscriptions. Store credit can be applied to shop past Club products, Club extras and regular releases.

Blog Hop Order: 
Next Stop on this Blog Hop is, Jeanne Bobish's blog.
Just in case you lose your place along the way, here is the complete list of participants so that you can find your way back:

                           Hussena Calcuttawala (You are HERE)

Thank you so much for your stopping by and reading this blog post. I hope you liked my project! 

If you like what you've seen from me, please give me a follow over on my Instagram (@hussena_cal) and/or subscribe to my blog if you haven't already.
Wishing you a great day ahead!

Thursday, January 6, 2022

Spellbinders Guest Design Post | Love You More Collection


Hello, crafty friends!
I'm so honoured to be guest posting today on the Spellbinders blog! I'm sharing a set of two cards today using dies from the NEW Love You More Collection. This die cutting collection features two sets that you can mix and match to create a variety of projects ranging from Valentine's Day cards or Anniversary Cards, just to name a few.

The Open House Door Base Die Set coordinates together with the Open House Valentines Set, but if you don't have that in your stash, you can easily substitute it with the Always Welcome Die Set as all of the accessories mix and match between these two styles of doors.

My first card features the Open House Valentines Set. I wanted to showcase how the die set could be used even without the front door die and this would be perfect to send to a friend or a loved one!

To create my card, I first trimmed piece of Snowdrift Cardstock to 4.25” x 5.5” and ink blended the top three-quarters of the panel using Cracked Pistachio and Tumbled Glass Distress inks, concentrating the darker shade towards the top. Next, I matted my panel with a piece of Brush Gold Cardstock. 

I die cut Wild Berry, Pink Sand, and Brush Gold Cardstock using the banner dies included in the Open House Valentines Set. I adhered each of the pieces down on my panel using foam adhesive for dimension. Next, I die cut Vellum using a Scalloped Circle die included in the Nestabilities Classic Scalloped Circles Small Etched Dies. Then, I die cut Snowdrift Cardstock using the 1-1/8-inch Circle Die from the Nestabilities Small Standard Circles Etched Dies. I layered the two pieces together, one on top of the other, using foam adhesive. Next, I die cut Wild Berry and Pink Sand Cardstock using the heart dies included in the Open House Valentines Set. I also die cut Pink Sand and Brush Gold Cardstock using the cute envelope and arrow dies included in the set. I adhered all the different die cut pieces on my panel using a mix of liquid glue and foam adhesive. 

Once that was done, I die cut Snowdrift, Wild Berry, and Brush Gold Cardstock with the door mat dies in the set. I layered the pieces together and adhered it on my panel using foam piece. I also die cut some mini hearts using leftovers from the die cut pieces to add to my card panel using liquid adhesive. Then, to complete, I went ahead and adhered the panel to a top-folding A2-sized white card base with tape runner.


For this card, I started off by die-cutting Snowdrift Cardstock using the Circular Stitch Background Etched Die in my Spellbinders Platinum 6" Machine. This die is super versatile and I love the beautiful die cut details in it! I matted the entire die cut panel with Pink Sand and Waterfall Cardstock before adhering to it a top-folding A2-sized white card base.   

I die-cut Pink Sand Cardstock, Brush Gold Cardstock, and White Foam Sheets using the outline and insert dies included in the Love You More Die Set. I adhered the pink die-cut sentiment on top of the gold die-cut with liquid glue, offsetting them a bit to form a shadow. I then adhered the shadow layers for each of the die cut pieces for dimension and depth. I then ink blended Picked Raspberry ink to the top three-quarters of the sentiment die-cut pieces for more depth. Once that was done, I adhered the pieces down to my panel using foam adhesive.

I die cut Snowdrift, Waterfall, Brushed Silver, and Pink Sand Cardstock using the mini flower, leaf, and foliage dies from the Mini Blooms and Sprigs Etched Dies and Layered Blooms Etched Dies. I assembled the floral sprays together in the corners of the card and adhered them down on my panel using a mix of foam adhesive and liquid adhesive for dimension and interest. Then, to finish, I adhered a few sparkling blue rhinestones to the flower centers and around my panel to embellish. 

I hope you enjoyed this duo of cards featuring the Love You More Collection. Thank you so much for stopping by today! You can find more inspiration over at my Instagram page. 

SPELLBINDERS SUPPLIES:
CS-003, CS-005, CS-017, CS-024, CS-027, SCS-116, SCS-117, SCS-151, SCS-160 S2-314, S4-114, S4-1091, S5-490, PCGO4E, PE-100, T-021

OTHER SUPPLIES:
Neenah Solar White Cardstock, Copic Markers, Picked Raspberry Distress Ink, Blending Tool, Sponge Daubers, Tape Runner, Foam Adhesive, Rhinestones, White Fun Foam Sheets

Saturday, January 18, 2020

Spellbinders + Amazing Paper Grace Die of the Month | January 2020


Hello, crafty friends!
I have a card to share today featuring the Spellbinders + Amazing Paper Grace January Die of the Month. This month's "Pop Up 3D Vignette Bouquet" is perfect for making gorgeous 3D cards and more. 

If you want to find out more about the Club – prices, how you sign up and what’s included, please look ——–> HERE. These dies are only available through the Club and are limited to the month of January, so hurry before they are sold out. There is also an inspirational PDF that you can download HERE that shows you how to use the die.

I created a Pop Up 3D Vignette Bouquet using the dies from this month's set. Here's a look at my project:

This die set is a great addition to Becca's 3D Vignettes Collection. One of the specialities of these dies is that they fold down flat to fit into an envelope. I went for a soft, watercolored look with this bouquet and had a lot of fun creating it!

I used 250 GSM Cold Press Watercolour Paper to die cut the flowers and foliage. I coloured all the die cut pieces using various dye inks. Then I adhered the elements using foam dots for added dimension.

I die cut the stems and the basket holder for the bouquet using White Cardstock as well as Gold Mirror Cardstock. I off-set the two when adhering so that the gold would peek through between the gaps.  I also added white pearls all along the border to give it a more dainty look.

I die cut the sentiment piece again from White Cardstock & Gold Mirror Cardstock. I inlay the pieces and added a red die cut heart to complete the look. I also added some ribbon and a flower on top to add some interest to the design. This is such a sweet project and is sure to bring a smile on the recipient's face.


If you are still on the fence about the Amazing Paper Grace Die of the Month Membership, do check out the project samples created using it on the Spellbinders blog. The dies are great value for money and the cost of the kit covers shipping cost within USA. So, what are you waiting for? Sign up as soon as possible!

That's it from me for today! I hope you liked my card. If you did, please do let me know in the comments below. I always love hearing from you.
Thank you so much for your visit to my blog today!

Monday, February 4, 2013

A Valentine Card! :)

Hi Friends,
Hope you all are doing fine ..I am back again to share with you a valentine card made for my inspiration at Crafter's Corner blog where our Theme this time is "Expression's of Love "and also our focus this time is on embossing and so keeping this in mind here's my card which has loads of embossing in it ...Here's a look first :-
  And here's a quick look at my gorgeous butterfly where I have done clear embossing with Versafine Black Ink and Ranger Super Fine Clear Embossing Powder ...Trust me this looks gorgeous in real life ..Wish I could have captured the essesnce in my picture though !!


  Okay gonna show you all an another view just to make sure you get how beautiful the embossing looks :)

                                       
There you have it !! ...I have done stamping and embossing on the heart 's as well they were hand-drawn and cut then embossed using  Ranger Super Fine Clear Embossing Powder with the Versafine Embossing Ink and then colored with two shades of the distress inks !  

Supplies used :
Base CS : Campap
Pattern Paper : Papermania,Graphic 45
Stamps :
Hero Arts :Flourish Background,Antique Engravings & Antique Brocade.
Lace stamp: My minds eye Miss Caroline collection
Dies:-
Cheery Lynn Olive Branches 
Inks :-
Tim Holtz Distress inks : Shabby Shutters ,Antique Photo ,Festive Berries ,Mustard seed & Tumbled Glass
Black ink -Versafine Onyx Black
For Embossing :-
Veramark Embossing Ink pad
American Crafts Zing! -Black
Ranger Super Fine Clear Embossing Powder
Sentiment -Simple Stories.(Sticker)
Mulberry Flowers These are part of the Candy I won at Shraddha's blog ...Lucky me :)
Laminated Jute -Itsy Bitsy
Leaves,Hat-pins ,Mesh ribbon ,Pearls & Key charm -Stash

Challenges Entered :
Glitter n Sparkle : Valentine/love          
Corrosive Challenge : Hearts and flower
My sheri crafts :Valentine (Honourable Mention)
Frosted Design :Love + Heart  
Simply Create Too : Valentine's day or include a heart
Flutter By Wednesday : must have a Butterfly.  

Hope you all like my work ...Please do leave me your Comments/ Suggestion.. It helps me grow :)
Have a nice day everyone! :)                                                         

Friday, January 18, 2013

Be Mine! :)

Hi friends,
Today I am sharing a card made with the sweet lil' Tilda with Peony Tails....I have just recently started working with the Tilda stamps and having quite a bit of fun using it!..I have colored with my image with Steadler Water -color pencils & used the Koi Water Brush which I got from Crafter's Corner along with my Tilda stamp :)..As this is my first time working with a water brush I am still learning the right way to use it ...But I have to say that online tutorials have been a big help..!!...So without further ado...Here's a look at my card :-

 And just because I can't resist a side view of the card :)

 Supplies used :-
Base CS- Fabriano Elle Erre!
Pattern Paper- W & M Papers
Magnolia Tilda -Crafter's Corner
Dies : Itsy Bitsy Fancy Venetian
         Memory Box Tessatina Border (The net effect)-Bought from Mansi's Store  
         Cheery Lynn Fanciful Flourish & Exotic Butterflies (Small)        
Mulberry Rose -Crafter's Corner
Small mulberry roses (Red) -RAK from Snehal
Punches : Martha Stewart Doily Lace Punch
                Medium Heart Punch -Jef
Sentiment -Krafter's Kart
Inks :Versafine Onyx Black -Crafter's Corner
        Memento Lilac Posies -Bought from Varshitha
        Vintage Photo Distress Ink

Challenges Entered :-
Lulupu -Love is in the Air (Honourable Mention)
Magnolia Down Under- Flowers
Penny Black and more -Love is in the air
Divas by Design -Girly
ABC Challenge -F for favorite Tilda Stamp (Tilda with Peony Tails)


Hope you all like my card ...Do leave me your comments /suggestions...I really appreciate it .
Have a nice day everyone!                                                                             

Wednesday, March 28, 2012

My Entry" For The Love Of Crafting" DT Call

Hi Friends,
                My Today's Post is Especially for The DT Call By Kavitha  of Kalalayaa's Art Studio on Her New Challenge Blog "For The Love Of Crafting"...Kavitha is Looking out for Few Designers to Help Her Out in Inspiring All the Participants for Her Challenge Blog...

Her Store Offers So Many New Crafting Supplies and Kits...Do Check it Out Over Here!

So Here are  some of My Projects for the DT Call :-


First Up is  A Few Boxes With Punch Craft done on Them...


Next up are A Purse, A Box  and a Tag :-


    Next is a Quilled 3-D Project  :-


And Last Up is a Card :-


That's All from Me.....Thank You for Taking Time to Browse Through My Post...Wish Me Luck :):)

Have a Nice Day Everyone!!                                                                                                                                 

Monday, February 13, 2012

Non -Traditional Valentine

Hi Friends,
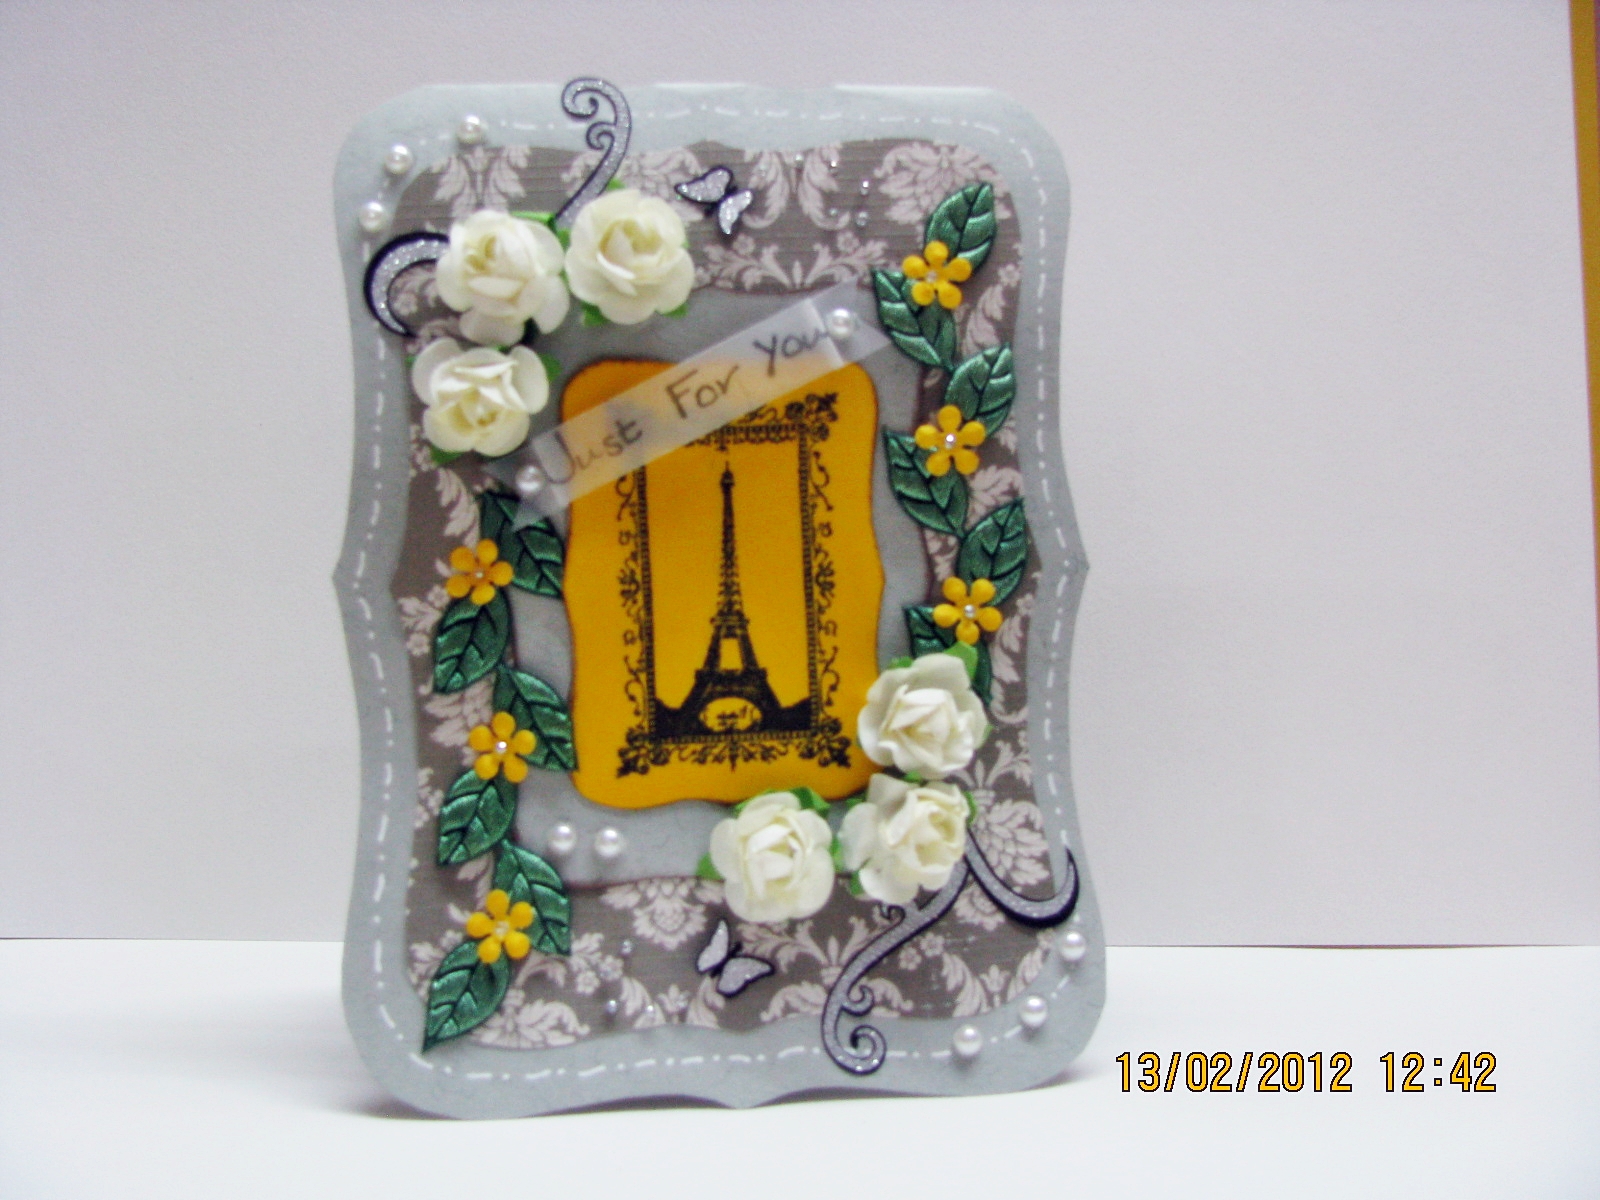
So I am back :) and I have a Card to share with you  ...Its  a Valentine /Anniversary Card using non traditional Colours..This was a tough one for Me!! as I always associated Valentine with Hearts and the Colour Red..But the Challenges at Beyond Grey and Crafty JC Asked for A non traditional Valentine  Card ..So here's a look at my Card first :
 Now a front View :-
                      As You all can see I have gone for a Vintage look for thus Card..I have tried a New  shaped Card

Supplies Used :-
 CS- Bought from Annanda Stationery.
 PP -Papermania Christmas Carol.
 Diecuts-Bought from Ujjwal.
 Stamp -TPC Studio (Jovi's Givewaway ) :) ; Sentiment-  Stamp from Hobby Ideas .
 Mulberry Roses- Snehal's Candy.
 Flowers- Jef Small Punch.
 Leaves- Ribbon from Stash.
Pie Lane Glitter Balls,Flourishes and Butterflies.
Self Adhesive Pearls-Bought from Annanda Stationery.


Challenges Entered :-

1.Crafty JC Challnege- Non Traditional Love Colours
2. Beyond Grey Challenges- Non traditional Love Colours
3.Pretty Paper Studios- Should use the Word "You"
4.Sentimental Sundays-Shaped Cards + Sentiment.
5.Stamptacular Sundays-Use pearls and  Laces
6.Truly Madly Crafty Challenge- Use ribbon and Bling.


I hope you all like my Card ..If you do, Please don't forget to Leave a Comment :)

Have a Nice Day everyone.