Monday, May 23, 2022

Altenew May 2022 Lovely in Lace Collection Release Blog Hop + Giveaway ($300 in total prizes)


Hello, crafty friends!
I am excited to be joining  Altenew for their May 2022 Lovely in Lace Collection Release Blog Hop! This release features so many beautiful new embossing folders and stencils along with other wonderful goodies for your crafty stash!

If you arrived here from, Daniel Diaz's Blog, then you are on the right track. If this is your first stop, then you will want to start at the beginning, the Altenew Card Blog. We've got tons of inspiration and giveaways for you on the hop today, so keep reading till the end of this post for more information.

Stunning florals, elegant lace, unique sentiments, and more!
This complete crafting bundle featuring the Lovely in Lace stencil and embossing folder release is full of beautiful inspiring designs to add to your craft room so you can create amazing paper crafting projects. Whether you enjoy card making, scrapbooking, or journaling, this bundle has something for you!


My first card features the NEW Starburst Embossing Folder and the Bountiful Bouquet Stamp & Die Bundle. 

I started off my card by stamping the Altenew Bountiful Bouquet Stamp Set onto Neenah Classic Crest Solar White Cardstock. I used the Altenew Martian Terrain and Tea Party Crisp Dye Inks for the layers of the flowers, and for the leaves, I used Altenew Tropical Forest Crisp Dye Inks. I stamped the flower centers using Honey Drizzle and Maple Yellow Crisp Dye Inks and then Die cut the stamped images using the coordinating dies.After die cutting them I fussy cut the indivual flower and leaves to create my floral arrangement.

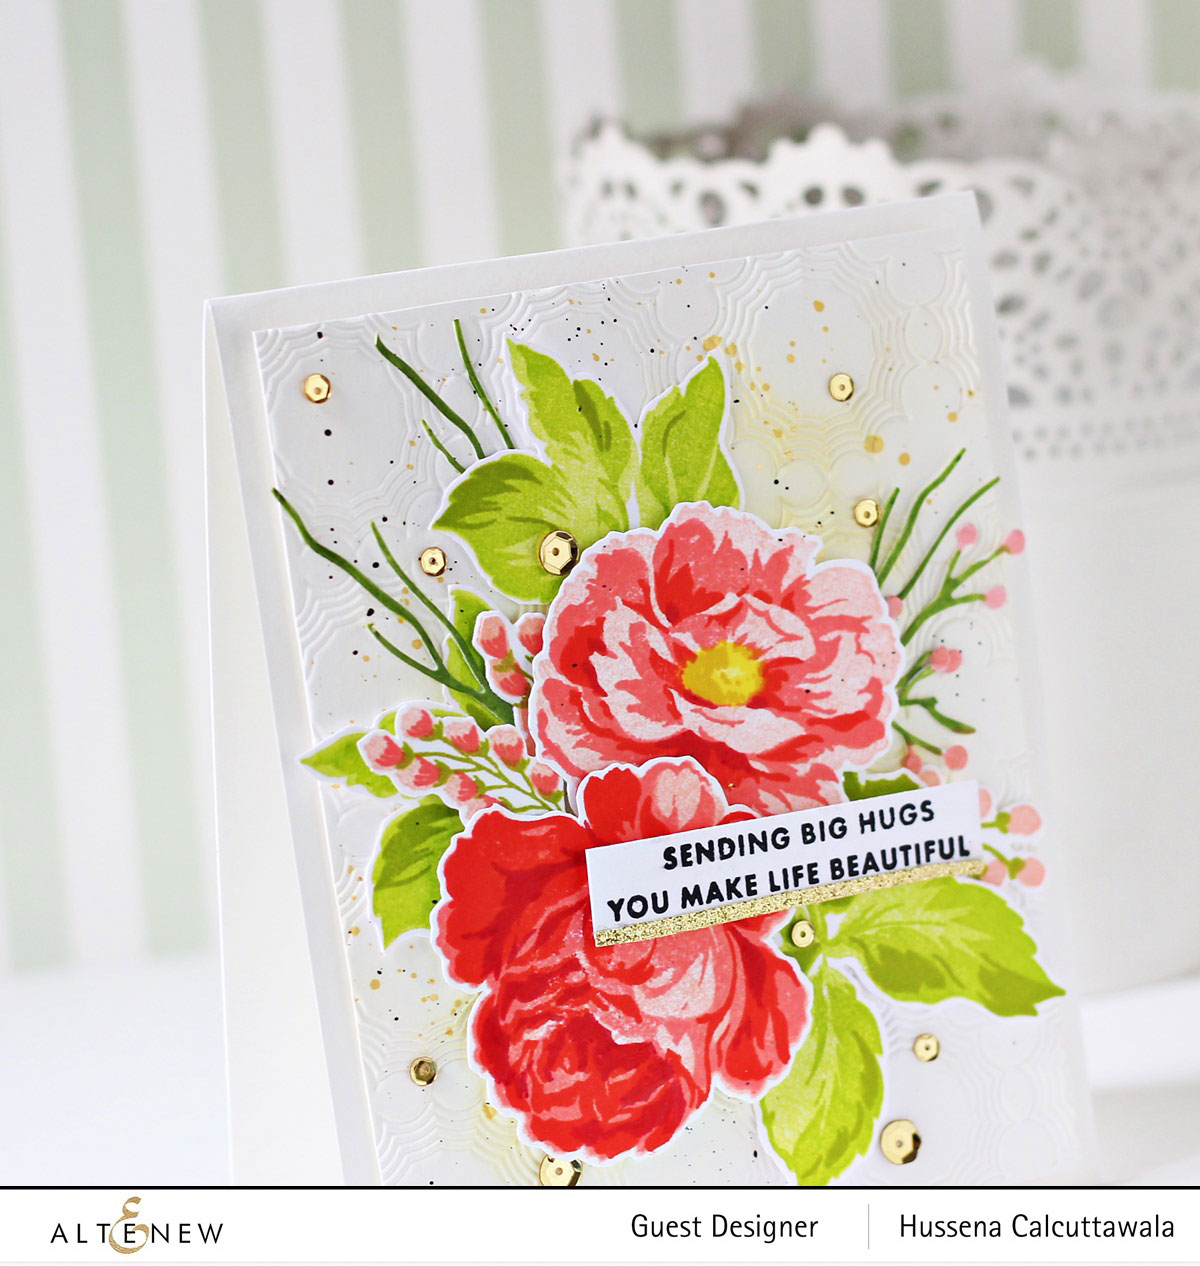
Next, I ran the Starburst 3D Embossing Folder through my die cutting machine using a piece of Neenah Classic Crest Solar White Cardstock. Then, I lightly wet the panel and added very diluted wash of color all over the background using the Fresh Lemon Brush Marker from the Tropical Fiesta Set. Once my layer of pale color had dried, I adhered down the blooms and foliage on the panel using foam adhesive. I absolutely love the subtle, exceptionally elegant look that these new embossing folders create. They are great for making quick cards that are incredibly elegant. Next, I die-cut some additional foliage for my floral arrangement from the Create-A-Wreath Die Set and coloured the pieces using Parrot and Coral Bliss Crisp Dye Inks. I also stamped some floral elements from the Bride To Be Stamp Set onto White Cardstock using Coral Bliss, Pink Pearl, and Parrot Crisp Dye Inks and cut them out using the coordinating dies

Then, I stamped my greeting from the Bountiful Bouquet Stamp Set onto a strip of White Cardstock using Obsidian ink and adhered it down on my panel using foam adhesive for dimension. Next, I adhered a strip of Citrine Cardstock along the bottom of the strip for a little pizzazz.

Once that was done, I adhered my card panel a top-folding A2 white card base using tape runner. As a finishing touch, I used the Jet Black Ink Spray and the Antique Gold Metallic Spray to add a few paint splatters to my panel for an artsy look. Lastly, I added a few Antique Gold - Sequins to help add some sparkle to the card front.


My next card features the Vintage Lace 3D Embossing Folder and the Vintage Lace Simple Coloring Stencil Set (3 in 1).

I love the effect of coloring on super detailed, textured embossed backgrounds, so I began my project by embossing the new Vintage Lace 3D Embossing Folder on some of Altenew’s Watercolor Paper. This lightly textured paper looks beautiful when embossed alone, almost like super fancy letterpress! 

 Next, I lightly wet the panel and added a wash of color all over the background using the Sweet Leaf Brush Marker from the Tropical Fiesta Set. Once that was done, I pulled out the coordinating Vintage Lace Simple Coloring Stencil Set to add colour to the embossed images and used Tide Blue, Sea Breeze, Burnt Red, and Coral Bliss for the roses and Just Green, and Parrot Crisp Dye inks for the leaves. The stained glass effect that is created with the stencils is so unique and lovely; instead of adding a gradual fade to each petal, it adds shading to entire petals for a different and fun look!

Once my stenciling had been completed, I used the Hello and Hugs Die Set to die cut a greeting out of White CardstockCitrine Cardstock, and White Foam. I layered the pieces together using Craft Glue, then ink-blended Coral Bliss ink into a nice ombré to add some visual interest to the sentiment. Next, I stamped a greeting from the Bountiful Bouquet Stamp onto a strip of White Cardstock using Obsidian Ink and affixed it to my panel using foam adhesive

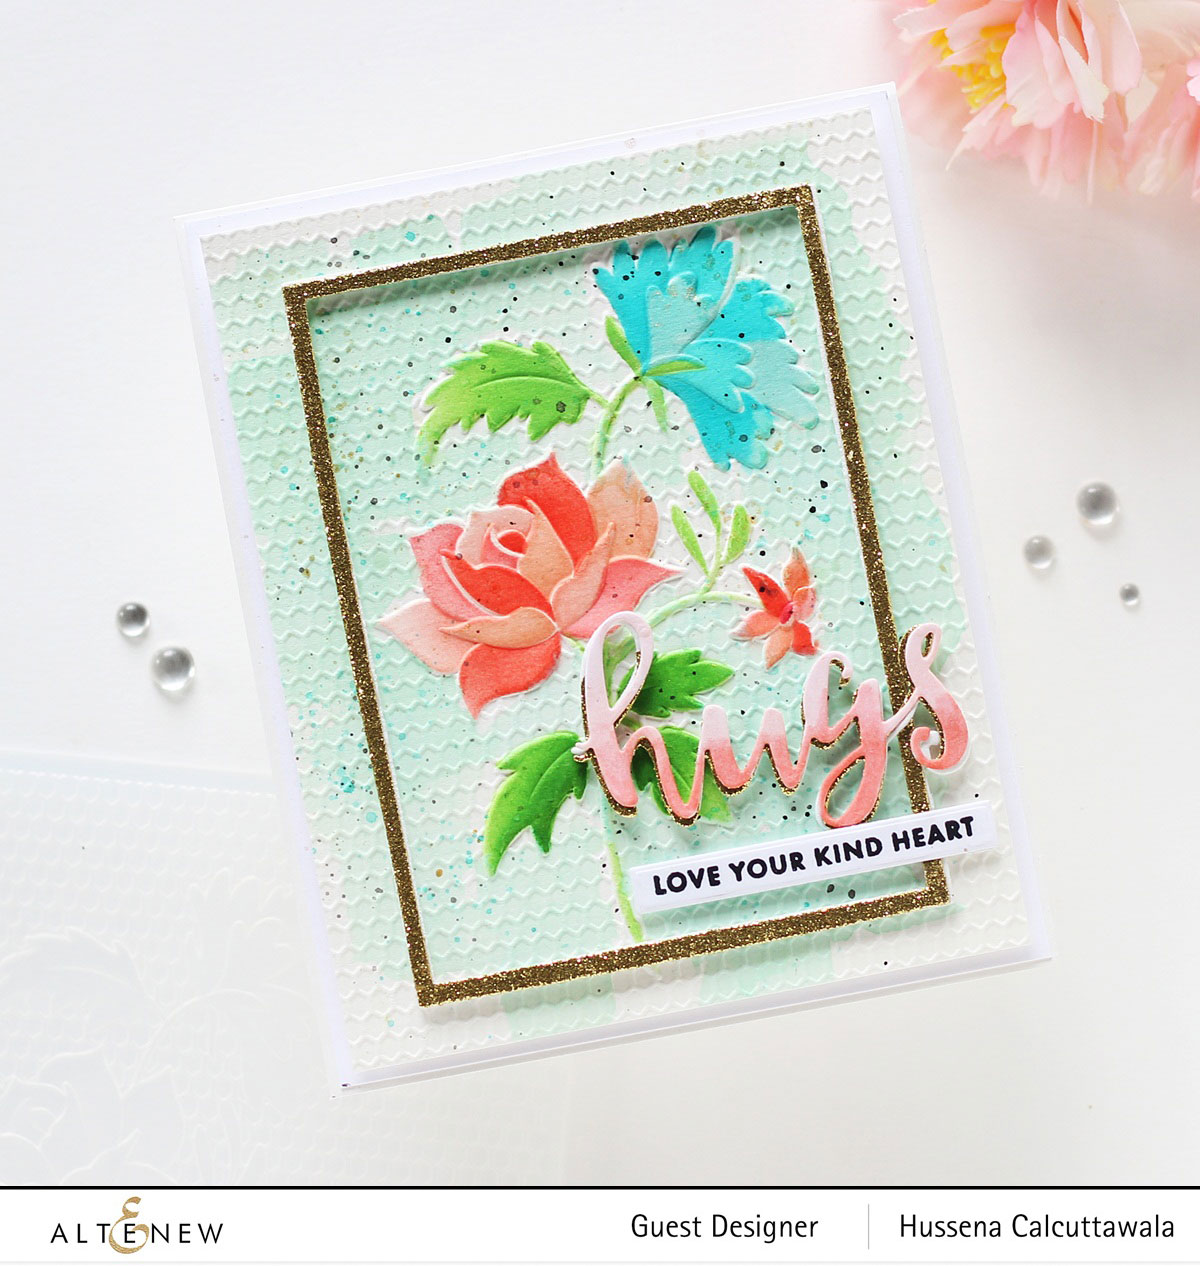
Then, to add a bit of texture and shine to my background, I die-cut Citrine Cardstock and White Foam using the Rectangle Shape Extra Large Pattern Die and Rectangle Shape Large Pattern Die from the Nestabilities Essential Rectangles Etched Dies and adhered it to my card panel with Craft Glue.
To complete, I adhered the panel to a top-folding A2-sized white card base using tape runner. Then, I added some metallic gold and blue paint from the Metallic Watercolor Set for a fun, artsy look. I finished off the card with a few black paint splatters using the Jet Black Ink Spray for visual interest.


Giveaway Prizes:
$300 in total prizes! To celebrate this release, Altenew is giving away a $50 gift certificate to 2 lucky winners and a $25 gift certificate to 8 winners! Please leave a comment on the Altenew Card Blog and/or each designer’s blog post on the blog hop list below by 05/29/2022 for a chance to win. Altenew will draw 10 random winners from the comments left on each stop of this blog hop and announce the winners on the Altenew Winners Page on 05/31/2022.

Blog Hop Order:
Next Stop on this Blog Hop is the wonderful, Nandini Karmarkar's blog. Just in case you lose your place along the way, here is the complete list of participants so that you can find your way back:

Jennifer McGuire

Jaycee Gaspar

Mindy Eggen

Jenny Colacicco

Angela Brennan

Tenia Nelson

LauraJane

Nathalie DeSousa

Carol Hintermeier

Virginia Lu

Nenette S. Madero

Terri Koszler

Katrina Howe

Reiko Tsuchida

Linda Westfall

Bridget Casey

Ann Taylor

Colleen Balija

SathyaKala Sankaran

Eva Bussom

Natasha Davies

Sande Woodson

Susan Stagno

Nichol Spohr

Daniel Diaz

                        Hussena Calcuttawala (You are HERE)

Nandini Karmarkar

Preeti Chandran


Well, that’s all for my projects today! Thanks so much for stopping by and reading. I hope you have a wonderful day!

If you like what you've seen from me, please give me a follow over on my Instagram (@hussena_cal) and/or subscribe to my blog if you haven't already.

Sunday, May 22, 2022

Altenew Paint-A-Flower: Magnolia Rustica Outline Stamp Set Release Blog Hop + Giveaway ($200 in Total Prizes)


Hello, crafty friends!
I'm so happy to be joining Altenew for the Magnolia Rustica Outline Stamp Set Release Blog Hop today showcasing the next installment in their monthly Paint-A-Flower series! You can purchase this fabulous set here individually for $15.99, or you can subscribe to receive the new Paint A Flower sets at a discount each month! When signed up, you are guaranteed a spot in their monthly their monthly Paint-A-Flower releases and will receive a set each month - at a specially discounted price! ($15.99 →$12.99)

If you arrived here from Preeti Chandran's Blog, then you are on the right track. If this is your first stop, then you will want to start at the beginning, the Altenew Card Blog. We've got tons of inspiration and giveaways for you on the hop today, so keep reading till the end of this post for more information.

 I have a soft, floral card for you today with a twist, so let’s get started with the details!

I began by stamping the magnolia image on some Neenah Classic Crest Solar White Cardstock using Obsidian Pigment Ink. I then used Altenew Coral Berry, Grapevine, Sea Glass, Ocean Waves, Evergreen, and Forest Glades Alcohol Markers from the Cosmic Garden Set to add highlights and shadows to the magnolia flower using the pointillist coloring technique. Look closely - I used the palest peach and aqua in the petals for overall color, and then I used the darker tone to add shading. It's simple to get it right on this magnolia image because the shading is already illustrated. I also added a bit of yellow in the flower centres for interest and dimension! 

After I'd completed the coloring, I did a little stenciling. I used my Altenew Blending Brushes to blend some beautiful Sweet Leaf ink to the background panel using the Altenew Sketched Lines Stencil to showcase these meticulously-colored flowers.

While my background was drying, I stamped a greeting from the  Magnolia Rustica Outline Stamp Set using  Obsidian Pigment Ink onto a piece of White Cardstock. Next, I adhered a strip of Citrine Cardstock along the bottom of the piece for a little pizzazz. I adhered  it down on my panel using foam adhesive for extra dimension and added gathered gold thread to give the panel more interest.

Then, to finish, I adhered the panel to a top-folding A2-sized white card base using foam adhesive. I added a few Antique Gold - Sequins to help add some sparkle to the card front.


Giveaway Prizes:
$200 in total prizes! To celebrate this release, Altenew is giving away a $50 gift certificate to 2 lucky winners and a $25 gift certificate to 5 winners! Please leave a comment on the Altenew Card Blog and/or each designer’s blog post on the blog hop list below by 05/28/2022 for a chance to win. Altenew will draw 10 random winners from the comments left on each stop of this blog hop and announce the winners on the Altenew Winners Page on 05/30/2022.

Blog Hop Order:
Next Stop on this Blog Hop is, Eva Bussom's blog. Just in case you lose your place along the way, here is the complete list of participants so that you can find your way back:

 Altenew Card Blog

Emily Midgett

Ann Taylor

Nathalie DeSousa

Carol Hintermeier

Jenny Colacicco

Angela Brennan

Tenia Nelson

Nenette S. Madero

Virginia Lu

Natasha Davies

Amy Hill

Terri Koszler

Nandini Karmarkar

SathyaKala Sankaran

Colleen Balija

LauraJane

Bridget Casey

Linda Westfall

Rosie Neustaedter

Preeti Chandran

                      Hussena Calcuttawala (You are HERE)

Eva Bussom

Daniel Diaz

Sande Woodson


Well, that's all for me today. Thanks so much for stopping by today, and have a marvelous day!
If you like what you've seen from me, please give me a follow over on my Instagram (@hussena_cal) and/or subscribe to my blog if you haven't already.

Thursday, May 12, 2022

Spellbinders May 12th Clubs Blog Hop + Giveaway!

 
Hello, crafty friends!
I'm happy and honoured to be joining Spellbinders for the May 2022 Clubs Inspiration Blog Hop today. Spellbinders is celebrating all their Club Kits in shop for May 2022.

If you arrived here from Linh Van's Blog, then you are on the right track. If this is your first stop, then you will want to start at the beginning, the Spellbinders Blog. We've got tons of inspiration and giveaways for you on the hop today, so keep reading till the end of this post for more information.


I have a 3D Vignette Card to share for the hop today using the Spellbinders and Amazing Paper Grace May 2022 Die of the Month Set

The Pop Up 3D Vignette What’s Bakin’ Oven Set is a new addition to the Amazing Paper Grace 3D Vignettes Collection and features fourteen cutting dies. The What’s Bakin’ Oven is an adorable 3D Oven that folds flat for mailing and comes complete with tons of baking accessory dies perfect for use on regular cards. There are a number of small pieces inside this die set, but the packaging has a helpful step by step guide on the back that makes it very simple to put this oven together. As with other Vignettes, you can make a 3D item or use it flat on a card.

To create my card, I first cut out the oven front die twice with door inserts using Waterfall and Snowdrift Cardstock. Next, I cut out the oven front die without door inserts six times using Silver Brushed Cardstock and Onyx Cardstock. I trimmed the pieces as required and then cut the remaining decorative pieces out of  Silver Brushed Cardstock and Onyx Cardstock.

Once I had all the pieces die-cut and ready to assemble, I adhered acetate behind the blue top door and added handles using Craft Glue. Next, I adhered the doors onto the blue layer - While adhering the doors, make sure the doors can open. Next, I adhered the strip with knobs with liquid glue and set it aside. 

Once the base was ready and assembled, I die-cut the sentiments from Onyx Cardstock and adhered it down on the front layer using liquid glue. Next, I adhered the baking racks and adhered the white oven layers onto the blue layer for definition and interest. Then, I folded the 3D Vignette pieces on perforations and used a tape runner to apply adhesive to the folded tabs. I attached one side of the Vignette piece to back layer of oven and placed 3 interior layers into slots. I repeated the process with the Vignette piece on other side. 

This 3D Vignette is a little different! It has a top layer (range top); and I die-cut and adhered 4 burners (cut from Silver Brushed Cardstock and Onyx Cardstock) to the range top to embellish the piece. Next, I folded the tabs and adhered the smaller Silver Brushed Cardstock tab to the back of the front oven layer so it is even with the top edge. Next, I attached the front of oven to the front of the 3D vignette assembled piece. Then, to further embellish the project, I adhered the utensil rack, utensils and other mitt to the 3D Vignette.

I die-cut some flowers and foliage out of Snowdrift Cardstock using the Petite Floral Potpourri Etched Dies and added a bit of Worn LipstickTwisted Citron, and Shabby Shutters Distress Oxide Inks to the petals and leaves and Spun Sugar ink to the flower centre with a sponge dauber to add shading. Then, I embossed the individual petals using the stylus tips from the Susan's Garden Ultimate Tool Kit and assembled the pieces with liquid glue.

I love this cute oven and how it all came together! The blessing is that if you don’t want to go all out 3D, it’s perfect to be used for the front of your card too. In fact, the oven door opens and it would make a lovely money holder, with the bills tucked into the door.


Giveaway:
To celebrate this release, Spellbinders are giving away a $25 gift certificate to 3 lucky blog readers – selected from the comments on their blog. Giveaway closes on Sunday, May 15th, 11:59 pm MST. The winner will be announced in this blog hop post the following Wednesday. The winner is responsible for shipping costs, duties, and taxes.

Please note, store credit (gift certificate) cannot be applied to Club Subscriptions. Store credit can be applied to shop past Club products, Club extras and regular releases.

Blog Hop Order:
Next Stop on this Blog Hop is the talented, Rosemary Dennis' blog.
Just in case you lose your place along the way, here is the complete list of participants so that you can find your way back:


Thank you so much for your stopping by and reading this blog post. I hope you liked my project! 

If you like what you've seen from me, please give me a follow over on my Instagram (@hussena_cal) and/or subscribe to my blog if you haven't already.
Wishing you a great day ahead!