Wednesday, January 13, 2021

Spellbinders January 13th Blog Hop + Giveaway!

Hello, crafty friends!
I'm thrilled to be joining Spellbinders for the January 2021 Clubs Inspiration Blog Hop today. Spellbinders is celebrating all their Club Kits in shop for January 2021.

If you arrived here from the talented, Dilay Nacar's Blog, then you are on the right track. If this is your first stop, then you will want to start at the beginning, the Spellbinders Blog. We've got tons of inspiration and giveaways for you on the hop today, so keep reading till the end of this post for more information.

I have a 3D Vignette Card to share for the hop today using the Amazing Paper Grace – January 2021 Die of the Month Set. In case you missed, it I shared a Card on my blog few days ago using this month's "Mini 3D Vignette Valentine’s Mailbox" Set, which you can check out HERE.
This Mini 3D Vignette Valentine’s Mailbox functions just like a 3D Vignette, except for this one is a “mini”.  The front of the mailbox has an aperture that you can layer with a second die cut of the mailbox front and add a surprise message or photo.

For my project, I die cut the front of the mailbox using the Mini 3D Vignette Valentine’s Mailbox from Lemon Yellow Textured Cardstock. The solid mailbox door was cut from Light Pink Cardstock. I die cut the photograph to add inside the mailbox using the same die and then adhered it down to my mailbox outline frame die cut. I assembled the different pieces together following the tutorial by Becca Feeken


The different stems were also cut from Lemon Yellow Cardstock using different dies from the Mini 3D Vignette Valentine’s Mailbox, while the hearts, mini envelopes, and hearts were die cut from Light Pink Cardstock, Gold Mirror Cardstock, and White Cardstock. I stamped mini sentiments using Licorice Black Ink on several of these die cuts to add interest. You can customize in any way and style you'd like. I designed this for a dear friend's wedding anniversary, so I used sentiments which would go with my theme.


 I decorated the front of the mailbox using the decorative tag from the Shapeabilities Grand Dome 3D Card Etched Dies which I die cut from Lemon Yellow Cardstock and Gold Mirror Cardstock. The oval for the centre was cut from Pink Cardstock and i stamped my sentiment on it using Licorice Black Ink. I popped the sentiment tag to the panel suing foam tape for dimension. The lil' flowers are from an older Amazing Paper Grace die, and I added some mini fillers and rose buds to accentuate the design. 

This was actually very simple to make and I really enjoyed the creative process too. I decorated the back of the card too for more interest. I adhered a Light Pink Cardstock die cut behind the filigree frame and that's about it. My card was done!


Giveaway:
To celebrate this release, Spellbinders are giving away a $50 gift certificate to 3 lucky blog readers – selected from the comments on our blog. Giveaway closes on Sunday, January 17th, 11:59 pm MST. The winner will be announced in this blog hop post the following Tuesday. The winner is responsible for shipping cost, duties and taxes.

Please note, store credit (gift certificate) cannot be applied to Club Subscriptions. Store credit can be applied to shop past Club products, Club extras and regular releases.


Blog Hop Order
Next Stop on this Blog Hop is, Mindy Eggen's blog.
Just in case you lose your place along the way, here is the complete list of participants so that you can find your way back:

                            Hussena Calcuttawala (You are HERE) 

Thank you so much for your stopping by and reading this blog post. I hope you liked my project! 

If you like what you've seen from me, please give me a follow over on my Instagram (@hussena_cal) and/or subscribe to my blog if you haven't already.
Wishing you a great day ahead!

Saturday, January 9, 2021

Spellbinders & Amazing Paper Grace Die of the Month | January 2021


Hello, crafty friends!
Hope you are doing well and are safe and healthy!
I have a Card to share today featuring the Spellbinders + Amazing Paper Grace January 2021 Die of the Month Set. This month's "Mini 3D Vignette Valentine’s Mailbox" Set is perfect for making Valentine's Day cards, gift boxes, and more.


I created a 2D Card using the Mini 3D Vignette Valentine’s Mailbox.  This die, like all the other 3D Vignettes dies, collapses flat to be sent in a regular envelope. Isn't that so cool!? The Mini 3D Vignette Valentine’s Mailbox comprises of 17 dies  and will have you create gorgeous, layered projects in no time!

I created a dainty floral mailbox using the die set to add to my card front. For my card, I first foiled the Diamonetta Background Glimmer Hot Foil Plate using Rose Gold Foil to a piece of Cream Cardstock using my Glimmer Hot Foil System. I repeated the pattern to cover my entire card panel. 

For the mailbox, I die cut the vignette piece from Cream Cardstock and the filigree inlay pieces from Gold Mirror Cardstock and Cream Cardstock. I also die cut the solid mailbox door from Rustic Rose Cardstock for contrast. I then cut the perforated tab in half, so that I'd have two pieces to add on either side of the mailbox to help it pop.  

 The Die Set is designed to help you create a 3D Vignette Mailbox, but you can use it to create a 2D piece for your card front as well. I always love how Becca designs her dies in a way that they can be used in more ways than one. 

I die cut a bunch of stems for the various elements of the mailbox from Cream Cardstock. The hearts, mini envelopes, stamps, and the word 'Mail' were die cut from Cream CardstockGold Mirror Cardstock, and Baby Pink Cardstock. I altered the lengths of the stems while adhering to give it more depth. I accented some of the elements with White Pearls for interest.

The little flowers were die cut using the Petite Double Bow/Flower (now discontinued) from Light Pink Cardstock. I embossed the die cut pieces using Embossing Tools and then added gold stamens to the centres. The leaves are from the Cinch and Go III Die Set. I die cut it from White Cardstock, coloured them using Electric Lime Ink, and then embossed the pieces using Groove Golf Tools. The sentiment is from the Sending Love Stamp Set, which is Spellbinders' Clear Stamp for January 2021. I stamped it using Licorice Black Ink on a strip of and popped it over on the mailbox using foam tape. A few White Pearls were the finishing touch for this card. 


The Amazing Paper Grace Die of the Month is available exclusively at Spellbinders Paper Arts during January 2021. You can get the Mini 3D Vignette Valentine’s Mailbox at the special Cub Kit price, along with other membership perks.

If you'd like to see some more project inspiration using the Amazing Paper Grace Die of the Month, check out the Spellbinders Blog where Becca shares some stunning project samples using it.  

Amazing Paper Grace Die of the Month Membership


That’s it for me today! I hope you liked my take on the die set! If you like what you've seen from me, please give me a follow over on my Instagram (@hussena_cal) and/or subscribe to my blog if you haven't already.

Thank you so much for your visit to my blog today!

Thursday, January 7, 2021

Spellbinders January 2021 Clear Stamp of the Month | Sending Love


Hello, crafty friends!
I have two Valentine's Cards to share today featuring the Spellbinders Clear Stamp Set of the Month - Sending Love. If you haven't heard about the Clear Stamp of the Month Club by Spellbinders, you can go over to the Spellbinders blog and read more about it HERE

The Spellbinders Clear Stamp for January includes 6 different hearts – two of which have sentiments inside them – and a Happy Valentine’s Day sentiment stamp. The stamp set coordinates with the other Spellbinders Club Kits for this month, so you can mix and match your supplies to create different projects. This “Sending Love” stamp set features made in the USA stamps from high-quality photo-polymer for clear, crisp impressions. 

I have made two cards using this stamp set, so without further ado, let's get started:


For my first card, I first pulled out a White Card Base - Top Fold from Spellbinders' NEW The Card Shoppe range. These are made from high quality Neenah Classic Crest 80# Cover Solar White Paper and are SO good! I layered a panel of Gold Mirror Cardstock followed by Light Pink Cardstock, and then again a panel of White Cardstock. I always like matting my card panels as they provide visual interest and create for a study card base. 

 I have used the 'Color Blocking' technique on this card in order to highlight the heat embossed image. To do so, I first die cut four square pieces from four different sheets of Pink Cardstock and adhered them to my panel using foam squares for dimension. Then, I stamped one of the patterned hearts from the Sending Love Stamp Set in Embossing Ink and heat embossed it using Super Fine Gold Embossing Powder. I fussy cut the heart and then added it to my card panel using foam dots. 

The sentiment is from the same stamp set. I simply stamped it on a strip of White Cardstock using Licorice Black Ink and popped it over on to the heat embossed heart using foam tape. 

I added a couple of tiny hearts die cut from Gold Mirror Cardstock as the finishing touch for my card. 


Moving on to my second card for today which again features the Sending Love Stamp Set and a couple of other  Spellbinders dies. 

To begin, I took a piece of Canson Montval Watercolor Cardstock and lightly ink blended the bottom of the panel using Distress Oxides - Picked Raspberry and Worn Lipstick.  Once, I was happy with the way it looked, I stenciled several little hearts on the top half of the panel using the same ink colours.

I then die cut a rectangle using the medium rectangle outer rim from the Elegant Twisted Rectangles Die Set from Silver Glitter Cardstock and glued it down to my panel using liquid adhesive. I also die cut a circle using the medium circle die from the Hemstitch Circles Die Set from Vellum Paper and attached it to my panel using glue dots. 

I stamped two different patterned heart designs from the Sending Love Stamp Set in Embossing Ink and heat embossed it using Super Fine White Embossing Powder. I coloured the hearts using Distress Oxides - Picked Raspberry and Worn Lipstick and then fussy cut them and popped them on my card panel using foam dots for dimension. The sentiment was also heat embossed in white on a strip of Black Cardstock and attached over the hearts using foam squares. I added a few clear sequins as the finishing touch for my card.


If you want to find out more about the Club – prices, how you sign up and what’s included, please look ——–> HERE
 The Stamp sets for Spellbinders Monthly Clubs are exclusive to Spellbinders and you won't find them anywhere else, so be sure to gets yours before it gets sold out! 
If you'd like to see some more project inspiration using the Clear Stamp Set of the Month, check out THIS YouTube video that has some amazing card ideas using it! 

That's it from me today! I hope you liked my cards and have fun creating your Valentine’s Day cards! 
 If you like what you've seen from me, please give me a follow over on my Instagram (@hussena_cal) and/or subscribe to my blog if you haven't already.
Thank you so much for stopping by!

Tuesday, January 5, 2021

Foiled Card Set | Delicate Impressions by Amazing Paper Grace


Hello, crafty friends!
Happy New Year! 2021 is here and I'm so glad that it's time for a fresh start on things.

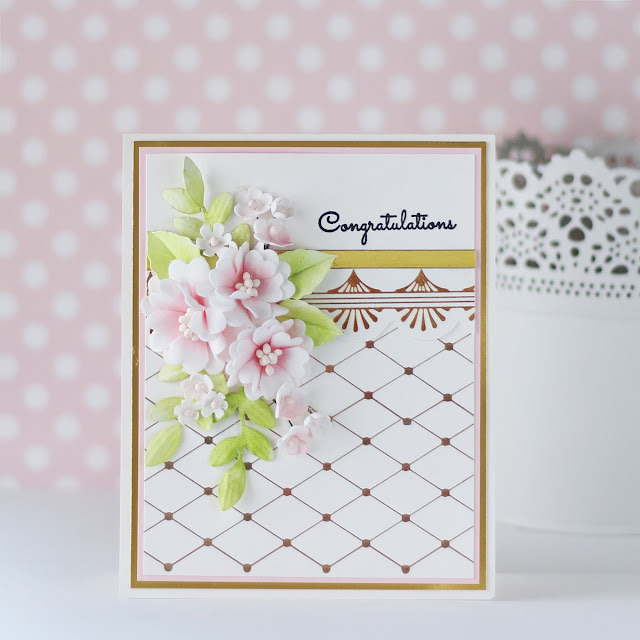
I am kick-starting the New Year with a set of floral foiled cards that I made using the Glimmer Hot Foil Plates from the Delicate Impressions Collection by Spellbinders/Amazing Paper Grace. It's a gorgeous collection comprising beautiful florals, elegant backgrounds, and uplifting sentiments. I had such a fantastic time creating with it! Here's a look at my Cards:


I designed my cards in two different orientations and used the Diamonetta Background Glimmer Hot Foil Plate and Fanfare Border Glimmer Hot Foil Plate to create them in hues of cream, gold, and pink, which also happens to be my most favourite colour combination. 

To begin, I foiled the Diamonetta Background Glimmer Hot Foil Plate using Matte Gold Foil to a piece of Cream Cardstock using my Glimmer Hot Foil System. The Diamonetta Background Plate is my favourite out of the entire collection. It foils beautifully and you have the ability to repeat the pattern over a larger area should you so wish. 

Next, I foiled the Fanfare Border Glimmer Hot Foil Plate using Matte Gold Foil to a piece of Cream Cardstock and then hand cut the scalloped border to add over my card panel. I also added a 1/4" strip of Gold Mirror Cardstock on to the panel for interest. 

My floral spray was created using the flower dies from the Cinch and Go III Dies and were die cut from White Foamiran sheets. It's been a while since I worked with Foamiran and I thoroughly enjoyed creating with it for my cards today. I colored the centres of the flowers using Rustic Rose Ink, but you can use any coloring medium that you have in your stash. I then embossed the petals of the flowers using Embossing Tools and added clay pollens to the centres for a naturalistic look. The leaves are die cut from the Cinch and Go III Die Set and the Cinch and Go IV Die Set. I cut them from White Cardstock and colored them using Electric Lime Ink. I also added some embossed groove lines to a few of the die cuts for interest. The teeny tiny filler flowers were also cut from White Foamiran using the smallest flower die in the Cinch and Go IV Die Set. Once everything was done, I adhered the floral spray to my card front using Hot Glue as Foamiran doesn't stick very well to paper with liquid adhesive.

The sentiment is from the Giving Occasions Stamp and Die Set and was stamped using Black Licorice Ink directly on to my card front. I adhered the panel to a piece of Pink Cardstock, which was then mounted to another panel of Gold Mirror Cardstock, and then finally to my card base which was created from Cream Cardstock.


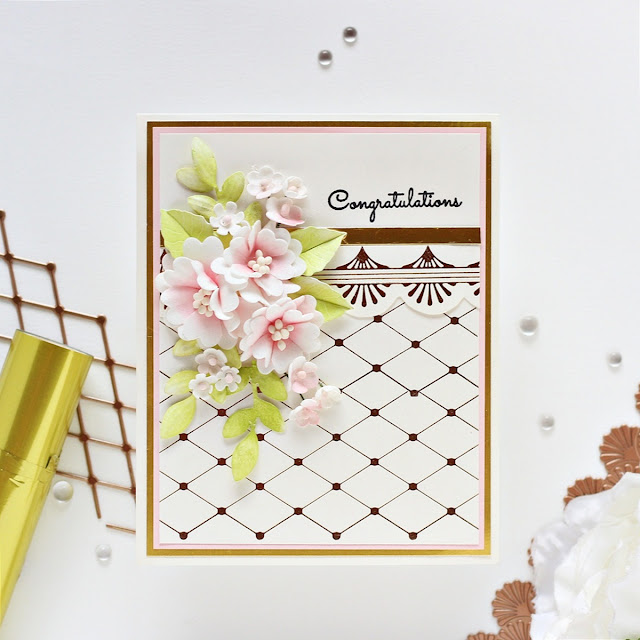
My second Card has a similar design, but I changed the orientation of the card and few elements here and there to come up with a new card layout!

I started by foiling the Diamonetta Background Glimmer Hot Foil Plate using Matte Gold Foil to a piece of Cream Cardstock using my Glimmer Hot Foil System. I also foiled the Fanfare Border Glimmer Hot Foil Plate using Matte Gold Foil on a piece of Cream Cardstock and then hand cut the scalloped border to add over my card panel. I affixed the two foiled pieces to my panel and added a 1/4" strip of Gold Mirror Cardstock in the centre to cover the seam. 

The floral spray is also quite similar to the one on my previous card, however I added some additional foliage and filler flowers to make the arrangement look more wholesome and complete. All the flowers have been die cut from White Foamiran sheets using the different sized flower dies from the Cinch and Go III Die Set. I used Rustic Rose Ink to colour the centres and added white clay pollens to make them look fuller and more natural. The leaves and foliage are die cut from Cinch and Go III Die Set, the Cinch and Go IV Die Set, and a die from a previous Card Kit from Spellbinders. I lightly coloured the leaves using Electric Lime Ink and shaped them using a selection of Embossing Tools and Groove Golf Tools. I arranged everything on my card panel and adhered it down using Hot Glue. 

The ornate sentiment frame is from the Giving Occasions Stamp and Die Set and was die cut from Gold Mirror Cardstock and Cream Cardstock. I stacked the two pieces together, slightly offsetting them to create the illusion of depth without an excessive amount of bulk.  

The sentiment is from the same set and I stamped it on a strip of Cream Cardstock using Black Licorice Ink which was then cut out using the coordinating die and attached to the centre of the frame. 


Well, that brings me to the end of my post for today! I hope you enjoyed looking at my cards and are inspired to give these foil plates a go. They are truly marvelous!

 If you like what you've seen from me, please give me a follow over on my Instagram (@hussena_cal) and/or subscribe to my blog if you haven't already.
Thank you for stopping by!