Wednesday, December 15, 2021

Embossed Butterfly Encouragement Card


Hello, crafty friends!
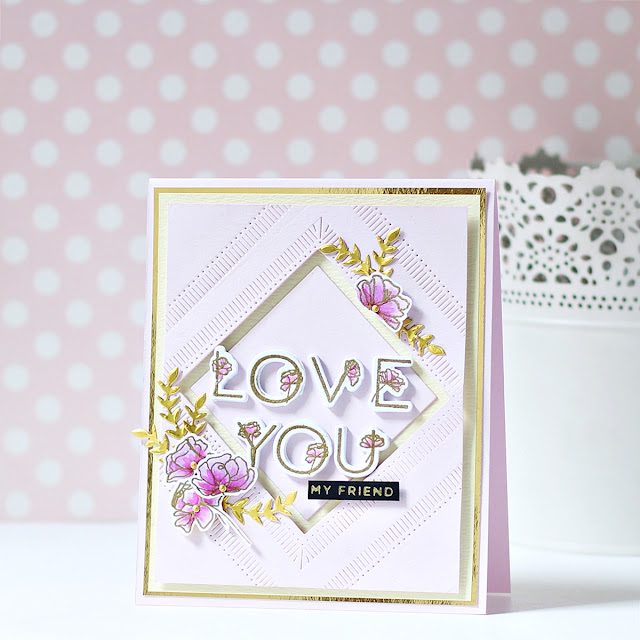
I am so happy to be back here today to share a spring-inspired card using supplies from Crafty Meraki. If you're missing a friend or loved one and looking for a special way to let them know you’re thinking of them, this card would be just the perfect thing to send to them! 

My card for today features the Angel Wings Layering Stamp Set. The whimsical butterflies in this set can be used as is, or combined with floral images. The set consists of a solid butterfly outline and three layering stamps to create a beautifully colored butterfly image. All four layers can be used together or you can just color the outline. 

To create my card, I first stamped the detailed butterfly outline from the Angel Wings Layering Stamp Set Stamp Set using Versamark Embossing ink onto Vellum and used the Journey Gold Embossing Powder to heat-emboss the images with the help of a Heat Tool. Next, I stamped the solid butterfly image from the set using Passion Fruit ink onto Snowdrift Cardstock and then trimmed out both the pieces with a pair of scissors, leaving a small white border. (If you don't want to cut the images by hand, you can use the coordinating dies available for the set too!)

Next, I die cut Snowdrift, Mirror Gold Cardstock, and White Foam Sheets using the Fancy Oval Frame Die to use as an accent piece on my card. I adhered the layers together with liquid glue, allowing the gold layer to peek out from behind the white layer a bit. I then ink blended Passion Fruit ink to the top three-quarters of the negative die-cut piece with a blending brush for more depth. Once that was done, I used the Heidi Swapp Color Shine Spray in Lame Gold to add gold splatters to the panel for an artsy look. 

Next, I die cut Snowdrift Cardstock using the Diagonal Stitched Plaid Die and mounted the panel to a top-folding white card base made from Snowdrift Cardstock with tape runner. Once that was done, I die cut Snowdrift Cardstock and White Foam Sheets using the Outer Rectangle Die from the Stitched Scallops Rectangle Die Set. Next, I coloured the outer scallop edge using Passion Fruit ink with a sponge dauber for interest. I adhered the frames down on my panel using liquid glue and then started assembling the rest of the pieces together.

Next, I adhered the oval frame down on my panel with liquid glue. I wanted the butterfly to have a 3D look, so I adhered the solid image down first and then adhered the heat-embossed image on top, bending the butterfly wings upwards for dimension and interest. I also adhered some Glacier Jewels to the body of the butterfly for a bit of glitz and glam. This is such a fun and easy way to create eye-catching embellishments for all your projects! Finally, to complete, I stamped a sentiment from the Blooming Birthday Stamp Set on a strip of Snowdrift Cardstock using Versafine Onyx Black ink and adhered it down on my panel using foam squares for dimension. 


I hardly ever create projects sans flowers on them, but I am quite pleased with how this card has turned out. What do you think? I'd love to hear!

I hope you enjoyed today's card and thank you so much for stopping by today. Be sure to check out Crafty Meraki on Instagram or visit their Blog for tons of inspiration!

Monday, December 13, 2021

Spellbinders December 2021 Clear Stamp & Die of the Month | Color Outside the Lines


Hello, crafty friends!
Happy December and welcome to the start of a fresh new week. I have a friendship card to share today made using the Spellbinders Clear Stamp & Die of the Month - Color Outside the Lines.

The Spellbinders Clear Stamp of the Month is all about florals and outside the line details. This is a 19-piece clear photopolymer 4 x 6 stamp set perfect for many cardmaking projects and lots of occasions. This “Color Outside the Lines” stamp set features made in the USA stamps from high-quality photo-polymer for clear, crisp impressions. 

 The pretty layered flowers and elegant floral letters from the set inspired me to create this friendship-themed card. I used the Clear Stamp and coordinating dies from the set along with the Fluted Classics Square Etched Dies for my design.

To create my card, I began by stamping the floral letters in Versamark Embossing ink on a piece of Snowdrift Cardstock and heat embossed it using Super Fine Gold Embossing Powder, before die cutting it with the matching coordinating dies. Next, I stamped the outlined floral images included in the Color Outside the Lines Set using Versamark Embossing ink on another piece of Snowdrift Cardstock and heat embossed the images using Super Fine Gold Embossing Powder. I did some quick colouring using Copic Markers and then cut out the pieces with the matching coordinating dies.

Next, I die cut Lilac Cardstock using the Large Outer Rim and Medium Outer Rim Dies from the Fluted Classics Square Etched Dies and foam mounted the die-cut panel to a piece of Lemon Yellow Cardstock. Once that was done, I die cut Lilac Cardstock using the Medium Outer Square and Inner Rim Dies from the same set and adhered the die-cut square piece to the centre of the panel using Liquid Glue. Then, I adhered each of the die cut letters down using foam squares in the center of the die-cut frame over the card panel to create the card sentiment.

Next, I die cut Mirror Gold Cardstock using the leaf die included in the Simply Perfect Layered Blooms Die Set. I die cut a few leaves to go along with my floral stamped images and adhered all the pieces down on my panel using Liquid Glue. The, for my sentiment, I used Gold Hot Foil to foil Onyx Cardstock using one of the sentiments from the Mini Sincere Sentiments Glimmer Hot Foil Plate and cut it out using the coordinating die. I adhered the piece onto my panel using foam tape for a raised effect. Then, to complete, I mat my background panel with Mirror Gold Cardstock before adhering it to a top-folding lilac card base with tape runner.


I hope you liked my card and thank you so much for stopping by today. You can subscribe to any of the Spellbinders Clubs between the 1st - 24th of each month and never miss a fun kit like this again!
  

Merry Member Appreciation
Spellbinders are offering a free gift in December Clubs. Gifts vary by club. Total Package Members receive the best value as they will receive all the clubs and all the free gifts!
 

If you like what you've seen from me, please give me a follow over on my Instagram (@hussena_cal) and/or subscribe to my blog if you haven't already.
Wishing you a great day ahead!

Sunday, December 12, 2021

Spellbinders & Amazing Paper Grace Die of the Month | December 2021


Hello, crafty friends!
I have a soft and feminine friendship card to share today featuring the Spellbinders & Amazing Paper Grace December 2021 Die of the Month Set. This month's "Enchanting Pocket Card & Envelope" Set is perfect for making gorgeous layered cards, tags, gift boxes, gift baskets, gift card holders, mini albums, and more. This die set features 14 dies.

 The Enchanting Pocket Card, Tag, and Envelope Set for the Amazing Paper Grace December 2021 Die of the Month is so many things wrapped up in one. It’s a gift card holder, it’s a tag, it’s a pocket card and an enclosure card all rolled up into one sweet package. I always love it when a die set can be used in more ways than one!

I have created a Friendship/Encouragement Card using this month's Enchanting Pocket Card & Envelope Die Set. I especially love the decorative tag pocket die and the floral pieces that are included in the set. There's so many ways to use it, but I chose to use it as a focal piece for my card front today. This is a multipurpose die that has a very specific function, but is also quite pretty when used for decoration.

To create my card, I first die cut Snowdrift Cardstock using the Envelope Insert Die included in the Enchanting Pocket Card & Envelope Die Set. I then flipped the paper over and die cut the insert one more time to create a label for my card front. Next, I die cut Raindrop and Brushed Gold Cardstock using the Notecard Die from the same set. I repeated the same process as before and then adhered the light blue die-cut piece on top of the gold die-cut with liquid glue, offsetting them a bit to form a shadow. 

Next, to embellish my card, I die cut Snowdrift Cardstock using the small blossom and leaf dies included in the Enchanting Pocket Card & Envelope Die Set. I embossed the individual petals with a Ball Stylus and added micro-fine gold glitter balls to the flower centres for a bit of pizzazz. Similarly, the leaves were coloured using Bundled Sage Distress ink and then shaped using the Small Ball Tip from the Ultimate Tool Kit. Next, I used 5/8" smooth satin ribbon to tie a bow around the front of my die cut pieces to accentuate the design.

Once that was done, I die cut Raindrop Cardstock using the Large Rectangle Outer Rim and Insert dies from the Fluted Classics Rectangles Etched Dies. I mat the panel with layers of Alabaster and Mirror Gold Cardstock and then adhered the decorative centrepiece and the floral spray to the front of my panel using Liquid Glue. To finish, I used Gold Hot Foil to foil Onyx Cardstock using one of the sentiments from the Mini Sincere Sentiments Glimmer Hot Foil Plate and cut it out using the coordinating die. I adhered the piece down onto my panel using foam tape for a raised effect. Then, to complete, I adhered the background panel to a side-folding Raindrop card base measuring 3.5″ x 8.5″ with tape runner.


The Amazing Paper Grace Die of the Month is available exclusively at Spellbinders Paper Arts during December 2021. You can get the Enchanting Pocket Card & Envelope Die Set at the special Cub Kit price, along with other membership perks.

If you'd like to see some more project inspiration using the Amazing Paper Grace Die of the Month, check out the Spellbinders Blog where Becca shares some stunning project samples using it.  
 

Merry Member Appreciation
Spellbinders are offering a free gift in December Clubs. Gifts vary by club. Total Package Members receive the best value as they will receive all the clubs and all the free gifts!
 

That’s it for me today! I hope you liked my take on the die set! If you like what you've seen from me, please give me a follow over on my Instagram (@hussena_cal) and/or subscribe to my blog if you haven't already.

Friday, December 10, 2021

Spellbinders Cardmaker II Collection | Guest Post


Hello, crafty friends!
 I’m so thrilled to be guest designing on the Spellbinders blog using the new Cardmaker II Stamp Collection. The beautifully illustrated images in this collection inspired me to create three easy and fun cards for a variety of occasions. 


My first project features the Love Never Fails Stamp Set and the New Start Stamp Set. I fell in love with the floral images in the Love Never Fails Stamp Set and had to use them right away for my Slimline Card. This set comprises of 20 clear photopolymer stamps and one can create a wonderful bouquet of flowers to a field of blooms using it. It's very versatile!

To create my card, I first stamped the various images from the Love Never Fails onto Snowdrift Cardstock using Pink Diamond and Rubellite inks for the blooms and Bamboo and Fresh Leaf inks for the leaves and foliage. Once I had all my images stamped, I fussy-cut them out using a pair of scissors. 

Next, I stamped the butterflies from the New Start Stamp Set using Versamark Embossing ink onto Snowdrift Cardstock and used the Journey Gold Embossing Powder to heat-emboss the images with the help of a Heat Tool. I coloured the wings of the butterflies using the Jane Davenport Mermaid Markers and fussy-cut the images using  a pair of scissors, leaving a small white border. Then, I die cut Vellum using the Circle 2 Die from the Nestabilities Hemstitch Circles Etched Dies. Once that was done, I die cut Snowdrift Cardstock using the Medium Circle Outer Rim, Insert, and Inner Rim Dies from the Fluted Classics Circle Etched Dies

Next, I die cut Snowdrift Cardstock using the Large Rectangle Rim and Insert Dies from the the Hemstitch Slimline Etched Dies and embossed the panel using the Diagonal Stripes Slimline Embossing Folder. I then flicked some Gold and Black Acrylic Paint on my panel using a paint brush for a fun splatter effect. 

Then to assemble my card, I adhered the stamped and die cut images down on my panel using foam adhesive for dimension. The butterflies were adhered down in the centre of the panel using Liquid Glue and I added some pink rhinestones to the body for interest. Next, I used Gold Hot Foil to foil Onyx Cardstock using one of the sentiments from the Mini Sincere Sentiments Glimmer Hot Foil Plate and cut it out using the coordinating die. I adhered the piece onto my panel using foam tape for a raised effect. Then, to complete, I mat my background panel with Pink Sand Cardstock before adhering it to a side-folding white card base measuring 3.5″ x 8.5″ with tape runner.


My next card features the Embroidery Flowers Clear Stamp Set. The beautiful flowers and leaves in the set can be used for so many different occasions. I combined them with the Essential Duo Lines Glimmer Squares and added them to an embossed background for this bright and cheery card.

To create my card, I first stamped the floral images from the Embroidery Flowers Clear Stamp Set onto Snowdrift Cardstock using Velvet ink. Next, I stamped the various leaf and foliage images from the Love Never Fails and Embroidery Flowers Stamp Sets onto Snowdrift Cardstock using Hazelnut ink. Once I had all my images stamped, I fussy-cut them out using a pair of scissors, leaving a tiny white border. 

Next, to create the diamond frames for the centre of my card, I die cut Snowdrift Cardstock using the Large Square Outer Rim and Insert Dies from the Fluted Classics Square Etched Dies. I then applied Gold Hot Foil to the die-cut piece using the Square Two Glimmer Plate from the Essential Duo Lines Glimmer Squares Glimmer Hot Foil Plate. Next, I die cut Snowdrift Cardstock using the Small Square Die from the Fluted Classics Square Etched Dies and applied Gold Hot Foil to the die-cut piece using the Square Six Glimmer Plate from the Essential Duo Lines Glimmer Squares Glimmer Hot Foil Plate. Then, to create my sentiment panel, I die cut Snowdrift Cardstock using the coordinating Small Square Die from the Fluted Classics Square Etched Dies and stamped a sentiment from the Embroidery Flowers Set using Versafine Onyx Black ink.

Once that was done, I trimmed a piece of Snowdrift Cardstock to size and embossed the card panel using the Scallops Embossing Folder. I really love the subtle texture it adds to the background! Next, I adhered down the foiled frames, the sentiment piece, and my floral arrangement to my panel using a combination of foam adhesive and Liquid Glue. All that was left to do now was to mat my card background using Mirror Gold Cardstock before adhering it down to a top-folding white card base with tape runner.


My last card for today features the Embroidery Flowers Clear Stamp Set again. I adhered a couple of die cut pieces around the sweet stamped image for an encouragement card.

This one was very simple and straight-forward to put together. To begin, I stamped the floral image from the Embroidery Flowers Set onto Snowdrift Cardstock using Volcano Lake ink. Next, I masked the image with a Post-It Note and stamped the leaf and foliage images from the stamp set using Olive ink. Then, I stamped the smallest flower to the right using Mountain Mist ink. 

Next, I die cut the image using the Large Oval Insert Outer Rim and Insert Dies from the Fluted Classics Ovals Die Set. Then, I centered my Glimmer Plate and applied Gold Hot Foil to my piece using the Oval Three Plate from the Essential Duo Lines Glimmer Ovals Glimmer Hot Foil Plate.

Next, I used the Circular Stitch Outline die to cut the background panel out of Snowdrift Cardstock. Then, to add some visual interest, I die cut the Large Rectangle Outer Rim and Insert Die together from the Fluted Classics Rectangles Etched Dies out of Snowdrift Cardstock. I affixed the panels together using Liquid Glue and adhered down my stamped piece on it using foam adhesive for dimension.   Next, I applied Gold Hot Foil to Onyx Cardstock using one of the sentiments from the Mini Sincere Sentiments Glimmer Hot Foil Plate and cut it out using the coordinating die. I adhered the piece onto my panel using foam tape for a raised effect. I then added a spray of blue rhinestones to embellish my panel. Finally, to complete, I mat my background panel with Waterfall Cardstock before adhering it to a top-folding white card base with tape runner. 


OTHER SUPPLIES:
Neenah Solar White Cardstock, Versafine Onyx Black Ink, Versamark Embossing Ink, Heat Tool, MISTI Stamping Tool, Tape Runner, Foam Adhesive, Heidi Swapp Color Shine Spray- Lame Gold, Camlin Artist Acrylic Colour Tube - Black 016, Paintbrush, Crystal Jewels, Rhinestones, White Fun Foam Sheets

I hope you enjoyed this set of stamped floral cards featuring the Cardmaker II Stamp Collection and are inspired to give it a try. Thank you so much for stopping by today!

You can find more inspiration over at my Instagram page

Tuesday, December 7, 2021

Floral Slimline Card with Crafty Meraki Products


Hello, crafty friends!
I am back today to share a Slimline Card featuring various stamps and dies from Crafty Meraki. I often like to combine new and old supplies for my projects to find unique ways to use certain designs and today's project is an great example of that idea.

My card for today features the Imperial Garden Layering Stamp Set. I particularly love this set as it comprises many color layering and outline image options, making it a perfect set to have in every flower lover's stash. I have also used the Crafty Meraki Mini Slimline Timeless Frames Meraki Para-Dies for my project along with the April Meraki Floral Para-Dies and Spade Meraki Floral Para-Dies Die Sets. I love these sets and have been using them a lot lately because they are so versatile and fun! 

To create my card, I began by stamping the large outline flower and leaves from the Imperial Garden Layering Stamp Set in my MISTI on to Snowdrift Cardstock using Versafine Onyx black dye ink. I repeated the process until I had enough stamped images to create a large floral spray and then trimmed out the pieces with a pair of scissors, leaving a small white border. (If you don't want to cut the images by hand, you can use the coordinating dies available for the set too!)

I coloured the flowers using Bubble Gum and Candy Apple Liquid Watercolours, concentrating the darker color towards the centre of the images for depth. The leaves were coloured using Key Lime and Emerald City Watercolors and I followed the same technique as above while colouring them. Next, I die cut Snowdrift Cardstock and White Foam Sheets using the floret dies from the April Meraki Flora Para-Dies and Spade Meraki Floral Para-Dies. I watercolored the pieces using Bubble Gum and Candy Apple Liquid Watercolors in a light wash for a soft look.

Then, I trimmed a piece of Snowdrift Cardstock to 8 7/8" X 3 5/8" and placed the Argyle Stencil in the centre of the panel and applied Metropolis Ink lightly all over with a blending brush. I then flicked some black paint on my panel using a paint brush for a fun splatter effect. Once that was done, I mounted the panel to a top-folding slimline-sized light pink card base with tape runner. Next, I die cut Snowdrift Cardstock and White Foam Sheets using the largest frame die from the Mini Slimline Timeless Frames Meraki Para-Dies and adhered it down to my panel using liquid glue. I then adhered my stamped and die cut images down on to the panel using a combination of foam adhesive and liquid glue for dimension. To complete my design, I stamped a sentiment from the Angel Wings Layering Stamp Set on a strip of Snowdrift Cardstock using Versafine Onyx Black ink and then die cut the sentiment out using the Fishtail Flag Trio Die Set, before popping it on my panel using foam squares for dimension. Finally, I adhered a few Bubblegum Crystal Jewels to embellish my card panel.


I hope you enjoyed this bright floral Slimline card and thank you so much for stopping by today. Be sure to check out Crafty Meraki on Instagram or visit their Blog for tons of inspiration!

If you like what you've seen from me, please give me a follow over on my Instagram (@hussena_cal) and/or subscribe to my blog if you haven't already.

Saturday, December 4, 2021

Spellbinders Guest Design Post | Fluted Classics Collection by Amazing Paper Grace


Hello, crafty friends!
I'm so honoured to be guest posting today on the Spellbinders blog! I'm sharing a set of four cards using dies from the new Fluted Classics Collection by Becca Feeken. The gorgeous classic nested design shapes can be used to create the perfect border for any background, sentiment, or focal image for a wide variety of projects.


My first card features the Fluted Classics Rectangles Etched Dies, Fluted Classics Ovals Etched Dies, and the Pop Up 3D Vignette Poinsettia Sleigh Die Set. The different nesting dies were simply perfect to create this pastel Christmas card. 

For my card, I first die cut Snowdrift Cardstock using the Large Rectangle Outer Rim and Insert Die together from the Fluted Classics Rectangles Etched Dies. Next, I die cut Alabaster Cardstock using the Medium Rectangle Outer Rim and Insert Dies from the same set. Then, I die cut Alabaster Cardstock using the Medium Oval Outer Rim, Insert, and Inner Rim Dies from the Fluted Classics Ovals Etched Dies. Once that was done, I die cut Pink Sand Cardstock using the Medium Oval Insert Die from the same set and stamped my sentiment on to the piece using Versafine Onyx Black ink

Next, I die cut Snowdrift Cardstock and Mirror Gold Cardstock using the Design Rim and Insert dies from the Flourished Fleurit Die Set together to add underneath my sentiment piece. I adhered the layers together using liquid glue, allowing a bit of the gold to show as a shadow. This card did involve a bit of die-cutting, but I think it was well worth it in the end! 

To embellish my card, I die cut Snowdrift Cardstock and Mirror Gold Cardstock using the poinsettia and evergreen leaf dies from the Pop Up 3D Vignette Poinsettia Sleigh Die Set. Next, I inked the centres of the flowers using Twisted Citron Distress ink with a sponge dauber. The petals were coloured very lightly using Picked Raspberry Distress ink and I lightly embossed the flower petals with a Ball Stylus. I then adhered the floral spray together using Liquid Glue and added a small sparkly rhinestone to the center of each flower.

I adhered down all the different die cut elements one on top of the other using foam adhesive and matted the entire panel with layers of Pink Sand and Mirror Gold Cardstock. Then, to finish, I adhered the card front to a top-folding white card base with tape runner. 


When you have a large focal image on your project, the Fluted Classics Collection is perfect for making elegant frames and background designs to draw attention to them. Here I combined the square and circle shapes to create a layered frame for these floral die-cut pieces.

To begin, I die cut Alabaster Cardstock using the Large Square Outer Rim and Insert Dies from the Fluted Classics Square Etched Dies. Next, I die cut Alabaster Cardstock using the Square Frame die from the Elegant Infinity Die Set. In order to highlight the intricate design, I matted the die cut panel with a piece of Mirror Gold Cardstock. Once that was done, I die cut Alabaster Cardstock and Mirror Gold Cardstock using the Large Circle Outer Rim, Insert, and Inner Rim Dies from the Fluted Classics Circle Etched Dies. I adhered the ivory die-cut piece on top of the gold die-cut with liquid glue, offsetting them a bit to form a shadow. Then, I die cut Alabaster Cardstock using the Medium Circle Outer Rim and Inner Rim Dies from the Fluted Classics Ovals Etched Dies. I adhered the pieces down on my panel using foam adhesive for dimension. 

Next, I stamped the sentiment from the Sending You stamp set onto Snowdrift Cardstock using Versamark Embossing ink, added Super Fine Gold Embossing Powder on top of the stamped images, and melted it with a Heat Tool. I cut out the stamped images using the coordinating dies and popped them on to my panel using foam adhesive for dimension. 

To create my floral spray, I die cut Snowdrift Cardstock using the small blossom and leaf dies from the Floral Potpourri Etched Dies. I coloured the die cut pieces using Mermaid Markers from Jane Davenport, shaped the individual pieces with a Ball Stylus, and added a small sparkly Styrofoam bud to the center of flower. I also die cut Snowdrift Cardstock using the floral accessory dies included in the Flourished Fleurit Die Set and coloured them using Mermaid Markers to add to my foliage. To complete my floral arrangement, I die cut Mirror Gold Cardstock using the decorative flourish die included in the Mini 3D Vignette Floral Mason Jar Die Set.

It was now time to assemble the card together. I adhered down the die cut pieces using a mix of foam adhesive and Liquid Glue. I arranged the flowers and leaves around the sentiment panel and adhered them down with strong Liquid Glue. Then, I matted the card background panel with Mirror Gold Cardstock and adhered it down to a top-folding white square card base with tape runner. To finish, I popped the die cut sentiment pieces on my panel using foam adhesive for dimension. 


My next card includes lots of die-cutting and a touch of stamping. I chose a color scheme that would work for most seasons so that I could send this friendship card any time of year.

To create my card, I first die cut Alabaster Cardstock using the Large Rectangle Outer Rim and Insert Dies from the Fluted Classics Rectangle Etched Dies. Next, I die cut Pink Sand Cardstock using the Medium Rim and Insert Dies from the Victorian Splendor Slimline Etched Die Set and adhered it down to my card panel using  Liquid Glue. Then, I die cut Alabaster Cardstock using the Medium Circle Outer Rim, Insert, and Inner Rim Dies from the Fluted Classics Circles Etched Dies and adhered it down to my background panel using foam adhesive. 

Then, to embellish my card front, I die cut Snowdrift Cardstock using the Oriental Lily and Wellies and Plumeria Etched Dies from Susan's Garden. I used Copic markers to colour the centres of the flowers and lightly shaped the petals using the Ball Stylus from Susan’s Garden Ultimate Tool Kit. I added a pink pearl to the centre of each flower for interest. Next, I die cut Snowdrift Cardstock using the large leaf, medium leaf, small leaf, and stem die from the Plumeria Etched Dies from Susan's Garden. I blended Peeled Paint and Twisted Citron Distress inks over the die cut pieces for depth. I went with 2D flowers this time and really like how they have turned out. 

Next, I die cut Snowdrift Cardstock and Mirror Gold Cardstock using the 'Hello' die from the Sweet Sayings Notecard Sentiments Etched Dies. I adhered the white die-cut sentiment on top of the gold die-cut with liquid glue, offsetting them a bit to form a shadow. I then ink blended Picked Raspberry ink to the top three-quarters of the sentiment die-cut piece for more depth. Once that was done, I adhered the piece down to my panel using foam adhesive. Then, I stamped a sentiment from the I'm Here for You Sentiments Clear Stamp & Die Set on to a strip of Snowdrift Cardstock using Versafine Onyx Black ink and popped it on to my panel using foam adhesive. I arranged the flowers and leaves around the sentiment panel and adhered them down with strong Liquid Glue. To assemble the card together, I matted the card panel with Pink Sand Cardstock before adhering it to a top-folding A2-sized ivory card base. I adhered pink pearls all over the intricate background panel as a finishing touch. 


I love creating Shaped Cards and the Fluted Classics Ovals Etched Die Set was just perfect for creating one. I always love when I can stretch my dies and use them to create new designs. I added a few handmade flowers for a simple congratulations card. 

To create my card, I first scored and folded Waterfall Cardstock in half and placed the Large Oval Insert Die included in the Fluted Classics Ovals Die Set along the fold of the card, so the cutting edges of the die are just above the fold. I then ran it through my Spellbinders Platinum 6" Machine machine. This helped me create a folded card base that matches the shape of the card. I then die cut Alabaster and Pink Sand Cardstock using the Large Oval Insert Outer Rim and Insert Dies from the same set. I adhered the ivory die-cut piece on top of the gold die-cut with liquid glue, offsetting them a bit to form a shadow. 

Next, I die cut Mirror Gold Cardstock using the Small Oval Outer Rim, Insert, and the Small Oval Inner Rim Dies included in the Fluted Classics Ovals Die Set. Once that was done, I adhered a solid oval cut using Snowdrift Cardstock inside the outline die cut piece with Liquid Glue. Next, I die cut Waterfall and Mirror Gold Cardstock using the sentiment die from the Elegant Infinity Die Set. I adhered the blue die-cut sentiment on top of the gold die-cut with liquid glue, offsetting them a bit to form a shadow. Next, I die cut Snowdrift Cardstock using the Plumeria Etched Dies from Susan's Garden. I lightly coloured the pieces using Mermaid Markers and shaped the petals using the Ball Stylus and Tweezers from Susan’s Garden Ultimate Tool Kit

Then, I die cut Snowdrift Cardstock using the leaf dies included in the Floral Potpourri Etched Dies. I coloured the individual die cut pieces using Mermaid Markers and embossed them using the Small Ball Tip and Tweezers from the Ultimate Tool Kit by Susan's Garden. I added sparkly styrofoam buds to the centre of each of the flowers for more dimension. To finish, I assembled the different card layers together and adhered them down using a mix of Liquid Glue and foam adhesive. 


SPELLBINDERS SUPPLIES:
CS-005, CS-017, CS-024, CS-027, SCS-118, SDS-167, S3-420, S3-428, S4-1148, S4-1150,  S4-1151, S5-474, S5-475, S5-478, DOMAPG-NOV20, DOMAPG-MAR21, DOMAPG-JUN21, JD-041, PCGO4E, PE-100, T-021

OTHER SUPPLIES:
Neenah Solar White Cardstock, Copic Markers, Peeled Paint, Picked Raspberry, Twisted Citron Distress Inks, Versafine Onyx Black Ink, Versamark Embossing Ink, Super Fine Gold Embossing Powder, Blending Tool, Sponge Daubers, Heat Tool, MISTI Stamping Tool, Tape Runner, Foam Adhesive, Crystal Jewels, Styrofoam Buds, Microfine Glitter Powder, Rhinestones, White Fun Foam Sheets

I hope you enjoyed this set of layered floral cards featuring the Fluted Classics Collection and are inspired to give it a try. Thank you so much for stopping by today!
You can find more inspiration over at my Instagram page