Showing posts with label Congratulations themed cards.. Show all posts

Monday, February 28, 2022

Spellbinders Be Bold Color Block Collection


Happy Monday, crafty friends!
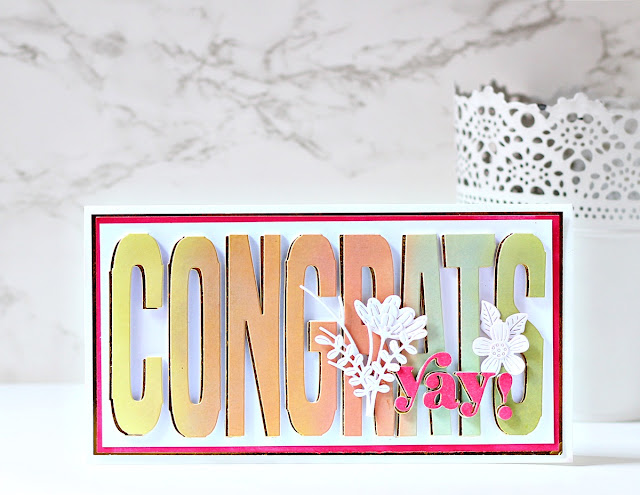
I wanted to sneak in and share a quick Slimline Card today made using the Spellbinders Be Bold Color Block Congrats Etched Dies from the Be Bold Color Block Collection.  I am in LOVE with the eye-catching sentiment designs in this collection, which are perfect for expressing yourself in a big way!

I used the Be Bold Color Block Congrats Etched Dies to create this bright and fun card with some vivid ink blending and a little gold shadow. I really like how this turned out!
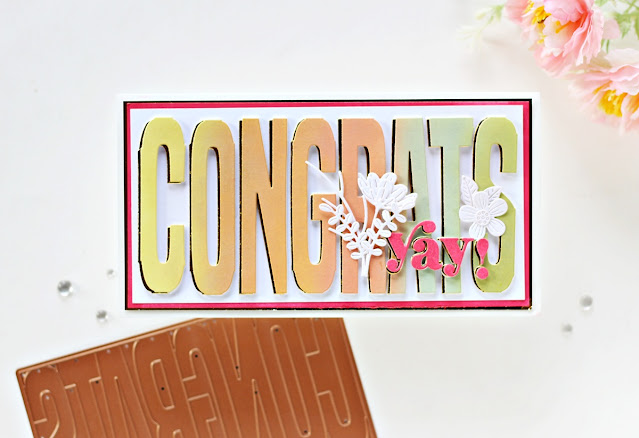
To create my card, I trimmed a piece of Snowdrift Cardstock to 3.25” x 6.25” and blended Mustard Seed, Scattered Straw, Spiced Marmalade, Dried Marigold, and Peeled Paint Distress Oxide inks on the panel using an ink blending tool to create a springtime background. Next, I die-cut the ink-blended panel with the Congrats die from the Be Bold Color Block Congrats Die Set. Once that was done, I die-cut Brush Gold Cardstock with the 'Congrats' and 'Yay' dies from the Be Bold Color Block Congrats Die Set. I adhered the ink blended “congrats” letters on top of the gold letters with Craft Glue, allowing the gold layer to peak out to the left side for depth.
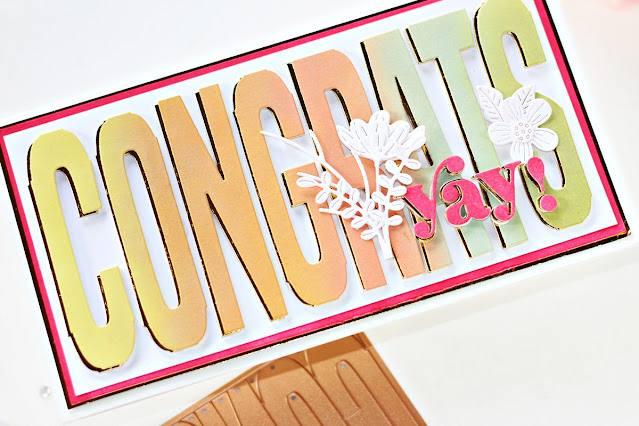
Next, I die-cut Wild Berry Cardstock with the 'Yay!' die from the Be Bold Color Block Congrats Die Set and adhered it on top of the gold die-cut sentiment piece with Craft Glue, allowing the gold layer to peak out to the left side for depth. Then, I die-cut  Snowdrift Cardstock using the various flower and foliage dies in the Be Bold Blooms Etched Dies and adhered them around the die-cut letters with foam squares. Then, I trimmed a piece of Snowdrift Cardstock to 3.25” x 6.375” and adhered the large letters onto the card front with foam squares. 
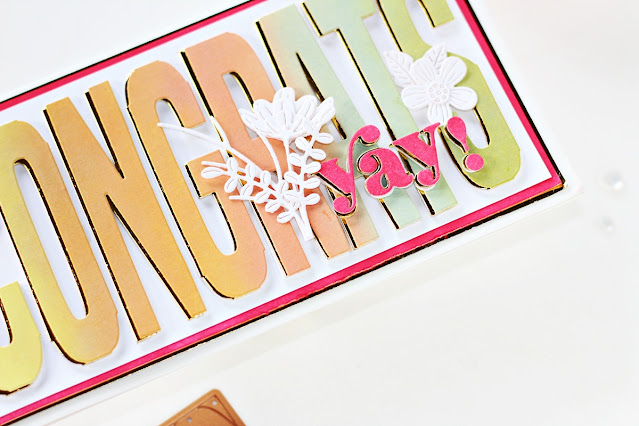
Next, I mat the card panel with layers of Wild Berry and Brush Gold Cardstock and then adhered it it on top of a 3.50” x 6.425” -sized top-folding white card base. This was so simple and easy to put together!
Limited Period Offer
Don't miss the BOGO (Buy One Get One) Die Cutting Sale going on over at Spellbinders now. Be sure to take advantage of the sale and stock up on your favourite die sets!
    

That’s it for me today! I hope you liked my take on the die set! If you like what you've seen from me, please give me a follow over on my Instagram (@hussena_cal) and/or subscribe to my blog if you haven't already.
Have a great day ahead!

Monday, January 10, 2022

Guest Post using Spellbinders Garden Shutters Collection


Hello, crafty friends!
I'm so honoured to be guest posting today on the Spellbinders blog using dies from the new Garden Shutters Collection by Becca Feeken. This is a very unique collection that can be used to create a fun element of motion. It creates a beautiful card, and with one pull of a tab, the shutters open to reveal a sweet surprise sentiment, but the die layers can really be used on any kind of card!


I had to start out by trying my hand at one of the classic Garden Shutters cards first. The Butterfly Bliss Garden Shutters 5 x 7" Card Base Etched Dies was the first set to catch my eye and I had to use it to create a delicate and feminine encouragement card for a friend. I also used elements from the Eyelet Lace Frame Etched Dies and the Primrose Heart Façade Etched Dies to embellish my card.

To create my card, I first die-cut Snowdrift Cardstock three times using the kinetic layer die in the Butterfly Bliss Garden Shutters 5 x 7" Card Base Etched Die Set. I folded the layers following the instructional PDF HERE and adhered down the layers using liquid adhesive to my already die-cut 5" X 7" card base. It did take me a while to get the configuration right, but once you get the hang of it, these will be a breeze to make! Next, I die cut Snowdrift Cardstock and Mirror Gold Cardstock using the Decorative Rectangle Insert Die from the Butterfly Bliss Garden Shutters 5 x 7" Card Base Etched Die Set. I adhered the layers together using liquid glue, allowing a bit of the gold to show as a shadow. 

Then, to embellish my card, front I die cut Snowdrift Cardstock using the butterfly and primrose dies from the Butterfly Bliss Garden Shutters 5 x 7" Card Base Etched Die Set and Primrose Heart Façade Etched Dies. I used Copic Markers to colour and shade the die-cut pieces, but you can also cut out the pieces from colored cardstock and assemble them together. I also die cut the body of the butterflies from Mirror Gold Cardstock for interest. Next, I used Gold Hot Foil to foil Onyx Cardstock using one of the sentiments from the Mini Sincere Sentiments Glimmer Hot Foil Plate and cut it out using the coordinating die. I adhered the piece onto my panel using foam tape for a raised effect.


Next, I die cut Waterfall Cardstock with the Scallop Rim and Outer Eyelet Insert Dies in the Eyelet Lace Frame Etched Die Set and adhered it on the front of the card base with liquid adhesive. Then, I die cut Waterfall and Mirror Gold Cardstock using the Pull Tab dies and adhered it to the back of the top front piece of the card to create the interactive motion for the card. When the recipient pulls on the top tab, the shutters open and the scene assembles itself almost magically. It's such a joy to look at how it works! I adhered down the various die-cut elements using foam adhesive for depth and dimension and completed the card by adhering down my card front panel to a side-folding Waterfall card base.


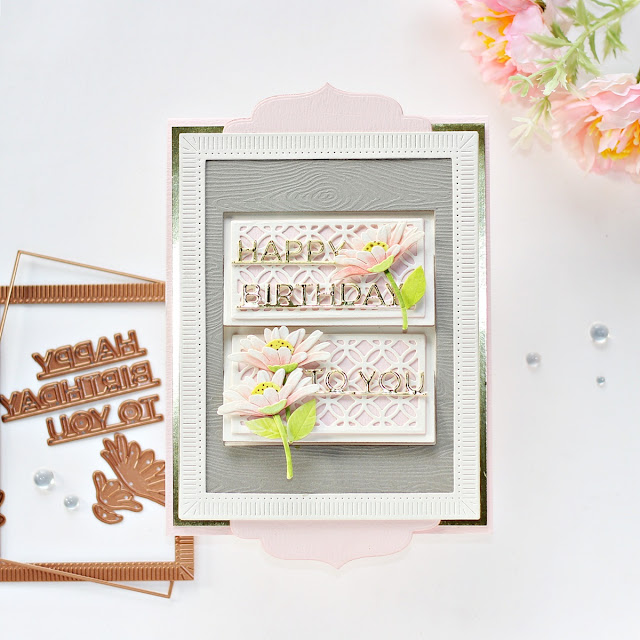
If you're not a fan of 5" X 7" Cards and would like something more petite and pretty, the Daisy Delight Garden Shutters A2 Card Base Etched Dies is just the set for you! Here I used the interactive A2 (4.25 x 5.5-inch) card base to create a soft floral birthday card.

To create my card, I die cut A2-sized Alabaster Cardstock thrice using the kinetic layer die included in the Daisy Delight Garden Shutters A2 Card Base Etched Die Set. Once the base of my card was die-cut and ready, I folded the layers following the instructional PDF HERE and adhered down the layers using liquid adhesive to my already die-cut A2 card base. Next, I die cut Pink Sand and Alabaster Cardstock using the Design Rectangle outline and insert Dies from the Daisy Delight Garden Shutters A2 Card Base Etched Die Set. I adhered down the layers to the front and back of the shutter layers for interest and then proceeded with embellishing the card front.

I die-cut Snowdrift Cardstock using the Angled and Side Flower Dies and the Stem Dies from the Daisy Delight Garden Shutters A2 Card Base Etched Die Set. I coloured the individual die-cut pieces using Copic Markers, adding some simple shading to each die-cut, however you can always use Distress inks or Watercolour Brush Markers too if you like. 

Next, I die cut Mirror Gold Cardstock using the 'Happy Birthday To You' Dies from the Daisy Delight Garden Shutters A2 Card Base Etched Die Set and adhered it down on my card panel using liquid adhesive. For the reverse layers, I die-cut Snowdrift Cardstock using the Angled and Side Flower Dies and the Stem Dies and Butterfly 2 Dies from the Daisy Delight Garden Shutters A2 Card Base Etched Die Set and Butterfly Bliss Garden Shutters 5 x 7" Card Base Etched Die Set. Once again, I coloured the pieces with Copic Markers and did some light shading and blending on the daisies for interest.


Then, I die cut Graphite Cardstock with the A2 Card Base included in the Daisy Delight Garden Shutters A2 Card Base Etched Die Set. Next, I die-cut the kinetic layer die from the set twice to create a frame for my card and adhered it on the front of the card frame piece with liquid adhesive. Next, I die cut Alabaster Cardstock using the Large Rectangle Outer Rim and Insert Die together from the Fluted Classics Rectangles Etched Dies and adhered the piece down onto my panel with liquid adhesive. I also die-cut Pink Sand Cardstock using the Pull Tab dies included in the Butterfly Bliss Garden Shutters 5 x 7" Card Base Etched Die Set and adhered it to the back of the top and bottom frame piece to create the interactive motion for the card. 


I adhered down all the different die cut elements to the card front using foam adhesive and matted the entire panel with Mirror Gold Cardstock. Then, to finish, I adhered the card front to a top-folding Pink Sand card base with tape runner. The layers in the set make it effortless to create a distinctive card! These cards can easily be mass-produced as well if you would like to create and give these cards to your friends and/or family members. There is something about interactive cards that appeals to all age groups. It's so rewarding to create them too! 


If you don’t want to create kinetic cards, this collection also has some gorgeous accessory die sets! I used the Eyelet Lace Frame Etched Dies and Primrose Heart Façade Etched Dies and lots of intricate layers to create this floral congratulations card.

For my card, I began by creating a top-folding A7-sized card base out of Pink Sand Cardstock by trimming it to 7” x 10” and scoring it down the center. Next, I die-cut Alabaster Cardstock using the Scallop Rim and Outer Eyelet Insert Dies from the Eyelet Lace Frame Etched Dies. Next, I die-cut Alabaster Cardstock using the Inner Rectangle Outline and Eyelet Insert Dies from the same set and layered it over the intricate die-cut frame with foam adhesive. Then, I cut Alabaster Cardstock using the smallest Inner Rectangle Outline and Inner Inner Oval Outline Dies and popped it over the die-cut panel using foam adhesive. 

Once my card layers were in place, I die-cut Snowdrift Cardstock using the flower layer and leaf dies from the Primrose Heart Façade Etched Dies. I inked the centre of the petals using Coral, while the tips and the centres of the leafy branches were colored using Seaweed and Siren. I die-cut some additional foliage from Snowdrift Cardstock using dies from the Flourished Fleurit Die Set and the Sweet Cottage Flowers Etched Dies and coloured them using the same colours as above.   

Next, I die cut Alabaster Cardstock and Mirror Gold Cardstock using the Inner Oval Outline Die from the Eyelet Lace Frame Etched Dies. I used the negative die-cut piece to stamp a sentiment from the All Occasion Sentiments Stamp and Die Set in Versafine Onyx Black ink and adhered the layers together using liquid glue, allowing a bit of the gold to show as a shadow. I then popped it on the die-cut panel using foam adhesive for dimension. Then, to finish, I adhered all the flowers and leaves down to the left of my panel using a combination of foam adhesive and liquid adhesive.


SPELLBINDERS SUPPLIES:
CS-005, CS-017, CS-024, CS-027, CS-030 SCS-118, SDS-166, SDS-167, S4-1025, S5-479, S5-484, S6-183, S6-184, GLP-288, DOMAPG-OCT21, GLF-014, GLS-003EUK, JD-041, PCGO4E, PE-100, T-021, AD-0084

OTHER SUPPLIES:
Neenah Solar White Cardstock, Copic Markers, Peeled Paint, Picked Raspberry, Twisted Citron Distress Inks, Versafine Onyx Black Ink, Sponge Daubers, MISTI Stamping Tool, Tape Runner, White Fun Foam Sheets

I hope you enjoyed this set of layered floral cards featuring the Garden Shutters Collection and are inspired to give it a try. Thank you so much for stopping by today!

You can find more inspiration over at my Instagram page.

Friday, July 31, 2020

Flower Play | Pinkfresh Studio

Hello, crafty friends!
I am so excited to to share my projects for my very first post on the Pinkfresh Card Blog! I am showcasing the Embroidered Blossoms Stamp and Die set and the Fancy Blooms Stamp and Die set for my projects today. I have created a total of THREE projects, so let's dive right in! 


My first Card features the Embroidered Blossoms Stamp and coordinating Die Set along with the Diagonal Stitched Rectangles Die Set. To begin, I stamped the various flowers and foliage from the set using a variety of Pinkfresh Inks (Sparkling Rose, Bubble Gum, and Coral Reef for the flowers and Grassy Knoll and Olive for the leaves). I stamped all the images on Neenah Classic Crest Solar White 110 LBS Cardstock and then die cut them using the coordinating Embroidered Blossoms Die Set. I also stamped and die cut some additional filler flowers and foliage pieces for my design.

For the focal of my card, I decided to do something interesting. I used the Diagonal Stitched Rectangles Die Set to de-boss the design on my card using a regular Tan Embossing Mat in my Die Cut Machine. I did this technique using two nesting dies from the set and really loved how it helped frame the card design! At this point, I also went ahead and added a few pink and grey paint splatters to help add interest to the design. Once that was done, I die cut a rectangle frame from the Diagonal Stitched Rectangles Die Set from Silver Glitter Cardstock and adhered it to my panel using foam tape. 

I adhered down all my stamped and die cut images to this panel using foam dots. I wanted the design to look balanced, hence I used a varied mix of colours for my card. 

My sentiment is from the Essentials: Classic Words Die Set and I love the font of the dies in this set. It looks very stylish! I die cut the word from Black Cardstock and adhered it to my panel using fun foam.


My next Card features the Fancy Blooms Stamp and coordinating Die Set. I decided to some quick and simple watercolouring on this card to colour the gorgeous floral images. I stamped the floral clusters using the Detail Black Ink on Canson Montval Watercolor Paper and then die cut them using the coordinating Fancy Blooms Die Set. I coloured the flowers using Clementine Liquid Watercolor, while the leaves and foliage were coloured using a mix of Key Lime and Emerald City. I diluted all the colours with water before colouring, to get a soft, pastel look.

For my card background, I decided to create some broad watercolour stripes. I used the Sunshine Liquid Watercolor and a flat paintbrush to make the stripes on a Canson Montval Watercolor paper panel. I love how it turned out and it contrasted really well with the colours of the floral cluster. Next, I added some black paint splatters to this panel for some interest and then die cut it using the largest rectangle die from the Diagonal Stitched Rectangles Die Set.

Then, I die cut a circle from the centre of this panel to create an aperture. I used one of the dies from the Braided Circles Die Set for it. I adhered this to my card base using foam tape. Once that was done, I adhered all the stamped images using foam dots on my panel. 

For the sentiment, I die cut the outer shadow and the word piece from the Essentials: Classic Words Die Set. I coloured the pieces in contrasting shades for added interest. The finishing touch was adding some glitter to the sentiment piece. 


My last project for today is a Mini Shaped Card which I made using the Embroidered Blossoms Stamp and coordinating Die Set and the Braided Circles Die Set. The idea for this card came when I finished creating the first card and I had some leftover stamped floral pieces. I decided to whip up this quick and simple Card using them.  

I love making Shaped Cards and this one was created using the Braided Circles Die Set. I used two different nesting dies from this set to create the base for my card from Neenah Classic Crest Solar White 110 LBS Cardstock. Once my card base was done, I die cut another circle from the set and popped it to my panel using foam dots. 

 The bloom, leaves, and filler flowers are from the Embroidered Blossoms Stamp and coordinating Die Set. I used the leftover stamped pieces from my first card here, and simply popped them to my panel using foam dots. The sentiment is from the Essentials: Classic Words Die Set. I die cut the outer shadow from Black Cardstock and the main word die from Silver Glitter Cardstock. 

I love how this Card turned out, and it hardly took me time to put together as well, so that was really awesome! I hope this inspires you to use your leftover stamped images or die cuts too to make mini notecards/tags! 

Hope you liked my cards for today and are inspired to pull out your floral stamp sets!
Thanks for stopping by and have a great day!

Wednesday, March 11, 2020

Spellbinders + Amazing Paper Grace Die of the Month | March 2020


Hello, crafty friends!
I have a Card to share today featuring the Spellbinders + Amazing Paper Grace March Die of the Month. This month's "Elegant Infinity" Set is perfect for making exquisite cards, boxes, bags, and more. 

If you want to find out more about the Club – prices, how you sign up and what’s included, please look ——–> HERE. These dies are only available through the Club and are limited to the month of March, so hurry before they are sold out. There is also a super helpful YouTube video that you can see HERE which shows you how to use the die.

Here's a look at my card using the Die Set. I have gone with a simple design as the dies do all the work for you!

To create this card, I first die cut the largest die from the Elegant Infinity Set from White Cardstock using my Spellbinders Platinum 6" Machine. I repeated the process for the other die layers as well. I have used all the die cut layers for my card front, however, you can always choose to only use one or two dies at a time and create different stacks. It's a really versatile set and is not limited to just cards as well. You can also create a number of 3D projects with it!

I die cut the second layer of the Elegant Infinity Set from Patterned Paper, while the delicate doily was die cut from both White Cardstock & Patterned Paper. I used White Fun Foam while adhering the die cut layers so that it would give a raised look.

The flowers were made using the mini flower dies included in the Elegant Infinity Set. I did not do anything elaborate to create them - I just die cut the flowers, embossed them, and added pollens to the centres.

Crafty Tip: I die cut the flowers from a piece of White Cardstock that I coloured using few drops of the Pretty Amethyst Re-Inker. This is one of favorite techniques to do whenever I want a particular shade of Cardstock for my projects. I simply use few drops of ink from a Re-Inker and add them to a sheet of White Cardstock. Then, I spray loads of water to it, and with the help of a water brush, spread the colour on the paper. And there you have your custom coloured paper ready! Easy and quick and works for me all the time!

I did not add many embellishments to this card as I wanted the dies to be the focus of my project. I die cut a sentiment banner from the same sheet of coloured paper that I used for creating my flowers. The 'Congrats' die is from the Elegant Infinity Set while the foliage is from the Cinch and Go Flowers Etched Dies. I also added few trinkets and floral buds to complete my design. Finally, I mounted my panel on a White Card Base and my card was done.


If you are still on the fence about the Amazing Paper Grace Die of the Month Membership, do check out the project samples created using it on the Spellbinders blog. The dies are great value for money and the cost of the kit covers shipping cost within USA. So, what are you waiting for? Sign up as soon as possible!

That's it from me for today! I hope you liked my card. If you did, please do let me know in the comments below. I always love hearing from you.
Thank you so much for your visit to my blog today!

Monday, November 18, 2019

Altenew + The Daily Marker Color Therapy Blog Hop & Giveaway

Hello, crafty friends!
I'm happy and honoured to be joining Altenew for the Color Therapy Blog Hop today. Altenew is collaborating with the amazing Kathy Racoosin from The Daily Marker to inspire crafters to find joy through coloring. Kathy is celebrating her 14th 30 Day Coloring Challenge until the end of November 2019. 

If you arrived here from the super talented, Gayatri Murali's Blog, then you are on the right track. If this is your first stop, then you will want to start at the beginning, the Altenew Card Blog.


I have created a Card for this hop which features the Altenew Perfectly Perfect Stamp set, Dotted Scales Debossing Cover Die, Virginia Rose 3D Die Set, Layered Floral Elements Die Set, and Sketchy Florals Stamp set. 

For my card, I started by stamping the flowers from the Altenew Perfectly Perfect Stamp set using Antique Linen Distress ink on Art Essentials 300 GSM Watercolor Paper. Next, I used the Purple Wine and Lime Brush Markers from the Tropical Fiesta Set to watercolour my flowers. I went in with about two to three layers of colour till I was happy with the way it looked. Then, I fussy cut the flowers and kept them aside.

For my card foliage, I die cut some leaves and filler flowers from the Virginia Rose 3D Die Set, and Layered Floral Elements Die Set and coloured the die cuts using the Purple Wine and Lime Brush Markers from the Tropical Fiesta Brush Markers Set. 

I used the Dotted Scales Debossing Cover Die to die cut a background panel for my card. Then, I die cut a circle from the centre of this panel and adhered my flowers and die cut leaves and foliage over it.

I used a sentiment from the  Sketchy Florals Stamp set which was stamped using the Altenew Obsidian Pigment ink. I then added some enamel dots as the finishing touch for my card. Finally, I adhered my card panel to an A2 top folding white card base. 


Prizes:
Altenew is giving away a $30 gift certificate to 5 lucky winners and Kathy from The Daily Maker is also giving away her original 5”x7” watercolor artwork (including a custom frame). Please leave a comment on the Altenew Card Blog by 11/22/2019 for a chance to win.

Additional Giveaway:
Altenew will also draw a winner to receive a $15 gift certificate from the comments left on each designer’s blog on the blog hop list below. All winners will be announced on the Altenew blogs on 11/24/2019.

Special Offer:
Receive a FREE brand new Like Family Stamp Set ($4.99 value) with every order from 11/18/2019 at 12:01 am EST until 11/29/2019 at 11:59 pm EST. The free gift will be added to cart automatically. While supplies last. Shop here -> https://altenew.com/collections/all-altenew-products


Blog Hop Order:
Next Stop on this Blog Hop is, Keeway Tsao's blog.
Just in case you lose your place along the way, here is the complete list of participants so that you can find your way back:
                          Hussena Calcuttawala (You are HERE)


I hope this inspires you to colour something today! Anyone can participate in the 30 Day Coloring Challenge by coloring something and sharing it on social media using the hashtag #thedailymarker30day. I hope you find your 'Me Time' and enjoy the benefits of colouring through this challenge.

Thank you so much for your stopping by and reading this blog post. I hope you liked my card! If you would like to see more of my work using Altenew, do follow my Instagram page.
Thank you for stopping by, and wishing you a lovely day!

Thursday, February 16, 2017

Colored Dahlia Congrats | Card

Hello crafty friends!
I am back from my holiday and am feeling all refreshed with my mojo slowly coming back. I have a card to share today which incorporates lots of stamping, colouring and masking. I have also been practicing a lot with my Zig Clean Color pens recently. Here's a look at my card :


If you are interested in seeing how I made the lime yellow striped background, then check out my tutorial on the Pretty Paper Studio blog where I share the technique.

I have combined lots of different techniques to make this card. To start with, I created my card panel using my Zigs. Then for the focal of my card I stamped the flowers from the Altenew Dahlia Blossoms set using Versafine Onyx Black ink. I then fussy-cut all the leaves, filler flowers and the main dahlia. I colored all my images using the Zig Brush pens. I used a waterbrush for blending in the colours. I then popped them all on foam dots for dimension. I also die-cut an oval frame using the Spellbinders Elegant Ovals die and colored it using Inka Gold. The sentiment comes from the Altenew Sentiment & Quotes set. I heat-embossed it in gold on some light pink cardstock. For the finishing touches, I stamped the black stripes on the side of my card and added few Nuvo Crystal drops in different colours. And my card was done :)

I hope you like my card. I would love to know what you think!

Linking this to the Altenew February Challenge. I have used the colours from the inspiration picture :) I am also entering this in the Simon Says Stamp - Fantastic Florals challenge and Happy Little Stampers - Watercolor  + Anything Goes plus Optional twist of Dies.


Have a nice day everyone!