Showing posts with label Seam-binding ribbon. Show all posts

Monday, July 18, 2016

You are amazing!

Hello everyone!
I have a card to share today which I made for the Papericious July Challenge. We have a Moodboard challenge for you this time to be inspired with. You can check out all the details HERE on the Papericious blog. Here's my card inspired by it.


(I was inspired by the colours as well as the white mulberry flowers, the woodgrain background and the mesh from the Moodboard)

I have used the Papericious - My Golden Garden paper for the base, then layered it with the Papericious Wooden collection and finally used the Papericious Infinity Collection papers for die-cutting that doily.
The flowers are from my stash and I have added some Stickles on them for adding some shimmer. The leaves have been colored using Inka Gold which were die-cut from a Sizzix die. The bow is  made using Creme Seam Binding Ribbon. The hat-pins are from my stash again.

I have added a crotchet lace and the Martha Stewart Doily Lace punched border for layering. The sentiment is from the Altenew - Sentiments & Quotes set which has been heat-embossed using Ranger Gold Tinsel Embossing powder. I added a small butterfly from Martha Stewart to finish off my card! 

I'm entering my card in the Lulupu - July Sketch Challenge ( I have flipped the sketch upside down) , Peek-a-Boo Designs - Layers Challenge, Card-Mania - Lace and Pearls, Happy Little Stampers - Anything  goes with Dies


I hope you liked my card. Please do leave me your comments/suggestions. I love hearing from you :)


Tuesday, April 19, 2016

Layered Card | Best Mom in the World

Hello friends!
I am blogging after a long time on my personal blog. I have been quite tied up with DT commitments, but I wanted to drop in and share this card that I created for the Papericious blog using their March release which was the Papericious Ephemera Collection. This is a gorgeous collection with some really beautiful prints! Here's my card which I made for the monthly challenge on the blog.


This was a pretty quick card to create. For the base layers, I have die-cut the pattern papers using Spellbinders Radiant Rectangles die and layered them using foam dots. I then die-cut an oval frame using a Couture Creations die and white cardsotck and slightly distressed it using Vintage Photo Distress ink.
 After a long time, I have made my own flowers which have been made using the Sizzix Tattered Florals die. The leaves are from Cheery Lynn. The berries and the skeletal leaf are actually chipboard pieces from Wycianka which I have colored using Distress inks. The berries were covered with Glossy Accents to give a more natural look.
The gorgeous butterflies that you see are paper-pieced from the Ephemera collection and foam-mounted on the card base. The sentiment is from Altenew and I created a banner by sponging the background with Tattered Rose Distress ink. The seam binding ribbon was colored using Heidi Swapp Color Shine Coral mist.

I hope you like my card. I've made a layered card after a long time and truly enjoyed it. Let me know your views regarding it.

I'm entering my card in the Artful Crafting- April challenge. I was inspired by the colors and the floral patter on the tea cup and ofcourse, this card was meant for my mom, so had to make it really feminine :)
alt


Tuesday, March 1, 2016

Love- Mixed Media Wall Art and Tutorial

Hello friends!
I have a Mixed Media Wall art and fridge magnet to share today along with a step by step tutorial. Here's a look at what I have created :

This wall hanging would make a perfect accent to your craft room or even as a home decor and I have created this based on the current theme this month at Pretty Paper Studio which is “LOVE”. I have a step by step tutorial on how I have created this, so sit back and relax and hope you enjoy seeing the creative process .

 I first started by roughly drawing a freehand heart shape on a recycled cardboard packaging and fussy cutting it and for the magnet, I have die – cut a heart shape using my die directly on the cardboard. I have used papers from 6″ X 6″ Crate Paper pad : Craft Market collection.

After I had cut the heart shape, I cut out the papers from my paper pad and glued them on the cardboard base. (The brown woodgrain & dotted paper). Then it was time to add some texture to the base so I used Tim Holt Lace stencil and embossing paste along with some Heidi Swapp mists to create my background.

This is how the base looks once the embossing was done . On my dotted heart, I mixed some blue mist with my embossing paste before applying it through the stencil.

This is how the base looks once the embossing was done . On my dotted heart, I mixed some blue mist with my embossing paste before applying it through the stencil.

To create more background texture, I water colored two images from Prima Marketing Everyday Vintage Paintables Cards- Bohemian 4 ”X 6” using my Distress inks and I fussy cut the images and layered them on my heart base.

After I watercolored and fussy cut my image it was time to start embellishing and putting down all my elements on my heart base . I decided to use the Prima Marketing Resin icons in a Box- Chalk Black Lock and Key Sets for this, so I painted it with gesso and colored it with my mist to give it a hint of blue.

After playing around with my embellishments, I finally arranged them on my final piece. I have used handmade flowers and some die cut and colored leaves using Joy! Crafts Die- Leaf #2, added a American Crafts/Amy Tangerine Stamped Myflair Flairs – Embossed Gold along with the Prima Marketing Resin icons in a Box- Chalk Black Lock and Key Set.

 I also made a co-ordinating fridge magnet  to go with my wall hanging :

For the fridge magnet, I have used paper from Crate paper : Craft Market collection 6 ” X 6″ paper pad. I have die-cut a scalloped circle from this paper pad and have foam mounted it on my heart base and used some mulberry flowers and a Prima Resin Icon Key to embellish it, finally used some sequins to finish my project.

w&w_bb2ndb_challengefinal
I'm linking my wall hanging and fridge magnet to the Winnie and Walter Belated Second Birthday challenge-
Anything but a card, Gold + Watercolor challenge with Heather (I have watercolored the Prima Paintable image) and Floral challenge with Lydia

Also entering it in the Artful Crafting- Love challenge.

I hope you liked my post and tutorial. Do leave me your comments/suggestions. I always look forward to them. :)

Wednesday, October 28, 2015

An Altered hoop and a Tag !

Hello, everyone!
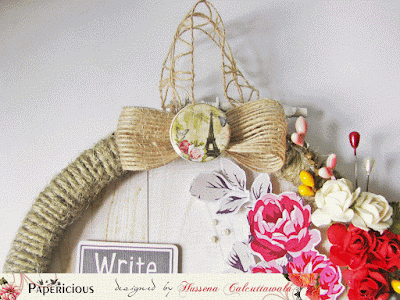
Today I have two projects to share with you all. These projects were created for the Papericious blog to introduce the new Adhesive buttons/flairs that have been released this month. I really enjoyed using these buttons on my projects. :) 

So, here's a look at what I created using these buttons. The first one is an altered hoop and the second one is a Mixed media tag!

For this hoop, I have used the Pattern Papers from the Papericious Grey Bloom collection and the Wooden Collection. The pink flowers and the leaves are fussy cut from the Grey Bloom collection paper and mounted on square foams for dimension. As you can see, I have used these buttons for the centre of my bow as well as a part of my sentiment.  These make very pretty centres and look great on cards, layouts and mixed media projects!


Here are few of the close ups!


I am entering my altered Hoop for the PPS challenge : Inspired by a song. I was inspired by THIS song from Francesca Battistelli.

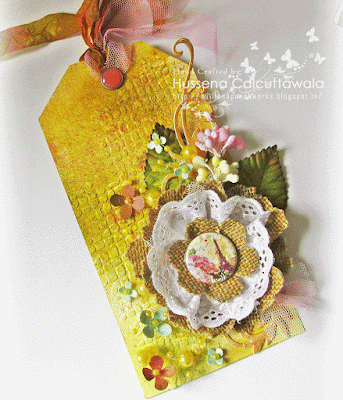
Moving on to my Mixed Media tag :

 I first created a burlap flower using the Tim Holtz Tattered florals die and layered it with some tulle and fabric cotton laces and finished it off with an adhesive button. Isn't it gorgeous??
I have created the background of the the tag using embossing paste and a stencil from Tim Holtz with Distress Stain Sprays.


 I am entering this tag in the Stamploration Mixed Media Challenge.

Thank you for your time and have a nice day everyone! Please do not forget to leave your comments/suggestions. I love to get feedback from you :)

Friday, January 16, 2015

A DIY Snowflake and card

Hello friends,
I am sharing a card today based on this weeks challenge theme at Cheery Lynn which is 'Snowflakes'. To tell the truth, I do not have any snowflake dies in my stash let along Cheery Lynn ones so I had to do a bit of an improvisation ad created my won snowflake using a paper punch and Cheery Lynn Olive Branches die. Before I show you how I made the snowflake, here's a look at my card :


 Here is the small tutorial on how I created the snowflake. I first punched out a medium size snowflake using white cardstock and colored it with Distress ink- Broken China. Then die cut 6 of the Cheery Lynn Olive branches leaves and cut them into half and stuck them on the base of the snowflake, thus creating the snowflake embellishment which then I blinged up by using a Silver Glitter Washi tape and punching out a snowflake through it !!

 This is how the snowflake embellishment looks like once its completed. You can distress it with any color ink.

To create my card, I first made two layers of these snowflakes and punched out the centre of it using silver glitter Washi tape. I layered it on Sophie's heart die and to create the frame, I die-cut the two 3 in 1 Corners (F) from Cheery Lynn again using silver washi tape and placed one each on the top and bottom. Then placed it on a DCWV pink polka dot patterned paper and added Anastasia Lace border.
Inked the edges of the lace using Distress ink- Spun Sugar. I distressed the edges of the card using Distress ink - Peacock feathers, added some rhinestones and made a bow using Seam Binding ribbon.

Supplies used :
Card base- Campap
Patterned papers- DCWV Fresh Floral Stack, Papermania Vintage Notes paper pack.
Dies :
Cheery Lynn Sophie's Heart mini doily die.
Cheery Lynn Olive Branches
Cheery Lynn Anastasia Border die,
Cheery Lynn 3 in 1 Corner dies (F)
Punch- Jef Snowflake punch.
Inks- Distress inks- Spun Sugar, Peacock Feathers and Broken China
Seam Binding Ribbon, Silver glitter Washi tape, Rhinestones and Twine.

Challenges entered :
Cheery Lynn - Snowflakes
Pinspirational Challenge- Snowflake (Made it to Top 3)
Craft Dee Bowz- Anything goes with a handmade bow

Hope you like my card. Do let me know your views regarding it. Would love to hear from you.
Have a nice day everyone!

Saturday, September 13, 2014

Textured, shabby tag !!

Hello everyone!
I've got two posts in two days. Yayy for me. :P
Okay, jokes apart, i have a tag to share today. My tag is totally inspired by all the gorgeous layered and textured tags that I keep seeing on Pinterest.  If you are a Pinterest addict like me, I'm sure you must have come across such tags which are loaded with details, yet they have a unique style of their own. Here I would like to mention that most of the Polish bloggers I've come across, do awesome work and my tag is a definite case of them! 


To make my tag, I have used on the base a very thick watercolor paper and layered it with a woodgrain background pattern paper. I have stenciled on one side using the Prima Damask stencil and texture paste, then smooshed my Distress inks on to an acrylic block and using a wet paint brush have painted the background randomly. The floral cluster on the left has it's base on first a piece of burlap whose edges I frayed, then created a frame using Spellbinders Floral Ovals die, made my flowers using punches this time, even the rose buds that you see are handmade by me using a small flower punch

This one I'm dying to share .. The small whitte resin frame you see is made using Mod Molds and a glue stick on which I've painted white using acrylic paint. I'm so loving the look of it !!

That's it from my side! 

Supplies used :
Pattern paper : DCWV, Prima Zephyr paper pad.
Punches : Jef six petal flower punch ( Large and small sizes).
Dies : Spellbinders Floral Ovals die, Impression Obsession Butterfly die set, Simon Says Stamp 'Be' stamp and die set.
Inks : Distress inks -Peacock feathers, Spiced Marmalade, Picked raspberry,Spun sugar and Wild honey.
Mold Molds Ornamental frames mold., White pollens, small pink pearls, light cream mulberry flowers and seam binding ribbon.

Challenges entered :
BGC -Textured tags - Made it to Top 3 !
SSS - Stamptember challenge ( I have used the 'Be' stamp and die set )
Polkadoodles- Tag, you're it.
We Do Doobadoo -Something feminine - Made it to Top 3 

Hope you all like my tag. I'm not very sure about this one so would love to know your views on it. Do drop me a line and have a nice weekend everyone :)

Monday, August 25, 2014

Thanks for everything

Hi Friends,
I am back again sharing a card I have made for my inspiration post at Lulupu. Our theme this time is "Background stamping plus use mist or sprays on your project' and here's what I have created :

I have done the background stamping using Hero Arts Flourish Background Cling stamp  .I first heat-embossed my background using Ranger Super Fine Gold Embossing powder and used Distress inks -Scattered Straw, Antique Linen, Black Soot and a little bit of Peacock Feathers to create my background. Then, I misted my background using the new Hedi Swapp Color Shine mists from the Lulupu store. These mists are really beautiful colours and when you spray them, they give this added shine which when you see in real life, is really beautiful. I have used Tropicana Teal, Coral and Gold on my card.

The small peach coloured flowers and the ribbon have been coloured using the Coral mist and the die-cut word 'Thanks' was sprayed with Tropicana Teal Mist and distressed around the edges with Black Soot I have die cut it 5 times using the Simon says die and the sentiment below it is also from the same set.. I have used the Gold mist to just fleck around the entire background. If you look closely, you will see it gives a gorgeous shine and I am using it almost on all my recent projects. The leaves were sprayed with Lindy's Stamp Gang Curiouser Chartreuse Flat Fabio mist. I love the intensity of it's colour !

The large blue flower is handmade using Spellbinder's Rose creation die and the black frame behind my flowers is also die cut using Spellbinder's Die- D-lites Frame Two dies and then heat embossed using Zing! Glitter Black embossing powder.
Supplies used :
Pattern papers- Graphic 45 Kraft Collection
Punches : EK Success Scalloped Scallop Border punch.
Dies-  Spellbinder's Rose creation die, Spellbinder's Die- D-lites Frame Two dies, Simon Says Stamp' Thanks' die and stamp set.
Stamps -Hero Arts Flourish Background Cling stamp, Simon Says Stamp 'Thanks' stamp set, Fiskars/Teresa Collins Girly Chic stamp set.
Inks- Versamark embossing ink pad, Distress inks -Scattered StrawAntique LinenBlack Soot and Peacock Feathers, Versafine Onyx Black ink pad.
Ranger Super Fine Gold Embossing powder, Zing! Glitter Black embossing powder, Mulberry flowers, Pollens, Heart stick-pin,  filler flowers and Seam binding ribbon.

I'm participating along with Pretty Pink Posh Cutting Edge blog hop. I have  used a couple of dies on my card and I have listed them above.

Challenges entered :
Paper Creators Craft  -Blings and Blooms
As you like it challenge : Favorite 2 embellishment and why (Mine is always flowers, fillers and gem stones  because they are the main focus of all my creations.)

That's it from me hope you like my card. Do let me know your reviews about it :)

Friday, January 10, 2014

Soft and Shabby chic !

Hi Friends,
Looks like this new year, I am on a roll :)  This is my 3rd post in this week, which is quiet an record for me :) This time the card I am sharing is inspired by the oh so 'Gorgeous picture' at the Shabby Tea Room and the sketch from Mojo Monday. So, here's a look at my card :                                                                    
                                                              
And, a close-up of the flowers :                                                        
I have followed the inspiration picture for the colors and the roses on my card. And, the bird-cage has been fussy-cut from a beautiful Pink Paislee pattern paper and popped on my card-base using foam dots! The flowers and the small rose-buds are all handmade, I have used gesso on the pattern paper to lighten the colors and give the shabby chic feel.

Supplies used :-
Base Cardstock - Campap.
Pattern Papers -Pink Paislee and Graphic 45 - ( RAK from Piali ).
Dies : Spellbinder's Rose Creation's Die, Spellbinder's Leaf Foliage dies, Cheery Lynn Anastasia Border, Simon Says Stamp Feather die-cuts, Provocraft/Cuttlebug Small Tags - ( RAK from Neha ).
Stamps - Inspired by Stamping Creative Tags set.
Inks :
Distress Inks -Spun Sugar, Victorian Velvet, Shabby Shutters and Peeled Paint.
Distress Stain - Mowed Lawn.
Versafine Onyx Black ink pad.
Martha Stewart 3 in 1 Butterfly Punch cut-outs, Seam-Binding Ribbon, Pearls.


Challenges Entered :
The Shabby Tea Room -Photo Inspiration. ( Made it to Top 3 )
Mojo Monday -Sketch
Really Reasonable Ribbon -Pink and Ribbon.
Inspired by Stamping Customer Gallery - Used Creative Tags set for the sentiment.

Hope you all like my card. Please do leave me your comments/ suggestions. Would love to hear from you!
Have a nice day everyone!

Saturday, August 3, 2013

A Mixed Media Tag !!

Heya friends:)
So am back again sharing with you all a tag I have made for the inspiration at the Crafter's Corner blog where our current challenge is everyone's favorite theme : "Anything Goes"...So I decided to make a tag this time and its a mixed media style which is quite new to me...  I have done a lot of distressing ,spritzing with the  Lindy stamp gang spays and stamping too ..This is a tag which is layered with different techniques rather than actual layers ..So here's look at what I have created :
And here's a close up of the flowers which I have colored  using the Lindy stamp gang spray ..These sprays have vibrant colors and a very nice shimmer to it ..I have really enjoyed working with it a lot :          
   
   A little bit about how I have made this tag ..Firstly I distressed the entire tag with the vintage photo distress ink then I have sprayed the Lindy Hottie Patottie spray on the background...  Then I used The Crafter's workshop stencil to create the hexagon background  with  my vintage photo distress inks then I did the stamping of the dress form and the leaf flourish finally finishing off with a punched lace and the floral arrangement .  
I hope you all like my tag..Please do leave me your comments /suggestion's...Would love to hear from you :)
PS : Flowers and Leaves are from a prize package which I won at Archana 's  Craftycity.com  site ..She has a large collection of paper flowers and various craft supplies at very reasonable rates  ..Do check out her site :)

Supplies Used :
Base CS : Fabriano Elle Erre.
Punch : MS lace doily punch .
DieMagnolia Do hickey Die Leaf and swirl.
Flowers and Leaves are from a prize package which I won at Archana 's Craftycity.com  site ..She has a large collection of paper flowers and various craft supplies at very reasonable rates  ..Do check out her site :)
Stencil : The Crafter's Workshop Hexagons.
Stamp : Prima Marketing.
Inks : Distress inks : Vintage photo,Scattered straw,Versafine Onyx Black,Lindy stamp gang mists-Hottie Patottie.
Seam binding ribbon,Rhinestones,Small flower's and filler's from stash.
Charm -Crafter's Corner.

Challenges entered :
For the love of crafting -Make a tag.
Sarah Hurley Challenge blog -Texture and Dimension
Creative Moments : Anything but a card
Dragons Dream : Tag it on : Use Stencil/mask,paint and Ribbon.
Stampotique Designer's Challenge : Tag youre it !!
The stamping chef : No cards allowed .

That's It from me ..Have a nice day everyone :)

Wednesday, March 20, 2013

Live.Laugh.Love.

Hi friends,
Today I have a fun card to share with you all which I have made for the inspiration at Crafter's Corner where our current challenge is 'Stamping'...So here's a look at my card :-

 And another view :-

 For my card I have stamped ,colored and fussy -cut the flowers and  embossed them....I have used distress inks to color my flowers & butterflies...And have also distressed the sides of the card as well as the seam binding ribbon...Kept things pretty simple! :)
I am entering My card in Brenda's challenge which She is currently hosting on her blog as a part of her 4000 followers celebrations...Brenda makes the most beautiful cards and She creates some of the most amazing stamped scenes that I have ever come across! :)

Supplies Used :-
Base CS -Fabriano Elle Erre!
Pattern Paper- Prima Marketing :RAK from Piali :)
Dies :-
Tim Holtz Caged Bird -RAK from Devika (Kukies Basket) :)
Cheery Lynn Lace Corner Deco (F)
Cheery Lynn Olive Branches
Stamps :-
For Flowers - Wilson Designs Stamp : RAK from Piali :)
Alphabet Stamps -Studio G : RAK from Yvonne :D
Butterfly -Hero Arts Antique Engravings
Inks :-
Distress inks -Scattered Straw ,Vintage Photo ,Mustard Seed ,Fired Brick ,Festive berries &Tumbled Glass
Versafine Onyx Black Ink pad
Seam Binding Ribbon
Pearls & gems -Stash    

Challenges Entered:-
Floral Fantasies- Make a card isnpired by Brenda's post...I have chosen THIS card as my inspiration! :)
For the love of Crafting - I have chosen Spring season
Sentimental Sundays -Anything goes
Perfect Sentiments- Butterflies/Fairies
Going grey with Scrap creations -Use your favorite embellishments (Pearls)
Shopping our Stash - Spring
ABC Challenges- Bring on the flowers (Made it to Top 3)
My Craft Spot - Embossing (I have done dry embossing on the flowers)

Hope you like my card...Please do leave me your comments/suggestions...Would love to hear from you! :)
Have a nice day everyone!                                                                                                  

Sunday, March 10, 2013

Spring colors! :)

Hiya Friends,
So I am back again to share a card I have made and its in my fave Shabby chic style again :) ...I don't know about you people but I was kind of missing using soft colors !!! ...Well so can I just show you what I have created :)  ..Here's a pic of it :

 I am so in love with these colors so sharing an another view as well  ...Here goes :

 And a peek into how it looks on the inside as well :

 Okay now a little bit about my card ...I have used the Webster's Pages DP  for my base and I have distressed it using a small pair of scissors to create the whole shabby chic  look... Have used  various dies to make the frame ,Eiffel tower, flourish and leaves ....And have used the seam binding ribbon which I have hand colored :) ...The buttons that you see here are  hand made too ...I have made these following the Tutorial that Colleen has shared on the IBS blog and there is also a fun challenge based on it so do check out this challenge Here... And most Importantly  the colors of my card are inspired by the gorgeous color's of the Pretty Paper studio March Challenge...They have put up such a soft and beautiful palette that I  just had to make a card based on these colors ...Here's a look at them below :
                                         

I hope I was able to do justice to this lovely color scheme ....Do let me know you guys :)....

Supplies used :
Base CS -Campap
Pattern paper -Webster's pages (RAK from Piali! :)
Dies :-
Spellbinders Label 3 -Bought from Kavi's store
MFT Fancy  Flourish -Crafter's Corner
MFT Eiffel Tower- RAK from Sindhu! :)                        
Cheery Lynn  Lace Corner Deco F -Crafter's Corner
Cheery Lynn Olive Branches -Crafter's Corner
MS Doily Punch
Mulberry Flowers -Candy from Shraddha! :)    
Stamps :-
My Minds Eye Sweetest thing Honey -Bought from Varshitha
PTI Mehendi Medallion Stamp set -For stamping the buttons (Bought from Priya )
Hero Arts Antique Engravings
Inks :-
Memento Pear Tart -Bought from Varshitha
Distress ink -Tumbled Glass
Memento Rich Cocoa
Seam Binding Ribbon -Priya's Store
Pearls- Stash

Challenges Entered :-
PPS -Colors ( Winner! )
WHW # 92 -Decorating Buttons
For the love of crafting - I have chosen the Spring season
The Scrap Master 's Paradise -Gopi's Tic Tac Toe Challenge ( I have used Pattern  papers ,flowers & ribbon)
All sorts- Spring-time

Hope you all like my card...Would love to hear your comments /suggestions on this! :)
Have a nice day Everyone!
                                                                                                                                                                                                            

Saturday, March 2, 2013

Congrats !!

Hi Friends,
Today the card that I am sharing is the one that I have made for my GD post at Catchy Challenges run by Deepti ..She has started this new challenge blog with some really Fab challenges and Yummy Prizes ....So  do check out her blog Here ..And  here's a look at my card  based on her challenge :-

                                                                                                                   
Since this card had to be based on the inspiration picture below I had to play along with only two colors so I kept my base brown and scored my cardstock on the bottom half using MS score board and to darken the upper half I inked it with Memento Rich Cocoa ink and then stamped and colored some flower then fussy cut them and popped them on dimensions also placed an die cut flourish below and inked it in blue as well ...Oh and did you notice the blue ribbon bow ...Well that is the Seam Binding ribbon which I had got from Priya's store and inked it using A -La -Mode dye ink to match with my flowers :) ...Doesn't that look Fabby :)...If you are interested on how to color your Seam Binding I have a Tutorial Here

 
Supplies Used :
Base CS : Local buy
Stamps : Inkadinkadoo Doodle flowers and Small wooden  alphabet stamps (Candy from Yvonne :)
Inks : Memento rich Cocoa,A-La - Mode Aqua
Die -Cheery lynn Fanciful flourish  (Priya's store )
Seam binding Ribbon ( Priya's Store )
Small blue flower ( Rak from Varshitha )
Pearls : Stash.

Challenges Entered :
Cut it up : Inspired from Pinterest and also use Die cuts.(Made it to Top 3)
For the Love of Crafting :Deep in the woods ( I am hoping my scored back ground  is eligible for this :)
Addicted to Stamps & more : Use a physical stamp (Honourable Mention)

Hope you all like my card..Do leave me your comments! :)
Have a nice day everyone!