Showing posts with label Heat-embossing. Show all posts

Sunday, May 1, 2022

Altenew Build-A-Garden: Magnificent Branch Release Blog Hop + Giveaway ($200 total prizes)

Hello and welcome!
It's the first of the month and I am delighted to be joining  Altenew for their Build-A-Garden: Magnificent Branch Release Blog Hop! The Altenew Build-A-Garden project set is an exciting monthly package that is sure to get the creative juices flowing! Each month includes a stamp set along with a coordinating stencil set and/or die set PLUS a customer-favorite Mini Blending Brush! When signed up, you are guaranteed a spot in their monthly Build-A-Garden releases and will receive a set each month - at a specially discounted price! ($35.99 →$29.99)

If you arrived here from, Mindy Eggen's Blog, then you are on the right track. If this is your first stop, then you will want to start at the beginning, the Altenew Card Blog. We've got tons of inspiration and giveaways for you on the hop today, so keep reading till the end of this post for more information.


 The Build-A-Garden: Magnificent Branch Set can help you create two card fronts at once with this first-of-its-kind floral stamp set! The imaginative set features a magnificent tree branch bearing flowers that you wouldn't normally see together in nature. Cut the design just right for a card featuring the cupped rose and another card featuring the flat rose. Stamp the heartwarming sentiments and quotes to inspire your loved ones. 

This set contains the following products:

- one 6" x 8" stamp set containing 10 stamps made in the USA from high-quality photopolymer
- one layering stencil set containing 4 stencils that coordinate with the stamp set
- one Mini Blending Brush for ink blending

Note: These products are NOT sold separately. 

I made a bright and cheerful thank-you card using the Build-A-Garden: Magnificent Branch Set, Pattern Play: Diamond Stamp Set, and Simple Alpha Die Set.


The Build-A-Garden: Magnificent Branch Set is simply incredible! The layering stencils in the set function very similarly to the layering stamps for which Altenew is known so well, but they allow for huge versatility in size and technique that can’t be achieved as easily with a stamp set. 
To create my card, I started by stamping the image on a card panel of Neenah Classic Crest Solar White Cardstock using Obsidian ink. Then, I added color, layering one stencil at a time (there are 4) using Mahogany BarkBurnt RedCanyon Clay, and Pastel Sunrise inks for the flowers and Evening GrayMoon Rock, and Lava Rock inks for the leaves on Neenah Classic Crest Solar White Cardstock plus Hazelnut and Milk Chocolate inks for the branches using the Mini Ink Blending Tool Brush Set.

I trimmed the panel down a bit and then fussy-cut the different images using a pair of scissors and kept them aside to work on my card background. To create the background, I stamped the background design from the Pattern Play: Diamond Stamp Set in Versamark Ink onto Neenah Classic Crest Solar White Cardstock, then sprinkled some White Embossing Powder over the image, and melted the powder with a Heat Tool. Then, I watercolored the panel using Lava Rock Brush Markers and drug the color out loosely with water for a soft, watercolored background. 

Once that was done, I splattered the card front with Enchanted Gold, Sterling Silver, and Rose Quartz paints from the Metallic Watercolor Set for a fun, artsy look. I also used some Antique Gold Metallic Spray to add some shiny, shimmery gold splatters to the flowers and leaves. Then, I used the Instant Dimension Foam Tape and Craft Glue to add lots of layers of the stenciled  pieces to the card panel. I adhered them all over the card front, leaving a small space on the left side for a greeting.

For a greeting, I die cut the word 'Hi' three times from the Simple Alpha Die Set from some Black Glitter Cardstock and Citrine Cardstock, then adhered them all together to create a dimensional die cut and adhered it to the left of the blended bouquet. The thick charcoal die cut pops off of the center of the heat-embossed background!  Then, I stamped the sentiment from the Build-A-Garden: Magnificent Branch Stamp Set onto a strip of White Cardstock using Obsidian Ink and affixed it to my panel using foam adhesive. The sentiment in the set isn't present in a vertical line, so I masked the stamp to have it combined into one line. Many of your sentiment stamps can be masked off to create different messages. Simply arrange your stamps on the block, then place a piece of tape over the word(s) you don’t want to stamp. You can use clear tape, washi tape or any other kind of low-tack tape!
\

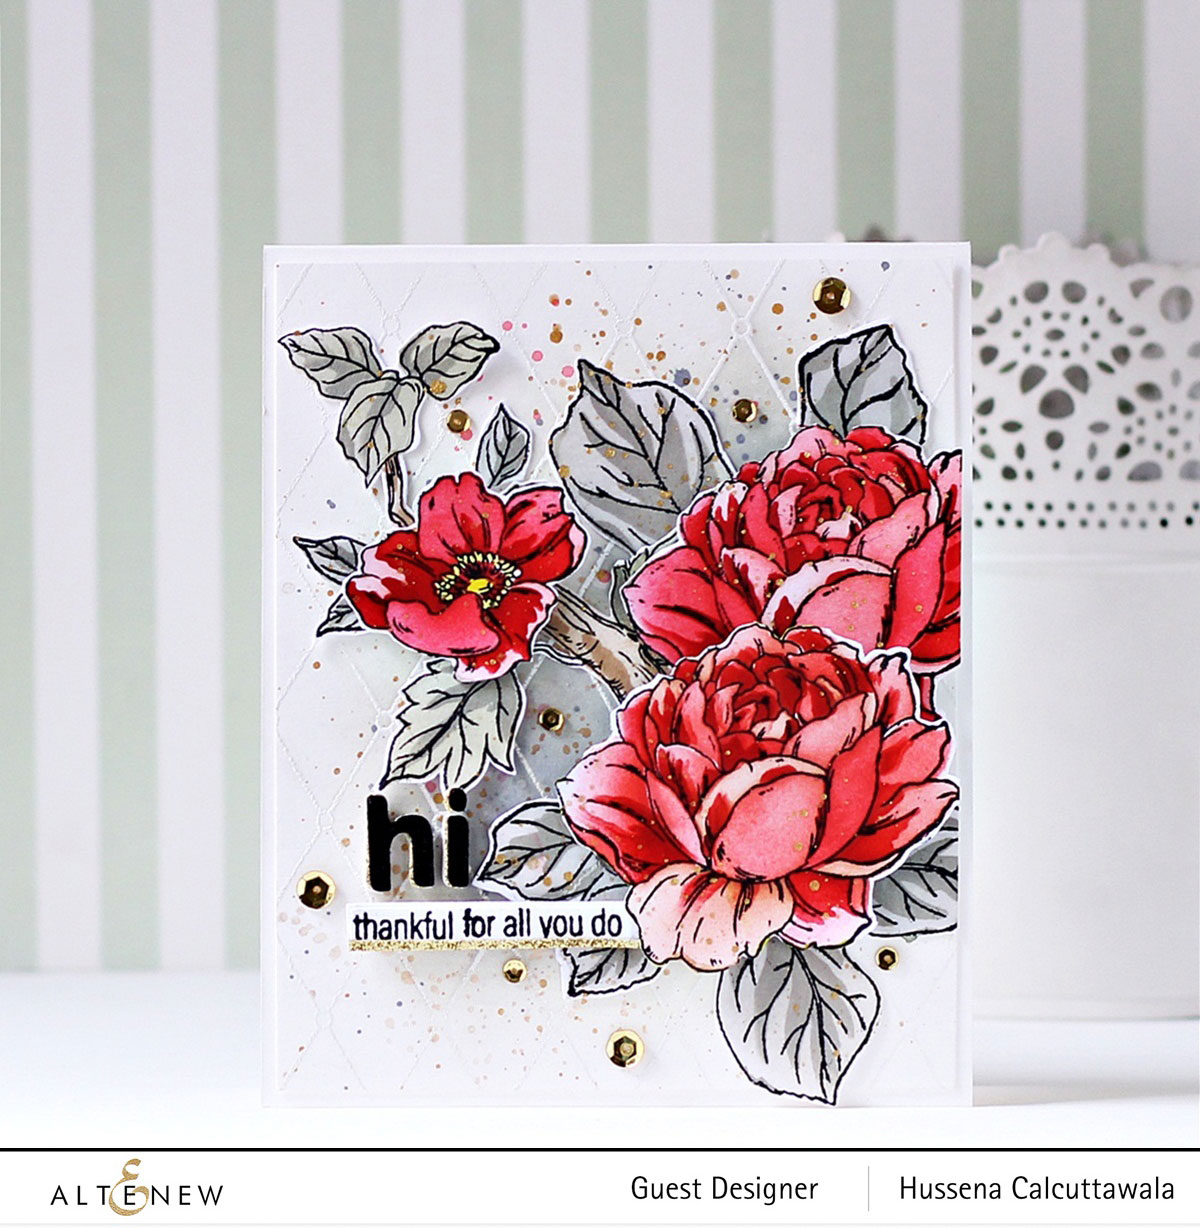
To complete, I adhered the panel to a top-folding A2-sized white card base using tape runner. I added a few Antique Gold - Sequins to help add some sparkle to the card front.


Giveaway Prizes:
$200 in total prizes! To celebrate this release, Altenew is giving away a $50 gift certificate to 2 lucky winners and a $20 gift certificate to 5 winners! Please leave a comment on the Altenew Card Blog and/or each designer’s blog post on the blog hop list below by 05/07/2022 for a chance to win. Altenew will draw 7 random winners from the comments left on each stop of this blog hop and announce the winners on the Altenew Winners Page on 05/092022.


Blog Hop Order:
Next Stop on this Blog Hop is, Laurie Patterson's blog. Just in case you lose your place along the way, here is the complete list of participants so that you can find your way back:

Altenew Card Blog

Vicky Papaioannou

Emily Midgett

Cheryl Espie

Jaycee Gaspar

Carol Hintermeier

Jenny Colacicco

Natasha Davies

Laurie Willison

Nathalie DeSousa

Rosie Neustaedter

Terri Koszler

Bridget Casey

Virginia Lu

Sande Woodson

Michelle Short

Nenette S. Madero

Colleen Balija

Tenia Nelson

LauraJane

Maryam Perez

Amy Hill

Mindy Eggen

                       Hussena Calcuttawala (You are HERE)

Laurie Patterson

Nandini Karmarkar

Daniel Diaz

Susan Busada

Katrina Howe

Ann Taylor

Eva Bussom

Linda Westfall

Susan Stagno

Preeti Chandran

SathyaKala Sankaran


Well, that’s all for my projects today! Thanks so much for stopping by and reading. I hope you have a wonderful day!

If you like what you've seen from me, please give me a follow over on my Instagram (@hussena_cal) and/or subscribe to my blog if you haven't already.

Friday, April 22, 2022

Altenew Paint-A-Flower: Gerbera Revolution Outline Stamp Set Release Blog Hop + Giveaway ($200 in Total Prizes)


Hello, crafty friends!
I'm so happy to be joining Altenew for the Gerbera Revolution Outline Stamp Set Release Blog Hop today showcasing the next installment in their monthly Paint-A-Flower series! You can purchase this fabulous set here individually for $15.99, or you can subscribe to receive the new Paint A Flower sets at a discount each month! When signed up, you are guaranteed a spot in their monthly their monthly Paint-A-Flower releases and will receive a set each month - at a specially discounted price! ($15.99 →$12.99)

If you arrived here from Daniel Diaz's Blog, then you are on the right track. If this is your first stop, then you will want to start at the beginning, the Altenew Card Blog. We've got tons of inspiration and giveaways for you on the hop today, so keep reading till the end of this post for more information.

These darling daisy-like flowers are so beautiful and cheerful, perfect for an encouragement card. Let’s get started with the details!


I began by stamping the main gerbera image from the Paint A Flower: Gerbera Revolution on some Altenew Cold-Pressed Watercolor Paper with Embossing Ink and heat embossed it using Antique Silver Super Fine Embossing Powder. I then used the Tropical Fiesta Watercolour Brush Markers Set to do some soft watercoloring on the images. Once my watercoloured images had dried, I dug out my long-neglected Prismacolor Pencils to add some shading and depth to the flowers.

Then, for my card background, I watercolored a panel of Altenew's Watercolor Paper using Lime and Sweet Leaf  Brush Markers and drug the color out loosely with water for a dreamy, watercolored background. Once it dried, I added dark green paint splatters all around the card panel for interest. 

Next, I die-cut Neenah Classic Crest Solar White Cardstock with some additional filler flower, leaf, and foliage dies from the Virginia Rose 3D Die Set, Garden Picks 3D Die Set, and the Craft-A-Flower: African Daisy Set. I coloured the die-cut pieces using Sweet Leaf, Lime, Purple Wine, and Turquoise Brush Markers from the Tropical Fiesta Set and assembled them using Craft Glue

Then, I stamped a sentiment from the Castle Garden Stamp Set onto a strip of Neenah Classic Crest Solar White Cardstock using Obsidian ink and adhered it on my panel using foam adhesive.

Then, to finish, I adhered the panel to a top-folding A2-sized white card base using tape runner


Giveaway Prizes:
$200 in total prizes! To celebrate this release, Altenew is giving away a $50 gift certificate to 2 lucky winners and a $20 gift certificate to 5 winners! Please leave a comment on the Altenew Card Blog and/or each designer’s blog post on the blog hop list below by 03/28/2022 for a chance to win. Altenew will draw 7 random winners from the comments left on each stop of this blog hop and announce the winners on the Altenew Winners Page on 04/30/2022.

Blog Hop Order:
Next Stop on this Blog Hop is, Eva Bussom's blog. Just in case you lose your place along the way, here is the complete list of participants so that you can find your way back:


Well, that’s all for my project today! Thanks so much for stopping by and reading. I hope you have a wonderful day!
If you like what you've seen from me, please give me a follow over on my Instagram (@hussena_cal) and/or subscribe to my blog if you haven't already.

Sunday, April 10, 2022

Guest Post using Open Road Collection by Spellbinders


Hello everyone!
I am so excited to be guest designing on the Spellbinders blog. I have three projects to share with you today highlighting the NEW Open Road Collection. The wonderful and fun products in this collection inspired me to create a set of three cards perfect for sending to your friends and family! 


My first project features the Open Road Etched Dies, On Cloud Nine Etched Dies, Head in the Clouds Embossing Folder, and the Open Road Sentiments Clear Stamp Set. I LOVE the convertible die in the set and used it to create soft pastel card for a friend. It was so fun to create this one!

To begin, I embossed the Head in the Clouds Embossing Folder on a piece of 4” x 5 1/4”  Waterfall Cardstock. Next, I trimmed a piece of Grey Woodgrain Paper to size and die-cut a circle in the middle of the pane using the Circle Shape Medium Die from the Essential Circles Die Set. Once that was done, I die-cut White Foam using the same die and adhered the two panels together with Craft Glue.

Next, I die-cut SnowdriftPink SandSilver Glitter Paper, OnyxWhite Foam, and Mirror Gold Cardstock using the Open Road Etched Dies and assembled the car with liquid glue. Then, I blended Squeezed Lemonade and Scattered Straw Distress inks over the convertible and the balloon die-cut pieces using a sponge dauber for depth. I adhered all the pieces down on my panel with Craft Glue.

Next, I die-cut Silver Glitter Paper using the Ribbon/Twine die included in the Assorted Tags Etched Die Set and grouped the die-cut pieces together to create the balloon strings. Next, I die-cut Snowdrift Cardstock using the On Cloud Nine Etched Dies and adhered them down on the card panel suing foam adhesive for a raised effect. Once that was done, I die-cut Pink Sand Cardstock using the large label from the Sentiment Labels Die Set. Next, I stamped a sentiment from the Open Road Sentiments Clear Stamp Set to Snowdrift Cardstock using Versafine Onyx Black ink and cut it out using one of the inserts dies from the Sentiment Labels Die Set. Once that was done, I adhered the sentiment strip on top with liquid glue. Next, I die-cut Silver Glitter Paper using the twine die in the Sentiment Labels Etched Dies. I attached the sentiment label on the card using the twine and adhered it on top using foam adhesive.

To finish, I adhered the embossed panel to a piece of Silver Glitter Paper before adhering it to a top-folding A2-sized Pink Sand card base using tape runner


My next card features the Open Road Etched DiesI Dance Etched Dies. and the Sentiments for You Clear Stamp Set.  I thought the balloons included in the Open Road Die Set were super fun on their own and just perfect for creating this easy and fun graduation card!

To start, I die-cut Barely Peach and Onyx Cardstock using the hand and leg dies from the I Dance Etched Dies.  I assembled the pieces with liquid glue and die-cut BnW Stripes Patterned Paper using the skirt die included in the same set. 

Then, I die-cut Snowdrift and Gold Glitter Cardstock using the balloon dies in the Open Road Etched Dies. I die-cut a bunch of them at once, so that I could use them later for other projects as well. Once that was done, I used an array of Distress Oxide inks to colour the balloons using sponge daubers. This took me some time to do, but I thoroughly enjoyed the process as it was very therapeutic. If you don't want to colour the pieces individually, you can die-cut the pieces from coloured cardstock scraps too. 

Once that was finished, I die-cut Mirror Gold Cardstock using the Ribbon/Twine die included in the Assorted Tags Etched Die Set and grouped the die-cut pieces together to create the balloon strings. Next, I stenciled on the panel with a DIY stencil created using the On Cloud Nine Etched Dies and lightly inked it with Shabby Shutters Distress ink as a way to ground the pieces. Once that was done, I die-cut Snowdrift Cardstock using the grass blade die in the Besties Forever Die Set and the itty bitty flowers and leaves from the Be Bold Blooms Etched Dies. I blended Mowed Lawn Distress Oxide ink over the glass blades using a blending brush to colour them, while the flowers were coloured using Ripe Persimmon, Milled Lavender, Shaded Lilac, and Broken China Distress Oxide  inks. I attached the pieces to the bottom of the panel using with liquid glue and adhered the flowers on the grass blades using foam adhesive for a raised effect. I then assembled the balloons and the skirt down on the panel  using foam adhesive for dimension and interest.

Next, I stamped a sentiment from the Sentiments for You Clear Stamp Set onto the panel using Versafine Black Onyx ink and then used the Antique Gold Metallic Spray and Jet Black Ink Spray to make it extra artsy! To finish things off, I mounted the panel to an A2-sized top-folding white card base using tape runner


My last card for today features the Open Road Etched DiesOn Cloud Nine Etched DiesFluted Classics Circle Etched Dies, and the Open Road Sentiments Clear Stamp Set. The convertible in the Open Road Die Set is super sleek and fun and can be customized with all of the little details included in the set. I added gold accents and colorful balloons to create this textured graduation card.

To begin, I trimmed a panel of Snowdrift Cardstock to 4 1/4” x 5 1/2” and stenciled on the panel with a DIY stencil created using the On Cloud Nine Etched Dies. I used Cracked Pistachio and Mowed Lawn Distress inks to apply ink over the top edge of the panel with a blending brush to give the illusion of blue skies.

Next, I die-cut Snowdrift Cardstock using the Medium Outer Rim and Insert dies from the Fluted Classics Circle Etched Dies. Then, I embossed the piece using the Radiant Burst Embossing Folder and inked the sides and the centre of the die-cut piece with Scattered Straw Distress Oxide ink on the top and Twisted Citron ink on the bottom using an ink blending tool to highlight and bring out the raised areas more.

Once that was done, I die-cut Poppy Field, Mirror GoldOnyx Cardstock, and White Foam using the Open Road Etched Dies and assembled the car with liquid glue. Next, I die-cut Snowdrift Cardstock using the balloon dies from the same set. Then, I coloured the pieces using Spun Sugar, Dried Marigold, Broken China, Mowed Lawn, and Worn Lipstick Distress Oxide inks. Next, I stamped 'Congrats' from the Open Road Sentiments Clear Stamp Set on the pieces using closely coordinating ink colors and arranged the balloons in a cluster with a piece of masking tape. Then, I flipped them over and added foam adhesive, before flipping them back over and adhering them to the card front. Next, I cut several pieces of white and gold Baker's Twine and adhered them under the balloons for a realistic touch. I mounted the embossed circle on my panel using foam adhesive and then adhered the car  over it using  liquid glue.

To finish, I stamped another sentiment from the Open Road Sentiments Clear Stamp Set onto the panel using Versafine Onyx Black ink. I then adhered this panel to an A2-sized top-folding white card base using tape runner and added a few Gold Mix Color Essential Gems to embellish. 


SPELLBINDERS SUPPLIES:

CS-002, CS-005, CS-010, CS-017, CS-027, CS-030, SCS-118, SCS-160, S2-328, S3-413, S3-427, S3-432, S4-1039, S4-1150, S4-1179, SES-028, ST-0147, MBR-EOM, TD055846, TD056294, TD056362,  TD056119, TD056232, TD056218, TD056072, TD056188, AD-0084, MISTI, PCGO4E, PE-100, T-021, STP-066, SCS-129

OTHER SUPPLIES:
Neenah Solar White Cardstock, American Crafts Grey Woodgrain Paper, Citrine Glitter Cardstock, Cracked Pistachio Distress Oxide ink, Versafine Onyx Black Ink, MISTI Stamping Tool, Gold and White Baker's Twine, Antique Gold Metallic Spray and Jet Black Ink Spray, Tape Runner.

That’s it for today’s post! I hope you enjoyed it and have been inspired to create with these stunning dies and stamp from the Open Road Collection. Thank you so much for stopping by!
You can find more inspiration over at my Instagram page