Hello everyone!
I'm back to share my second card that I made for my DT post at Pretty Paper Studio. I shared one card earlier HERE, incase you have missed seeing it.
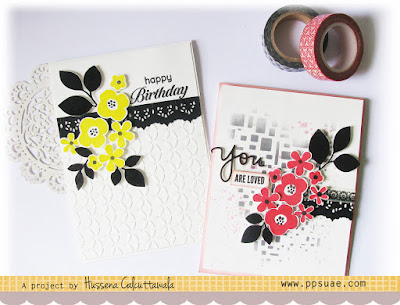
I'm sharing the second one today with a step by step tutorial on how I made it. Here's a look at both the cards.
And the second card!
- - - - - - - - - - - - - - - - - - - - - - - - - - - - - - - - - - - - - - - - - - - - - - - -
TUTORIAL
Step 2 – Once the background was created, I again stamped the flowers and the foliage using the Paper Smooches Clear Stamps 4″X6″ – Botanicals 3 stamp set. I stamped my flowers using 2 colours of ink- Cotton Candy from the Altenew Four Scoops ink set and Papertrey Ink Pure Poppy Ink. The leaves were stamped in Versafine Onyx Black ink. These were all fussy-cut.
Step 5– A complete look of the card. I mounted it on a white card base whose edges I had colored using Altenew’s Cotton Candy ink so that a hint of the pink shows through the all four sides!
Bazzill Cardstock 12×12″ Classic White
Paper Smooches Clear Stamps 4″X6″ – Botanicals 3 Archival Ink Pad – Jet Black
Bazzill Cardstock Orange Peel Black 12×12″ Cardstock Hero Arts Acrylic Stamping Block
Hero Arts Acrylic Block 4.75″X 6″
Crafter’s Workshop Template 6″X6″ – Mini Cubist
Ranger Mini Ink Blending Tool 1″
Tim Holtz Distress Ink Pad – June-Hickory Smoke
Heidi Swapp Color Shine Spritz 3/Pkg – Sweetheart
Papertrey Ink Pure Poppy ink
Versafine Onyx Black Ink Pad
Altenew Four Scoops Ink Pad Pack
Washi Tape – 527
I'm entering my card into the SSS- Flora & Fauna, Peek-a-Boo Designs- Only layers 4 Crafty Chicks- Flowers, Moving along with the Times- No Designer Papers, & City Crafter Challenge - On the Border challenge.
I hope you like my card & tutorial. If you have any queries, please leave them below. If you liked my card, don't forget to leave me a comment :)
Have a nice weekend everyone!


.jpg)
.jpg)


