Showing posts with label Spellbinder's dies. Show all posts

Wednesday, September 29, 2021

Spellbinders Merry Stitchmas Collection


Hello everyone!
I hope you are doing well. I am very excited to share a set of cards today showcasing the Spellbinders Merry Stitchmas Collection. If you’re brand new to stitching dies, don’t worry at all, because these dies are super easy to work with and you’ll get the hang of them very quickly! 


My first card features the Circular Stitch Background Etched Dies, the Pop Up 3D Vignette Poinsettia Sleigh, the Shapeabilities Swirl Tags Dies, and the Petite Floral Potpourri Etched Dies.

This Circular Stitch Background Etched Dies set will add detail and texture to your holiday projects and is versatile enough to use all year long. The Circular Stitch Background die set contains two dies – Outline as well as a stitch-able insert. It's perfect for creating a stitched background on an A2 card base and has an intricate pierced pattern. Stitching brings out the beauty of this design, but is an option - You can also just die cut and emboss to highlight the lines and layer onto the A2 card front. The other thing I love about this die set is that the possibilities are endless. Just by changing the colors of card stock and floss you use you can get so many different looks. 

To create my card, I used the Circular Stitch Outline die to cut the background panel out of Alabaster Cardstock. Next, I stitched the entire design with light peach embroidery thread. I split the thread in half so that the 6 strands become 3, then thread a needle, and began stitching. I worked from the area in the middle out to the edges, but you could really stitch in whatever order you like! If you’ve never stitched like this before, do not worry, for there are templates included to help you figure out where to put your needle! 

Next, I die cut Alabaster Cardstock using the various poinsettia dies included in the Pop Up 3D Vignette Poinsettia Sleigh Set. I coloured each of the pieces using Mermaid Markers from Jane Davenport and embossed the centres using the 2mm and 5mm ball stylus tips from Susan's Garden Ultimate Tool Kit. I added some glitzy jewel stickers in the centres of the flowers to give them more definition. The leaves and sprigs were die cut out of Snowdrift Cardstock again using dies included in the Pop Up 3D Vignette Poinsettia Sleigh Set and the Petite Floral Potpourri Etched Dies. These were coloured using Mermaid Markers from Jane Davenport too. Then, I shaped the die cut pieces using the 2mm ball stylus tip from Susan's Garden Ultimate Tool Kit. I adhered the flowers and leaves to my panel using hot glue.

Once that was done, I die cut Vellum and Snowdrift Cardstock using the scalloped tag dies in the Swirl Tags Etched Die Set. Next, I stamped my sentiment to the die cut piece using Versafine Onyx Black ink and then attached it to my project using foam squares. I then matted my card panel to a piece of Snowdrift Cardstock before adhering it to an A2-sized top-folding white card base using liquid glue. I added some light blue rhinestones in the centre of each of the stitched circles as the finishing touch. 


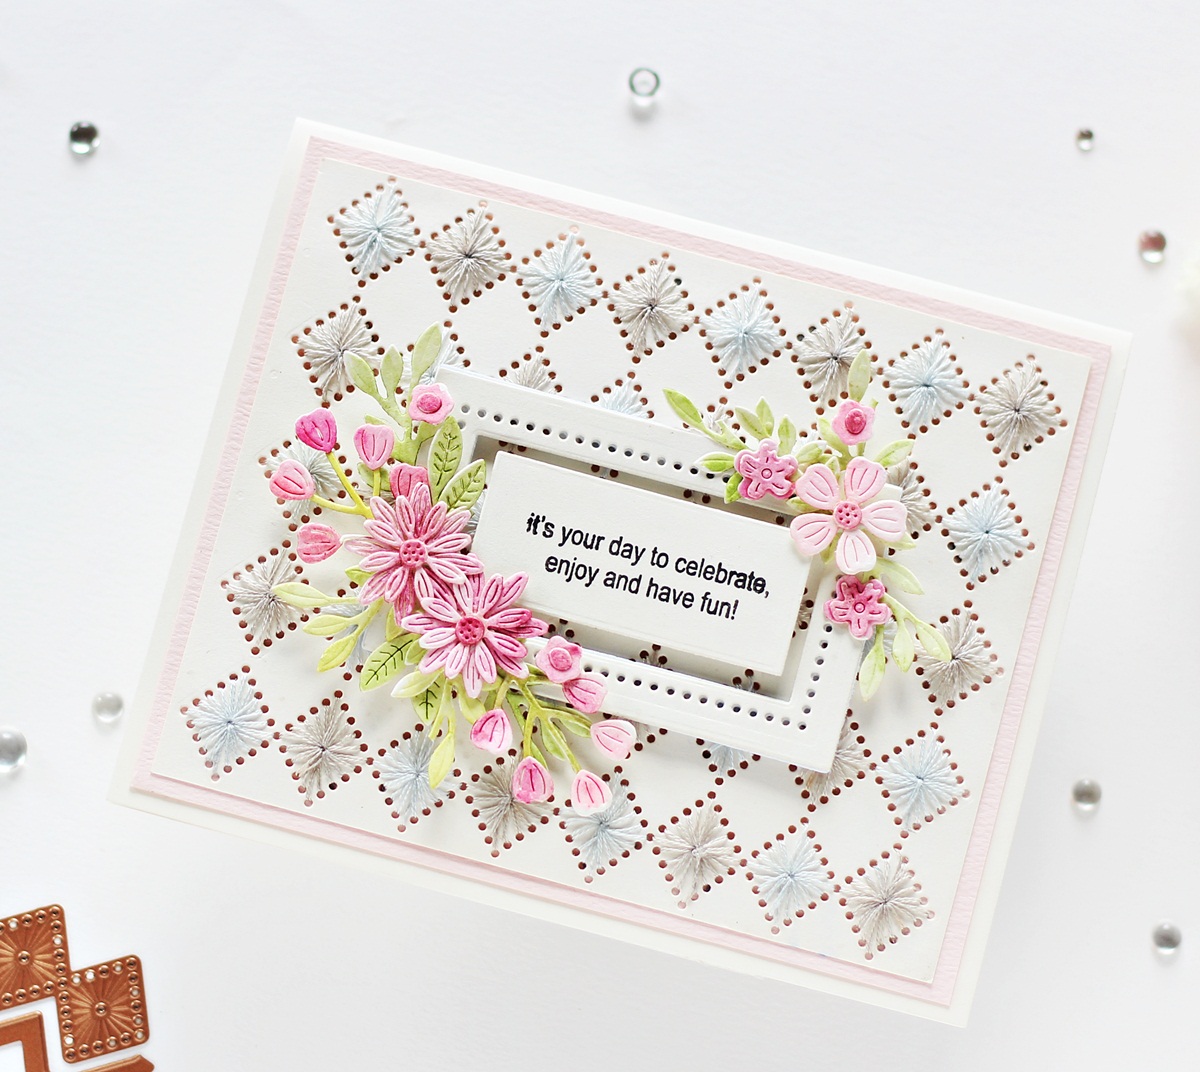
This is a set of three thin metal dies and the diamond insert cuts dots to act as a guide for stitching a diamond pattern. You can also use the design as is because the embossed lines have faux stitched details. One can also add the split rims together with the insert for a wonderful border or a single die to create a decorative edge! It's a versatile set and can be used in a number of ways. I decided to create an entire card panel using the design!

To create my card, I used the diamond insert die to cut the design in the centre of my panel on Snowdrift Cardstock. Then, I went ahead and die cut it four more times to create my background panel. Next, I stitched the entire design with sky blue and grey embroidery threads. I split the thread in half so that the 6 strands become 3, then thread a needle, and began stitching. This was very therapeutic to do and quite fun too! 

Once I finished stitching on the entire panel, I die cut Snowdrift Cardstock using the medium frame die in the Hemstitch Rectangles Etched Die Set. I then cut the centre of the die cut piece using a coordinating rectangle die from the A2 Matting Basics A Card Creator Etched Die Set. Next, I die cut another rectangle, albeit a little smaller, from Snowdrift Cardstock. I stamped my sentiment on to it using Versafine Onyx Black ink and then adhered both the frames down to my panel using foam squares. 

Next, I die cut Snowdrift Cardstock using the floral and leaf dies included in the Simply Perfect Layered Blooms Etched Dies and the Mini Blooms and Sprigs Etched Dies. I coloured the pieces using the Mermaid Markers from Jane Davenport and then adhered them around the frame using foam squares. 

I matted my stitched panel to a panel of Pink Sand Cardstock before adhering it to a top-folding white card base with liquid adhesive. I love how this card came together. What do you think?


I hope you liked my cards featuring the Spellbinders Merry Stitchmas Collection and thanks so much for stopping by today. Are you going to try some stitching on your cards? I'd love to know!

Don't miss out on the MASSIVE Jane Davenport Sale going on now with up to 60% off select Jane Davenport art supplies, stamps, and more through Sunday, October 3rd!

If you like what you've seen from me, please give me a follow over on my Instagram (@hussena_cal) and/or subscribe to my blog if you haven't already.

Tuesday, July 9, 2019

Spellbinders Vintage Treasures Blog Hop + Giveaway


Hello, crafty friends! 
I'm beyond thrilled and honoured to be joining Spellbinders for their Blog Hop today featuring the Vintage Treasures Collection by Amazing Paper Grace. You should have arrived here from the Spellbinders Blog.
 We've got tons of inspiration and giveaways for you on the hop today, so keep reading till the end of this post for more information.

For my first card today, I have used the Marquise Diamond Pendant Etched Dies, Brillante Rondelle Etched Dies, and the Cinch and Go V Etched Dies. You might have seen my projects using them earlier, if you haven't and would like to take a look, click HERE.

I always love working with Becca's dies as they are so exquisite and elegant! For my card, I used the Marquise Diamond Pendant Etched Dies to create the main focal. I die cut it twice, once from White Cardstock and the other from Gold Mirror Cardstock. I offset the die cuts a bit while adhering it to my card panel, so that the gold would peek through. I did the same process for my next layer as well. I die cut the decorative label frame two times, once from White Cardstock and once from Gold Mirror Cardstock using the Brillante Rondelle Etched Dies. I popped this frame on foam dots for added dimension.

To embellish the card, I created some handmade paper flowers using the Cinch and Go V Etched Dies. I die cut these flowers from White Heavyweight Cardstock and coloured them using Distress Ink Re-inkers. I shaped the petals using an Embossing Ball Tool and added pollens in the centres for a fuller look. I die cut the leaves using dies included in the same die set and coloured them with Re-inkers.
 At this point I felt that my background looked a bit plain, so I used the Fun Stampers Journey Deco Wall Stamp and Journey Gold Ink Pad to stamp on the entire card panel. This gave the card some interest, in my opinion.

I stamped the sentiment in the centre of the die cuts to complete my card design. I then decided to add some corners to this panel to further embellish it. I die cut them from White Cardstock and Gold Mirror Cardstock using dies from the Swirl Tags Etched Dies. Finally, I matted this card panel on to some Gold Mirror Cardstock, which was then adhered to a top folding card base.


My next card is made in some of my favourite colour tones. I love using pastel colours for my cards as they look so elegant. For my card, I used the Bella Luce Oval Etched Dies, Cinch and Go V Etched Dies, and the Swirl Tags Etched Dies. 

My creative process for creating this card was very similar to the previous one. My cards primarily consist of layering as that's the style I enjoy the most. For this one, I started by die cutting a piece of White Heavyweight Cardstock using the Bella Luce Oval Etched Dies. This is an intricate die, but cuts like butter when I am using the Spellbinders Platinum 6 Die Cutting and Embossing Machine. All my dies cut perfectly in a single pass, and you don't require any additional shims whatsoever as well.
I die cut two more pieces using another intricate frame die from the  Bella Luce Oval Etched Dies from White Cardstock and  Gold Mirror Cardstock. I offset the die cuts a little so that the Gold Mirror world peek from the sides. This is one of my all time favourite techniques to use to highlight different dies in a project.

For the focal, I die cut some flowers using the Cinch and Go V Etched Dies from Light Pink Cardstock. I shaped them lightly using an Embossing Tool and added brads to the centres so that they would stay put. It's been such a while since I used brads on any project! These used to be so in vogue few years ago, but are not to seen anymore. I also added some mulberry rose buds, pollens, and filler flowers to complete my floral arrangement.

I decided to use this wonderful saying/sentiment from the Fun Stampers Journey Inside and Out Stamp set for my card, which was stamped using Versafine Onyx Black ink. For this card too, I wanted to add some corners, albeit a different design this time, which are from the  Swirl Tags Etched Dies. Once I adhered the four corners on my card panel, I matted this panel onto some Gold Mirror Cardstock, which was then adhered to an A2 sized top folding card base.

And here's something a little bit different from my side. I decorated the inside of the card as well to give it a more finished look. Let me know if you liked the idea!

And here's a look at both my cards together. I hope you liked them!

Disclosure:
Where available, I use compensated affiliate links which means if you make a purchase I receive a small commission at no extra cost to you. Thank you so much for your support!

Giveaway:
To celebrate this release, Spellbinders is giving away a $50 gift certificate to 3 lucky blog readers – selected from the comments across all of the blogs in the hop. Giveaway closes on Sunday, July 14th 11:59 pm EDT. The winners will be announced in the blog hop post the following Monday. The winner is responsible for shipping cost, duties and taxes.

Blog Hop Order:
Next Stop on this Blog Hop is Jean Manis's blog.
Just in case, you lose your place along the way, here is the complete list of participants so that you can find your way back.

Spellbinders
                           Hussena Calcuttawala (You are HERE!)
Jean Manis
Mallika Kejriwal
Jennifer Snyder
Laurel Beard
Anita Kejriwal
Melody Rupple
Marie Heiderscheit
Brenda Noelke
Mindy Eggen
                          Varada Sharma                           

Thank you so much for your stopping by and reading this blog post. I hope you liked the cards I made. I would love to hear if you have a favourite!

Have a wonderful day!

Tuesday, July 2, 2019

Spellbinders July 2nd Decorative Glimmer Blog Hop


Hello, crafty friends! 
I'm so excited to be joining Spellbinders for their Decorative Glimmer Blog Hop featuring the January and April Glimmer Plates. You should have arrived here from the super talented and creative, Yana Smakula's blog. If you arrived here on your own, then you will want to start at the beginning, the Spellbinders Blog so that you don’t miss a thing!  We've got tons of inspiration and giveaways for you on the hop today, so keep reading till the end of this post for more information.

For my first card today, I have used the Fanciful Corners Glimmer Hot Foil Plate and the Circle Pattern Glimmer Hot Foil Plate. You might have seen my cards using them earlier, if you haven't and would like to take a look, click HERE.

I love using these two Glimmer Plates in combination with each other because I find it gives a very elegant look. For my card, I used the Glimmer Hot Foil System to foil the four corners from the Fanciful Corners Glimmer Hot Foil Plate on to my card panel using Glimmer Hot Foil Roll - Gold. Once that was done, I die cut a hemstitch circle from the Nestabilities Hemstitch Circles Etched Dies using white cardstock. I used the smallest circle from the Circle Pattern Glimmer Hot Foil Plate to foil on this die cut using Glimmer Hot Foil Roll - Gold.

Then, I stamped my sentiment in the centre of this foiled circle die cut and popped it on my panel using foam dots. To embellish the card, I created some mini handmade paper flowers and added few gold pollens for the finishing touches. I matted this card panel on to some Gold Mirror Cardstock and Pale Blue Textured Cardstock, which was then adhered to a top folding card base.


My next card is bold and dramatic - That's how I would describe it! I seldom use coloured cardstock for my card panels and this was really refreshing for me!

When I saw the Flower Border Glimmer Hot Foil Plate, I was not sure how to use it for a project. Then, it occured to me that I could use it to create my own background piece, and that's what I did for my card. I took out my Flower Border Glimmer Hot Foil Plate and Glimmer Hot Foil Roll - Copper and foiled the plate on a piece of Navy Blue Cardstock. I was really happy with how it turned out and decided to keep the rest of the design simple.
I die cut a border using the Shapeabilities Infinity Link Border Etched Dies again from the same Navy Blue Cardstock. I adhered this border in the middle of my card panel and started working on my embellishments.

For the focal, I die cut the ornate frame from the
Amazing Paper Grace Giving Occasions Stamp and Die Set using Copper Foil Cardstock. Next, I added a strip of Navy Blue Cardstock in the centre of this die cut and then added my sentiment piece, which are actually foiled stickers from a past Spellbinders Card Kit.

I also die cut few flowers and leaves using some previous Club Dies from Spellbinders. I added blue pearls to the centres of the flowers as the finishing touches. I matted this panel on a piece of Copper Foil Cardstock and then adhered this to a top folding card base.

Disclosure:
Where available, I use compensated affiliate links which means if you make a purchase I receive a small commission at no extra cost to you. Thank you so much for your support!

Giveaway:
To celebrate this release, Spellbinders is giving away a $50 gift certificate to 3 lucky blog readers – selected from the comments across all of the blogs in the hop. Giveaway closes on Sunday, July 7th 11:59 pm EDT. The winners will be announced in the blog hop post the following Monday. The winner is responsible for shipping cost, duties, and taxes.

Blog Hop Order:
Just in case, you lose your place along the way, here is the complete list of participants so that you can find your way back.


Thank you so much for your stopping by and reading this blog post. I hope you liked the cards I made. I would love to hear if you have a favourite!

Have a wonderful day!

Friday, September 21, 2018

Spellbinders A Charming Christmas Collection | Guest Post Three

Hello everyone!
I am sharing my third and last guest post today for Spellbinders. I have three projects to share today featuring the ever elegant 'A Charming Christmas' collection by Amazing Paper Grace.

This collection is full of absolutely gorgeous and elegant dies, and I couldn't resist making some non traditional Christmas projects using them. These dies are infinitely versatile, and can be used for a wide variety of projects, and not just Christmas ones. I will be sharing one such example today.

Here's my first project for today! It's a gate-fold card:

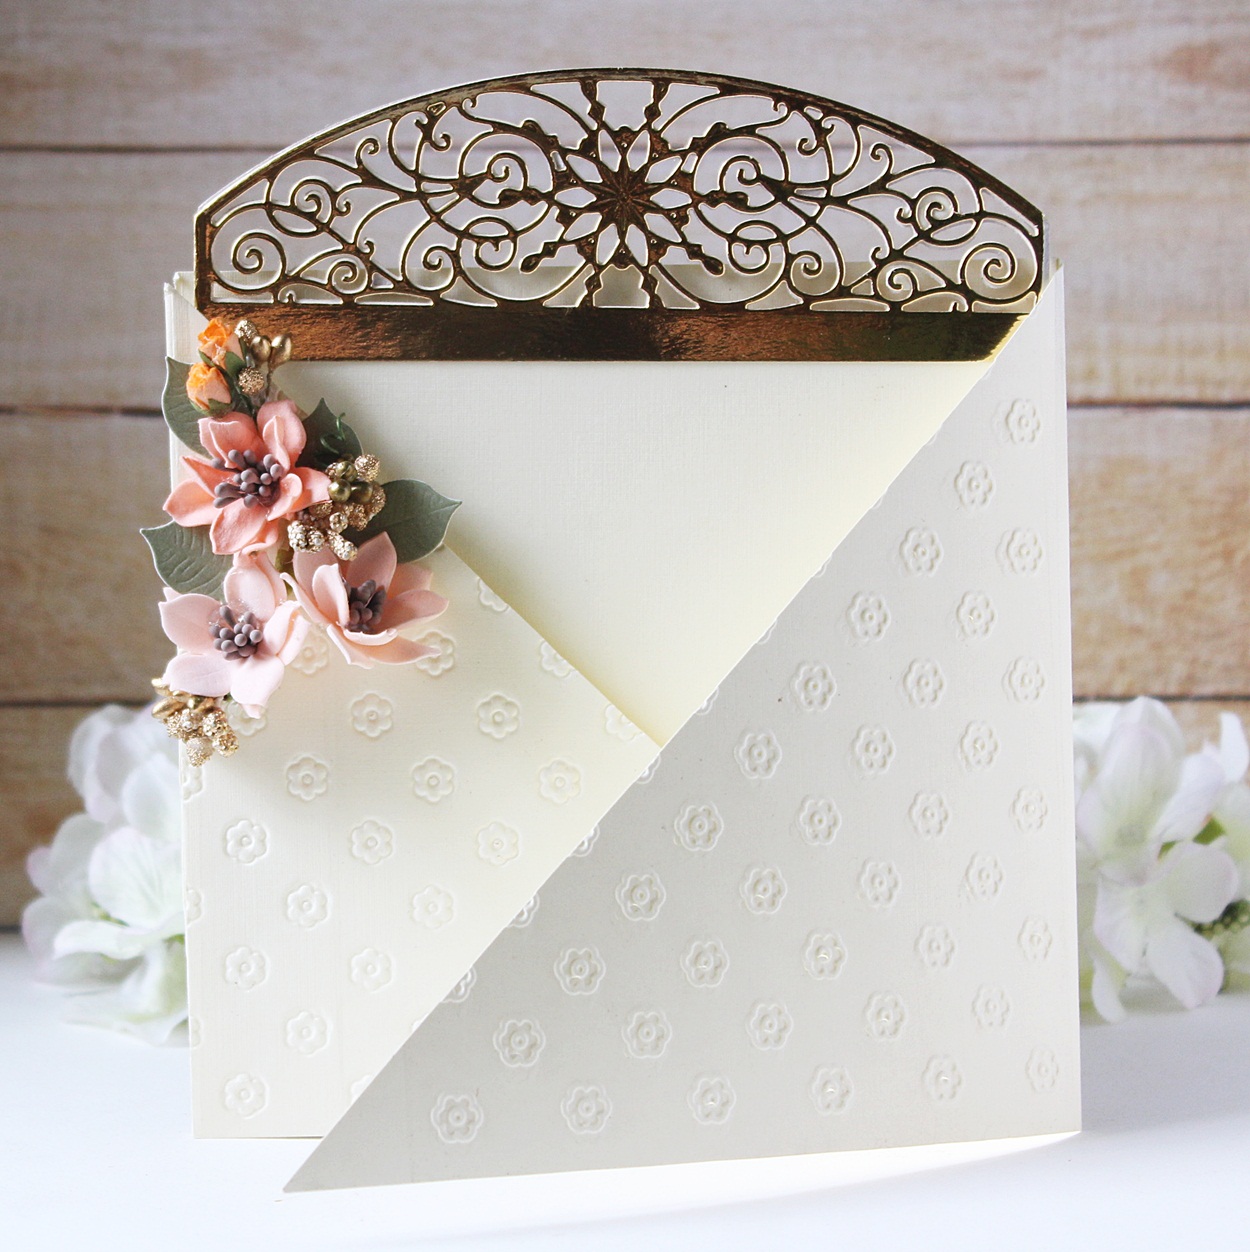
This card measures well over 6 x 6 inches. I seldom create cards which are this large in size, but I wanted to create one this time just to use the beautiful Snowflake Toppers Etched dies. Becca always creates the most exquisite and detailed dies and I absolutely love them! The inspiration for creating this card most definitely came from this die set. :)

To create this card, I first started with a sheet of 12" X 12" Cream Textured Cardstock and cut the paper in half so that I'd have two pieces of 12" x 6'' cardstock. I scored and folded both of them in the middle, that is the 6 inch mark. I adhered both the pieces together in the centre creating two flaps, which I then cut into triangles.  Next, I created the insert for the card which was 5.5" x 6" and adhered the Snowflake Toppers Etched dies to the top of the insert.

I die cut the Snowflake Toppers Etched dies from gold foil cardstock. I have started using gold foil cardstock quite recently on my projects, and it is totally inspired by Becca's projects. I love the elegant touch it gives to any project!

I wanted my card to have a belly band which was removable. To create the band, I used a 13" inch strip of cream textured cardstock. (I know most cardstock sheets come only in 12" X 12"size, so what I did is, I attached another 1" strip to the 12" strip to make it 13" in total). I camouflaged the extra strip which was glued on the band by adhering a swirly die cut frame in the centre.

Here's a stand-alone picture of the band. I kept the embellishing very simple on this one: I die cut the outer and inner frame from the Sentimental Christmas Stamp and Die set from cream textured cardstock and gold foil cardstock respectively, and adhered them on the band. I then stamped my sentiment directly on the band using Black Dye ink. I also included a small floral cluster on the left side. The flowers are made with peach Foamiran sheets using the Cinch and Go Poinsettia Etched dies. The leaves are also from the same die set.

Here is a closer look of the flowers on my card. I have a little trick to share here - I used the same Cinch and Go Poinsettia die to create both my Foamiran flowers and leaves. This die can be used for creating leaves as well, and this is a great way to get more out of your dies from a single die set.

I wanted the card design to look balanced, so I adhered some Foamiran flowers directly on the card as well. I also added grey pollens to my flower centres, and some golden pollen bunches and peach micro rose buds as foliage on the card.

Another picture to show the floral arrangement. Flowers are my all time favourite (which some of my crafty friends might be knowing), and I can't stop adding them to each project of mine! :D

Here's an aerial shot of the card. This is a very dimensional card as you can see in the picture.
 
And here's a flat-lay picture of the card. I hope you liked it!

My next two projects for today are gift tags cum gift card holders. These are again my favourites to make, and I totally love the idea to having a die which can create a tag and gift card holder all at once. I created two very simple Christmas gift card holders:

Both the tags were super quick and fun to put together. For the first tag, I used the Charming Tag Pocket Etched dies for die cutting the base of the tag using White heavy weight cardstock.

Next, I die cut the pocket to add to the front of the tag again from White heavy weight cardstock. I didn't want the pocket to have a very plain look so I took one of the decorative insert dies, and die cut the pocket so that it would have an intricate design on the front.

I also die cut another decorative insert piece, and adhered it to the top half of the gift tag cum gift card holder.

To embellish my project, I added a red poinsettia flower and few holly leaves made using the Cinch and Go Poinsettia Etched dies and Holly Jolly Christmas Etched dies respectively. And this tag was done!

Here's how it looks with a gift card.


The next tag is even more simple in terms of the design. I die cut the tag base using the Charming Tag Pocket Etched dies. I followed the same steps I did for creating my previous tag. This time, I chose to die cut a different design of the decorative insert pocket.

I again added a red poinsettia flower, but this time, I die cut the holly leaves from gold foil cardstock. The poinsettia flower was made using the dies from the Cinch and Go Poinsettia Etched dies, while the holly leaves were die cut from the Holly Jolly Christmas Etched die set.

And here's how it looks with a gift card!

Supplies used:
S5-384 Charming Tag Pocket Etched Dies
SDS-164 Sentimental Christmas Stamp and Die Set
PE-100 Platinum 6 Die Cutting and Embossing Machine - 6" Platform
T-001 Tool' N One

Other supplies used : Neenah Solar White 110 LB cardstock, Cream Linen Textured 12 x 12 Cardstock, American Crafts Colored 12×12 cardstock, White 80 LBS Cardstock Sheets, Gold Foil Cardstock, White Fun Foam; Stick It Double Sided Adhesive Sheets; Adhesive: Scrapbook Adhesives 3D Foam Squares, Tombow Mono Multi Liquid Glue, Double Sided Foam Tape, Glue Gun; Versafine Onyx Black Ink Pad, Foamiran Sheets (Peach), McGill Inc. Paper Blossoms Tool kit, Pollens, Micro Rose Buds, Ribbon.


Thank you so much, for taking out time and reading my post. If you liked my projects, please do leave me a comment below. I always love to hear what you think of my projects. :)

Have a nice day everyone!