Showing posts with label Lulupu.. Show all posts

Tuesday, December 2, 2014

You are awesome!

Hello everyone!
I am back again to share a shabby-chic card with you all. Love this style of card making and can't stay away from it for long. :P
Recently, I have been getting quite involved with the mixed media trend and I guess my card does incorporate a bit of Mixed media this time around! Here's a look at what I have created :

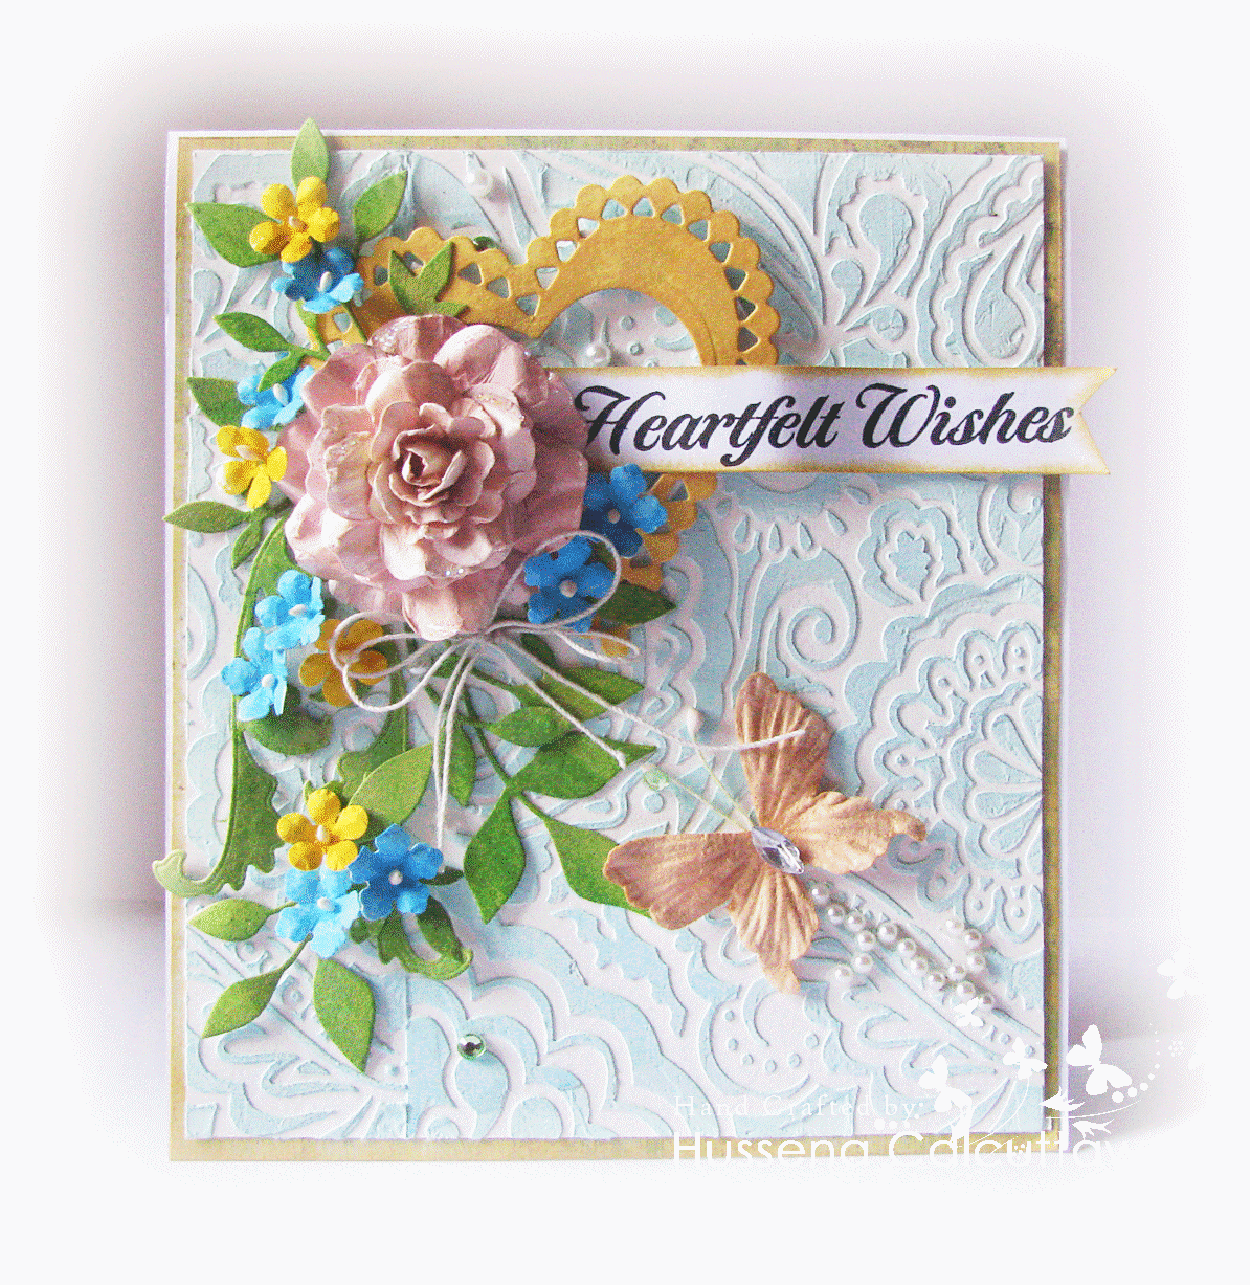
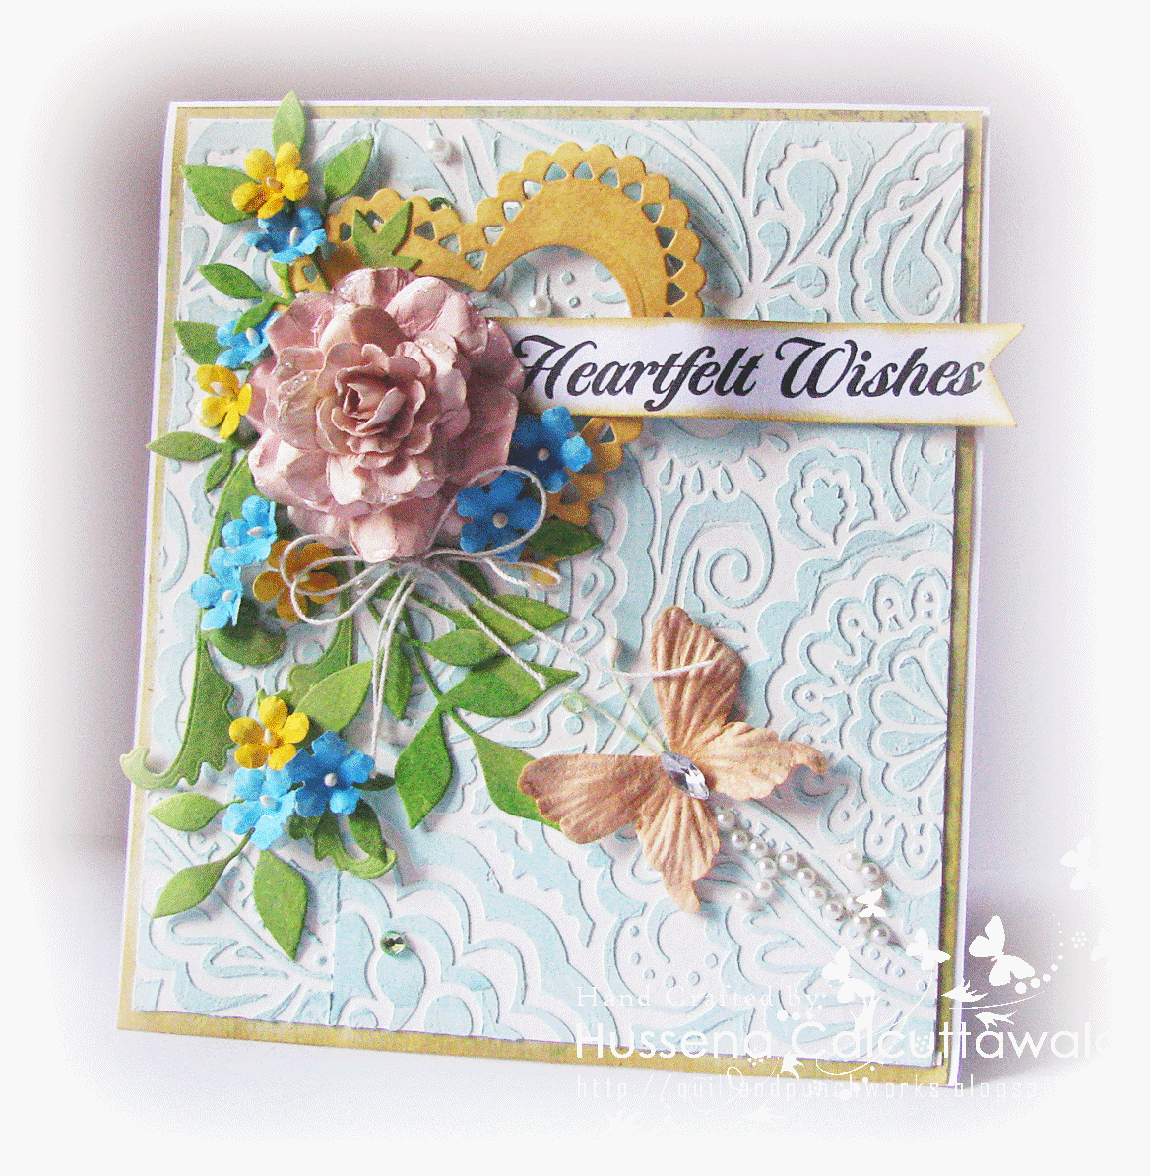
The base of my card has been made using three different patterned papers. The light pink striped pattern paper is from Graphic 45, followed by the blue one from Prima Marketing Cigar Box paper pad and finally the alpha one from Prima Marketing Coffee Break Paper pad.

The small butterflies were paper pieced from Prima Marketing Forever Green paper pad. For the base of my floral arrangement, I have used a Prima Marketing Doily Die #1 and popped it up on foam dots and colored with Distress ink- Tattered Rose.

 I have created a shabby-chic card so to create the look, I have distressed all the papers using a paper distressing tool and have inked all the edges of the papers with Distress ink- Tattered Rose. The flowers are all from my stash and I have Gesso-ed the edges of the flowers using Heidi Swapp Color Shine- Tropicana Teal Mist mixed with Gesso and painted using a paint brush to give that light blue colour to the flowers. The Gesso gives the flower a very nice texture and colour!

The sentiment has been stamped and paper-pieced and popped up on foam dots to give that raised look. I have used a lot of rhinestones on my card to add the bling factor to it. :D

Hope you all like it.

Supplies used :
Base cardstock- Campap and Fabriano Brustro.
Dies- Prima Marketing Doily Die #1.
Patterns papers - Graphic 45 (RAK from Piali), Prima Marketing A4 Cigar Box Secrets paper pad. Prima Marketing Forever Green 6 by 6 paper pad,  Prima Marketing Coffee Break Journaling Notecards - 4 X 6.
Flowers- Stash and few were RAK from Priya.
Stamps- Technique Tuesday Incredible stamp set.
Inks- Versafine Onyx Black ink pad, Distress ink- Tattered Rose.
Heidi Swapp Color Shine- Tropicana Teal Mist, Lindys Stamp Gang Hottie Pattotie Mists. (Used to colour the flowers).
Gesso, Rhinestones, Fillers, Mulberry Leaves.


Challenges entered :
Cardabilities - Sketch challenge ( Featured )

Have a nice day everyone!

Monday, October 20, 2014

Sparkle with Prima Lulupu Blog Hop!

Hello everyone!
Welcome to the Lulupu Sparkle with Prima blog hop!
You should have come here from the very talented, Nikita's blog.
If not, here's a link to follow the complete hop list starting from the Lulupu blog.

Today is the Day 8 of the Blog hop and I hope you all have been enjoying all the gorgeous inspiration that the Lulupu team and the Guest Designers have been sharing up to now. We also hope you're hopping along each of the blogs and leaving us some love as they are lot of prizes to be won this month! Not only that, we have a month long challenge this month where we are asking you to use your Prima products to create a 'sparkly' project for this festive season. We not only are giving prize to to the Winner, but also to do the Top 3 this time. You really don't want to miss this opportunity :)

Now, coming to my project, I have an altered MDF box to share with a step-by-step tutorial. 


 The insides of the box which I have covered with a pattern paper from the Prima A4 Cigar Box paper pad.

Now, for the tutorial part :

Step 1- Paint the MDF box with White Gesso entirely. This will help in the paint coverage as Gesso gives tooth to your projects and so it takes colours very well.

 Step 2- Measure and cut the pattern papers you're going to use. I've used Prima A4 Cigar box paper collection entirely for my box right from the base paper to ALL the embellishments as well.
Distress your papers after cutting them either with a Distressing tool or with the help of a small pair of scissors and ink the edges using Distress inks of your choice. I have used Scattered Straw thought it is totally optional.

 Step 3- Before sticking the papers to your box, paint the box using paints of your choice. I have used Acrylic paints from Camlin- Chromium Yellow and Cobalt Blue.
Then, I have done stenciling using modelling paste from Sakura and a art knife and ofcourse a stencil of your choice.Mine is from My Favorite Things.

Step 4 - I've done stenciling on the top and all four sides. Then, added blue splatters using Heidi Swapp- Tropicana Teal mist and Heidi Swapp- Gold Lame mist. (This step is optional)

After these steps, I painted the insides of the box as well with Gesso and Blue paint and layered the Prima pattern paper inside as well. This is from the Prima Cigar Box paper pad too!
To embellish my box on the top, I've paper pieced the flowers from the Cigar Box paper pad again, mounted it on foam and adhered it to the top of the Honeycomb MDF piece.
The butterfly die-cut, the wooden cage and the bow are all from the Prima Epiphany collection- Wood icons and Ephemera pack.
I have used the Prima Coffee Break Crystals on the butterfly and also some gold sequins from the Epiphany Ephemera pack. The sentiment and the small tag n the right hand side are from a discontinued collection of Prima now, called Prima Romance Novel paper pad. I have liberally used Ranger Platinum Stickles on the butterfly and flowers though it does'nt seem to show in the photograph. :(

Hope you like my project. Do leave me your comments and views regarding it. 
You next stop on the hop is another incredible crafter, Mallika Kejriwal

Have a nice day everyone!

Friday, September 12, 2014

Mini Magazine holder with folders !

Hi friends,
Today, I have a mini magazine holder to share. There are lot of different versions of these magazine holders/ card holders all over the internet and, I have followed a tutorial from one such source from HERE. Here's a look at the way I have embellished my magazine holder once the base was made :


 This is the magazine holder :

I created a few folders with pockets so that I could store all my small dies in it. The base of the  folders are recycled from cereal boxes to give it a sturdy base. 


To make these folders, I cut apart a cereal box and used the central panel of the box to make my folder by scoring it in the middle and folding it like a card base. Check the picture below :

I have decorated the magazine holder with DCWV Fresh Florals pattern paper stack, assorted Washi tapes and my handmade flowers using dies.

Supplies used :
Pattern papersDCWV Fresh Florals pattern paper stack, K &Company papers.
Dies : Cheery Lynn French Pastry doliy die, Cheery Lynn Olive branches die, Cheery Lynn Embellishment #3 die, Spellbinders Rose Creations die, Spellbinders Floral Flourishes die, Memory Box/ Simon Says Hexagons die.
Punches : Punch Bunch 3 in 1 Hydrangea punch, Martha Stewart 3 in 1 Butterfly punch.
Kaisercraft Butterflies stamp set.
Inks : Distress inks - Worn Lipstick, Shabby Shutters, Vintage Photo, Peacock Feathers, Versafine Onyx Black ink pad.
Washi tapes, Modelling paste, Retro flower punch, Lindy's Stamp Gang Curiouser Chartreuse Flat Fabio mist.

Challenges entered :
Cheery Lynn - All about texture
Imaginations- Embossing ( I have used modelling paste on my first  folder and have done dry embossing on my flowers)
City Crafter Challenges- Butterflies ( I have added them on my file holders )
Craft Room - Something old, something new ( I have used my new SSS Hexagons die and the Cheery Lynn doily die, old is pattern papers which I've been hoarding and also my Washi tapes which are atleast 2 years old. ) ( Made it to Top 3 )
We Do Dobadoo - Something feminine ( I created this holder for my crafty desk ).

Hope you all like my project. Do leave me your comments. Would love to hear from you.
Have a nice day everyone.

Monday, August 25, 2014

Thanks for everything

Hi Friends,
I am back again sharing a card I have made for my inspiration post at Lulupu. Our theme this time is "Background stamping plus use mist or sprays on your project' and here's what I have created :

I have done the background stamping using Hero Arts Flourish Background Cling stamp  .I first heat-embossed my background using Ranger Super Fine Gold Embossing powder and used Distress inks -Scattered Straw, Antique Linen, Black Soot and a little bit of Peacock Feathers to create my background. Then, I misted my background using the new Hedi Swapp Color Shine mists from the Lulupu store. These mists are really beautiful colours and when you spray them, they give this added shine which when you see in real life, is really beautiful. I have used Tropicana Teal, Coral and Gold on my card.

The small peach coloured flowers and the ribbon have been coloured using the Coral mist and the die-cut word 'Thanks' was sprayed with Tropicana Teal Mist and distressed around the edges with Black Soot I have die cut it 5 times using the Simon says die and the sentiment below it is also from the same set.. I have used the Gold mist to just fleck around the entire background. If you look closely, you will see it gives a gorgeous shine and I am using it almost on all my recent projects. The leaves were sprayed with Lindy's Stamp Gang Curiouser Chartreuse Flat Fabio mist. I love the intensity of it's colour !

The large blue flower is handmade using Spellbinder's Rose creation die and the black frame behind my flowers is also die cut using Spellbinder's Die- D-lites Frame Two dies and then heat embossed using Zing! Glitter Black embossing powder.
Supplies used :
Pattern papers- Graphic 45 Kraft Collection
Punches : EK Success Scalloped Scallop Border punch.
Dies-  Spellbinder's Rose creation die, Spellbinder's Die- D-lites Frame Two dies, Simon Says Stamp' Thanks' die and stamp set.
Stamps -Hero Arts Flourish Background Cling stamp, Simon Says Stamp 'Thanks' stamp set, Fiskars/Teresa Collins Girly Chic stamp set.
Inks- Versamark embossing ink pad, Distress inks -Scattered StrawAntique LinenBlack Soot and Peacock Feathers, Versafine Onyx Black ink pad.
Ranger Super Fine Gold Embossing powder, Zing! Glitter Black embossing powder, Mulberry flowers, Pollens, Heart stick-pin,  filler flowers and Seam binding ribbon.

I'm participating along with Pretty Pink Posh Cutting Edge blog hop. I have  used a couple of dies on my card and I have listed them above.

Challenges entered :
Paper Creators Craft  -Blings and Blooms
As you like it challenge : Favorite 2 embellishment and why (Mine is always flowers, fillers and gem stones  because they are the main focus of all my creations.)

That's it from me hope you like my card. Do let me know your reviews about it :)

Saturday, August 9, 2014

'You Anchor me' !

Hello friends,
Today I have a Nautical masculine card to share with you all. It's so not my usual style and my first real attempt at a Masculine card.So without further ado, here's a look at what I have made! :)
                                                                     
 And  an another view :
To create the base of my card I have used a Woodgrain embossing folder. I cut the paper into long strips measuring 3/4 of an inch by 3 inch and embossed it in the embossing folder, then I distressed it using Vintage Photo and Scattered Straw Distress inks and tried to create the wooden plank kind of effect we see on water fronts! I have created the Sailor's knot on the either side of the sentiment banner and added a die-cut 'You' and stamped my sentiment using Lawn Fawn Harol'ds ABC stamp set.

Incidentally the sentiment banner is made from the smallest of the Timeless Tags 2 from Wplus9. I used the partial die cutting technique to create a long base for it so that it could be held by the sailor's knot on the two sides. So love using my dies in a creative way :) The life- buoy ring I have made using two circle dies and distressed it with Peacock Feather's Distress ink. The anchor in the centre is a wooden MDF piece which I have heat embossed using Ranger Super Fine Silver Embossing powder on a MDF base and the four golden brads that you see on the corners are actually plain flat-backed pearls which I first coated in Versamark Ink pad, then completely covered it with Gold UTEE(Ultra Thick Embossing Enamel) and heat-set it and voila! you have a gorgeous golden brad-like embellishments and nobody will know the difference! *Winks* 

Here's a quick tutorial on how I created these Faux brads :

Hope you find this tip useful and that's about all the information regarding my card ! If you have been with me till now thank you so much for your patience :) I really wanted to share all the tips and tricks which went into making this card as I really had a lot of fun creating it !

Supplies used :
Card baseFabriano white cardstock, Fabriano Watercolor paper.
Dies : Ironwork Motifs Circle dies, Timeless Tags 2 from Wplus9, Simon says stamp 'You' die.
Embossing folder : Woodgrain Embossing folder from Darice.
Distress inks : Vintage photo, Scattered straw, Peacock feathers.
Versamark Dazzle Embossing ink pad and Versafine Onyx Black ink pad.
Stamp - Lawn Fawn Harold's ABC stamp set.
Embossing Powder : Ranger Superfine Silver Embossing powder, Gold UTEE.
Twine, Brads, Pearls and Studio Calico Stars Wood veneers.

Challenges entered :
BGC #56 : Nautical
Allsorts challenge blog :All Sentimental
Brown Sugar challenge : Use a Banner ( Made it to Top 3! )
Little Red Wagon : :Embossing

Hope you all like my card please do leave me your comment's /suggestion would love to hear from you :)
Have a nice day everyone !

Sunday, July 27, 2014

A gift bag with a tutorial !

Hi friends!
I am posting after a long time. As many of you may know, this month Ramadan was going on for us, and it has been tough past few days with fasting and lots of prayers, so I have been very inactive regarding my blog. But, I am here to share my gift bag with you all, this was made as a a part of my DT project at Lulupu and I have shared a tutorial for it too. So, here's a look at what I have created :


Here's how the back and the sides look like :

 Another side view :

It's a very simple bag and here's a template on how I have created the base of the bag :
Please right click on the picture to see the measurements clearly, but just incase, I am sharing those measurements again :
1. Take a 8 X 11 inches piece of cardstock.
2. On the long side (11 inch), score at 4.5 inches and 6.5 inches.
3. On the short side (8 inch), score at 2 inches and 6 inches.
4. Following the below template, cut on the dotted lines of your scores and fold all your scored lines to create the base of the bag.
5. For the handle of the bag, I have taken a piece of cardsotck measuring 11 inches x 1 1/2 inches.

I made some tags to gift along with this bag. Here's a look at those :

The panels of my bag are created by heat embossing and distressing and I have a detailed tutorial on how it is made on the Lulupu blog. Do check it out, HERE.
The yellow rose has been handmade by me using the new Spellbinder's D-lites die- Create a Rose. It was so much fun assembling this flower as it is almost similar to doing a three-dimensional punched flower because this die cuts out petals along with the centres and you have to emboss each petal separately and create your flower layers!

Supplies used :
Cardstock- Local buy
Watercolor paper- Fabriano Brusto.
Punches : EK Success Scalloped Scallop border punch, Martha Stewart 3 in 1 Butterfly punch.
Dies : Spellbinders D-lites Create a Rose die, Sizzix Flower Branches and leaves set die, Spellbinders border die (Name not known).
Stamps : Kaisercraft Twig and Berry stamp set, Kaisercraft Humming bird stamp set, Inspired by Stamping Creative tags stamp set.
Inks: Distress inks- Fired brick, Antique linen, Vintage photo, Victorian velvet, Tattered rose, Shabby shutters and Crushed olive.
Versamark Frost embossing ink pad, Ranger Clear Super fine embossing powder.
Heidi Swapp Gold Lame Color shine mist.
Filler flowers, Lines and Paris Japanese Washi tapes.

Challenges entered :
4 Crafty Girls -Anything goes.
Tuesday Throwdown- Handmade flowers.
Crafting with dragonflies- Bag and a tag. (I have created my bag from scratch using a scoreboard).Winner and Top 3! )  
Creative Moments- Anything goes with Flowers.
The Sisterhood of Crafters -Die cuts/ punches. ( Made it to Top 3! )
SSS -Emboss it (I have heat embossed the flourish).

Hope you like my work! Please leave me your comments/suggestions. :)
Have a nice day everyone!

Sunday, June 29, 2014

A gift box !!

Hi friends!
Today, I am sharing with you all a giftbox that I have made from scratch using cardstock and some beautiful pattern paper . The measurements of the box and the method on how I made it, I have referred to the youtube video of an international crafter that I found on Pinterest. HERE's a link to it if you are interested in making this.and keeping in mind the current Lulupu challenge which is to use 'Minimum 4 colours from the Lulup logo + create banners or pennants . This cute, little box can very easily hold a small sweet treat or an accessory like a bracelet or some pretty earnings. This could make a perfect party favour gift too! So, here's a look at what I have made :


To make this box, I have first cut and scored the cardstock, then measured and cut the pattern paper from the DCWV Fresh Floral Stack accordingly, and then covered all the four sides and the top of the box with it. Then, I created a small handle on the lid to make it easy to open and decorated the front of it using a die-cut panel which I have distressed on the edges using Crushed Olive Distress ink. I stamped the sentiment in the centre and also stamped, colored and fussy-cut the flowers and leaves using the Lawn Fawn Blissful Botanicals and Flutter By sets. Added the banners on the two sides of the box and a punched lace using the Martha Stewart Doily Lace which was then colored using Distress inks- Crushed Olive, Shabby Shutters and Tumbled glass.

Challenges entered :
Kraft Zone- Dies with Pattern paper.
A Creative Romance- Anything goes with Happy Birthday!

Hope you like my box. Do leave me your comments/suggestions. 
Have a nice day everyone! 

Saturday, May 3, 2014

You are the Best !!

Hiya friends ,
I have a card to share today. I made it for the inspiration of the current challenge at Lulupu blog which is to make Feminine cards using Border punches & Flowers. This card would be perfect for Mother's Day as well as any special occasion. My colours are soft and I have kept the background a bit on the dark side to contrast against the flowers. So, here's a look at what I made :
                                                                   
Another view :

I got to play with my new Simon Says Stamp and Die set on this card :D I am so in love with it and I think this must be  first time that I have used so much glitter, all at once on my card. I know many of you have admired the blooms I made on this card on my facebook page, these were made with the newly bought Tim Holtz/Sizzix Flower Garland die. I really, really like this flower die, as it gives you an option of three different flowers and leaves. Totally worth the money I spent on it. You all will be seeing much more variety of flowers I make using this die :D

Supplies used :
Base cardstock -Kraft.
DCWV Pattern papers.
Embossing folder -Cuttlebug/Provocraft Textile folder.
Punch -Martha Stewart Doily Lace punch.
Dies : Spellbinders Fluer De Lis Square die, Spellbinder's Classic Squares die, Tim Holtz/Sizzix Flower Garland die, Simon Says 'You' Stamp and Die Set, MFT Die-namics Scrolled Flourishes, MFT Die-namics Fancy Flourish die.
Inks : Distress Inks -Tattered Rose, Scattered Straw. Peeled Paint, Vintage Photo, ColorBox Frost White Pigment ink, Versafine Onyx Black ink pad.
White Pollens, Pie Lane Chevron Stickers, Itsy Bitsy Glitter Sheet.

Challenges entered :
Crafter's Corner -Something Special.
Dies R Us -Anything Goes. ( Made it to Top 3 )
Frosted Designs - I have used Flowers, Green and Yellow.
SSS -Anything Goes.
SS Work out Wednesday- Use Pattern Papers ( I have used pattern papers to punch out the border lace).

Hope you like my card. Please leave em your comments/suggestions. I would love to hear from you :D
Have a nice day everyone!

Monday, April 28, 2014

Memories! ...


Hi friends!
We, at Lulupu have a very interesting challenge for this fortnight which is Vacation/Travel/Holidays - Only LO Theme for our Challenge #29. With this month nearly coming to an end, you just have two more days to join in the fun.
Here's what I have created for our current challenge :

And, you know what ? This is my first ever layout. and I was quite nervous about creating it but once I got the right pictures to scrap about, and, the sketch from Once upon a ..Sketch Challenge, I was all set. And, this is what I ended up creating :
My LO is based on my parent's first international trip to the U.S.A to meet my brother and his family. My brother and me were so excited and nervous at the same time as my parent's were travelling alone. But, by God's grace, everything went quite smoothly and they really had a very good time in California where my brother is put up. The photo that I am scrapping about was taken on a water-front near Milpitas and it was really cold there as my parent's had traveled during the winter's.
Sadly, this was my father's first and last trip to U.S as he is no more with us. I really, really miss him a lot. So, this layout has a special significance for me. Since, this trip was one of the big events of my parent's life, in a way, it was even mine and my brother's.

Some more views of the layout with a little bit of journaling done :

Here's a close-up of my flower cluster :

 And a close up of the removable Tag on which the journalling is done :

A little bit about how I made this. For the base, I first took a 300gsm white cardstock and stuck my DCWV pattern paper over it. Then, I used the Sakura Modelling paste and TCW Hexagons Stencil on the two corners of my LO to create the hexagon background. Most of the bright, cheerful die-cuts used on my LO are from the Simple Stories Travel Snap! cards which I have fussy-cut and stuck on my LO with 3D Foams tabs to give it a little bit of dimension. The flowers are all die-cut using Spellbinder's die and I have used brads on the centre of my flowers. Added a little bit of journaling on a removable tag!

Supplies used :
Base paper : Local Cardstock
Pattern papers : DCWV, Pebbles Basic Cardmaking paper pad, My Mind's Eye..
Dies : Spellbinder's Rose Creations, Memory box Fabulous Phlox dies.
Punches : Martha Stewart Doliy Lace border  punch.
 Travel Snap! cards from Simple stories
Distress Stains : Peacock Feathers, Salty Ocean,Wild Honey, Mowed Lawn.
Distress Inks :Tumbled Glass,Spiced Marmalade.
The Crafter's Workshop Hexagons Stencil, Sakura Modelling paste, Washi tapes,Basic grey Brads,Studio Calico Tiny Stars Wood Veneers, Twine, Pearls.


Challenges entered :
Once Upon a Sketch -Sketch Challenge.
Scrap Around the World - Mood Board Challenge ( I was inspired by the colours and the background from the inspiration picture).
Color Conceptions- Anything but a Card.

Hope you like my first attempt at making a layout. Please leave me your comments/ suggestions. I would love to hear from you :)
Have a nice day everyone!

Saturday, April 5, 2014

Summer fun at Lulupu!

Hi friends!
Today I am sharing with you all a CAS card based on summer theme which is our current challenge at Lulupu. I have used some really bright, happy colours for my card. And, here's a look at what I made :

I have chosen to work with Light pink, Dark pink, Yellow and Orange colour form the photo inspiration and on a embossed kraft base of the card I have placed a white embossed panel and created an ice-cream cone. Isn't it the perfect summer treat to cool off ?! :)
My sentiment banner is created with a piece of vellum strip on which I have heat embossed the sentiment using two different stamp sets and coloured it using Mustard Seed Distress ink, then secured the base of it using brads.
The scoops of ice-cream, I have created using three different colored cardstocks and a circle die for the upper round part but you can also use punches for this and a scallop square die/square punch for the bottom part and after I cut out those shapes, I embossed it with the Provocraft/Cuttlebug Swiss Dots embossing folder and voila I got three different flavoured scoops of ice-cream on to my cone :D

Challenges entered :
Allsorts- No flowers
SSS -Happy Birthday
Brown Sugar -Clean and Simple
Moving along with the times -Sweet treatsMade it to Top 3 )

I would love to hear your thoughts about my card as CAS is so not my forte so I would really appreciate it if you could do drop in a line! :)
Have a nice day everyone!

Friday, March 28, 2014

Heartfelt Wishes!

Hi friends!
I am posting after a long time. I have been busy with my children's exams and also was down with fever and an eye infection. So, I was not very active in the blogland but I will be catching up with you soon :)
Well, today I am sharing a card which I made as an inspiration for the Lulupu blog where we are celebrating Lulupu's 2nd birthday this whole month with some really amazing prizes up for grabs.
Here's a look at my card which I have shared there as well!
                                                                 

I have created the base of my card using Memory Box Rhapsody stencil and Modelling paste to which I have added a little bit of Distress Stain- Salty Ocean. This gives such a nice tinge of color to the stenciled area. The central pink flower is handmade and so are the filler's. I have shared a TUTORIAL for the flower on the Lulupu blog. Please do check it out!
To create my card, I have followed the sketch from Cardabilities. I really loved the sketch this time and wanted to play along with them.

Challenges entered :
Word Art Wednesdays - Anything Goes
Kaboodle Doodles- Dreaming of Spring
Fussy and Fancy -Shabby chic

Hope you all like my card. Do leave me your comments. Would love to hear from you!
Have a nice day everyone!

Saturday, March 1, 2014

An Altered Photo Frame!

Hi friends,
Today, is  the first day of a new moth, and we have a very exciting challenge at Lulupu as this is also the second birthday celebration of the Lulupu store! And, here is what I have crated for this month's inspiration. It's a photo-frame which I have altered. I am sorry, I completely forgot to take the before pictures to show what this frame looked like before. Trust me, you would have been surprised to see the transformation.

                                                                           
A closer look at the blooms which are handmade :
 I have worked on the frame from scratch. This was a very plain white and red photo-frame. I first added two layers of Gesso on the base and then, applied two coats of Camlin teal color on it. This helped cover the base design completely and once it was dry, I took the Prima Designer stencil and the Sakura Modelling Texture paste and mixed some drops of the Distress Stain -Spiced Marmalade to it and applied it all over the sides of my frame to create the damask design on my frame!
I think it gives a beautiful, rich look to the frame and by adding the color to the texture paste there is a small hint of orange showing in the stenciled design! The flowers on my frame are all handmade and they are made by using the Distress Re-inker Spiced Marmalade and water added to a Mini Mister and sprayed directly on paper! Does'nt it give a vibrant look :)
The corners and the golden leaves on the frame are all made with die-cuts covered with UTEE and heat-embossing it. If you want to see how I made the corners using UTEE, here's the LINK to the tutorial that I shared on the Rainbow Craftykari blog!

Supplies used :
Dies - Cheery Lynn Gardenia Strip, Cheery Lynn Flourish Leaf Strip,Spellbinder's Leaf Foliage die, Joy! Crafts Vintage Flourishes Corner die.
Distress Re-inker -Spiced Marmalade, Distress Inks -Shabby Shutters, Mustard Seed, Distress Stains- Mowed Lawn, Wild Honey.
Sakura Modelling Texture paste, Prima Damask Designer Stencil, Punched flowers, Gold Ultra Thick Embossing Enamel, Glossy Accents, Pollens and Pearls.

Challenges entered :
Cheery Lynn Designs- Flowers ( Have used the Cheery Lynn Gardenia Strip to make my flowers)
Itsy Bitsy -Say it with Roses 
Crafts 4 Eternity- Texture

I hope you all like my project! Do leave me your comments/suggestions. I would love to hear from you! :)

Sunday, February 23, 2014

An Accordion Fold card! :)

Hi friends,
Today, sharing with you all an Accordion fold card which I have made for my inspiration post at Lulupu where our current challenge #26 is 'Try something New' .I have tried this fold card for the very first time and here's how it looks :                                                            
Here is how it looks when it is opened fully :
A look at some of the inside pages :

I have made a co-ordinating box to keep this card in. Here's a look at it :

This card opens up to 4 inches by 18 inches and I have embellished the front of the card with handmade flowers made using Joy! Crafts flower dies and colored them using Distress inks. Have also used Spellbinder's dies to layer my die-cuts. The corner, the border die are all from Spellbinder's. Unfortunately, don't know the name for this die as it is now, discontinued :( My box measure 51/2 inches by 1/2 inches and there's ample space inside for the card and the ribbon bow on the side. I have created the window using Spellbinder's Square dies and then placed a acetate sheet below the scalloped square.
 I am entering this card in Brenda's 5th Blogoversary Celebration .I would like to mention here that my all time favorite craft items to work with are definitely my Distress inks and my flower dies. I almost always make my own flowers and color them using distress inks :)

Supplies used :
Pattern papers - Prime Rondelle Collection and Prime Romance Novel paper pad.
Embossing folder Provocraft/Cuttlebug Swiss Dots embossing folder.
Punches -Martha Stewart 3 in 1 Classic Butterfly Punch.
Dies  - Spellbinder's Fluer De lis Square die,  Sags Ironworks Motif Scalloped Squares die, Joy! Crafts Flower dies, Spellbinder's Leaf Foliage die, Cheery Lynn Olive Branches die.
Inks - Distress inks -Spun Sugar, Victorian Velvet, Peacock Feathers, Shabby Shutters, Peeled Paint.
Versafine Onyx Black ink pad.
Stamps - Inspired by Stamping Small Fancy Labels 18,  Micia Hello Girl stamp set.
Kaisercraft Pink flowers, Daisy flowers, Pearls.
                                                                      
Challenges entered :
PPS -All about Love
Itsy Bitsy -Say it with Roses
Allsorts -Ladies Day
Inkspirational Challenge -Bingo (Shaped card, Ribbon or lace, Punches or Dies)
The Card Concept -I have chosen the style Shabby Chic.
Inspired by Stamping Customer Gallery Contest - I have used the Inspired by Stamping Small Fancy Labels 18


Hope you all like my card. Please do leave me your comments/ suggestions. I love to hear from you! :)
Have a nice day everyone!