Showing posts with label Cheery Lynn dies. Show all posts

Saturday, April 29, 2017

Pretty Paper Studio | Fifth Birthday Blog Hop

Hi everyone!
Pretty Paper Studio is turning 5 this month and we are celebrating with a Blog Hop! There is also a giveaway so do read till the end of the post to know more!


Here's what I have to share with you for this hop. It's an Altered Embroidery Hoop turned into a Home Decor piece.


I have shared a detailed tutorial on the PPS blog on how I created this hoop which you can check out HERE. The theme for this month is 'Gratitude'. I have used the chipboard pieces - Be Thankful to go along with the theme.

- - - -
Now on to the deets for the Blog Hop :
You need to leave a comment on every stop of the hop and like the Pretty Paper Studio Facebook page, follow Pretty Paper Studio on Instagram and Pinterest, subscribe to the YouTube channel and join the Facebook group. You will also need to follow our Guest Bloggers Mummy On My Mind, Cuddles and Crumbs and Explore with Mafaza on Instagram.

Here's the Blog Hop list :

Blog Hop Prize

 One winner will be picked randomly and will receive a Silhouette Cameo 3 Electronic Cutting Machine worth AED 1250. Simple. International entries are welcome too! You got to follow all the instructions to stand a chance though – that’s the only condition.
Pretty Paper Studio reserves the right to final decision regarding the judgment method and winning Entries. This contest is not sponsored by or affiliated with Silhouette America.
Blog Hop ends on May 1st, 2017 and a winner will be announced on the PPS blog on May 5th, 2017.
Alright then, hop on! I would love to hear what you think about my project. Thanks for stopping by!

Monday, August 8, 2016

Best Wishes | Card

Hi everyone!
Today I'm sharing a card I made for the Collaboration Blog Hop going on between Papericious & Mudra. Here's a look at it :


I have used products from both companies on my card. The grey text pattern paper is from the July 2016 release from Papericious and is called 'Mi Estilo'. I have die-cut a diagonal panel using it. The super bright red flower is a stamp from Mudra called Zinnia which I have colored using 3 shades of Distress inks.
I did some light water-coloring on my card front and added few gold paint splatters using my favorite Heidi Swapp Color Shine Gold Lame Mist. Added some green die-cut leaves using a Cheery Lynn die and few enamel dots to finish off my card. I adhered this card panel to a white A2 card base. The sentiment is from another Mudra set and is called Sophisticated Sentiments.

I'm entering my card in the SSS - Fabulous Florals, Wow  Embossing Powder Challenge - Flowers, The Crafter's Cafe- Flowers and Stampotique Designer Challenge- Text background.

I hope you like my card. Do leave me your comments/suggestions regarding it :)


Have a nice day everyone!

Monday, July 18, 2016

You are amazing!

Hello everyone!
I have a card to share today which I made for the Papericious July Challenge. We have a Moodboard challenge for you this time to be inspired with. You can check out all the details HERE on the Papericious blog. Here's my card inspired by it.


(I was inspired by the colours as well as the white mulberry flowers, the woodgrain background and the mesh from the Moodboard)

I have used the Papericious - My Golden Garden paper for the base, then layered it with the Papericious Wooden collection and finally used the Papericious Infinity Collection papers for die-cutting that doily.
The flowers are from my stash and I have added some Stickles on them for adding some shimmer. The leaves have been colored using Inka Gold which were die-cut from a Sizzix die. The bow is  made using Creme Seam Binding Ribbon. The hat-pins are from my stash again.

I have added a crotchet lace and the Martha Stewart Doily Lace punched border for layering. The sentiment is from the Altenew - Sentiments & Quotes set which has been heat-embossed using Ranger Gold Tinsel Embossing powder. I added a small butterfly from Martha Stewart to finish off my card! 

I'm entering my card in the Lulupu - July Sketch Challenge ( I have flipped the sketch upside down) , Peek-a-Boo Designs - Layers Challenge, Card-Mania - Lace and Pearls, Happy Little Stampers - Anything  goes with Dies


I hope you liked my card. Please do leave me your comments/suggestions. I love hearing from you :)


Friday, July 15, 2016

You are Loved | Photo Tutorial

Hello everyone!
I'm back to share my second card that I made for my DT post at Pretty Paper Studio. I shared one card earlier HERE, incase you have missed seeing it.
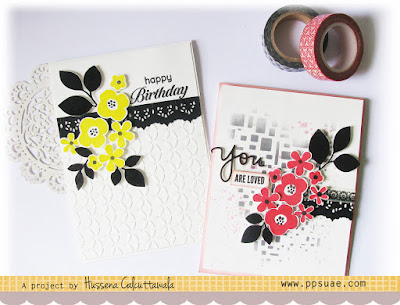
I'm sharing the second one today with a step by step tutorial on how I made it. Here's a look at both the cards.


And the second card!


- - - - - - - - - - - - - - - - - - - - - - - - - - - - - - - - - - - - - - - - - - - - - - - -

TUTORIAL

Step 1 – I started with a piece of White cardstock measuring 4 1/4 inches by 5 and a 1/2 inches and I decided to create a stenciled background using The Crafter’s Workshop- Mini Cubist stencil & Distress ink- Hickory Smoke using the Ranger Mini Round Ink Blending Tool. I created some splatters on my card using the Heidi Swapp Color Shine- Rose Mist.

Step 2 – Once the background was created, I again stamped the flowers and the foliage using the Paper Smooches Clear Stamps 4″X6″ – Botanicals 3 stamp set. I stamped my flowers using 2 colours of ink- Cotton Candy from the Altenew Four Scoops ink set and Papertrey Ink Pure Poppy Ink. The leaves were stamped in Versafine Onyx Black ink. These were all fussy-cut. 

Step 3 – I used the Cheery Lynn- Anastasia border die to die-cut a border from Black CS, and added a strip of that pretty Washi Tape to my card base to anchor my floral arrangement. These flowers and leaves are all popped up on foam dots to give them a bit of dimension.


Step 4 – For the sentiment, I went for the Simon Says Stamp – Expressions for You stamp and die set. I  die-cut that ‘You’ using black cardstock and the ‘are loved’ is stamped. I distressed the edges of the piece using Altenew Cotton Candy ink pad.

Step 5– A complete look of the card. I mounted it on a white card base whose edges I had colored using Altenew’s Cotton Candy ink so that a hint of the pink shows through the all four sides! 

Supplies used :
Bazzill Cardstock 12×12″ Classic White 
Paper Smooches Clear Stamps 4″X6″ – Botanicals 3 Archival Ink Pad – Jet Black 
Bazzill Cardstock Orange Peel Black 12×12″ Cardstock Hero Arts Acrylic Stamping Block 
Hero Arts Acrylic Block 4.75″X 6″ 
Crafter’s Workshop Template 6″X6″ – Mini Cubist
Ranger Mini Ink Blending Tool 1″ 
Tim Holtz Distress Ink Pad – June-Hickory Smoke 
Heidi Swapp Color Shine Spritz 3/Pkg – Sweetheart 
Papertrey Ink Pure Poppy ink
Versafine Onyx Black Ink Pad
Altenew Four Scoops Ink Pad Pack 
Washi Tape – 527 

I'm entering my card into the SSS- Flora & Fauna, Peek-a-Boo Designs- Only layers  4 Crafty Chicks- Flowers, Moving along with the Times- No Designer Papers, & City Crafter Challenge - On the Border challenge.

I hope you like my card & tutorial. If you have any queries, please leave them below. If you liked my card, don't forget to leave me a comment :)

Have a nice weekend everyone!

Wednesday, July 13, 2016

Happy Birthday | Photo Tutorial

Hello friends!
I'm back to blogging finally and I have lots of cards to share. Today I'm sharing one of the two cards I made for my DT post at Pretty Paper Studio. The July challenge at PPS is- Black, White & a splash of Colour. Here is my card based on this theme. I have a tutorial to share as well on how I made each of them!


Wednesday, May 25, 2016

Altered Tin | Photo Tutorial

Hello friends!
I am posting after quite a long time. I am trying to be more regular on my blog, but somehow don't seem to find time. :(
If you want to be updated with my latest work, please do follow Papericious and Pretty Paper Studio. You will find all my new work there :)
Moving onto today's post, I have an altered DIY tin to share. This is a very easy to do fun crafty makeover and I even have a step by step tutorial for it, so sit back, relax and hope you like it!


Tuesday, April 19, 2016

Layered Card | Best Mom in the World

Hello friends!
I am blogging after a long time on my personal blog. I have been quite tied up with DT commitments, but I wanted to drop in and share this card that I created for the Papericious blog using their March release which was the Papericious Ephemera Collection. This is a gorgeous collection with some really beautiful prints! Here's my card which I made for the monthly challenge on the blog.


This was a pretty quick card to create. For the base layers, I have die-cut the pattern papers using Spellbinders Radiant Rectangles die and layered them using foam dots. I then die-cut an oval frame using a Couture Creations die and white cardsotck and slightly distressed it using Vintage Photo Distress ink.
 After a long time, I have made my own flowers which have been made using the Sizzix Tattered Florals die. The leaves are from Cheery Lynn. The berries and the skeletal leaf are actually chipboard pieces from Wycianka which I have colored using Distress inks. The berries were covered with Glossy Accents to give a more natural look.
The gorgeous butterflies that you see are paper-pieced from the Ephemera collection and foam-mounted on the card base. The sentiment is from Altenew and I created a banner by sponging the background with Tattered Rose Distress ink. The seam binding ribbon was colored using Heidi Swapp Color Shine Coral mist.

I hope you like my card. I've made a layered card after a long time and truly enjoyed it. Let me know your views regarding it.

I'm entering my card in the Artful Crafting- April challenge. I was inspired by the colors and the floral patter on the tea cup and ofcourse, this card was meant for my mom, so had to make it really feminine :)
alt


Tuesday, March 1, 2016

Love- Mixed Media Wall Art and Tutorial

Hello friends!
I have a Mixed Media Wall art and fridge magnet to share today along with a step by step tutorial. Here's a look at what I have created :

This wall hanging would make a perfect accent to your craft room or even as a home decor and I have created this based on the current theme this month at Pretty Paper Studio which is “LOVE”. I have a step by step tutorial on how I have created this, so sit back and relax and hope you enjoy seeing the creative process .

 I first started by roughly drawing a freehand heart shape on a recycled cardboard packaging and fussy cutting it and for the magnet, I have die – cut a heart shape using my die directly on the cardboard. I have used papers from 6″ X 6″ Crate Paper pad : Craft Market collection.

After I had cut the heart shape, I cut out the papers from my paper pad and glued them on the cardboard base. (The brown woodgrain & dotted paper). Then it was time to add some texture to the base so I used Tim Holt Lace stencil and embossing paste along with some Heidi Swapp mists to create my background.

This is how the base looks once the embossing was done . On my dotted heart, I mixed some blue mist with my embossing paste before applying it through the stencil.

This is how the base looks once the embossing was done . On my dotted heart, I mixed some blue mist with my embossing paste before applying it through the stencil.

To create more background texture, I water colored two images from Prima Marketing Everyday Vintage Paintables Cards- Bohemian 4 ”X 6” using my Distress inks and I fussy cut the images and layered them on my heart base.

After I watercolored and fussy cut my image it was time to start embellishing and putting down all my elements on my heart base . I decided to use the Prima Marketing Resin icons in a Box- Chalk Black Lock and Key Sets for this, so I painted it with gesso and colored it with my mist to give it a hint of blue.

After playing around with my embellishments, I finally arranged them on my final piece. I have used handmade flowers and some die cut and colored leaves using Joy! Crafts Die- Leaf #2, added a American Crafts/Amy Tangerine Stamped Myflair Flairs – Embossed Gold along with the Prima Marketing Resin icons in a Box- Chalk Black Lock and Key Set.

 I also made a co-ordinating fridge magnet  to go with my wall hanging :

For the fridge magnet, I have used paper from Crate paper : Craft Market collection 6 ” X 6″ paper pad. I have die-cut a scalloped circle from this paper pad and have foam mounted it on my heart base and used some mulberry flowers and a Prima Resin Icon Key to embellish it, finally used some sequins to finish my project.

w&w_bb2ndb_challengefinal
I'm linking my wall hanging and fridge magnet to the Winnie and Walter Belated Second Birthday challenge-
Anything but a card, Gold + Watercolor challenge with Heather (I have watercolored the Prima Paintable image) and Floral challenge with Lydia

Also entering it in the Artful Crafting- Love challenge.

I hope you liked my post and tutorial. Do leave me your comments/suggestions. I always look forward to them. :)

Friday, February 27, 2015

One of a Kind

Hello friends,
I am back after a month long break as my son had his exams and after which my entire household fell sick one by one due to the flu going around ...But anyways all's well now and I have a card to share today which I have created for the Cheery Lynn DT call going on...I seem to have left it at the very last moment but luckily I am just in time :)..Here's a look at my card :


Front view of the card :


This time I have created a mixed media kind of card with soft spring colors and as usual all the flowers and  leaves on my card are created using Cheery Lynn dies. One of the reasons I love working with Cheery Lynn flower dies is that they have a strip of dies which cuts through five layers in one go, so it makes it so much easier to create sculpted flowers which require atleast 4-5 layers to complete the bloom! The added advantage is all Cheery Lynn dies cut very well and work perfectly with different thickness of paper and their leaves and foliage dies have an embossed impression, which really adds to the beauty of the finished product, so your work is already done for you in creating those special handmade flowery cards.

To make my card, I first took a 41/2"  by 51/4" watercolor card panel and did some stenciling using embossing paste mixed with Distress ink. I created the paint spatters using the wet brush technique. Then, I have layered my various die cuts using foam tape. The base doily is from Prima Marketing and the Cheery Lynn flower dies that I have used here are Daisy Strip, Medium Tea Rose, Gardenia Strip, Fanciful Flourish.
I have colored the flowers using Distress inks- Peacock Feathers, Squeezed Lemonade, Ripe Persimmon and the leaves using Crushed Olive. The sentiment has been stamped from an old MME stamp set and fussy cut and distressed.

Supplies used :
Base cardstock- Watercolor paper.
Dies- Cheery Lynn Daisy Strip, Cheery Lynn Medium Tea Rose, Cheery Lynn Gardenia Strip, Cheery Lynn Fanciful Flourish, Prima Marketing Scallop Doily Die #1.
Punches- Martha Stewart 3 in 1 Butterfly Punch, EK Success Scalloped Scallop Border punch.
Stamps -My Minds Eye The Sweetest Thing- Honey stamp set.
Inks- Distress Inks (Peacock Feathers, Squeezed Lemonade, Ripe Persimmon and Crushed Olive), Versafine onyx black ink pad.
Hero Arts Arrow Pattern stencil, Wendy Vecchi White Embossing paste, Black Acrylic Color, Prima Marketing Platinum Glass Glitter, Pollens.


Challenges entered :
Cheery Lynn- Anything Goes
BGC- I was inspired by the colors of the cake and the glitter photo, and the flowers of course. My sentiment is stamped. ( Merit Winner! )
SSS-Anything goes
a2zScrapbooking.com  - Embossing ( I have used the Hero Arts Arrow pattern stencil to created my embossed background using texture paste )

Hope you like my card. Do leave me your feedback as this is my first ever attempt at a Mixed media card.


Sunday, February 1, 2015

Winnie & Walter Birthday Celebrations- Part 2

Hello friends.
This is the part 2 of the Winnie and Walter Birthday Celebrations challenge. I have two more cards to share. The linky closes in just an hour, so this is going to be a very quick post.
My first card is based on the Gradient Challenge by Vanessa. Here's a look at what I have created :


To create my gradient, I have used different shades of yellow and orange Distress inks and stenciled the background using the MFT Moroccan Tile stencil. After I stenciled it, I sprayed the background with plain water to create the watercolor effect. I have done two-toned stamping on my flowers which are from the Winnie & Walter- The Big, the Bold and Extras set. The sentiment is from the Winnie & Walter- The Big, the Bold and You stamp set. The leaves have been colored using Inka gold after I stamped it with Versafine Onyx Black ink pad. Everything has been popped on foam dots to give dimension to my card.

Supplies used :
Cardstock base- Campap
Die- Paper Smooches Dots and Dashes Borders.
Inks- Versafine Onyx Black ink pad, Distress inks- Squeezed lemonade, Mustard Seed, Spiced Marmalade and Dried Marigold.
MFT Moroccan Tile Stencil, Inka Gold, Prima Epiphany Ephemera Pack, Sequins.


Challenges entered :
 Just us Girls challenge- Sentiment as the focal point.
 Crafts 4 Eternity- No pattern paper.
The Crafters cafe challenge- Make your own background.
SSS- Anything Goes


My second card is based on Lea's Mood Board challenge :

My take on the mood board :


I was inspired by the various elements of the mood board -The polka dot tissue, the scattered glitter and the soft pink gloves. To create the polka dot banner, I stenciled Inka Gold onto a vellum paper using a Heidi Swapp stencil. The woodgrain circle, I have die-cut and embossed using a woodgrain embossing folder. The doily behind, I have watercolored using Spun Sugar Distress re-inker, scattered some punched out glittered hearts and have placed a scalloped border behind the circle. The sentiment has been stamped and fussy-cut from the Winnie and Walter- The Big, the Bold and You stamp set which has been gold heat embossed and adhered to the card. I have coated the flowers and the background with Stickles Platinum, but unfortunately it doesn't show through the picture. The background has been stamped using a Hero Arts/Basic Grey background stamp using Spun Sugar Distress ink which is also not showing through. :(
I'm also entering this in Gayatri's CAS + Freestyle/ Collage challenge

Supplies used :
Cardstock base- Campap, Paper Accents Vellum Sheets.
Dies- Cheery Lynn French Pastry Doily die, Paper Smooches Dots and Dashes Borders.
Punches- EK Success Scalloped Scallop Slim Edger, Jef 3 in 1 Hearts punch.
StampsWinnie and Walter- The Big, the Bold and You stamp set, Winnie and Walter The Big, the Bold and You stamp set, Hero Arts/Basic Grey Herbs and Honey tile background stamp.
Inks- Versafine Onyx black in pad, Distress re-inker - Spun Sugar, WPlus9 Flamingo Dye ink pad, Versamark Dazzle embossing ink pad.
Ranger Super fine Gold embossing powder. Heidi Swapp Medium Dots Stencil, Inka Gold, Gold Glitter Washi tape, Golden thread, Ranger Platinum Stickles.

Challenges entered :
Cut it up -Embossing ( I have done both dry and heat embossing )
Crafty Gals corner- I have tried this collage style for the first time and the W & W stamp set is being used for the first time.

I hope you like my cards. I would love to know your views on it.