Showing posts with label Martha Stewart Punches.. Show all posts

Monday, July 18, 2016

You are amazing!

Hello everyone!
I have a card to share today which I made for the Papericious July Challenge. We have a Moodboard challenge for you this time to be inspired with. You can check out all the details HERE on the Papericious blog. Here's my card inspired by it.


(I was inspired by the colours as well as the white mulberry flowers, the woodgrain background and the mesh from the Moodboard)

I have used the Papericious - My Golden Garden paper for the base, then layered it with the Papericious Wooden collection and finally used the Papericious Infinity Collection papers for die-cutting that doily.
The flowers are from my stash and I have added some Stickles on them for adding some shimmer. The leaves have been colored using Inka Gold which were die-cut from a Sizzix die. The bow is  made using Creme Seam Binding Ribbon. The hat-pins are from my stash again.

I have added a crotchet lace and the Martha Stewart Doily Lace punched border for layering. The sentiment is from the Altenew - Sentiments & Quotes set which has been heat-embossed using Ranger Gold Tinsel Embossing powder. I added a small butterfly from Martha Stewart to finish off my card! 

I'm entering my card in the Lulupu - July Sketch Challenge ( I have flipped the sketch upside down) , Peek-a-Boo Designs - Layers Challenge, Card-Mania - Lace and Pearls, Happy Little Stampers - Anything  goes with Dies


I hope you liked my card. Please do leave me your comments/suggestions. I love hearing from you :)


Tuesday, July 5, 2016

Party Favour Bag | Photo Tutorial

Hello everyone,
As promised, I am trying to get back to regular blogging and I have a very fun, pretty and a easy to make party favour bag to share using papers from the Papericious new release- Pretty Basics. This bag measures nearly 7 inches in length by 8 inches in width and would make a perfect hostess gift and even a perfect party favour gift for your young ones. This bag can hold quite a decent size gift :)

Here's a look at the bag first followed by a step by step tutorial on how to go about making one for yourselves :)


Thursday, March 31, 2016

Layered Birthday Card with Tutorial

Hello friends!
I have a layered Mixed Media card to share today which is based on this month’s PPS color palette challenge. We have such beautiful, soft pastels for inspiration and I really enjoyed working with these colours! I have a step by step tutorial on how I created my card. Hope you enjoy seeing my creative process!


Wednesday, October 28, 2015

An Altered hoop and a Tag !

Hello, everyone!
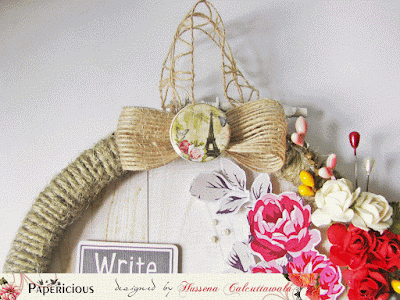
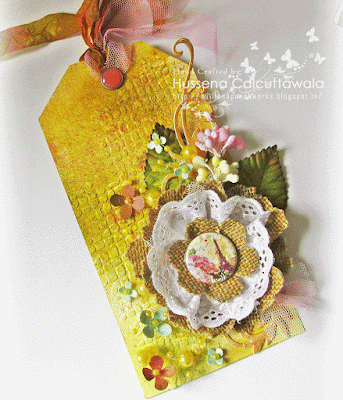
Today I have two projects to share with you all. These projects were created for the Papericious blog to introduce the new Adhesive buttons/flairs that have been released this month. I really enjoyed using these buttons on my projects. :) 

So, here's a look at what I created using these buttons. The first one is an altered hoop and the second one is a Mixed media tag!

For this hoop, I have used the Pattern Papers from the Papericious Grey Bloom collection and the Wooden Collection. The pink flowers and the leaves are fussy cut from the Grey Bloom collection paper and mounted on square foams for dimension. As you can see, I have used these buttons for the centre of my bow as well as a part of my sentiment.  These make very pretty centres and look great on cards, layouts and mixed media projects!


Here are few of the close ups!


I am entering my altered Hoop for the PPS challenge : Inspired by a song. I was inspired by THIS song from Francesca Battistelli.

Moving on to my Mixed Media tag :

 I first created a burlap flower using the Tim Holtz Tattered florals die and layered it with some tulle and fabric cotton laces and finished it off with an adhesive button. Isn't it gorgeous??
I have created the background of the the tag using embossing paste and a stencil from Tim Holtz with Distress Stain Sprays.


 I am entering this tag in the Stamploration Mixed Media Challenge.

Thank you for your time and have a nice day everyone! Please do not forget to leave your comments/suggestions. I love to get feedback from you :)

Friday, June 5, 2015

Ombre fun

Hello friends!
Today I have a card to share which I have  made especially for the Sparkle and Shine challenge. Their inspiration picture is so gorgeous that one look at it, and I was very sure that I wanted to create a card based on it :)
Also, the DT inspiration was really awesome out there. You really need to check it out HERE.

Here's a look at my card based on the inspiration picture :

This was clicked in artificial light and the colors seem much lighter here!

To create my card, I first took a 41/4 X 51/2 inch piece of watercolor paper and using Distress ink - Cracked Pistachio I watercolored my layers by masking each layer with washi tape. Once the ombre layer was created, I found it a bit dark so I heavily spritzed the panel with water. This softened the colours and really enhanced the ombre look more.
Using Wendy Vecchi White embossing paste and a Heidi Swapp stencil, I created the embossed bubbles. The cake is from the Winnie and Walter Sugar Rush set. It's actually a two tired cake, but I wanted a three tired one, so I stamped and embossed the cake image twice and fussy cut the top tire from one of the cakes and paper pieced it on the main cake image. The cake and the flowers are watercolored using Cracked Pistachio Distress ink.
Then, I stamped the cake stand which is also a part of the set using Mama Elephant Fresh Mint ink and fussy cut it. I just used part of the image on my card here! The banner and the sentiment is also from a W & W set- The big, the bold and extras. The flowers were punched out using the MS 3 in 1 Hydrangea punch and I have added Platinum Stickles in the centre of the flowers.

Supplies used :
Fabriano White Elle Erre, Brustro Watercolor paper.
Die- Paper Smooches Dots and Dashes.
Stamps- Winnie and Walter Sugar Rush, Winnie and Walter The big, the bold and extras.
Inks- Mama Elephant Fresh Mint, Distress ink Cracked Pistachio, Versafine Onyx black ink, Versamark embossing ink.
Ranger Liquid Platinum embossing powder, Pretty Pink Posh/ Winnie and Walter Birthday Sequins Mix, Ranger Platinum Stickles, Heidi Swapp Confetti stencil, Martha Stewart 3 in 1 Hydrangea punch, Wendy Vecchi White embossing paste.

Challenges- Sparkle and Shine, PPP Watercolor Blog hop, Virginia's View Ombre challenge.


I hope you like my card. Please do drop me your comments/suggestion. I love to hear from you :)
Have a nice day everyone.

Wednesday, September 18, 2013

Guest Desiging for Lessology's Birthday celebration Month :)

Hi Friends,
Today sharing with you all an upcycled Gift box which I have made for my Guest Designer spot at LESSology as they are celebrating their second birthday blogoversary. I am thrilled to  be a part of their birthday celebration as the team of LESSology is a very talented  bunch and they always come up with some fabulous upcycling ideas.If you haven't checked out their blog yet drop in here I promise you won't be disappointed :)  Ok now here's a look at what I have made for  my guest designing spot :                                                        
I have up-cycled an old I-cod tablet box to create this gift box. Here is a look at how it looks from the top and the sides :                                                    
                                                
This is the box that I have upcycled :
                                                       
To make the base of my box I have first taken some water-color paper and added texture to it by stenciling it with texture paste and the damask Prima stencil.I have added a dash of Lindy's sprays to my texture paste to give a hint of color to it.Then, I have distressed it completely using Spun Sugar and a bit of Fired Brick distress inks.Also, I have distressed the edges of the paper using my scissors and this forms the base of the box on the top and on the sides.I have then embellished it using MDF embellishments and my ever favorite flowers using Spellbinder dies and colored it using Distress Stains.A little bit of pearls here and there and some delicate foliage completes my project! :)
I have also decorated the insides of the box with some Martha Stewart punched laces and a base white paper.
Finally, added some yummy chocolates to it and my gift is ready to be shared :)

Supplies used :
Base CS -Brustro Water-color paper.
Camlin Texture Paste.
Prima marketing Damask Stencil.
Dies & Punches :
Spellbinders Resplendent Rectangles die,Spellbinder's Rose Creations die, Spellbinder's Foliage die.
Martha Stewart Doily Lace Punch, Martha Stewart 3 in 1 Butterfly punch.
Stamps & Inks :
TPC Birthday clear stamp set.
Distress inks - Vintage photo, Fired brick, Spun sugar and Shabby shutters.
Versafine Onyx Black ink pad.
MDF embellishments, Glitter strips, Rose buds, Small flowers and Pearls.

Challenges entered :
Itsy Bitsy -Pretty with P challenge ( My P's are Pink, Pearls and Posy )
Artistic Inspiration - Anything goes/Frame it ( Made it to Top 3 )
There she goes -The gift of giving 
Craft Room challenge - Use something wooden.(Corner & Flourish )
Color Conceptions -Spread your wings with Distress inks! ( Made it to Top 6 )


Hope you like this gifting idea.Most of us love to receive or give chocolates as gifts and when it's packaged beautifully, it's all the more fun to receive.