Showing posts with label Simon Says die. Show all posts

Friday, July 15, 2016

You are Loved | Photo Tutorial

Hello everyone!
I'm back to share my second card that I made for my DT post at Pretty Paper Studio. I shared one card earlier HERE, incase you have missed seeing it.
I'm sharing the second one today with a step by step tutorial on how I made it. Here's a look at both the cards.


And the second card!


- - - - - - - - - - - - - - - - - - - - - - - - - - - - - - - - - - - - - - - - - - - - - - - -

TUTORIAL

Step 1 – I started with a piece of White cardstock measuring 4 1/4 inches by 5 and a 1/2 inches and I decided to create a stenciled background using The Crafter’s Workshop- Mini Cubist stencil & Distress ink- Hickory Smoke using the Ranger Mini Round Ink Blending Tool. I created some splatters on my card using the Heidi Swapp Color Shine- Rose Mist.

Step 2 – Once the background was created, I again stamped the flowers and the foliage using the Paper Smooches Clear Stamps 4″X6″ – Botanicals 3 stamp set. I stamped my flowers using 2 colours of ink- Cotton Candy from the Altenew Four Scoops ink set and Papertrey Ink Pure Poppy Ink. The leaves were stamped in Versafine Onyx Black ink. These were all fussy-cut. 

Step 3 – I used the Cheery Lynn- Anastasia border die to die-cut a border from Black CS, and added a strip of that pretty Washi Tape to my card base to anchor my floral arrangement. These flowers and leaves are all popped up on foam dots to give them a bit of dimension.


Step 4 – For the sentiment, I went for the Simon Says Stamp – Expressions for You stamp and die set. I  die-cut that ‘You’ using black cardstock and the ‘are loved’ is stamped. I distressed the edges of the piece using Altenew Cotton Candy ink pad.

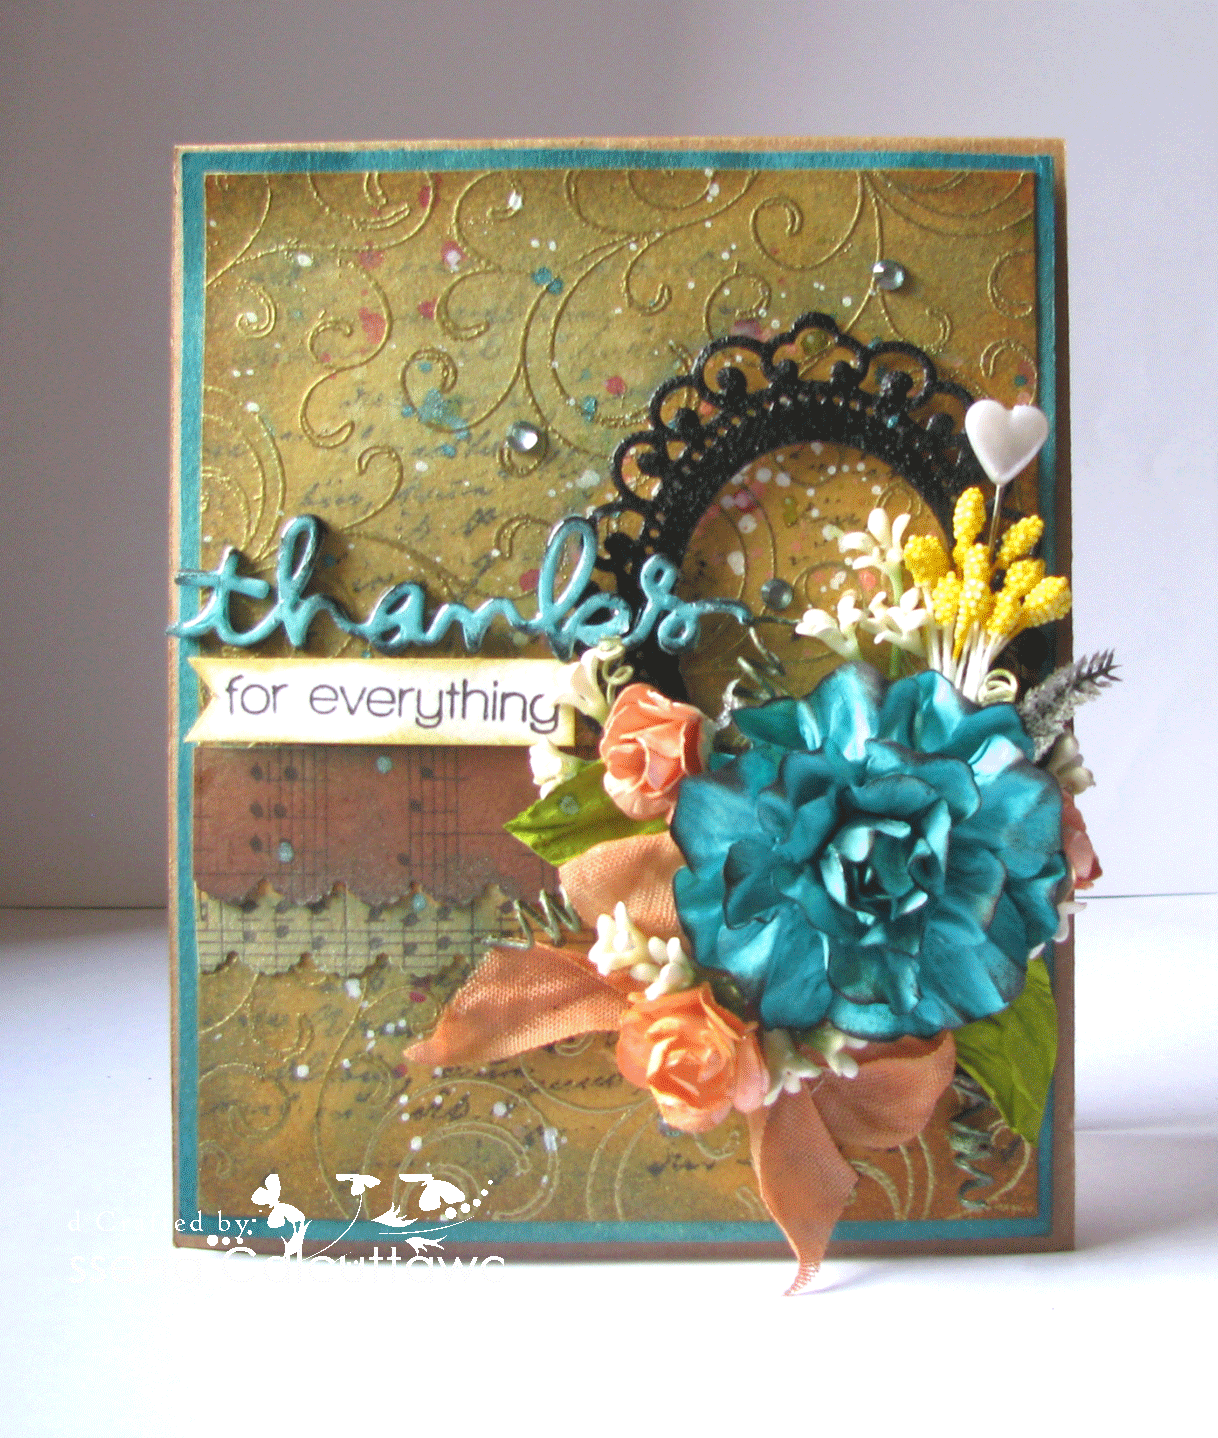
Step 5– A complete look of the card. I mounted it on a white card base whose edges I had colored using Altenew’s Cotton Candy ink so that a hint of the pink shows through the all four sides! 

Supplies used :
Bazzill Cardstock 12×12″ Classic White 
Paper Smooches Clear Stamps 4″X6″ – Botanicals 3 Archival Ink Pad – Jet Black 
Bazzill Cardstock Orange Peel Black 12×12″ Cardstock Hero Arts Acrylic Stamping Block 
Hero Arts Acrylic Block 4.75″X 6″ 
Crafter’s Workshop Template 6″X6″ – Mini Cubist
Ranger Mini Ink Blending Tool 1″ 
Tim Holtz Distress Ink Pad – June-Hickory Smoke 
Heidi Swapp Color Shine Spritz 3/Pkg – Sweetheart 
Papertrey Ink Pure Poppy ink
Versafine Onyx Black Ink Pad
Altenew Four Scoops Ink Pad Pack 
Washi Tape – 527 

I'm entering my card into the SSS- Flora & Fauna, Peek-a-Boo Designs- Only layers  4 Crafty Chicks- Flowers, Moving along with the Times- No Designer Papers, & City Crafter Challenge - On the Border challenge.

I hope you like my card & tutorial. If you have any queries, please leave them below. If you liked my card, don't forget to leave me a comment :)

Have a nice weekend everyone!

Friday, October 9, 2015

Thanks!

Hello friends,
I am back again with another card made for the WCMD challenges at Winnie and Walter. I had a lot of fun creating my card and have combined some of my favorite brands in making it. Also its my first time making a complete watercolored card ..Till now I have been quite vary in trying out only watercoloring on my cards ...Anyhow :) ...Here's a look at what I have made :


And an another view :

I have used Altenew's Painted Flowers stamp set and colored it with distress inks Squeezed Lemonade, Mustard Seed, Peacock Feathers ,Twisted Citron and Shabby Shutters inks..Painted my background using  these inks as well on a watercolor cardstock ..I stamped the image and then heat embossed it with Ranger Clear Embossing powder so that my ink would not bleed.
The sentiment die cut  "Thanks" is from SSS and the 'For all you do' sentiment is from Winnie and Walter ..The Big , The Bold and Thanks set.
I finished my card with some ink spatters using black acrylic paint and Heidi Swapp Gold Color Shine spray.

I am entering this card in the following challenges :
Winnie and Walter WCMD 2015 Color challenge with Heather , also entering my card for Virgina's View Challenge # 19 (Watercolor challenge).
Beyond Grey Challenges- Anything Goes.


Thursday, June 11, 2015

Floral Thanks

Hello, hello friends!
So, I'm back again with another card and this time I have played with the Altenew Vintage Flowers set. Totally, totally in love with this set and if my budget did allow me, I could have very nearly bought all of their stamp sets :):)
Anyhow,  here's a look at what I have created :


Because this stamp set is so beautiful, I have kept this card pretty simple just to highlight the stamp itself!
I won't lie. The layered stamping is definitely tricky and it takes a lot of practice before one gets perfect results and mine is nowhere near perfect. :/ After lot of trial and error, what I found is Dye inks work best for the layered stamps. I have used a combination of Memento and Mama Elephant inks for my pink flowers where as for the yellow flower I have used Hero Arts Shadow inks along with Memento inks.
The background is embossed using an embossing folder from Darice. I love the contrast of the woodgrain against the soft flowers. I have lightly inked the panel using Black Soot Distress ink. Some random ink splatters and PPP sequins completes my card. The sentiment is die cut and is my ever favorite SSS die.

Supplies used :
Cardstock- White Iris Cardstock.
Stamps- Altenew Vintage Flowers.
Dies- Simon Says Stamp Thanks Craft die.
Inks- Memento Angel Pink, Mama Elephant Piggy Bank, Avery Elle Raspberry, Hero Arts Soft Blossom, Memento Dandelion, Hero Arts Butter Bar, Hero Arts Orange Soda, Distress ink Black Soot.
Darice Woodgrain embossing folder, Black acrylic paint, Pretty Pink Posh Sequins.

I'm entering this card in the Cardabilities Sketch challenge, Beyond Grey Challenges, A Blog Named Hero- Favorites (I have used my absolutely fave stamp set here), Create Something Catchy -CAS and Inspired by the moodboard. (I have been Inspired by the flowers ), SSS - Love of plants.


Hope you like my attempt at layered stamping.  I would love to hear your comments/suggestions on my card.
Have a nice day everyone!

Thursday, May 28, 2015

'You do amazing things'

Hi friends,
Hope you all are having a great time this summer vacation. I have been busy with my kids, too but, I did find time to play along with this time's Altenew May challenge which is From Places Abroad- Tunisia. Here's my take on this challenge.


The inspiration picture :

I have taken inspiration from the above picture quite literally, as you can see. I have not only tried to include the colours but kind of tried to create the design from the ceiling as well.
To make this card, I embossed a piece of watercolor paper which I had painted very lightly using Salty Ocean Distress Stain with lots of water. I used the Anna Griffin/Cuttlebug embossing folder- Foundry, then I distressed a piece of watercolor paper with Distress inks- Chipped Sapphire and Peacock feathers and used this paper to die cut my frame.
I, then die cut the Memory Box Amira Flourish die from a piece of white scrap paper and covered it entirely with Inka Gold. This creates the backdrop for my flowers.
The flowers are from the Altenew Doddle Flower set which I have stamped and heat embossed on a light blue paper using Super Fine Gold embossing powder. The leaves are heat embossed on vellum and fussy cut.
The sentiment 'You' has been die cut from a SSS die and I have stamped the sentiment from the coordinating stamp set. Have splattered some drops on my card base using Chipped Sapphire, Peacock feathers and Heidi Swapp- Gold Lame mist using a water brush.

Supplies used :
Cardstock- Fabriano Elle Erre Black ,Fabriano Brustro Watercolor paper.
Stamps- Altenew Doodle flower, SSS Expressions for you stamp.
Dies- Itsy Bitsy Venetian Label die, Memory Box Amira Flourish, SSS Expressions for you die.
Inks- Distress inks- Chipped Sapphire, Peacock Feathers, Distress Stain- Salty Ocean, Versamark Dazzle embossing ink, Versafine Onyx black ink pad.
Anna Griffin/Cuttlebug Foundry embossing folder, Ranger Super Fine Gold embossing powder,  Heidi Swapp Gold Lame mist, Gems, Inka Gold.

I am entering my card in the SSS- Anything Goes challenge, Crafting When We Can- Bling it up

Have a nice day everyone!

Monday, October 6, 2014

Peach|Gold|Blush

Hello friends!
I am back again to share my second take for the WCMD challenge at Winnie and Walter. I told you, I was really excited about them, right ? :D
Here's a look at my card, first :
I've played along Gayatri's color combination challenge on W & W blog which was to use the color palette of using Peach, gold and blush. I really loved these colours but it was very challenging to create a card only with these colours. After a lot of false start, I decided to stamp and colour my flowers and leaves using a combination of Hero Arts Fresh Peach Mid-Tone Shadow ink and heat-embossing the leaves and the flower outline with Ranger Super Fine Gold Embossing powder. The background I have created using a stencil and Distress ink- Spun Sugar to give that blush touch to my card. 

Th sentiment is a combination of a die and sentiment stamp from Winnie and Walter. I die-cut the 'thanks' die-cut with gold glitter washi tape and it really sparkles in real life. Unfortunately, not able to capture it on camera. :( Those sequins you see scattered around were actually a gift from Winnie and Walter. :)

Supplies used :
Cardstock- Fabriano white cardstock.
Dies- Simon Says Stamp' Thanks' die
Stamps -Penny Black Petal Power stamp set, Winnie and Walter 'The Big, The Bold and You' stamp set.
Inks- Hero Arts Fresh Peach Mid-Tone Shadow ink, Distress Ink Spun Sugar, Versamark stamp pad.
Accessories- Heidi Swapp Polka Dots stencil, Ranger Super Fine Gold Embossing powder, Sequins, Gold glitter tape (Used for die-cutting).

Challenges entered :
Addicted to CAS -Stencil
Crafty Boots- Gold
House of Cards- Punches and Dies -I have used the 'Thanks' die from SSS.
Inspired by Stamping- Gold
Stamploration : stamping and Embossing

Thanks for dropping by! Hope you like my card. Would love to hear your views on it.

Saturday, September 13, 2014

Textured, shabby tag !!

Hello everyone!
I've got two posts in two days. Yayy for me. :P
Okay, jokes apart, i have a tag to share today. My tag is totally inspired by all the gorgeous layered and textured tags that I keep seeing on Pinterest.  If you are a Pinterest addict like me, I'm sure you must have come across such tags which are loaded with details, yet they have a unique style of their own. Here I would like to mention that most of the Polish bloggers I've come across, do awesome work and my tag is a definite case of them! 


To make my tag, I have used on the base a very thick watercolor paper and layered it with a woodgrain background pattern paper. I have stenciled on one side using the Prima Damask stencil and texture paste, then smooshed my Distress inks on to an acrylic block and using a wet paint brush have painted the background randomly. The floral cluster on the left has it's base on first a piece of burlap whose edges I frayed, then created a frame using Spellbinders Floral Ovals die, made my flowers using punches this time, even the rose buds that you see are handmade by me using a small flower punch

This one I'm dying to share .. The small whitte resin frame you see is made using Mod Molds and a glue stick on which I've painted white using acrylic paint. I'm so loving the look of it !!

That's it from my side! 

Supplies used :
Pattern paper : DCWV, Prima Zephyr paper pad.
Punches : Jef six petal flower punch ( Large and small sizes).
Dies : Spellbinders Floral Ovals die, Impression Obsession Butterfly die set, Simon Says Stamp 'Be' stamp and die set.
Inks : Distress inks -Peacock feathers, Spiced Marmalade, Picked raspberry,Spun sugar and Wild honey.
Mold Molds Ornamental frames mold., White pollens, small pink pearls, light cream mulberry flowers and seam binding ribbon.

Challenges entered :
BGC -Textured tags - Made it to Top 3 !
SSS - Stamptember challenge ( I have used the 'Be' stamp and die set )
Polkadoodles- Tag, you're it.
We Do Doobadoo -Something feminine - Made it to Top 3 

Hope you all like my tag. I'm not very sure about this one so would love to know your views on it. Do drop me a line and have a nice weekend everyone :)

Monday, August 25, 2014

Thanks for everything

Hi Friends,
I am back again sharing a card I have made for my inspiration post at Lulupu. Our theme this time is "Background stamping plus use mist or sprays on your project' and here's what I have created :

I have done the background stamping using Hero Arts Flourish Background Cling stamp  .I first heat-embossed my background using Ranger Super Fine Gold Embossing powder and used Distress inks -Scattered Straw, Antique Linen, Black Soot and a little bit of Peacock Feathers to create my background. Then, I misted my background using the new Hedi Swapp Color Shine mists from the Lulupu store. These mists are really beautiful colours and when you spray them, they give this added shine which when you see in real life, is really beautiful. I have used Tropicana Teal, Coral and Gold on my card.

The small peach coloured flowers and the ribbon have been coloured using the Coral mist and the die-cut word 'Thanks' was sprayed with Tropicana Teal Mist and distressed around the edges with Black Soot I have die cut it 5 times using the Simon says die and the sentiment below it is also from the same set.. I have used the Gold mist to just fleck around the entire background. If you look closely, you will see it gives a gorgeous shine and I am using it almost on all my recent projects. The leaves were sprayed with Lindy's Stamp Gang Curiouser Chartreuse Flat Fabio mist. I love the intensity of it's colour !

The large blue flower is handmade using Spellbinder's Rose creation die and the black frame behind my flowers is also die cut using Spellbinder's Die- D-lites Frame Two dies and then heat embossed using Zing! Glitter Black embossing powder.
Supplies used :
Pattern papers- Graphic 45 Kraft Collection
Punches : EK Success Scalloped Scallop Border punch.
Dies-  Spellbinder's Rose creation die, Spellbinder's Die- D-lites Frame Two dies, Simon Says Stamp' Thanks' die and stamp set.
Stamps -Hero Arts Flourish Background Cling stamp, Simon Says Stamp 'Thanks' stamp set, Fiskars/Teresa Collins Girly Chic stamp set.
Inks- Versamark embossing ink pad, Distress inks -Scattered StrawAntique LinenBlack Soot and Peacock Feathers, Versafine Onyx Black ink pad.
Ranger Super Fine Gold Embossing powder, Zing! Glitter Black embossing powder, Mulberry flowers, Pollens, Heart stick-pin,  filler flowers and Seam binding ribbon.

I'm participating along with Pretty Pink Posh Cutting Edge blog hop. I have  used a couple of dies on my card and I have listed them above.

Challenges entered :
Paper Creators Craft  -Blings and Blooms
As you like it challenge : Favorite 2 embellishment and why (Mine is always flowers, fillers and gem stones  because they are the main focus of all my creations.)

That's it from me hope you like my card. Do let me know your reviews about it :)

Saturday, August 9, 2014

'You Anchor me' !

Hello friends,
Today I have a Nautical masculine card to share with you all. It's so not my usual style and my first real attempt at a Masculine card.So without further ado, here's a look at what I have made! :)
                                                                     
 And  an another view :
To create the base of my card I have used a Woodgrain embossing folder. I cut the paper into long strips measuring 3/4 of an inch by 3 inch and embossed it in the embossing folder, then I distressed it using Vintage Photo and Scattered Straw Distress inks and tried to create the wooden plank kind of effect we see on water fronts! I have created the Sailor's knot on the either side of the sentiment banner and added a die-cut 'You' and stamped my sentiment using Lawn Fawn Harol'ds ABC stamp set.

Incidentally the sentiment banner is made from the smallest of the Timeless Tags 2 from Wplus9. I used the partial die cutting technique to create a long base for it so that it could be held by the sailor's knot on the two sides. So love using my dies in a creative way :) The life- buoy ring I have made using two circle dies and distressed it with Peacock Feather's Distress ink. The anchor in the centre is a wooden MDF piece which I have heat embossed using Ranger Super Fine Silver Embossing powder on a MDF base and the four golden brads that you see on the corners are actually plain flat-backed pearls which I first coated in Versamark Ink pad, then completely covered it with Gold UTEE(Ultra Thick Embossing Enamel) and heat-set it and voila! you have a gorgeous golden brad-like embellishments and nobody will know the difference! *Winks* 

Here's a quick tutorial on how I created these Faux brads :

Hope you find this tip useful and that's about all the information regarding my card ! If you have been with me till now thank you so much for your patience :) I really wanted to share all the tips and tricks which went into making this card as I really had a lot of fun creating it !

Supplies used :
Card baseFabriano white cardstock, Fabriano Watercolor paper.
Dies : Ironwork Motifs Circle dies, Timeless Tags 2 from Wplus9, Simon says stamp 'You' die.
Embossing folder : Woodgrain Embossing folder from Darice.
Distress inks : Vintage photo, Scattered straw, Peacock feathers.
Versamark Dazzle Embossing ink pad and Versafine Onyx Black ink pad.
Stamp - Lawn Fawn Harold's ABC stamp set.
Embossing Powder : Ranger Superfine Silver Embossing powder, Gold UTEE.
Twine, Brads, Pearls and Studio Calico Stars Wood veneers.

Challenges entered :
BGC #56 : Nautical
Allsorts challenge blog :All Sentimental
Brown Sugar challenge : Use a Banner ( Made it to Top 3! )
Little Red Wagon : :Embossing

Hope you all like my card please do leave me your comment's /suggestion would love to hear from you :)
Have a nice day everyone !

Saturday, May 17, 2014

You fill my thoughts !!

Hiya Friends ,
This is going to be a quick post as I am leaving for a short break starting today, have lots to do and very little time to complete :) Today I am sharing a card I made for the Lulupu blog where our current challenge is 'Inspired from the Movies' with the added twist being to use dry embossing on our projects.I have made a card based on the movie 'PS : I Love you' and here's a look at it :

My card was inspired by the beautiful love story between the husband and wife in the movie and how even after his death the husband manages to surprise his wife with secret gifts and messages. I have used this sentiment and whole scene to  recreate the feel of the movie:)
For the embossing part, I have embossed the tree trunk using a woodgrain embossing folder and inked it using Distress ink Vintage Photo and the grid like pattern on the background was created using a Martha Stewart Scoreboard I have shared the details about it on the Lulupu blog ..Do check it out for a fun tutorial I have shared there !
Hope you like my card ..I would love to hear your views on it ..Please do leave me your comments/suggestions.
Have a good day everyone :)

Supplies used :
Base cardstock- Campap
Martha Stewart Scoreboard.
Embossing folder - Darice Woodgrain embossing folder.
Dies :
Memory Box Nestled Bird, Memory Box Wrought Iron gate, Simon Says 'You' Stamp and die set.
Inks :
Distress inksVintage Photo, Tumbled Glass, Antique Linen and Shabby Shutters.
Distress stains : Picked Raspberry, Mowed Lawn and Wild Honey.
Versafine Onyx Black ink pad.
Unity Stamp, Punch Bunch 3 in 1 Hydragena punch and Pie Lane Glitter balls.

Challenges entered :
Color Conception : Dry or wet embossing
Crafter's Corner : Something special ( Made it to Top 3! )
BGC : Bingo (Last line : Birds,Black,grid,Sentiment)
Simon Says Stamp - Die Crazy!

Saturday, May 3, 2014

You are the Best !!

Hiya friends ,
I have a card to share today. I made it for the inspiration of the current challenge at Lulupu blog which is to make Feminine cards using Border punches & Flowers. This card would be perfect for Mother's Day as well as any special occasion. My colours are soft and I have kept the background a bit on the dark side to contrast against the flowers. So, here's a look at what I made :
                                                                   
Another view :

I got to play with my new Simon Says Stamp and Die set on this card :D I am so in love with it and I think this must be  first time that I have used so much glitter, all at once on my card. I know many of you have admired the blooms I made on this card on my facebook page, these were made with the newly bought Tim Holtz/Sizzix Flower Garland die. I really, really like this flower die, as it gives you an option of three different flowers and leaves. Totally worth the money I spent on it. You all will be seeing much more variety of flowers I make using this die :D

Supplies used :
Base cardstock -Kraft.
DCWV Pattern papers.
Embossing folder -Cuttlebug/Provocraft Textile folder.
Punch -Martha Stewart Doily Lace punch.
Dies : Spellbinders Fluer De Lis Square die, Spellbinder's Classic Squares die, Tim Holtz/Sizzix Flower Garland die, Simon Says 'You' Stamp and Die Set, MFT Die-namics Scrolled Flourishes, MFT Die-namics Fancy Flourish die.
Inks : Distress Inks -Tattered Rose, Scattered Straw. Peeled Paint, Vintage Photo, ColorBox Frost White Pigment ink, Versafine Onyx Black ink pad.
White Pollens, Pie Lane Chevron Stickers, Itsy Bitsy Glitter Sheet.

Challenges entered :
Crafter's Corner -Something Special.
Dies R Us -Anything Goes. ( Made it to Top 3 )
Frosted Designs - I have used Flowers, Green and Yellow.
SSS -Anything Goes.
SS Work out Wednesday- Use Pattern Papers ( I have used pattern papers to punch out the border lace).

Hope you like my card. Please leave em your comments/suggestions. I would love to hear from you :D
Have a nice day everyone!