Showing posts with label MFT dies. Show all posts

Sunday, March 5, 2017

Home Background Builder | Card

Hi friends!
I have my last card to share which I made for the Winnie & Walter Birthday Celebrations Challenges. I had a really good time playing along their challenges. Here's a look at my card for today :


The colours look quite better in real. Anyhow, for this card I used the Winnie and Walter- Our Town set to create that house background repeatedly. I really love this set a lot, it has such cute elements for creating scenes. I have used various brands of inks here and don't really remember which ones I used, but if you are interested in knowing any particular ink, I will let you know :) The sentiment comes from the Happiest of Holidays by Evelin T Designs, another favourite set of mine! I added a scalloped die-cut frame to complete the look and few Sparkling Clear Sequins from Pretty Pink Posh.

I will be entering my card in the following W & W challenges :
Pattern-Making Challenge with Mayuri
Sequin Challenge with Kate
Bright Colours Challenge with Lydia
Mood Board Challenge with Heather P (I have been inspired by the yellow, blue and the white colours from the Mood Board)


I hope you liked my card! I would love to hear what you think.


Thanks for stopping by!

Sunday, January 22, 2017

You are amazing | Card

Hello all!
Today I have a card which I've made for this time's Altenew Inspiration Challenge hosted by Yoonsun Hur. I'll be honest with you, the colours for this month's challenge are totally out of my comfort zone. I have never played around with browns much so this one was quite challenging for me, but I took the plunge & here is what I've created :


To create this card, I took an A2 card panel & did some ink blending using Altenew Dark Chocolate ink and I wanted to create a slightly ombre effect. I also spritzed water over it and then used a tissue paper to absorb the colour from the areas where the water was to create a bleached effect on paper. Next, I die-cut some scalloped frames and then embossed it using my WRMK Next Level Embossing Folder- Geometric & Darice Woodgrain folder. The frames were then coloured using Vintage Photo Distress ink.  The florals are from my newest favourite set - Vintage Roses and I have used Altenew inks in shades of yellows & browns to stamp my flowers & leaves. For the sentiment, I have used the Altenew Sentiments & Quotes set which was heat embossed in white on plain white cardstock & then coloured using the Altenew Caramel Toffee ink. Finished off my card by adding some Sparkling Clear sequins from Pretty Pink Posh.


I am also playing along Darnell's NBUS Challenge. I have not gone with the technique she asked us to try, but I do have lot of NBUS products on this card - The clear sequins from PPP, the MFT frames. Also these colours are something I have never tried before.


That's it from my side today! I will see you soon with another card in few days. I hope you liked my today's card, I would love to know what you think about it. Thanks for dropping by :)

Sunday, December 11, 2016

Christmas Card | One

Hello friends!
I'm back today to share a Christmas card I made recently. I don't usually work with such stamps often, but I am glad I finally gave them a try. Here's a look at what I came up with :


To create this card, I took a A2 sized white card panel and did some Distress ink blending using shades of blue to do the night sky. Then using the Heidi Swapp Confetti stencil and white embossing paste by Wendy Vecchi, I created the falling snow. I added some white glitter to the paste when it was wet to give it some extra shimmer. Next, I die-cut the snowy hills using a die by MFT and added some Ranger Clear Rock Candy Distress Glitter to the edge using Glossy Accents. This gives a beautiful snow-like effect and adds more dimension to your project.
Now for the main focal of my card, I stamped and coloured the images from the Mudra Santa & Friends set on watercolour paper using Faber Castell watercolour pencils. I fussy-cut the images and added them on some foam dots. I stamped the sentiment on the base of my card. Finally I die-cut the stenciled background using a scalloped rectangle frame from MFT and added it to my card base.

I'm entering my card in Winter Wonderland - Frame it/Night Scene, My Time to Craft - Christmas Animals, Crafty Catz - Christmas in Non-traditional Colours and QKR Stampede - Non-Traditional Christmas Colors

I hope you liked my card. Please do leave me your comments/suggestions below. I would love to hear what you think.


Have a nice day everyone!

Monday, December 5, 2016

Mudra Christmas Cards | Sneak Peek

Hi, bloggy friends!
Today I have some Christmas cards to share on the Mudra blog using their newest stamp release. Here's a sneak peek for you :

Please head over to the Mudra Craft Stamps blog to check out the full cards. I hope you like what I have created :)


Have a nice day everyone!

Wednesday, November 16, 2016

Sneak Peek

Hi, friends!
I am blogging after a short break. I know it's been long since I visited your blogs, but I hope to do it soon :)
In the meantime, I have some cards to share today on the Mudra blog using their November release. Here's a sneak peek for you :


Please do visit the Mudra blog to see the complete cards and if you like them, please do leave me a comment :)

Have a nice day everyone!

Thursday, September 22, 2016

MFT Florals | Card Two

Hello, friends!
Back again with my second submission for the MFT Superstar Contest. This time around, I have used the same stamp set as the previous one which is the MFT Desert Blooms set, but I have tried to play with some unusual colours using the same set, here's a look :


For this card, I have used cream cardstock from MFT as my base. This cardstock has some interesting texture in it and it's the most gorgeous shade of cream. I first embossed the background using the MFT Mini Chicken Wire Cover Plate then did some wet embossing using texture paste and the Grid Stencil from MFT adding a slight hint of blue color to the paste. Added some black spatters and stamped the flowers and leaves using just two shades of ink : Altenew Ruby Red and Dark Chocolate ink. The gears are die-cut from another MFT Die-namics called Time Pieces.This was distressed using Dark Chocolate ink as well. I finally added some gold glitter die-cut leaves and flourishes. The sentiment is from a SSS Stamp set .

I hope you like it. Do leave me your comments/suggestions regarding it. Have a nice day everyone!


MFT Florals | Card One

Hello, friends!
Today I have two cards to share. I'll be sharing the first card here and the second one in the next post.
After a very longggg time, I have made cards to participate in challenges. I have been so tied up with all my DT work that I have recently not got any time to play with the new goodies in my stash.
I made this card for the MFT Superstar Contest. I'm literally giving a last moment entry. This contest has been so popular that people have been entering in this contest through all medias.  Here's a look at my card first :


Although, I have a lot of dies from MFT & even stencils, I seem to have only one stamp from this company which I recently got & that is the Desert Blooms. I've used this set to create both my cards. Also, I have die-cut some glitter flourishes using the Die-namics Fancy Flourish. 
This card was pretty easy to put together. I did some light blending on a piece of cardstock using Tumbled Glass Distress ink, added some black & gold coloured splatters, stamped the flowers & leaves & fussy-cut them and popped them on foam dots and adhered everything on my card base along with a stitched die-cut circle which was colored using distress inks as well. Finally added a die cut sentiment to finish off my card.

Supplies used :
Off - white cardstock, MFT Desert Blooms Stamp Set, MFT Fancy Flourish die, Distress inks, Altenew inks, Gina Marie Stitched Circle dies, Die-Versions 'Celebrate' Sentiment die.


I hope you like my card. Please do leave me your views regarding it. Would love to hear from you.

Tuesday, September 13, 2016

Gift Bag & Notecards | Photo Tutorial

Hi, crafty friends!
I'm posting after a short hiatus on my blog :D
Today, I have a very quick and easy tutorial to share for making a beautiful card pouch. I really had a lot of fun creating this. My son has a male class teacher & coming up with a gift for him for Teachers' Day was quite a challenge as I usually tend to create quite feminine project, so I was pretty happy to work with the newest collections from Papericious which has some really good masculine tones. 
Warning - It's a picture heavy post.

Here's a look at the card pouch :


Here's how it looks when opened up :

I have embellished the insides using pattern papers from the Mi Estilo collection. The bow-tie & sentiment have been fussy-cut from the Gentleman pack. (The papers used here are all from Papericious)

As you can see, it has two pockets and can hold 4 X 4 inch notecards with coordinating envelopes and also there is enough space to hold a candy bar of your choice.

The note-card & coordinating envelope :


The trio together!


The back side of the pouch :


- - - - - - - - - - - - - - - - - - - - - - - - - - - - - - - - - - - - - - - - - - - - - - - - -
Here's the tutorial on how to create this :

TUTORIAL

Step 1 - Take a 12 X 5" piece of cardstock and score at 5 1/2 and 6 1/2 inches.

Step 2 - To create the inside pockets, take TWO pieces of 2 3/4 inches X 5 3/4 inches piece of cardstock.

Step 3 - Score at 1/4 inch TWICE on three sides of this cardstock and fold it to form the pocket. Cut out the two squares on the sides to help create a crisp pocket-fold.

Step 4 - To create handles of the card pouch, you can either use any punch of your choice or a die, I have used Spellbinders Label 4 to create my handles.

After die-cutting the handle looks like this :

Step 5 - To further embellish the handles, create a frame using the same die set. I have distressed it using Hickory Smoke Distress ink. ( I have used the Papericious Craft Sheet & Ink Blending Tool )

Step 6 - To embellish the front & back of the pouch, I have used different pattern papers from Mi Estilo and the Gentleman pack.

The Note card and the co-ordinating envelope were also made using these papers.

For the pouch, I die-cut a scalloped border panel using papers from the Mi Estilo collection and layered it with another paper from the same collection. I then made a handmade flower again die-cut using papers from the Mi Estilo pack. Added few leaves, filler flowers and the sentiment, and my bag was ready :)

For the note-card, I have used die-cuts from the Infinity Collection. I have used three different pattern papers from the Mi Estilo collection.

For the envelope, I have again used a die-cut from the Infinity pack.


Hope you liked the tutorial and give it a try. I would love to hear your views on it :)

Linking this to Eclectic Ellapu- Gifts, Challenge up your life- Lace (Have used paper lace on both the gift bag & envelope), Crafty Catz- Anything but square (entering my bag only), Jo's Scrap Shack - 3 colors (Red, Gray and Green), 2 embellishments (2 kinds of filler flowers and enamel dots), 1 technique- Die-cutting, Just add ink - Just add P (Pattern papers).

Have a nice day everyone!

Monday, August 22, 2016

Mixed Media Canvas | Photo Tutorial

Hi, friends!
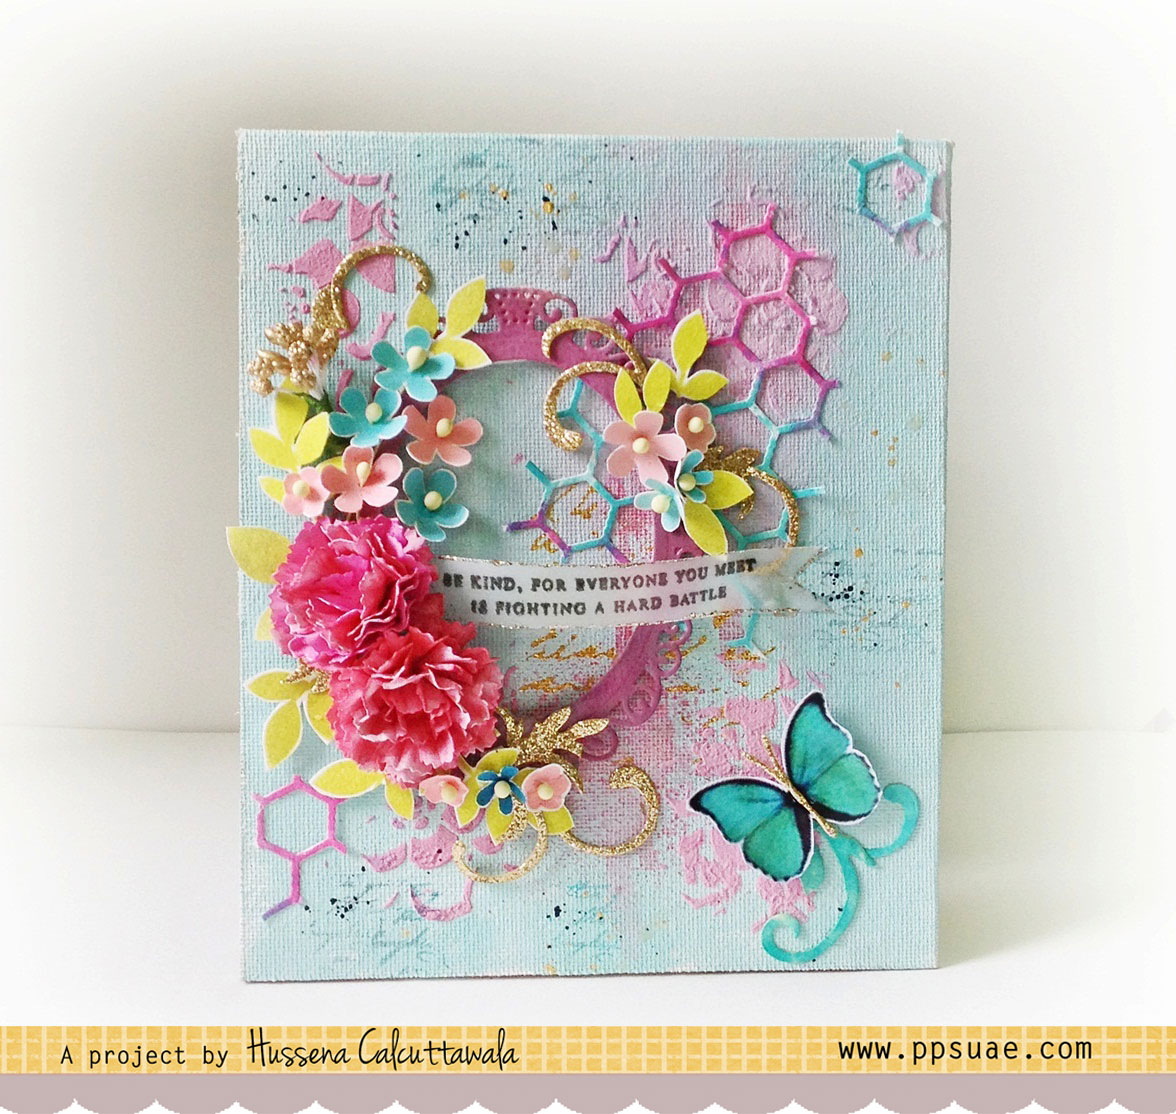
I have a Canvas to share today which I made for my DT post at Pretty Paper Studio. It's been a while since I made one of these and I was pretty happy with the outcome. I am also sharing a step by step tutorial on how I made it. Here's a look at my canvas first :


- - - - - - - - - - - - - - - - - - - - - - - - - - - - - - - - - - - - - - - - - - - - - - - - -

 PHOTO TUTORIAL

Here’s how I went about  creating this Canvas :

Step 1 – I have used a canvas board which is 6 inches X 7 inches in size for my base. I prepped the surface with some Gesso and Prima Texture Powder to give it some tooth.

Step 2 –  After priming the base with Gesso, I then painted the entire canvas with Prima Egg Blue Chalkboard Paint using a broad, flat brush.

Step 3 – Once my background was painted, I  started gathering my supplies to embellish my canvas. I first die cut some oval frame using Spellbinders Elegant Oval dies from a watercolor paper which is 300 gsm in thickness

Step 4 – I then started to work some colors on my background using Heidi Swapp Color Shine sprays .I have used Rose color below.I then gessoed my oval frame and colored it using the Rose Color spray.

Step 5 – I wanted to incorporate some foiling in my project so I used the Prima Adhesive Rub Ons along with some Prima Golden Girl Foil Sheets.I selected a script pattern for my canvas.

Step 6 – The shine that this foil gives is really very beautiful.I found that this adhesive rub on works better on very smooth surfaces like paper rather than a uneven texture of canvas.

Here’s a close up of the foiling I did, as you can see it has some partial foiling in it  rather than a crisp image. This was due to the uneven surface of the canvas.

Step 7 – Once the foiling was done I added in more texture using the Tim Holtz Lace stencil along with texture paste which I made by mixing Gesso with the Prima Texture Powder and a little bit of Heidi Swapp Color Shine Raspberry spray which  I stencilled through the Tim Holtz Lace stencil.

Step 8 – To create my flowers, I die-cut some flowers using a white cardstock and colored them using the Rose color from Heidi Swapp Color Shine spray.


Step 9 –  To further create some foliage and flower sprays for my canvas, I stamped the leaves and flowers from the Paper Smooches Botanicals 3 set using the Prima Lime Pie Chalk ink and some Altenew inks from the Four Scoops Mini set.

After stamping and fussy cutting the flowers, I embossed them using a embossing stylus and added a pollen in the centre to make a dimensional flower.

Step 10– Finally, I added some hexagon die cuts in the background to accent it and also used a butterfly to finish off my canvas.


I'm linking this canvas to the Ranganjali Monthly Challenge - Favorite Technique (I love making handmade flowers and have incorporated those here), STAMPlorations - Mixed Media Challenge, Quick Quotes - Handmade Flowers, Love to Create - Mixed Media, Mod Squad Challenge - The Die's the thing


I hope you liked my project. If you did and also have any queries please do let me know in the comments below.