Showing posts with label Prima Chalkboard Paint. Show all posts

Saturday, April 29, 2017

Pretty Paper Studio | Fifth Birthday Blog Hop

Hi everyone!
Pretty Paper Studio is turning 5 this month and we are celebrating with a Blog Hop! There is also a giveaway so do read till the end of the post to know more!


Here's what I have to share with you for this hop. It's an Altered Embroidery Hoop turned into a Home Decor piece.


I have shared a detailed tutorial on the PPS blog on how I created this hoop which you can check out HERE. The theme for this month is 'Gratitude'. I have used the chipboard pieces - Be Thankful to go along with the theme.

- - - -
Now on to the deets for the Blog Hop :
You need to leave a comment on every stop of the hop and like the Pretty Paper Studio Facebook page, follow Pretty Paper Studio on Instagram and Pinterest, subscribe to the YouTube channel and join the Facebook group. You will also need to follow our Guest Bloggers Mummy On My Mind, Cuddles and Crumbs and Explore with Mafaza on Instagram.

Here's the Blog Hop list :

Blog Hop Prize

 One winner will be picked randomly and will receive a Silhouette Cameo 3 Electronic Cutting Machine worth AED 1250. Simple. International entries are welcome too! You got to follow all the instructions to stand a chance though – that’s the only condition.
Pretty Paper Studio reserves the right to final decision regarding the judgment method and winning Entries. This contest is not sponsored by or affiliated with Silhouette America.
Blog Hop ends on May 1st, 2017 and a winner will be announced on the PPS blog on May 5th, 2017.
Alright then, hop on! I would love to hear what you think about my project. Thanks for stopping by!

Monday, August 22, 2016

Mixed Media Canvas | Photo Tutorial

Hi, friends!
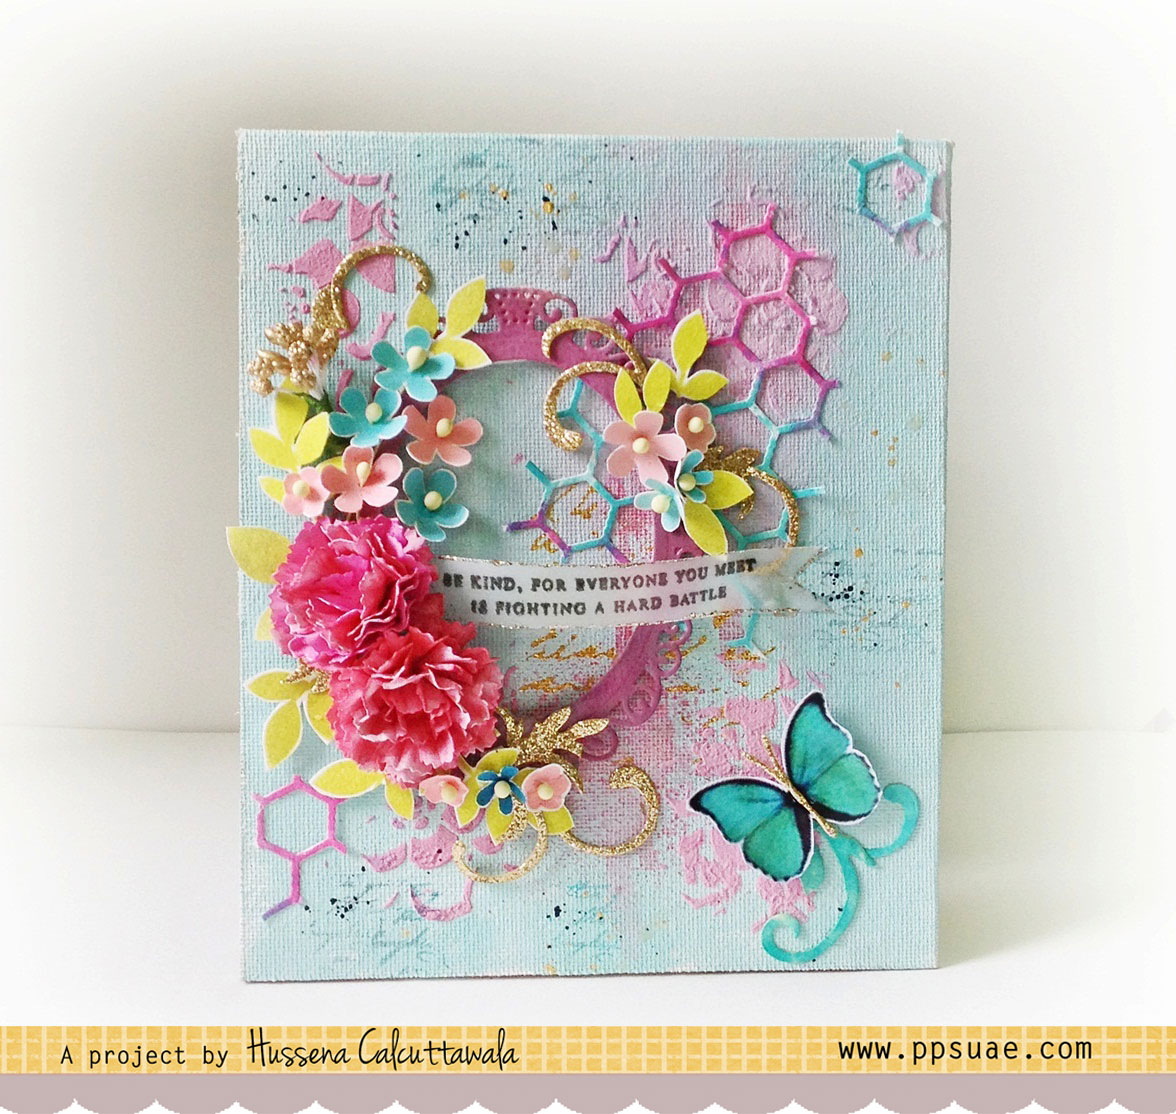
I have a Canvas to share today which I made for my DT post at Pretty Paper Studio. It's been a while since I made one of these and I was pretty happy with the outcome. I am also sharing a step by step tutorial on how I made it. Here's a look at my canvas first :


- - - - - - - - - - - - - - - - - - - - - - - - - - - - - - - - - - - - - - - - - - - - - - - - -

 PHOTO TUTORIAL

Here’s how I went about  creating this Canvas :

Step 1 – I have used a canvas board which is 6 inches X 7 inches in size for my base. I prepped the surface with some Gesso and Prima Texture Powder to give it some tooth.

Step 2 –  After priming the base with Gesso, I then painted the entire canvas with Prima Egg Blue Chalkboard Paint using a broad, flat brush.

Step 3 – Once my background was painted, I  started gathering my supplies to embellish my canvas. I first die cut some oval frame using Spellbinders Elegant Oval dies from a watercolor paper which is 300 gsm in thickness

Step 4 – I then started to work some colors on my background using Heidi Swapp Color Shine sprays .I have used Rose color below.I then gessoed my oval frame and colored it using the Rose Color spray.

Step 5 – I wanted to incorporate some foiling in my project so I used the Prima Adhesive Rub Ons along with some Prima Golden Girl Foil Sheets.I selected a script pattern for my canvas.

Step 6 – The shine that this foil gives is really very beautiful.I found that this adhesive rub on works better on very smooth surfaces like paper rather than a uneven texture of canvas.

Here’s a close up of the foiling I did, as you can see it has some partial foiling in it  rather than a crisp image. This was due to the uneven surface of the canvas.

Step 7 – Once the foiling was done I added in more texture using the Tim Holtz Lace stencil along with texture paste which I made by mixing Gesso with the Prima Texture Powder and a little bit of Heidi Swapp Color Shine Raspberry spray which  I stencilled through the Tim Holtz Lace stencil.

Step 8 – To create my flowers, I die-cut some flowers using a white cardstock and colored them using the Rose color from Heidi Swapp Color Shine spray.


Step 9 –  To further create some foliage and flower sprays for my canvas, I stamped the leaves and flowers from the Paper Smooches Botanicals 3 set using the Prima Lime Pie Chalk ink and some Altenew inks from the Four Scoops Mini set.

After stamping and fussy cutting the flowers, I embossed them using a embossing stylus and added a pollen in the centre to make a dimensional flower.

Step 10– Finally, I added some hexagon die cuts in the background to accent it and also used a butterfly to finish off my canvas.


I'm linking this canvas to the Ranganjali Monthly Challenge - Favorite Technique (I love making handmade flowers and have incorporated those here), STAMPlorations - Mixed Media Challenge, Quick Quotes - Handmade Flowers, Love to Create - Mixed Media, Mod Squad Challenge - The Die's the thing


I hope you liked my project. If you did and also have any queries please do let me know in the comments below. 

Thursday, August 11, 2016

Altered Perfume Box

Hi, crafty friends!
I have an Altered Box to share today made using Papericious papers & Mudra stamps. I have made one after a long time, here's a look at it :


Here's how I went about altering it :
  • I first gessoed the entire box so that it could take paint easily.
  • I then used the Prima Chalkboard paint - Egg Blue to color my base. I made sure to cover all sides of the box as well as the insides to give it a nice, shabby look.
  • I then measured and cut pattern papers from The Gentleman paper pack and distressed the edges of the paper using Hickory Smoke Distress Ink.
  • Then, I have die-cut a scalloped border using the Mi Estilo paper pack and I have used this border on all four sides of the box. 
  • To embellish the top of the box, I have die-cut a few decorative frames using Spellbinders Dies. I have stamped the sentiment from the Mini Bunch set.
  • The flowers & the leaves are stamped & fussy-cut using the Daisy Bloom set. 
  • I have also used some die-cut leaves and some glitter flourishes to create my foliage.
  • I added a decorative buckle to the box which has been die-cut using a Spellbinder's die. I have added velcro dots on the insides for the closure.
  • Added some pearls and a butterfly to complete the overall look.
I'm entering my altered box in the Inky Chicks- 5 or more flowers ( I have used stamped flowers), Crafty Boots- Use a stamp, Love to Scrap - Use 2 of something (Stamped Daisies) and Things to Alter- Anything Goes challenge ( I unfortunately don't have a picture of the perfume box I altered before starting on my project ), SSS- Try to contain yourself (I have upcycled a box).

I hope you like my project. Do leave me your comments/suggestions regarding it. I love hearing from you.

Have a nice day everyone.