Showing posts with label Mudra Design team. Show all posts

Sunday, December 11, 2016

Christmas Card | One

Hello friends!
I'm back today to share a Christmas card I made recently. I don't usually work with such stamps often, but I am glad I finally gave them a try. Here's a look at what I came up with :


To create this card, I took a A2 sized white card panel and did some Distress ink blending using shades of blue to do the night sky. Then using the Heidi Swapp Confetti stencil and white embossing paste by Wendy Vecchi, I created the falling snow. I added some white glitter to the paste when it was wet to give it some extra shimmer. Next, I die-cut the snowy hills using a die by MFT and added some Ranger Clear Rock Candy Distress Glitter to the edge using Glossy Accents. This gives a beautiful snow-like effect and adds more dimension to your project.
Now for the main focal of my card, I stamped and coloured the images from the Mudra Santa & Friends set on watercolour paper using Faber Castell watercolour pencils. I fussy-cut the images and added them on some foam dots. I stamped the sentiment on the base of my card. Finally I die-cut the stenciled background using a scalloped rectangle frame from MFT and added it to my card base.

I'm entering my card in Winter Wonderland - Frame it/Night Scene, My Time to Craft - Christmas Animals, Crafty Catz - Christmas in Non-traditional Colours and QKR Stampede - Non-Traditional Christmas Colors

I hope you liked my card. Please do leave me your comments/suggestions below. I would love to hear what you think.


Have a nice day everyone!

Tuesday, December 6, 2016

Black & Gold | CAS Card

Hi, everyone!
I finally got some time to share my cards which I made for Mudra last month. There are lots of awesome stamps which were released and here's my card using one of them. This set was designed by a very close friend, Ruchi of Ruchi's Crafeteria. This is a very simple design and can easily be mass produced.


To make this card, I took a piece of black cardstock measuring 4 1/4 by 5 1/2 inches and die-cut it using a Gina Marie Stitched Frames die. Next, I prepped up my card surface for heat-embossing using the EK Success Powder Tool (This is used to remove the static from the paper). I used the Leaves stamp set for stamping on the two corners using Versamark Embossing ink and heat-embossed it in gold. (Tip - Since the leaves are pretty intricate, always use a Super Fine Detail embossing powder while heat embossing. Using a normal embossing powder will give you very thick & unclear images). I added two butterflies from the Butterfly Layers set which I had heat-embossed in gold and colored using Distress inks. For one of the butterflies, I cut off one part of the wing to create a silhouette shape. I wanted the sentiment to be a bit bold so I heat set the sentiment from the same set - Butterfly Layers and adhered it in the middle. I added two strips of gold paper to enhance focus on the sentiment. I added few tiny flowers from the Bunny Wishes set to finish off my card.

Linking my card to the Simon Says Stamp - Anything Goes Challenge, heARTful Stamping- Anything Stamped, and WOW Embossing Powder Challenge.


Have a nice day everyone!

Monday, December 5, 2016

Mudra Christmas Cards | Sneak Peek

Hi, bloggy friends!
Today I have some Christmas cards to share on the Mudra blog using their newest stamp release. Here's a sneak peek for you :

Please head over to the Mudra Craft Stamps blog to check out the full cards. I hope you like what I have created :)


Have a nice day everyone!

Wednesday, November 16, 2016

Sneak Peek

Hi, friends!
I am blogging after a short break. I know it's been long since I visited your blogs, but I hope to do it soon :)
In the meantime, I have some cards to share today on the Mudra blog using their November release. Here's a sneak peek for you :


Please do visit the Mudra blog to see the complete cards and if you like them, please do leave me a comment :)

Have a nice day everyone!

Wednesday, October 19, 2016

Florals & some stamping!

Hello, friends!
I am sharing a card today which is totally stamped. I have used Mudra sets for this one! Here's a look at my card :


To create this card :
I first took a 4 1/4 inch by 5 1/2 inch card panel & stamped the word 'happy day' all over the card front using my MISTI and the Brushed Alphas set. This background took some time to create as each alphabet had to be stamped individually since this font is in cursive, but as you can see the end result is quite striking. 
Once I had stamped the background, I die-cut a semi-circle from the side of the card front using a Spellbinders circle die. Then I stamped the Gerberas & leaves using various colours of Altenew inks, and fussy-cut them & arranged it on the card panel.This card panel was foam mounted on to a plain white cardstock and the semi-circle space that was left after die-cutting has been distressed using Tumbled Glass Distress ink to add a bit of colour. I've added some flowers & foliage from a previously released set called Botanical Blooms. Finally added some Pretty Pink Posh sequins to finish off my card.

I'm linking my card to these challenges :
The Flower Challenge, Crafting with Dragonflies- Let's go floral, The Crazy challenge - Use Red, Use Your Stuff - Use two or more stamps ( I have used 3 different sets), and Make My Monday - I have used the colours black, red and white predominantly in my card.


I hope you like this attempt of mine! Do leave me your comments below :) Would love to hear from you!

Friday, October 14, 2016

Sending you loads of love | Card

Hi, crafty friends!
I have a card to share today I made for the Mudra October Challenge inspiration. I had a lot of fun creating it. Here's a look at my card :


I have used the Mudra Daisy Blooms set for the flowers which have been heat-embossed in white & fussy-cut, and Mudra Raksha Bandhan Sketches set for the sentiment. Added a gold glitter die-cut frame for some sparkle and shine to the card. The background has been stenciled using a Heidi Swapp stencil. Also, I added few clear droplets to finish off my card :)

Linking my card to Paru's Card Making Challenges - Add a hint of Gold, Lulupu - Bling ding with a stamping twist, Just Add ink - Add 'G' ( I have used a Gold Glitter frame) & Simon Says Stamp - Totally Resistible


Have a good day everyone!

Wednesday, October 12, 2016

Bunny Wishes | Card

Hi, friends!
I have a very adorable card to share today which I made using the stamp set designed by a good friend of mine, Ruchi of Ruchi's Crafeteria. She designed this adorable 'Playful Bunnies' set & I was so excited to use them. Here's my card using the set  :


A close-up of the bunnies :

This set has some of the most adorable images to create a scene and that's what I did on my card :)

I first die-cut a small panel around 3 by 4 inches in size using the faux stitched die by Gina Marie Designs, then die-cut the circles using another die by Pretty Pink Posh called the Stitched Duo 2. I stamped the bunnies using Versafine Onyx Black ink on some Neenah Solar White cardstock & coloured it using Distress inks. I fussy-cut the bunnies and popped them using foam dots in the die-cut circle frame I had cut earlier, and arranged them so that they would peek out of the circular windows.
I die-cut the grass border & colored it using Distress inks, then I stamped some flowers & leaves from the same set, colored again using Distress inks & fussy-cut them before placing it on the grass. I stamped the sentiment on a piece of cardstock & placed it one of the windows along with some hearts which are also from this set. I layered this panel onto another die-cut panel was distressed using inks from PTI. Finally added the layered panels on the card base. To add some shine to the card, I've added Ranger Stickles on the grass border & around the sentiment banner.

Linking it to Inky Chicks - Animals, Happy Little Stampers - Anything goes with Dies, Cutie Pie Challenge - Cute + 5 flowers, Get Creatives Challenge - Stitching and Cupcake Inspirations - Inspired by the soft pastel colours.


So, how did you like it ? Do let me know in the comments below :) I look forward to hearing from you.


Have a good day everyone!

Tuesday, October 4, 2016

Happy Wishes!

Hi, friends!
Sharing another card I made recently for my post at Mudra. This one is quite different from my usual style and it has very bright & bold colours. Here's a look :


To create this card :
I first die-cut a card panel using an A2 sized die from one of my favorites, Gina Marie Designs. I have die-cut this panel using Canson Watercolour paper. I then distressed the entire panel using three different shades of Distress inks in shades of yellow.Added some white splatters using Picket Fence Distress Stain Spray, pink splatters using Picked Raspberry Distress ink and some golden splatters using Inka Gold.  I then added some texture using a stencil by MFT and Texture paste and sprinkled some Ranger Dry Glitter while the paste was wet to add some really amazing shine to it.

I die-cut a frame using black cardstock and clear embossed it thrice to give it a glossy effect using  Ranger Super Fine Clear embossing powder and Versamark ink.
I stamped the butterfly using Versamark embossing ink and embossed it using Ranger Gold Glitter Embossing powder from Ranger and heat set it.

I colored the butterfly using Picked Raspberry Distress ink. I then stamped the "Birthday" sentiment from the Butterflies set and added the "Wishes" part from another stamp from the previous release - Sentiment EssentialsI then colored the sentiment banner using Picked Raspberry Distress ink and foam mounted it. Finally added two black enamel dots on the sides of the sentiment banner to finish off my card.

I'm entering my card in the Simon Says Stamp- Anything Goes, Cards in Envy - Frame, Dream Valley - Embossing, Incy Wincy- All that Glitters (Have used glitter embossing powder on the butterfly & sentiment as well as white glitter on the stenciled background), and Love to Create- Anything Goes/ Mixed Media.

I hope you like this card of mine. Do leave me your comments/suggestions regarding it. I love to hear from you :)

Have a nice day everyone!

Friday, September 30, 2016

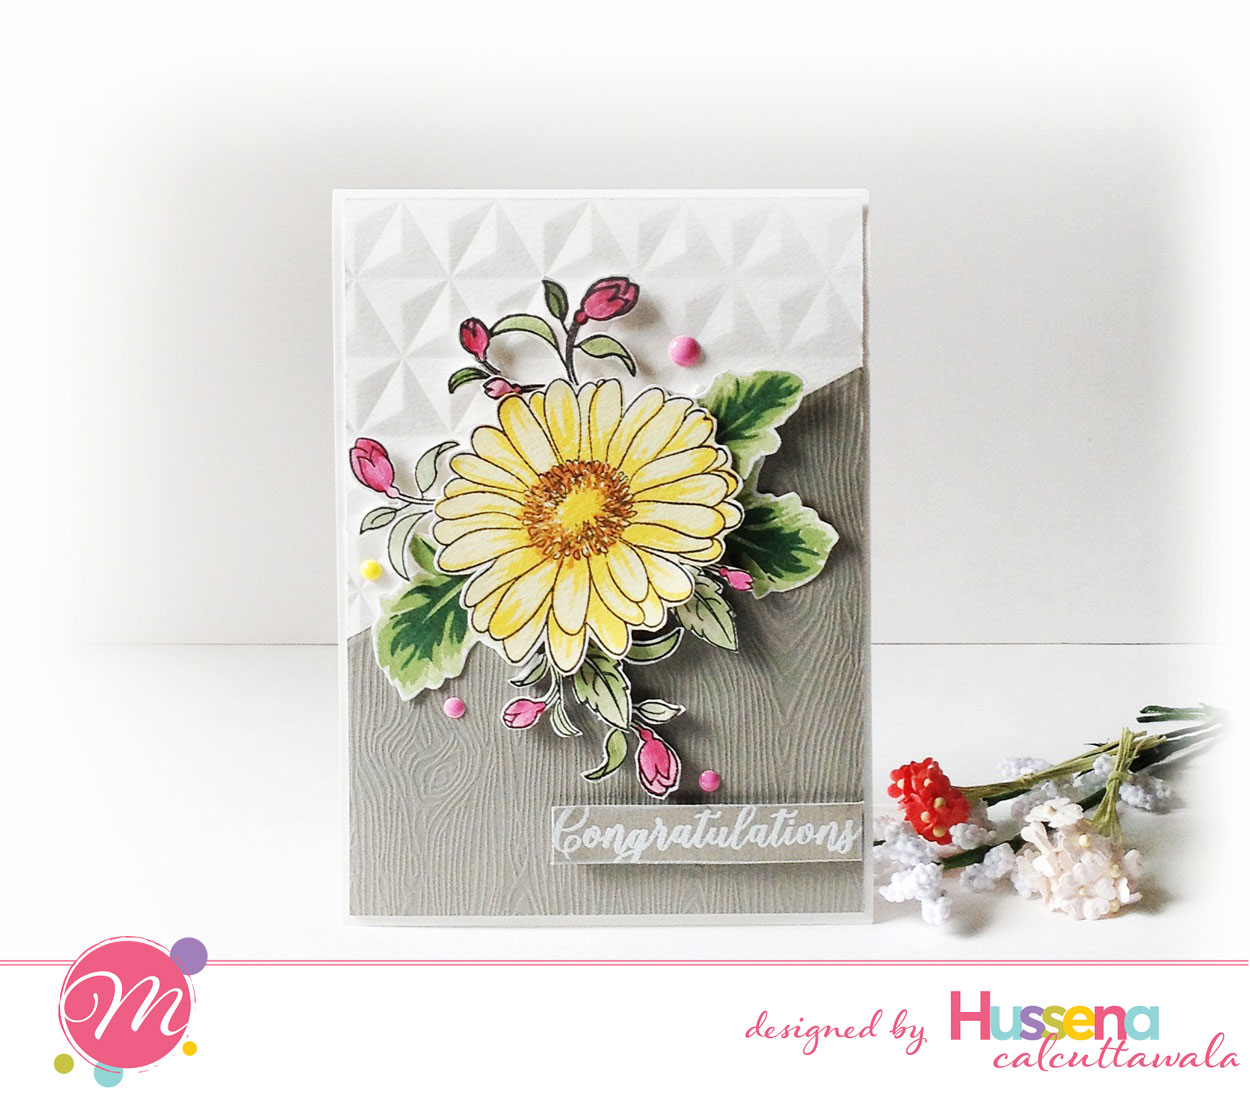
Congratulations | Card

Hello, friends!
I'm blogging again after a short break. I have a lot of cards to share with you all in the upcoming days. In the mean time, here's a look at a card I created for my DT post at the Mudra blog.


Close-up of the Gerberas :


Here's how I created it :
To begin, I took a gray woodgrain textured cardstock from American Crafts and cut it at an angle, then I dry-embossed a white piece of cardstock using a 3D embossing folder by We R Memory Keepers & glued both the panels on a white card front. I stamped the Gerbera Blooms using Versafine Onyx Black ink and two shades of yellow inks from Altenew & fussy-cut it and popped it on foam dots. Did the same for the leaves. The inks I used for stamping the leaves are from the Altenew - Green Fields set. I also stamped & watercolored some leaves & buds from the Hummingbirds set and fussy-cut it and added it as a foliage against the Gerbera. Added a sentiment from the Sentiment Essentials and some enamel dots to finish off my card.


So, did you like my card? Let me know in the comments below if you did :)

I'm entering this in the STAMPlorations Sketch Challenge, Mod Squad Challenge Blog- Falling Leaves, Simon Says Stamp - Anything Goes, Word Art Wednesday- Anything Goes and Get Creative Challenges- Embossing


Thank you so much for stopping by! Have a nice day everyone :)

Monday, September 19, 2016

Sneak Peek | Cards

Hi, crafty friends!
I'm sharing some cards today at the MUDRA blog using their newest stamps from the September Release. Here's a sneak peek for you :


I am sharing a total of 4 cards. Do visit the blog for the complete reveal and don't forget to leave me a comment there. I would love to hear your views regarding it :)


Have a nice day everyone!

Wednesday, August 31, 2016

Gift Tags!

Hi, friends!
I'm sharing some gift tags I made for my inspiration post at Mudra. I had so much fun creating these..Here's a look at them. I have made 4 tags in total.


First Tag

For this tag, I stamped the flowers & leaves from the Botanical Blooms set and fussy cut them before foam mounting it on the tag base. I have used inks from Altenew here.
I decided to stamp the sentiment on the left side at an angle to create some interest.
Finished it off by doing some black ink splatters and adding the pink satin ribbon.


Second Tag

For this tag, I water-colored the background using Distress inks & I stamped the flower & the foliage by doing a little bit of masking. I kept it simple by just doing some stamping & watercoloring. Finished it off by stamping the sentiment from the Mini Bunch set.


Third Tag

For this one, I stamped the flower bouquet from the On your Special Day set and water colored it using Distress inks before fussy-cutting it & adding foam tape.
For the base of my tag, I die-cut the stitched pattern at an angle and water-colored the bottom half of the tag using Cracked Pistachio Distress ink. I then stamped the sentiment by masking and using two different fonts for it. The 'Special' is from the  On your Special Day set and the 'Wishes' is from the 'Mini Bunch' set. Added some ribbon to finish off my tag.


Fourth Tag

For this tag, I water-colored the background using Distress inks & I stamped the flower & the foliage by doing a little bit of masking. The stamp set used here is from Mudra & is called 'Wild Florals'
To create a bit of dimension, I again stamped, watercolored & fussy-cut the flower before foam mounting it and adhering it to the tag base. Stamped the sentiment from the Mini Bunch set and added some splatters of gold mist.


Few more shots :

Entering these in Cupcake Inspirations (only the right hand-side tag - I was inspired by the colours), Tuesday Throwdown -CAS, Amusing Challenges- Anything Goes,  Inkspirational - Primary Colours, SSS- Anything Goes


Linking the tags to - Love to Scrap- Anything Goes, Sweet Stampin- No designer paper.


I hope you like these..Would love to hear your views on them! :)

Have a nice day everyone!

Monday, August 29, 2016

Floral Happy Birthday | Card

Hi, friends!
I am sharing a card I made for my DT inspiration post at Mudra using few of their new stamps. Here's a look at my card :


Few close up shots :


To create this card, I took an A2 white card base and die-cut a rectangle frame to fit my card front using some Gold Glitter paper. I kept aside the frame and did not adhere it right away.
I made some watercolored stripes on my card front using a light blue shade of Distress ink. These were hand painted using a flat brush. I really loved the soft look of it.
Now, for the main focal of my card. I first stamped the sentiment for my card - I decided to go with "Happy birthday". It was stamped using some Versafine Onyx Black ink and is from the Mudra- Brushed Sentiments set. Since the font is pretty bold and it is in a brush lettered font, it creates a really striking focal.  I, then stamped and fussy-cut some flowers & leaves using the Mudra Daisy Blooms and Botanical Blooms set. I have used the Altenew Mini Inks for stamping all the flowers & leaves- Red Cosmos, Green Fields & Summer Afternoon. Adhered them using some foam tape and added the glitter frame to my card base that I had die-cut earlier. Finally added some sequins from my all time favourite, Pretty Pink Posh to finish off the card.

Linking his card to STAMPlorations CASEplorations Challenge- CASEing Shalu's card (I was inspired by the stripes and the florals), NBUS Challenge- My Mudra Happy birthday stamp set is brand new and I finally used the Gold Glitter paper which was there in my stash for a long time, ColourQ #356, Sweet Stampin- No Designer paper and Little Red Wagon- Birthdays


I hope you like my card. Do leave me your comments/suggestions regarding it. I love to hear from you! :)

Have a nice day everyone!