Showing posts with label Dry embossing. Show all posts

Friday, April 8, 2022

Spellbinders Celebrate You Collection | Guest Design Post


Hello, crafty friends!
I am so excited to be guest designing on the Spellbinders blog today featuring the NEW Celebrate You Collection. This is a large collection with lots of great gifting and greeting cards goodies which pair beautifully with cardstock or patterned paper for a quick easy card, or something a little more stepped up with the addition of floral dies.


My first project is a set of Gift Bags made using the Gift Bag Etched Dies, Be Bold Blooms Etched Dies, the Mini Blooms and Sprigs Etched Dies, and the Geo Screen Embossing Folder. These are so simple and easy to make and are perfect for holding little treats or jewelry and more!

To start with, I die-cut Snowdrift Cardstock using the Gift Bag Etched Dies. Next, I embossed
the front and back panels of the gift bags using the Geo Screen Embossing Folder and assembled the bags with double sided tape. Next, I blended Cracked Pistachio and Worn Lipstick Distress inks over the bottom two-thirds of the cardstock pieces using a blending brush and adhered them down to the front and back of the bags. 


Next, I die-cut Snowdrift Cardstock using the flower and foliage dies from the Be Bold Blooms Etched Dies and the Mini Blooms and Sprigs Etched Dies. I inked the flowers using Worn Lipstick and Peacock Feathers Distress Oxide inks and the leaves using Peeled Paint Distress Oxide ink.

Next, I die-cut Silver Glitter Cardstock, Gold Glitter, and Snowdrift Cardstock using the Large, Medium, and Small circle dies from the Fluted Classics Circle Etched Dies. I stamped my sentiment from the Let's Celebrate Sentiments Clear Stamp Set onto the Small Circle Insert pieces using Versafine Onyx Black ink and adhered the pieces. I adhered the pieces down in the centre of my bags using a combination of liquid glue and foam adhesive. I then assembled my flowers and leaves around it and adhered them down using foam tape for dimension and interest.

Once that was done, I die-cut SnowdriftSilver Glitter, and Gold Glitter Cardstock using the Small Round Tag Die in the Assorted Tags Etched Die Set. I trimmed the glitter die cut-pieces in half and adhered them over the white pieces. Next, I stamped my sentiment from the Sentiments for You Clear Stamp Set onto the die-cut pieces using Versafine Onyx Black ink. I then die-cut the handles of the bags using Snowdrift Cardstock and blended Cracked Pistachio and Worn Lipstick Distress inks over the pieces using a blending brush. I attached the tags to the bag using gold metallic twine and adhered the pieces on top using foam adhesive.


My next project features the Swallowtail Tags Etched Dies, the Romantic Slimline Borders Etched Dies, the Sentiments for You Clear Stamp Set, and the I Dance Etched Dies. I thought the banners in the Swallowtail Tags were so wonderful that they could be a focal point all on their own. I used a multitude of bright colours and paired it with an embossed background for a simple birthday card.

To create my card, I trimmed Snowdrift Cardstock to 4” x 5.25” and embossed it using the Optical Arches Embossing Folder. Next, I die-cut Snowdrift Cardstock using the Perforated Edge and Scalloped Border dies in the Romantic Slimline Borders Etched Dies. There are several beautiful designs you can create with this border set, and they're perfect for any card size. Once my border was die-cut, I went ahead and die-cut Mirror Gold Cardstock using the Ribbon/Twine die included in the Assorted Tags Etched Die Set and adhered it right above the perforated edge for visual interest. 

Next, I die-cut Snowdrift Cardstock using the various tag dies in the Swallowtail Tags Etched Dies. I coloured the pieces using Dried MarigoldMustard SeedBroken ChinaTwisted Citron, and Worn Lipstick Distress inks using a blending brush. Once they were all coloured, I assembled the pieces on my embossed panel using Craft Glue.

Then, I die-cut Dahlia, Fuchsia, Rainforest, Peridot, and Mirror Gold Cardstock using the flower and foliage dies in the I Dance Etched Dies. I assembled the flower together and adhered it down on the left-hand side of the panel using foam adhesive for a raised effect. Next, I tucked in the leaves and foliage underneath the bloom to create a floral spray on my card front. Then, to finish, I stamped a sentiment from the Sentiments for You Clear Stamp Set onto the card panel using Versafine Onyx Black ink. I adhered the embossed panel to a top-folding A2-sized white card base using tape runner to finish off the card. 


My last project for today is a Slimline Card made using the Radiant Burst Embossing Folder, Hats Off to You Etched DiesSentiment Labels Etched Dies, and the Open Road Sentiments Clear Stamp Set. I used the Hats Off to You die set to create a stand-alone focal point with a sentiment for this embossed graduation card. 

To start, I trimmed a piece of Snowdrift Cardstock to 3.50 x 8.50-inch and embossed it using the Radiant Burst Embossing Folder. Next, I blended Cracked Pistachio Distress ink over the top two-thirds of the cardstock using a blending brush. Next, I die-cut the mortarboard cap, with sentiment insert, and button from the Hats Off to You Etched Dies out of Onyx and Dahlia Cardstock. Then, I die-cut the solid mortarboard cap and tassel pieces from Mirror Gold Cardstock and assembled it using Craft Glue. I love the way this die set is designed. It's super cool and simply perfect for graduation cards! Next, I die-cut Snowdrift Cardstock and Vellum using the Fluted Classics Circle Etched Dies. I blended Scattered Straw Distress Oxide ink on the white die-cut piece using a blending brush and then adhered the circle die-cut piece over the circle layer on my panel using foam adhesive.

Once that was done, I stamped a sentiment from the Open Road Sentiments Clear Stamp Set to Snowdrift Cardstock using Versafine Onyx Black ink and cut it out using one of the inserts dies from the Sentiment Labels Die Set. Then, I die-cut Snowdrift Cardstock using the large label from the Sentiment Labels Die Set and blended Candied Apple Distress Oxide ink over the piece using a blending brush. Once that was done, I adhered the sentiment strip on top with liquid glue. Next, I die-cut Mirror Gold Cardstock using the twine die in the Sentiment Labels Etched Dies. I attached the sentiment label on the card using the twine and adhered it on top using foam adhesive.


Next, I die-cut Snowdrift Cardstock using the On Cloud Nine Etched Dies and blended Cracked Pistachio and Broken China Distress inks over the edges of the clouds using a blending brush. Then, I die-cut the seagulls from the Build a Summer Birdhouse Etched Die Set out of Snowdrift Cardstock and coloured them using the same ink colours. I popped the pieces onto my card front using foam adhesive and mat the card panel with Mirror Gold Cardstock. Finally, to complete, I adhered the embossed panel to a side-folding slimline white card base using tape runner. Then, as a finishing touch, I adhered a few Teal Color Essentials Gems around my panel. 

SPELLBINDERS SUPPLIES:
CS-004, CS-012, CS-013, CS-027, CS-030, S2-314, S2-327, S2-328, S3-427, S3-432, S3-434, S4-1108, S4-1150, S4-1165, S4-1179, S5-502,  S6-191, SES-030, SES-032, SCS-118, SCS-148, SCS-151, ST-0147, STP-066, STP-079, MBR-EOM,  TD056089, TD055914, TD056362, TD055846, TD056294, TD056188, TD056119, TD056102, AD-0084, MISTI, PCGO4E, PE-100, T-021


OTHER SUPPLIES:
Neenah Solar White Cardstock, Citrine Glitter Cardstock, Cracked Pistachio Distress Oxide ink, Versafine Onyx Black Ink, MISTI Stamping Tool, Gold Baker's Twine, Tape Runner.

That’s it for today’s post! I hope you enjoyed it and have been inspired to create with these stunning dies and stamp from the Celebrate You Collection. Thank you so much for stopping by!
You can find more inspiration over at my Instagram page

Wednesday, September 15, 2021

Spellbinders September 15th Clubs Blog Hop + Giveaway!


Hello, crafty friends!
I'm so happy to be joining Spellbinders for the September 2021 Clubs Inspiration Blog Hop today. Spellbinders is celebrating all their Club Kits in shop for September 2021.

If you arrived here from Ilina Crouse's Blog, then you are on the right track. If this is your first stop, then you will want to start at the beginning, the Spellbinders Blog. We've got tons of inspiration and giveaways for you on the hop today, so keep reading till the end of this post for more information.

I have a layered card to share today for the hop today using the Amazing Paper Grace – September 2021 Die of the Month Set. In case you missed, it I shared a Stand-Up Card on my blog a few days ago using this month's "Pop Up 3D Vignette Vintage Cash Register" Set, which you can check out HERE.

The Pop Up 3D Vignette Vintage Cash Register is a wonderful set of sixteen dies and it features a vintage cash register as well as wonderful dimension, and folds flat like all of the 3D Vignettes, so that it can be easily sent through the mail.

I have used the Pop Up 3D Vignette Die Set to create an A7 card, however the die set offers endless possibilities and can be used for 3D projects as well. You can also use the Pop Up 3D Vignette Set to make the traditional cash register and stock it with gift cards, create a basket from both facades, or even create a mini album with a cash register on the front and back for children to record their savings. 

To create my card, I first die cut all the different die pieces of the house in the Pop Up 3D Vignette Vintage Cash Register from Cream CardstockOatmeal Cookie CardstockGold Mirror Cardstock, and Graphite Cardstock using my Spellbinders Platinum 6" Machine. Next, I cut a watercolor patterned paper to size and adhered it to my card panel using Journey Craft Glue.

I assembled the cash register together following Becca's How-To Video and adhered all the little pieces on the die cut Cash Register piece using Journey Craft Glue and Foam Squares - Small.  Next, I lightly sanded the raised edges of the die cut pieces to distress it. This really makes the delicate details pop! 

The dainty flowers and leaves were die cut from Snowdrift Cardstock using a combination of dies included in the Petite Floral Potpourri Etched Die Set. I coloured the floral die cut pieces using an array of Distress inks - Spun Sugar, Worn Lipstick, Picked Raspberry, and Abandoned Coral.  The leaves were coloured using Shabby Shutters Distress ink. I embossed each of the die cut pieces using the small ball tip from the Ultimate Tool Kit and then added pearl finish pollens to the centres of the flowers. I adhered them to my card front using Journey Craft Glue. The sentiment piece is a part of the Pop Up 3D Vignette Vintage Cash Register die set. There are four different sentiment pieces included in the set, so you can pick and choose whichever one you like best for your project.

To assemble, I matted the background panel with layers of Oatmeal Cookie Cardstock and Gold Mirror Cardstock before adhering it to a top-folding ivory card base with liquid adhesive. This is such a remarkable die set and a must-have if you love all things vintage! What do you think?


Giveaway:
To celebrate this release, Spellbinders is giving away a $50 gift certificate to 3 lucky blog readers – selected from the comments on our blog. Giveaway closes on Sunday, September 19th, 11:59 pm MST. The winner will be announced in this blog hop post the following Wednesday. The winner is responsible for shipping cost, duties and taxes.

Please note, store credit (gift certificate) cannot be applied to Club Subscriptions. Store credit can be applied to shop past Club products, Club extras and regular releases.

Blog Hop Order
Next Stop on this Blog Hop is, Alanna Moses's blog.
Just in case you lose your place along the way, here is the complete list of participants so that you can find your way back:

                         Hussena Calcuttawala (You are HERE)

Thank you so much for your stopping by and reading this blog post. I hope you liked my project! 
If you like what you've seen from me, please give me a follow over on my Instagram (@hussena_cal) and/or subscribe to my blog if you haven't already.
Wishing you a great day ahead!

Sunday, September 12, 2021

Spellbinders & Amazing Paper Grace Die of the Month | September 2021


Hello, crafty friends!
Hope you are doing well and staying safe!
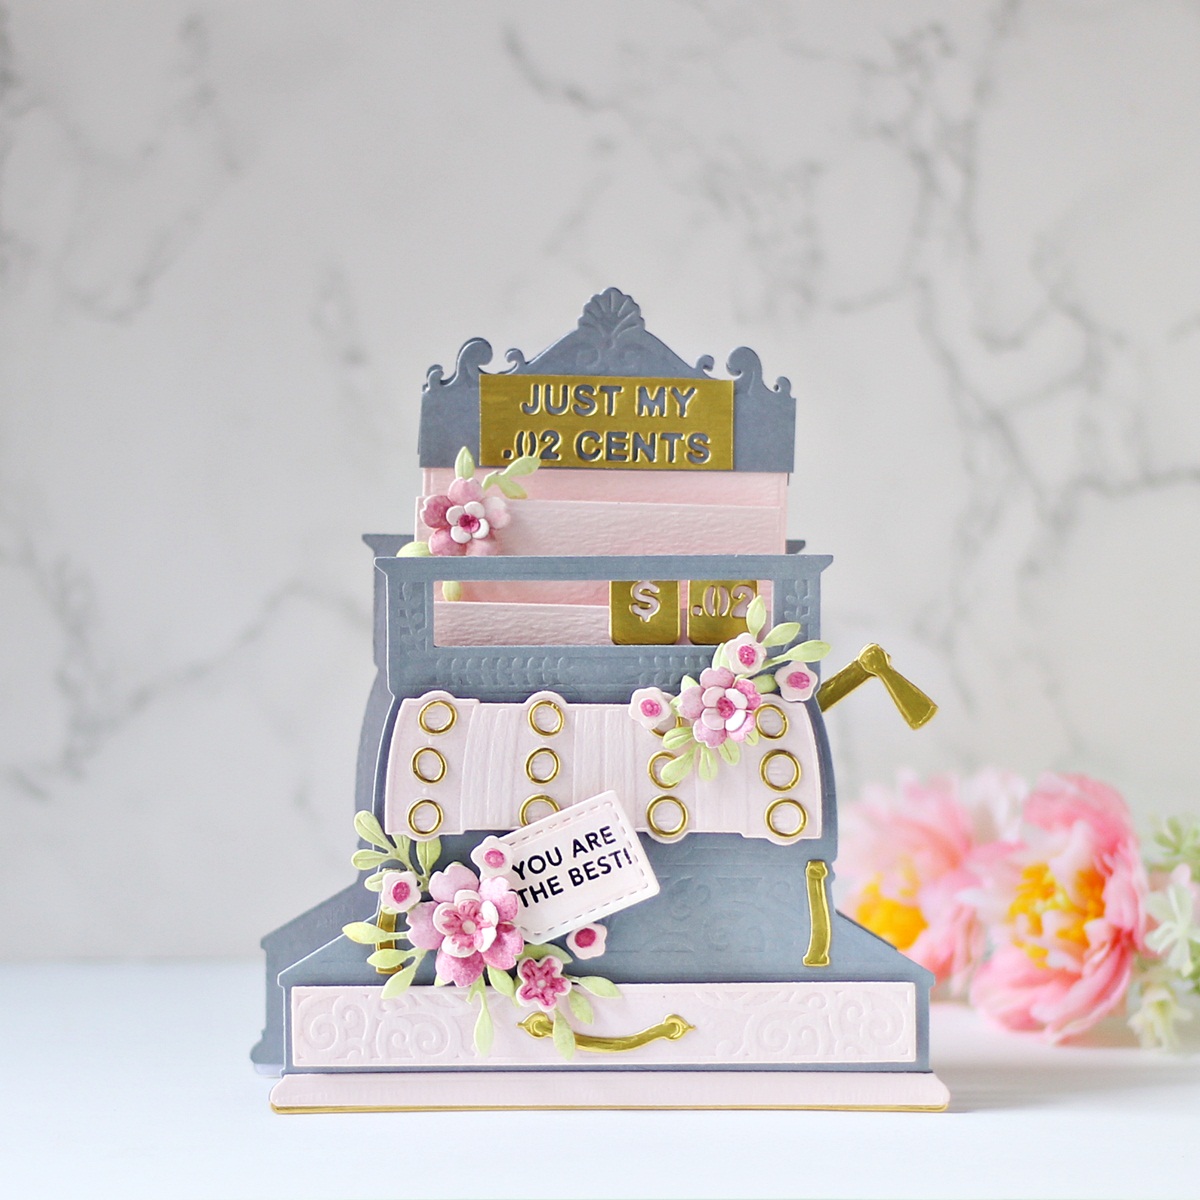
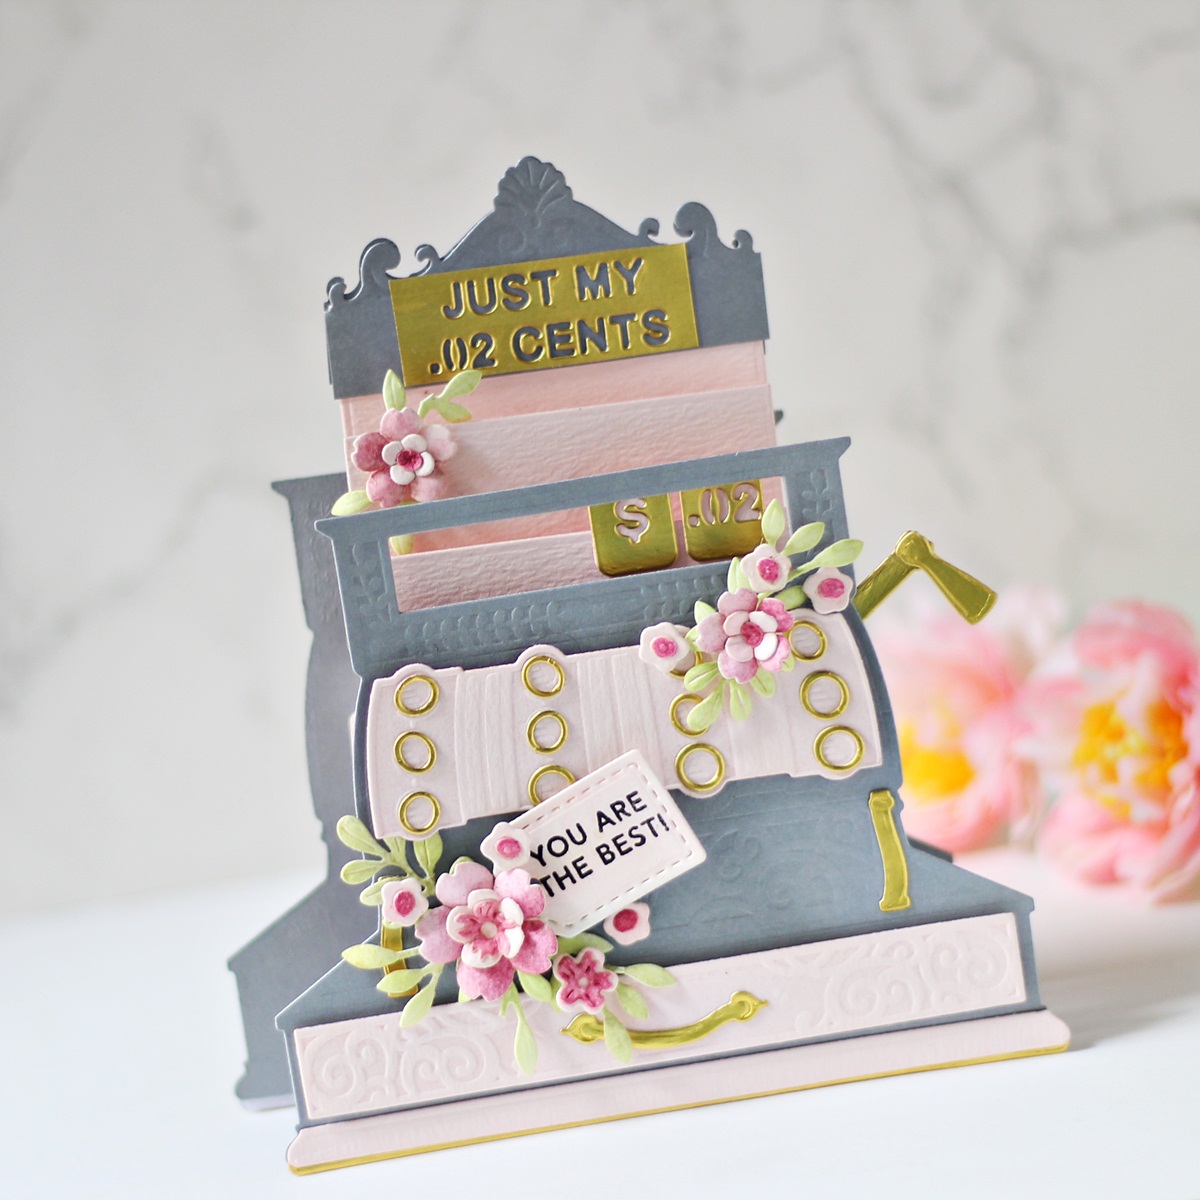
I have a 3D Vignette Card to share today featuring the Spellbinders & Amazing Paper Grace September 2021 Die of the Month Set. This month's "Pop Up 3D Vignette Vintage Cash Register" Set is perfect for making gorgeous cards, a gift card caddy, a card to hold cash bills, or can be just a sweet way to tell someone how valuable they are to you! This die set features 16 dies.

The Pop Up 3D Vignette Vintage Cash Register is a very unique and magnificent Die Set and I LOVE all the cute embellishments, markings, and sentiments that make it a showpiece. I had oodles of fun creating with it! 

One of the things I really like about Becca's 3D Vignettes die range is that they fold flat for mailing. Imagine the recipient's delight on receiving such a handmade card in the mail. It's sure to intrigue them! I created a 3D Vignette Card for my post today using the Vintage Cash Register Set. 

For my card, I started by die cutting Pink Sand and Silver Brushed Cardstock using the various die pieces included in the Vintage Cash Register in my Spellbinders Platinum 6" Machine. Then, I die cut Gold Mirror Cardstock using the keys, the drawer handle, and the crank diesOnce I had everything die-cut, I assembled the pieces together following Becca Fekeen’s Video Tutorial. I highly recommend following her tutorials when making your 3D Vignettes projects as she breaks down the process for you in a very simple manner!

Next, I die cut Pink Sand Cardstock using the three sets of tab dies included in the Vignette Inserts that allow for different heights in the cash register. I applied liquid adhesive to the 2 wings of the Vignette Side Pieces, folded the wings, and placed the Vignette Inserts as seen. 

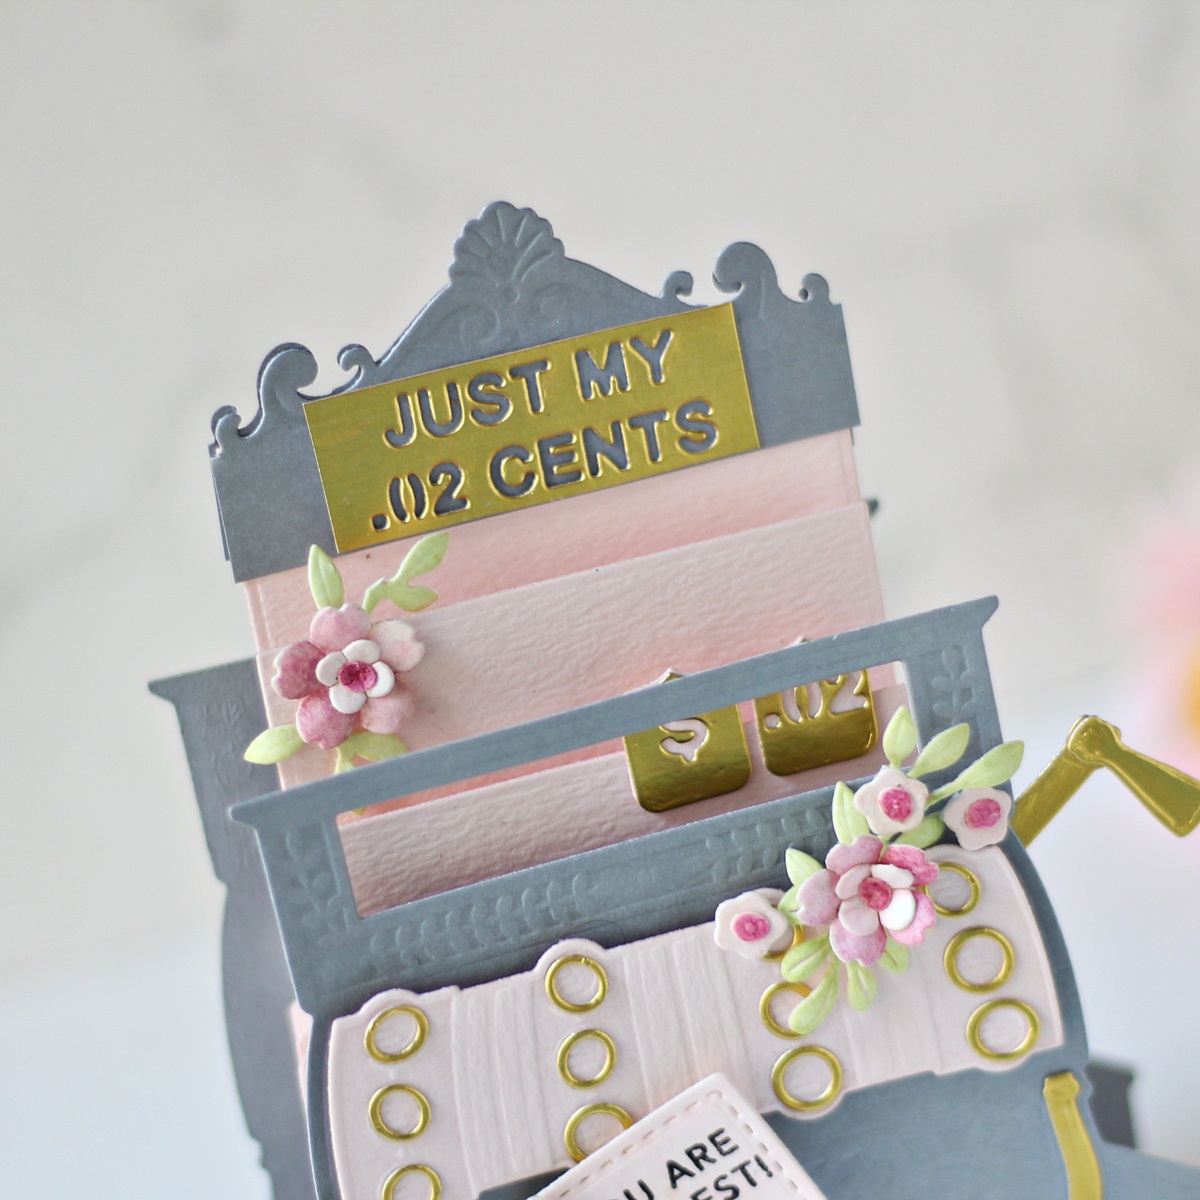
Once that was done, I die cut Silver Brushed Cardstock and Gold Mirror Cardstock using the decorative register top and the sentiment dies. There are four different sentiment pieces included in the set, so you can pick and choose whichever one you like best for your project. I went with "Just my 0.02 Cents" for my project. I adhered the pieces together using liquid adhesive, ensuring that the decorative piece is adhered along the top of the Vignette Insert. I also adhered some die cut pieces in between the Vignette Inserts for interest. Them, I attached the Vignette side pieces to the front and back of the cash register. 

It was now time to embellish the cash register, which also happens to be my most favourite part ever when creating any project. I die cut Snowdrift and Pink Sand Cardstock using the various blossom dies included in the Petite Floral Potpourri Etched Dies. I coloured the pieces using dye inks  and embossed the centres using the 2mm ball stylus tip from Susan's Garden Ultimate Tool Kit. The leaves were die cut from Snowdrift Cardstock as well and then coloured using Shabby Shutters Distress ink. I arranged the different pieces together on my project and then adhered them down using liquid glue. I love the soft, feminine touch it gives to the project. What do you think?! 

I also die cut Pink Sand Cardstock using the tag die from the Mini 3D Vignette Floral Mason Jar Set. I stamped a sentiment on to the die cut piece using Versafine Onyx Black ink and then attached it to my project using foam squares. I had such a wonderful time playing with this die set and coming up with my card. I'd also like to mention that if you want, you can highlight the several embossed sections on the piece using Gilding Wax or lightly sand the raised edges of the die cut pieces to distress it. This will help make those details pop! I skipped this step as I already had a lot of dimension layers on my card, but you can most definitely include it if you so wish. 


The Amazing Paper Grace Die of the Month is available exclusively at Spellbinders Paper Arts during September 2021. You can get the Pop Up 3D Vignette Vintage Cash Register Set at the special Cub Kit price, along with other membership perks.

If you'd like to see some more project inspiration using the Amazing Paper Grace Die of the Month, check out the Spellbinders Blog where Becca shares some stunning project samples using it.  
 

Don't miss out on the marvelous Bi-Annual Warehouse Sale going on now at Spellbinders. This sale features incredible deals starting from just $1. This is one of Spellbinders' biggest sales of the year with a HUGE product offering and will run until Sunday, September 19th!

That’s it for me today! I hope you liked my take on the die set! If you like what you've seen from me, please give me a follow over on my Instagram (@hussena_cal) and/or subscribe to my blog if you haven't already.

Wednesday, February 10, 2021

Spellbinders February 2021 Clear Stamp of the Month | Trefoil Florals & Sentiments


Hello, crafty friends!
I have a Card to share today featuring the Spellbinders Clear Stamp Set of the Month - Trefoil Florals & Sentiments. If you haven't heard about the Clear Stamp of the Month Club by Spellbinders, you can go over to the Spellbinders blog and read more about it HERE

The Spellbinders Clear Stamp for February includes 18 different stamps, four of which have floral images, and a number of coordinating sentiments, which you can tile into the background panel. The stamp set coordinates with the Spellbinders Small Die of the Month, so you can mix and match your supplies to create different projects. This “Trefoil Florals & Sentiments” stamp set features made in the USA stamps from high-quality photo-polymer for clear, crisp impressions. 
For my card, I stamped the four floral tile images onto Watercolour Paper with Memento Black ink using my MISTI Tool. I colored the images using the Watercolors Sets - Bright and then die cut them using the coordinating Trefoil Frame Dies from the Spellbinders Small Die of the Month Set. I also die cut the frames from Black Cardstock so that I could layer the tile pieces together. 

Next, I die cut four squares pieces using the Amazing Paper Grace Die of the Month - Bella Diamante from Light Pink Cardstock. For my card background, I used the Bella Diamanate Die Set to emboss a panel of White Cardstock using the Spellbinders Tan Mat in my Platinum Die Cutting Machine. This is a great way to get more out of your supplies! I love the subtle dimension of the dry embossed background. 

I adhered this panel to a piece of Light Pink Cardstock, then onto a piece of Mirror Gold Cardstock to create my background panel. Then, I adhered it to an A2 sized top-folding white card base using White Liner tape.
I arranged the tiles on my card panel and adhered them down using Craft Glue

The sentiment from the Trefoil Florals & Sentiments Stamp Set was stamped using Black Licorice Ink on a strip of White Cardstock. Then, I added a strip of Gold Mirror Cardstock to mat the white piece, which was foam mounted to the panel using. I finished off the cards with a few clear sequins. 


The Trefoil Florals & Sentiments Set is available exclusively at Spellbinders Paper Arts during February 2021. You can get the Clear Stamp of the Month at the special Cub Kit price, along with other membership perks.

I hope you enjoyed looking at my card today! I would love to hear what you think of it. 
 If you like what you've seen from me, please give me a follow over on my Instagram (@hussena_cal) and/or subscribe to my blog if you haven't already.
Thank you so much for stopping by!

Thursday, July 11, 2019

Altenew July 2019 Stamp/Die/Stencil/Stamping Mat Release Blog Hop + Giveaway


Hello, crafty friends! 
I'm so happy and honoured to be joining Altenew for their Blog Hop today featuring the July 2019 Stamp/Die/Stencils. You should have arrived here from Ilina Crouse's blog.  If you arrived here on your own, then you will want to start at the beginning, the Altenew Card Blog so that you don’t miss a thing!  
We've got tons of inspiration and giveaways for you on the hop today, so keep reading till the end of this post for more information.


To create my card, I first took a piece of Coldpressed White Watercolor Cardstock measuring 4 1/4" X 5 1/2" and used the Purple Wine Watercolor Brush Marker from the Altenew Tropical Fiesta Set to create the light watercolor wash on the background. Once I was happy with it, I added few black and orange paint splatters on the background for some interest.

I heat embossed several flowers, fillers, and leaves from the Pen Sketched Flowers Stamp and the Altenew Charming Doodles Stamp sets using Pure White Crisp Embossing Powder. Then, I coloured them all using the different brush markers from the Altenew Tropical Fiesta Set and cut them out using the coordinating dies. I adhered these images to my panel using foam tape for dimension.

The sentiment comes from the Crystal Frames Stamp set. I stamped it using the Altenew Obsidian Pigment ink, which is, by far, the BEST black ink I have ever used! It gives clean, crisp impressions every time. Definitely recommend this ink to everyone out there. :)
Next, I added a thin strip of Gold Glitter Washi Tape on the edge of the sentiment banner to accentuate it and finally adhered few gold sequins to complete my card.


My next card features the Altenew Charming Doodles Stamp & Charming Doodles Die Set again with the Crystal Frames Die Set. I love the Crystal Frames Die Set because of its elegant frames, and I can see myself using it for so many different projects!

To create my card, I first took a piece of A2 sized Smooth White Cardstock and used the Dotted Scales Debossing Cover Die to create the debossed effect on my panel. Then, I used Tumbled Glass Distress ink to lightly colour the top half of my panel. I also added few black paint splatters for added interest.

Next, I die cut the geometric frame from the Crystal Frames Die Set from Gold Mirror Cardstock. I also stamped some flowers, leaves, and foliage from the Charming Doodles Stamp set using the Altenew Obsidian Pigment ink on White Heavyweight Cardstock. The Charming Doodle Stamp set is a layering stamp set and I used different dye inks from Altenew to fill in the solid images. Then, I die cut these out using the coordinating Charming Doodles Die Set. I played around my arrangement till I was satisfied with the design and then adhered them all on to the panel using foam dots.

The sentiment is from the Crystal Frames Stamp set. I used the Altenew Obsidian Pigment ink to stamp it on a strip of White Cardstock. The Obsidian ink has easily become my go-to black ink for stamping images. It's that good!


Moving on to my third card for today, and this one features another beautiful set - Pen Sketched Flowers Stamp. I used this set with the Crystal Frames Die Set.

This card did not turn out the way I had envisioned, but I still wanted to share it with you'll. For my card, I started by creating a stenciled background so that the flowers would pop against it. I used the Beveled Squares Stencil and Altenew Warm Sunshine Dye ink for the background. I used a Ranger Mini Ink Blending Tool with the Warm Sunshine Dye ink to stencil on the card panel. Next, I added few black paint splatters to add some more interest to the design.

The flowers and leaves are from the Pen Sketched Flowers Stamp set. I stamped several of them on White Cold Pressed Watercolor Cardstock using VersaMark Embossing ink. I used the Antique Gold Crisp Embossing Powder for heat embossing the images and then coloured them using the Altenew Tropical Fiesta Brush Markers Set. I die cut all the images using the Pen Sketched Flowers Die Set and adhered them to my card panel.

To add some interest to my  design, I die cut a frame from the Crystal Frames Die Set using Gold Mirror Cardstock. I adhered that to my panel and did the floral arrangement around it. The sentiment is from the Pen Sketched Flowers Stamp as well.  I added a strip of the Golden Trim Washi Tape to my sentiment banner to accentuate the look. Lastly, I adhered few gold sequins to my card as the finishing touch.


My last card for today features the Sophisticated Wreath Stamp Set and Sophisticated Wreath Die Set. I also used the Crystal Frames Stamp set to create the focal for my card.

 For this card, I first stamped the geometric frame from the Crystal Frames Stamp set using Altenew Obsidian Pigment ink on my card panel. Next, I stamped the flowers and foliage from the Sophisticated Wreath Stamp Set using the Cherry Blossom Oval Set. The flowers are a 2-step layered stamp, so I used only Razzleberry and Rubellite from the set. The leaves and small filler flowers are also a part of the same set. For the leaves, I used Parrot Crisp Dye ink for the most part. Once the stamping was done, I die cut all the images using the coordinating Sophisticated Wreath Die Set.

Before adhering  my images to the panel, I lightly ink blended the background using Tumbled Glass Distress ink. I adhered few of the stamped images directly to my card base, while some were adhered using foam dots just to create some interest in the design.

The sentiment is also from the Crystal Frames Stamp set. I stamped it using the Altenew Obsidian Pigment ink. For the finishing touches, I added few clear sequins and my card was ready!
Disclosure:
Where available, I use compensated affiliate links which means if you make a purchase I receive a small commission at no extra cost to you. Thank you so much for your support!

Giveaway:
To celebrate this release, Altenew is giving away a $50 gift certificate to 6 lucky winners! Please leave a comment on the Altenew Card Blog and/or Altenew Scrapbook Blog by 7/16/2019 for a chance to win.

They’ll also draw a winner to receive a $20 gift certificate from the comments left on each designer’s blog on the blog hop list below. All winners will be announced on the Altenew blogs on 7/16/2019.

Blog Hop Order:
Just in case, you lose your place along the way, here is the complete list of participants so that you can find your way back.

                           Hussena Calcuttawala (You are HERE!)


Thank you so much for your stopping by and reading this blog post. I hope you liked the cards I made. I would love to hear if you have a favourite!

Have a wonderful day!