Showing posts with label Embossing paste. Show all posts

Friday, August 2, 2019

Guest Post using CrafTreat Stencils


Hello, everyone!
I have some projects to share today I created using stencils from CrafTreat's April 2019 Release. Without further ado, let's get started!

My first card features the Round Dot Mandala Stencil. I have never worked with Mandala stamps or stencils before, so I was thrilled when I saw this design. To create my card background, I used Prima Marketing's Light Paste mixed with different shades of dye inks to achieve the colour hues I wanted for my card design. Once that was done, I used Papericious' Twinkling Spark Glitter Powder to sprinkle glitter all over the stenciled mandala design. This gave a really subtle yet pretty shimmer to the card. 

To complete my card, I fussy cut a couple of flowers and leaves from Altenew's Botanical Rhapsody Washi Tape and adhered them to my panel using foam dots for added dimension. 

Here's a look at the gorgeous shimmer and texture. I honestly am in love with the sherbet colours. These are my all-time favourites!

To complete the card, I added a sentiment to the centre and matted it on some grey textured cardstock. This was then adhered to an A2 sized top folding card base. 
  

My next card is different from my usual style and is created using the Flower Fusion Positive Dots & Flower Fusion Negative Dots Stencils. This is something really new from CrafTreat and I was really excited to give it a try!
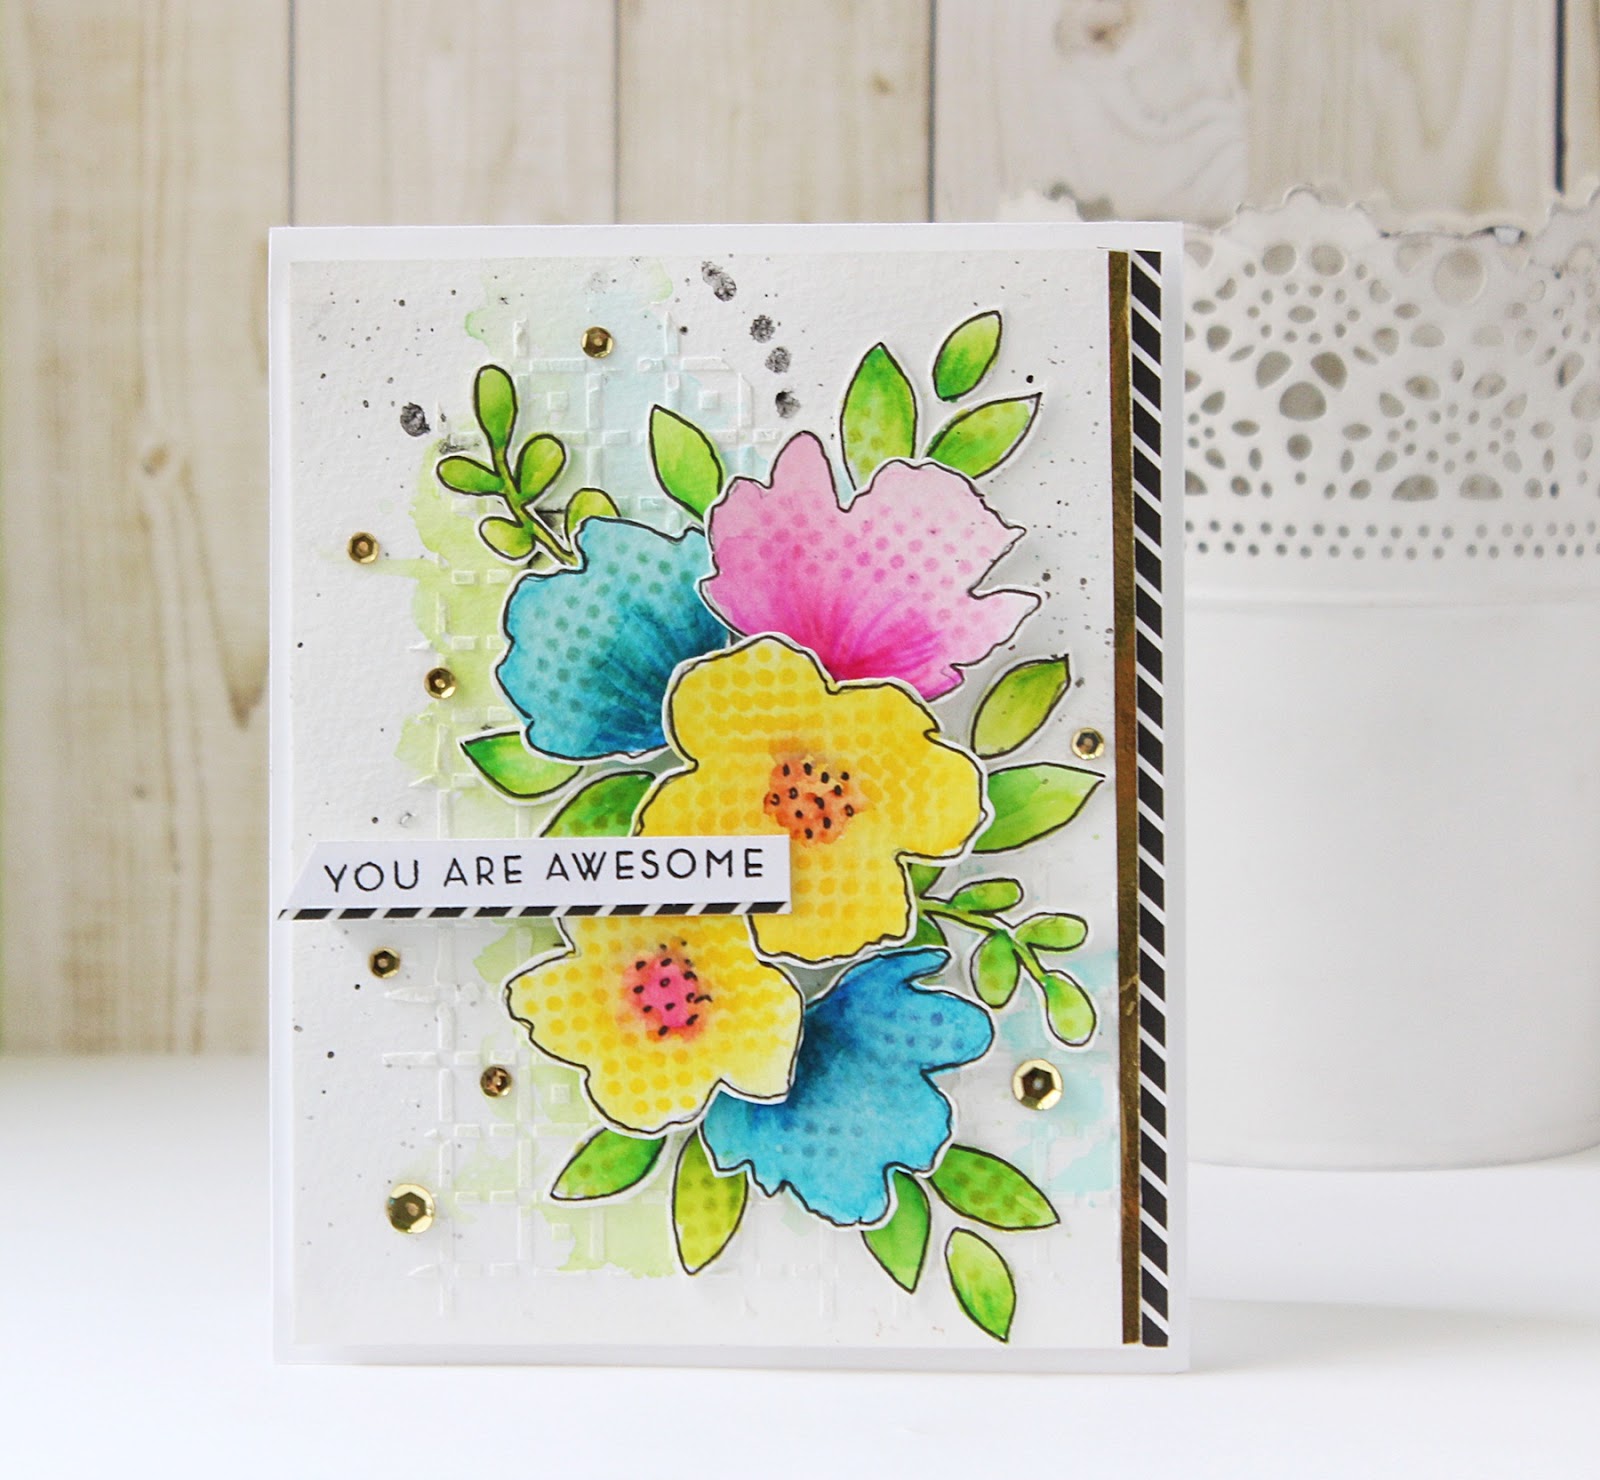
For my card, I wanted to use some fresh and bold colours reminiscent of spring. I started by stenciling my card panel using the Checkered Rose Stencil and Altenew's Modelling Paste. Once that was dry, I lightly watercolored the background.

For my card focal, I stenciled the flowers and leaves from the Flower Fusion Positive Dots & Flower Fusion Negative Dots Stencils. I sketched the outline of both the flowers and leaves using a Black Microtip Pen to add some definition to the design. I fussy cut these out and arranged them on my card panel. I also stamped my sentiment on a banner and popped it up on my card panel.

To accentuate my card design, I added a strip of Gold Mirror Cardstock and Papericious' Monochrome Patterned Paper along the right side of my card. I also added some gold sequins and black paint splatters to finish off my card. 


My third card for today is even more different from my regular cards. The Flower Fusion 2 Step Stencils were quite challenging for me to use and this is my take on them!

For my card, I used the Flower Fusion Step 1 Stencil to stencil the lovely tile design using Altenew Limestone Dye ink. My next step was to stencil the flowers over this background. I would like to say this here, that it is absolutely not necessary to use both these stencils together, you may just stop at one step or use both. That's the beauty of them! I went ahead with the Step 2 stencil and coloured the flowers and leaves using Prismacolor Pencils. 

I didn't want to take the focus away from the amazing background so I kept the rest of the card simple. I stamped the first half my sentiment on a banner and the other directly on the panel. I added some clear sequins for the finishing touches. I matted this panel onto some Gold Mirror Cardstock which was then adhered finally to an A2 sized top folding card base.

There are various ways you could use these Flower Fusion stencils! I really love that tile background and can see myself using it on a lot of projects. By the way, I am sorry that the Gold Mirror Cardstock is not reflecting in this picture. It's not a dark brown cardstock. :)


Now, I have some Gift Tags to share with you using the Flower Fusion Triangles Stencil. I have masked and used only a small portion of the stencil on the tags, but it adds so much to the design. Here's a look at them:

 I used the Flower Fusion Triangles Stencil and Altenew's Limestone Dye ink for stenciling on the bottom of the tags. Once that was done, I die cut and coloured the flowers and leaves and added them to the gift tags. All that was need to complete them was a sentiment, and that's it. They were done! 

These were really simple to put together and are great for mass producing or creating in bulk.


My final project for today is a Money Wrap. I love creating them and wanted to do something slightly different on this one, so I combined stenciling with Foamiran flowers. I used the Beaded Flourish Stencil for creating that flourish design on the patterned paper. Then, I embellished my wrap with a handmade Foamiran rose and some filler flowers and foliage. 

I tend to create very elaborate designs, but if you don't want to do that, you can make it simple by cutting down on the number of filler flowers and foliage. The stenciled design makes for a great background for envelopes and you can use it in different ways to achieve different results!

That brings me to the end of this post! I hope I gave you some ideas to use these stencils. I would like to thank Priya and her team for inviting me to guest design on the CrafTreat blog. This post was supposed to go live back in April, but I couldn't send it across at that time, so I am finally sharing these projects now. I hope you liked them! :)

Supplies Used:


If you have any questions regarding any of the projects or the supplies used, please don't hesitate to ask me in the comments section below. I would be happy to help you out.

Have a lovely day, you all!

Thursday, April 25, 2019

Altenew April 2019 Washi Tape/Embossing Paste Release Blog Hop + Giveaway


Hello, crafty friends!

I am so excited and honoured to be joining Altenew for their NEW April 2019 Washi Tape/Embossing Paste Release Blog Hop! Today we are showcasing the new Washi Tapes and Embossing Paste from Altenew. If you arrived here from the talented Erum Tasneem's blog, then you are on the right track. If you arrived here on your own, then you will want to start at the beginning, the Altenew Card Blog so that you don’t miss a thing! Join the inspirational blog hop for lots of giveaways and for taking a closer look at the new products.

I have made 3 projects today featuring the new products. Without further ado, let's get started!


To make this card, I started by creating a stenciled background using the Altenew Embossing Paste and Beveled Squares Stencil. Next, I die cut a heart shape from the middle of this panel. Then, on another card panel, I adhered the Gold String Washi Tape. This Washi Tape design is so elegant and classic, that I felt I had to create a monochromatic card in shades of white and gold, in order to highlight its beauty!

I adhered the panel with the Washi Tape on my card base, and then adhered the stenciled panel on top of it. Next, I started working on the focal of my card. I used the Rose Flurries 3D Die Set to die cut the roses and leaves from gold mirror cardstock, vellum, and white cardstock. I layered them together to create some beautiful roses and arranged them on my card panel. I really liked the look of the roses against the stenciled background and felt it gave an elegant touch to the card. 

The Altenew Embossing Paste is super creamy in texture and was an absolute delight to work with! It has such a wonderful consistency to it and is really moist and good to use. Here is a shot showing you the stenciled background closely.

I used the Altenew Celebrations Stamp set for the sentiment. It was heat embossed using Super Fine Gold Glitter Powder. I also added a panel with gold mirror cardstock behind my stenciled panel to bring all the elements together. And this was done!


My second card features the Botanical Rhapsody Washi Tape, Golden Trim Washi Tape, Halftone Stencil, and Embossing Paste.

If you have not yet seen the Botanical Rhapsody Washi Tape, you must! It's such a gorgeous Washi Tape and the width of this tape is really mind blowing! I adhered this Washi Tape to a piece of white cardstock, so that I could colour the flowers and leaves using the Altenew Artist Markers (Set A). Once they were coloured, I fussy cut them out and popped them on my card panel using foam dots.

I wanted to add some subtle texture to my card panel, so I used the Altenew Halftone Stencil and Embossing Paste to stencil my background. I mixed the Embossing paste with  the Volcano Lake dye ink to get a nice blue colour. 

The sentiment was heat embossed in white on a strip of black cardstock. I added a strip of the Golden Trim Washi Tape on it to accentuate the look. Finally, I added some patterned paper behind my card panel, and my card was done!


My third and final card features the Teal Shadow Washi Tape, Misty Meadows Washi Tape, Dotted Washi TapeGolden Trim Washi TapeLeaf Burst Stencil, and Embossing Paste.

This card has a Washi overload! :D To create it, I started by fussy cutting the flowers from the Teal Shadow Washi Tape, and the leaves from the Misty Meadows Washi Tape. I adhered both these Washi Tapes to pieces of white cardstock before fussy cutting them so that it would give it some thickness and make fussy cutting the elements easier. I also added a touch of stenciling to the background using the Leaf Burst Stencil and Embossing Paste

I then added a strip of the Dotted Washi Tape and the Golden Trim Washi Tape to the left of my card to help balance the card design. I also added a gold heat embossed sentiment strip over the florals.

I added a light blue watercolor wash over the stenciled panel and few black ink splatters to complete my card. This one took some time to put together, but I am happy with the end result. Let me know what you think!

Prizes:
To celebrate this release, Altenew is giving away a $30 gift certificate to 6 lucky winners! Please leave a comment on the Altenew Card Blog and/or Altenew Scrapbook Blog by 5/1/2019 for a chance to win.

Additional Giveaway
Altenew will also draw a winner to receive a $15 gift certificate from the comments left on each designer’s blog on the blog hop list below. All winners will be announced on the Altenew Card Blog on 5/4/2019.


Blog Hop Order:
Next stop on this Blog Hop is Sandra Dietrich's blog.
Just in case you lose your place along the way, here is the complete list of participants so that you can find your way back:
                            Hussena Calcuttawala (You are HERE)

I hope you liked my cards! I would love to know what you think of them and if you have any favourites!
I appreciate you stopping by today. Have a great day ahead!

Sunday, December 11, 2016

Christmas Card | One

Hello friends!
I'm back today to share a Christmas card I made recently. I don't usually work with such stamps often, but I am glad I finally gave them a try. Here's a look at what I came up with :


To create this card, I took a A2 sized white card panel and did some Distress ink blending using shades of blue to do the night sky. Then using the Heidi Swapp Confetti stencil and white embossing paste by Wendy Vecchi, I created the falling snow. I added some white glitter to the paste when it was wet to give it some extra shimmer. Next, I die-cut the snowy hills using a die by MFT and added some Ranger Clear Rock Candy Distress Glitter to the edge using Glossy Accents. This gives a beautiful snow-like effect and adds more dimension to your project.
Now for the main focal of my card, I stamped and coloured the images from the Mudra Santa & Friends set on watercolour paper using Faber Castell watercolour pencils. I fussy-cut the images and added them on some foam dots. I stamped the sentiment on the base of my card. Finally I die-cut the stenciled background using a scalloped rectangle frame from MFT and added it to my card base.

I'm entering my card in Winter Wonderland - Frame it/Night Scene, My Time to Craft - Christmas Animals, Crafty Catz - Christmas in Non-traditional Colours and QKR Stampede - Non-Traditional Christmas Colors

I hope you liked my card. Please do leave me your comments/suggestions below. I would love to hear what you think.


Have a nice day everyone!

Monday, December 5, 2016

Mudra Christmas Cards | Sneak Peek

Hi, bloggy friends!
Today I have some Christmas cards to share on the Mudra blog using their newest stamp release. Here's a sneak peek for you :

Please head over to the Mudra Craft Stamps blog to check out the full cards. I hope you like what I have created :)


Have a nice day everyone!

Wednesday, November 16, 2016

Sneak Peek

Hi, friends!
I am blogging after a short break. I know it's been long since I visited your blogs, but I hope to do it soon :)
In the meantime, I have some cards to share today on the Mudra blog using their November release. Here's a sneak peek for you :


Please do visit the Mudra blog to see the complete cards and if you like them, please do leave me a comment :)

Have a nice day everyone!
