Showing posts with label Christmas Cards. Show all posts

Thursday, November 5, 2020

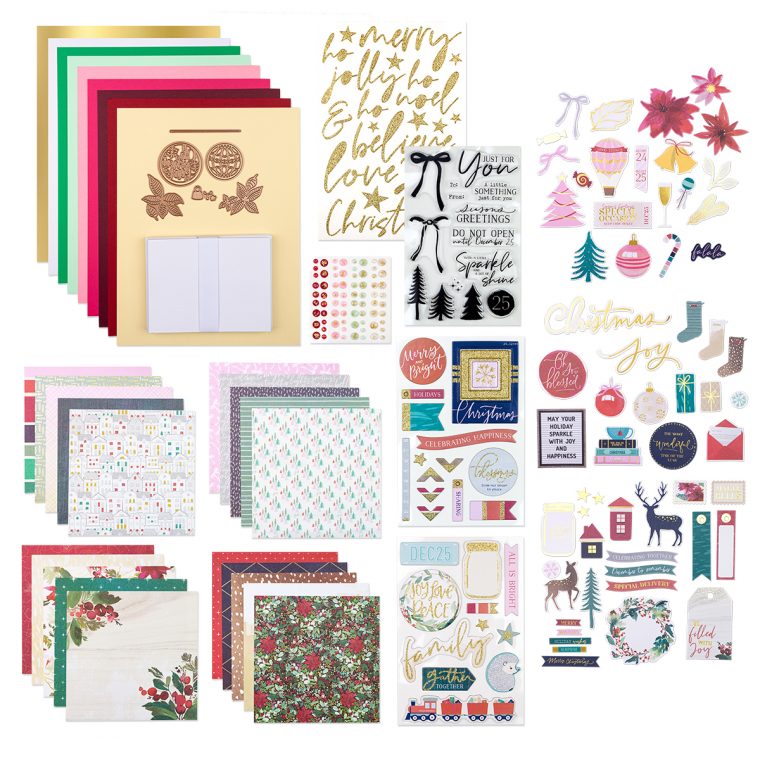
Spellbinders November 2020 Card Kit | Merry Wishes + Exciting News!


Hello, crafty friends!
It's the start of a new month which means it's time for a NEW Card Kit from Spellbinders. I have a bunch of cards to share today featuring the November 2020 Card Kit by Spellbinders - Merry Wishes. If you haven't heard about the Monthly Card Kits by Spellbinders or don't know how to subscribe to one, you can go over to the Spellbinders website and/or blog and read more about them HERE


This "Merry Wishes" Kit, like all their other Card Kits, gives you everything you need to create 10 unique cards and even more. You now also get better goodies, including a 40 sheet paper pad, clear stamps, an adorable die set, tons of embellishments, and more!

I have FIVE Card ideas to share with you today using this kit, so let's get started!


Card #1
My card uses the Merry Wishes Paper Pad, and the Merry Wishes Die Cut Shapes Set.

To create my card, I first picked out a woodgrain patterned paper design from the Merry Wishes Paper Pad and trimmed it to size. Next, I took a sheet of Gold Mirror Cardstock and layered the patterned paper over it to give it a framed look.

Then, I die cut a decorative frame to add to the centre of the panel. To embellish my card front, I used some die cuts from the Merry Wishes Die Cut Shapes Set. I also added some additional die cut foliage to give it more interest. I adhered the die cut shapes using foam dots and the foliage with Craft Glue. Aren't those watercolored poinsettias so beautiful?! I love how they look paired up against the patterned paper!

I used a combination of 3D Chipboard Stickers and Die Cut Shapes for my sentiment, which are included in the contents of the Card Kit. To finish, I added some gold sequins. This was simple and quick to create and I am quite pleased with how it turned out.


Card #2
My card uses the Merry Wishes Paper PadMerry Wishes Die Cut Shapes Set, and the exclusive dies in this month's Card Kit.

This month’s kit is all about the Christmas Season that will soon be upon us! I had so much fun creating these bright and festive cards. It's also perfect for getting your Holiday Cards a good head start! 
For my card, I first die cut a panel from a foiled patterned paper design from the Merry Wishes Paper Pad. I adhered this to a panel of White Cardstock and then onto a panel of Red Cardstock to mat an A2-sized white card base.

I used one of the die cut pieces from the Merry Wishes Die Cut Shapes Set to create my card focal. I added a scalloped circle cut from Gold Mirror Cardstock atop the wreath die cut and then adhered another die cut piece over it to resemble the look of a Christmas ornament. Next, I die cut a mini wreath and some flowers and leaves using the dies from the Card Kit to embellish the circle and adhered the pieces down using Craft Glue. I added sequins in the centres of the flowers for added interest.

To complete the card, I die cut the body of the lamp post from Gold Mirror Cardstock and snipped it to look like the string of a bauble. I added a chipboard sticker shaped like a bow to accentuate the design. Finally, I adhered some die cut red stars for a festive touch. 


Card #3
My card uses the Merry Wishes Paper PadMerry Wishes Die Cut Shapes Set, and the exclusive dies in this month's Card Kit.

This card comprises predominantly of die cut shapes, so it was really quick to put together. To begin, I chose a patterned paper print from the Merry Wishes Paper Pad and trimmed it to size to adhere to my A2-sized white card base. 

Next, I pulled out some die cuts from the Merry Wishes Die Cut Shapes Set and adhered them to my card panel using foam squares. Then, I die cut the body of the lamp post from Gold Mirror Cardstock and trimmed it to look like the strings of the baubles. I adhered them to the panel and added some additional die cut foliage to give the design a more cohesive look. To finish, I added some Puffy Sticker Stars and a sentiment circle. 


Card #4
My card uses the Merry Wishes Paper PadMerry Wishes Die Cut Shapes Set, Merry Wishes Stamp Set, and the exclusive dies in this month's Card Kit.

To create my card, I first trimmed a patterned paper design from the Merry Wishes Paper Pad to size and adhered it over my A2-sized white card base. Next, I took a piece of White Cardstock and stamped snowflakes on the top half of the panel using one of the stamps from the Merry Wishes Stamp Set. I used Pool Play ink for stamping the snowflakes. Next, I die cut a circle from regular White Cardstock and placed it on the right hand side of the paper to act as a temporary mask while I lightly ink blended the panel again using Pool Play ink. 

I wanted to create a Winter scene on my card front, so I stamped a bunch of trees in the middle of the panel and did some partial ink blending on the bottom to create the look of various layers of snow. The tress are from the Merry Wishes Stamp Set and were stamped using Sweet Pear ink.  

To create my card focal, I die cut different components of the lamp post from a variety of Cardstock sheets. I then assembled it together and added it to my card panel using Craft Glue. I also added a little die cut wreath and bow to the lamp post to accentuate the design. Next, I adhered a polar bear die cut from the Merry Wishes Die Cut Shapes Set. The sentiment is also from the same Die Cut Shapes Set and was matted to Black Cardstock and then popped on to the panel using foam tape. 

To finish, I added some die cut and coloured snow banks to the bottom of the lamp post. I also used Ranger Stickles Glitter Glue in Diamond to create the effect of snow on the trees. I also used it along the various layers of the snow banks for some shimmer and shine. 


Card #5
My card uses the Merry Wishes Paper Pad, and the Merry Wishes Die Cut Shapes Set.

This card too didn't take me much time to put together. To begin, I picked out a foiled patterned paper print from the Merry Wishes Paper Pad and trimmed it at an angle to fit my card panel. I adhered this over a panel of White Cardstock to mat an A2-sized white card base.

Next, to embellish my card front, I used some die cuts from the Merry Wishes Die Cut Shapes Set and Chipboard Stickers from the Card Kit.  I adhered everything to my panel using foam squares for dimension. I love how the die cut packs always include so many different options. They really help one to create a multitude of cards in a jiffy! To complete my card, I adhered the sentiment banners to my panel, which are also die cuts from the Merry Wishes Die Cut Shapes Set.


Now, for the EXCITING NEWS!
Spellbinders has made changes to delivery options! They now offer NEW affordable International Shipping options for Spellbinders Clubs. Isn't that so exciting?! Be sure to pop over to the Spellbinders Website to read more. 


Spellbinders has also a NEW Clear Stamp of the Month Club. Here's a look at this month's Set. Isn't it so beautiful?! You can find more details for it HERE.

Limited Period Offer
Enjoy $25 off on your next $100 purchase + Free Shipping within USA! Click HERE to SHOP! This cart level discount automatically applies a additional $25 discount at checkout for orders over $100 after all other coupons and discounts, before tax. The offer is now live and will be available until Sunday 11/08/2020.


If you want to find out more about the Club – prices, how you sign up and what’s included, please look ——–> HERE
 The Card Kits for Spellbinders Monthly Clubs are exclusive to Spellbinders and you won't find them anywhere else, so be sure to gets yours before it gets sold out! If there are any leftovers, they are added to the Spellbinders store for sale at full price after a few months. You can see all of the past Card Kits HERE.
Card Kit of the Month Membership
If you'd like to see some more project inspiration using the Card Kit, check out THIS super helpful YouTube video that has some awesome card ideas using the Card Kit. 

That's it from me for today! I hope you liked my cards. Let me know if you have any favourite(s)! I would love to hear from you.

 If you like what you've seen from me, please give me a follow over on my Instagram (@hussena_cal) and/or subscribing to my blog if you haven't already.

Thank you so much for your visit to my blog today!

Thursday, September 17, 2020

Pinkfresh Studio September 2020 Holiday Stamp and Die Release Blog Hop


Hello, crafty friends!
It's release day at Pinkfresh Studio and we have a wonderful Blog Hop to celebrate Pinkfresh Studio's September 2020 Stamp and Die Release! You aren't going to want to miss a stop along the way. This blog hop is full of amazing projects showcased by all the guest designers and the design team.

You should’ve arrived here from the talented, Heather Hoffman's blog, if you’re following the blog hop order. In case you’re lost on the way or want to start over, please hop over to Pinkfresh Studio blog!
We've got TONS of inspiration and giveaways for you on the hop today, so keep reading till the end of this post for more information.


I have got THREE Cards to share today and have focused on the Sleigh Bells Ring Stamp and coordinating Die Set throughout all of my cards, mixing them with other items from this release.  Let's just get right into it all!

The Sleigh Bells Ring Stamp is a 4"x6" photopolymer clear stamp set with 16 images designed by Lizzy M. It is made to coordinate with the Sleigh Bells Ring Die Set, which available for purchase separately. Perfect for a special Christmas card, or for sending out winter wishes all season long, the sentiments are versatile enough to be used for more than just the holidays.


My first Card features the Sleigh Bells Ring Stamp, and the Our Home To Yours Stamp set. All the stamps in this month's release are simply fabulous and I had a ball mixing and matching different sets to create my projects! 
I stamped the critters from the Sleigh Bells Ring Stamp on a piece of Neenah Classic Crest Solar White 110LBS Cardstock using Detail Black Ink. I let them dry for a bit and then coloured the images using Zig Clean Colour Brush Markers. Once my colouring was complete, I die cut the images using the coordinating Sleigh Bells Ring Die Set.

Next, I stamped the sleigh from the Sleigh Bells Ring Stamp using Candy Apple ink and then die cut the image using the coordinating die set. Once that was done, I stamped a couple of houses from the Our Home To Yours Stamp using Ballet Slipper, Sky Blue, and Mint dye inks. These are some of my most favourite ink colors from Pinkfresh and I love using them time and again for my projects! Once my images were stamped, I die cut them using the coordinating die set and kept them aside.

I wanted to create a soft, winter sky for my card background, so I took a piece of Neenah Classic Crest Solar White Cardstock and ink blended the background using Ocean Breeze ink. Next, I stamped some simple snowflakes on the top half of the panel using the Ocean Breeze ink for a monochromatic look. I also stamped, coloured, and die cut a little birdie from the Sleigh Bells Ring Stamp set and popped it to my panel using foam dots. 

I adhered the sleigh, stamped houses, and critters to my card panel using foam squares. Then, I stamped my sentiment from the Our Home To Yours Stamp on it using Detail Black Ink. To finish, I added some white Jewels and Diamond Stickles over the stamped snowflakes for some shimmer and shine! 


My second card for today also features the Sleigh Bells Ring Stamp and Our Home To Yours Stamp sets.

For this card, I first stamped the different houses from the Our Home To Yours Stamp using Metropolis ink on a piece of Neenah Solar White Classic Crest 110 LBS Cardstock. I stamped them a bit afar from each other, as I wanted to partially die cut the entire border using the coordinating Our Home to Yours die set. This was a bit time-consuming to do, as the alignment needed to be perfect, but I think it was well worth it in the end. 

Next, I stamped the critters from the Sleigh Bells Ring Stamp set on some Neenah White Cardstock using Detail Black Ink. I coloured them using Zig Clean Color Brush Markers and then die cut the images using the coordinating die set. I also stamped the sleigh from the Sleigh Bells Ring Stamp set using Berrylicious ink and die cut it as well using the coordinating Sleigh Bells Ring die set

Once that was done, I decided to add some bells and gift boxes to my panel to create a more lively scene. The bells were stamped using Detail Black Ink and then coloured using Zig Markers. The gifts were stamped in an assortment of colours - Candy Violet, Berrylicious, and Sunshine . I die all of them using the coordinating Sleigh Bells Ring die set, and popped them to my panel using foam squares. Next, I took a piece of Navy Blue Cardstock and stamped some snowflakes on it using the Sleigh Bells Ring Stamp and then heat embossed it using Ultra Fine White Embossing Powder. I then die cut the panel using the Stitched Rectangles die set and kept it aside.

I took another piece of Neenah Solar White Cardstock and used the Floral Diamond Cling Stamp to stamp on it using Metropolis ink. Next, I die cut a hill slope from White Cardstock and adhered it to the front of my card panel using foam dots. I coloured the edge of the slope using Ocean Breeze ink to give it more definition. Then, I stamped my sentiment on it from the Tree Trimming Friends stamp set using Detail Black Ink. Once that was done, I adhered my panels to a white card base. I also added a teeny bit of Diamond Stickles to the embossed snowflakes and hill slope for a touch of shimmer. 


My third and final card for today features the Tree Trimming Friends Stamp, and the Our Home To Yours Stamp Set.

I stamped the lush Christmas tree images from the Tree Trimming Friends Stamp set using Evergreen and Emerald City dye inks for the first tree, and Meadow and Emerald City inks for the second tree on Neenah Classic Crest Solar White 110 LBS Cardstock. I let them dry for a bit and then die cut them using the coordinating Tree Trimming Friends die set. Next, I stamped the Christmas ornaments for the tree using Detail Black Ink and then coloured them using Zig Brush Markers. I die cut these too using the coordinating die set and kept them aside. 

Next, I stamped the sweet bunnies from the Tree Trimming Friends stamp set on Neenah Cardstock using Detail Black Ink and coloured them using Zig Brush Markers. I have done very simple colouring, but you can make it as detailed as you would like - That's the beauty of these stamp sets! Later, I die cut them using the coordinating die set.

 To add some visual interest to the scene, I decided to add stamped houses and gift boxes. I stamped the houses from the Our Home To Yours Stamp Set using Ballet Slipper and Sky Blue inks and then die cut them using the coordinating dies.  The gift boxes are from the Sleigh Bells Ring Stamp set and were stamped using Berrylicious and Sunshine inks. I popped all of these images to my card panel using foam squares for dimension.

To bring the scene to life, I decided to create an ink blended galaxy sky. I took a piece of Neenah Classic Crest Solar White 110 LBS Cardstock and blended the panel using Stargazer, Sapphire, and Summer Shower inks. I then flicked some water on the panel to create a bleached look. Once that was done, I die cut the panel using the Diagonal Stitched Rectangles die set. I went ahead and die cut two others panel from Neenah Classic Crest Solar White Cardstock using the Diagonal Stitched Rectangles die set. I layered these panels one on top of the other for a crisp look.

The sentiment is from the Our Home To Yours Stamp Set and was stamped using Berrylicious ink on a piece of White Cardstock. I die cut it using the coordinating die set.  To finish, I scattered some white Jewels all over my panel. Lastly, I adhered the various card panels together to the white card base.


PRIZES
Pinkfresh Studio will be giving away the ENTIRE release on their Pinkfresh blogInstagram Feed, & YouTube Channel.

You also have the chance to win a $25 gift card sponsored by Pinkfresh Studio from my blog. All you have to do is leave a comment letting me know which card is your favourite. :)

All winners will be chosen and posted on the Pinkfresh Blog on Wednesday, September 24, 2020 - so make sure and check back to see if you were a winner! Winners must check the Giveaway Page on the Pinkfresh Blog and claim their prize within 2 weeks.
SHIPPING PROMO
Pinkfresh Studio is offering FREE US shipping or discounted international shipping on orders over $50+. Offer valid from 9/17/2020 at 12:01 am EDT through 9/24/2020 at 11:59 pm CST. Be sure to stock up on your favorites from this release to lock in this special promo!


You can find all of the links to the full list of hop members below.
You are invited to the Inlinkz link party!
Click here to enter

Thank you so much for stopping by today! Be sure to leave a comment before you leave and enjoy all of the inspiration on the rest of the hop!

Monday, November 11, 2019

Spellbinders November Card Kit of the Month | Christmas Wishes


Hello there, crafty friends!
I have a couple of cards to share today featuring the November Card Kit by Spellbinders - Christmas Wishes. If you haven't heard about the Monthly Card Kits by Spellbinders or don't know how to subscribe to one, you can go over to the Spellbinders website and/or blog and read more about them HERE

This "Christmas Wishes" Kit, like all their other Card Kits, gives you everything you need to create 10 unique cards and even more. You now also get better goodies, including a 40 sheet paper pad, clear stamps, an adorable die set, tons of embellishments, and more!
November 2019 Card Kit of the Month is Here – Christmas Wishes

I have FIVE Cards to share with you today using this kit, so let's get started!

My first card features the Christmas Wishes Paper Pad, Christmas Wishes Die Cut Shapes SetChristmas Wishes Chipboard Sticker Pack, along with the stamp set included in the kit.

For my card, I started by selecting a patterned paper design from the Christmas Wishes Paper Pad and die cut a circle in the centre of this paper using the Nestabilities Standard Circles LG die set. I took another piece of White Cardstock and created a mini scene using different stamps included in the Christmas Wishes Stamp set included from the kit. I incorporated some ink blending and masking in this scene to make it look a bit more realistic. 

I used a layer of White Fun Foam between the patterned paper and the stamped scene to make the top panel pop a bit. I also adhered a die cut from the Christmas Wishes Die Cut Shapes Set and a sentiment banner from the Christmas Wishes Chipboard Sticker Pack. I also added a couple of stars and photo corners from the same chipboard set to complete my card. 


My next card features the Christmas Wishes Paper PadChristmas Wishes Die Cut Shapes Set, and the dies included in the kit.

To create my card, I started by die cutting the ornament die included in the kit from Gold Mirror Cardstock and some foiled patterned paper. I also die cut the strings and the little accessories for the ornament from Gold Mirror Cardstock.

Once that was done, I did the assembly for it, and picked out two ornament die cuts from the Christmas Wishes Die Cut Shapes Set. I adhered these three over a patterned paper from the Christmas Wishes Paper Pad. I also added a sentiment banner from the Christmas Wishes Die Cut Shapes Set and some gemstones for the finishing touch.


My next card is made entirely using the flower and leaf dies from the kit.

I took a piece of A2 Navy Blue Cardstock and die cut a couple of poinsettia flowers and leaves all over this panel to create my own background piece. Then, I die cut several of these poinsettias from Red Cardstock and leaves from Green Cardstock and used the inlay technique to adhere them over the previously die cut panel. I also added the centres of the flowers which were die cut from Gold Mirror Cardstock.

My panel was almost done and I decided to die cut a circle from Vellum using the Nestabilities Hemstitch Circles Dies. I topped this up with another circle die cut from the Christmas Wishes Die Cut Shapes Set.


My fourth card features the Christmas Wishes Paper Pad, and the Christmas Wishes Die Cut Shapes Set along with the dies from the kit.
For my card, I first picked out a patterned paper from the Christmas Wishes Paper Pad which would go well with the design of my card. Once I did that, I die cut some poinsettias and leaves using Red and Green Cardstock respectively, and adhered them over a watercolored wreath die cut from the  Christmas Wishes Die Cut Shapes Set. I also added some punched sprig leaves and flower centres to the poinsettias.

I stamped two bows using two different ink colours and fussy cut them to place them over the wreath.  I also added a white gemstone to the centre of the bow and die cut pieces in the centre of the wreath for my card sentiment. 


This is my favourite from the lot because I love the way it turned out. To start with, I picked out two different patterned papers from the Christmas Wishes Paper Pad. I adhered one directly on to my card panel, while I die cut from the other to create hills for my scene. Once they were die cut, I adhered these panels in a way that one would overlap over the other to create the illusion of a hill.

I used lots of die cuts from the Christmas Wishes Die Cut Shapes Set to create the entire scene for my card. I adhered few directly, while some were popped up using foam tape. The sentiment banner is also from the same set. 


If you want to find out more about the Club – prices, how you sign up and what’s included, please look ——–> HERE.
I know that I say this every month, but this kit is amazing and so worth the cost! You get everything you need to create AT LEAST ten cards. How awesome is that?!

That's it from me today! I hope you liked my cards using the Spellbinders November Card Kit. If you have a favourite, please do let me know. I would love to hear from you! :)
Thank you so much for stopping by!