Hello, crafty friends!
You should’ve arrived here from the talented,
Heather Hoffman's blog, if you’re following the blog hop order. In case you’re lost on the way or want to start over, please hop over to
Pinkfresh Studio blog!
We've got TONS of inspiration and giveaways for you on the hop today, so keep reading till the end of this post for more information.
I have got THREE Cards to share today and have focused on the
Sleigh Bells Ring Stamp and coordinating
Die Set throughout all of my cards, mixing them with other items from this release. Let's just get right into it all!
The
Sleigh Bells Ring Stamp is a 4"x6" photopolymer clear stamp set with 16 images designed by Lizzy M. It is made to coordinate with the
Sleigh Bells Ring Die Set, which available for purchase separately. Perfect for a special Christmas card, or for sending out winter wishes all season long, the sentiments are versatile enough to be used for more than just the holidays.
I stamped the critters from the Sleigh Bells Ring Stamp on a piece of Neenah Classic Crest Solar White 110LBS Cardstock using
Detail Black Ink. I let them dry for a bit and then coloured the images using Zig Clean Colour Brush Markers. Once my colouring was complete, I die cut the images using the coordinating
Sleigh Bells Ring Die Set.
I wanted to create a soft, winter sky for my card background, so I took a piece of Neenah Classic Crest Solar White Cardstock and ink blended the background using
Ocean Breeze ink. Next, I stamped some simple snowflakes on the top half of the panel using the
Ocean Breeze ink for a monochromatic look. I also stamped, coloured, and die cut a little birdie from the
Sleigh Bells Ring Stamp set and popped it to my panel using foam dots.
I adhered the sleigh, stamped houses, and critters to my card panel using foam squares. Then, I stamped my sentiment from the
Our Home To Yours Stamp on it using
Detail Black Ink. To finish, I added some white Jewels and Diamond Stickles over the stamped snowflakes for some shimmer and shine!
For this card, I first stamped the different houses from the
Our Home To Yours Stamp using
Metropolis ink on a piece of Neenah Solar White Classic Crest 110 LBS Cardstock. I stamped them a bit afar from each other, as I wanted to partially die cut the entire border using the coordinating
Our Home to Yours die set. This was a bit time-consuming to do, as the alignment needed to be perfect, but I think it was well worth it in the end.
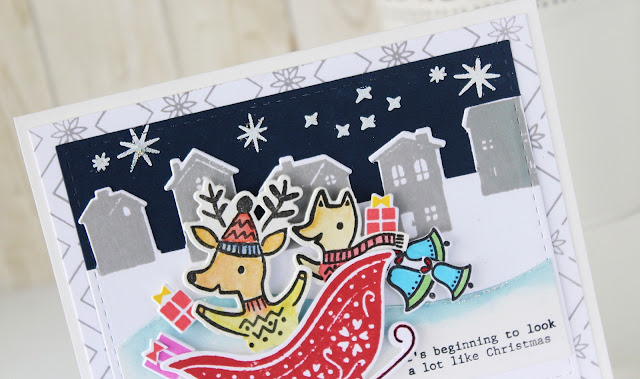

Once that was done, I decided to add some bells and gift boxes to my panel to create a more lively scene. The bells were stamped using
Detail Black Ink and then coloured using Zig Markers. The gifts were stamped in an assortment of colours -
Candy Violet,
Berrylicious, and
Sunshine . I die all of them using the coordinating Sleigh Bells Ring
die set, and popped them to my panel using foam squares. Next, I took a piece of Navy Blue Cardstock and stamped some snowflakes on it using the
Sleigh Bells Ring Stamp and then heat embossed it using Ultra Fine White Embossing Powder. I then die cut the panel using the
Stitched Rectangles die set and kept it aside.

I took another piece of Neenah Solar White Cardstock and used the
Floral Diamond Cling Stamp to stamp on it using
Metropolis ink. Next, I die cut a hill slope from White Cardstock and adhered it to the front of my card panel using foam dots. I coloured the edge of the slope using
Ocean Breeze ink to give it more definition. Then, I stamped my sentiment on it from the
Tree Trimming Friends stamp set using
Detail Black Ink. Once that was done, I adhered my panels to a white card base. I also added a teeny bit of Diamond Stickles to the embossed snowflakes and hill slope for a touch of shimmer.
Next, I stamped the sweet bunnies from the
Tree Trimming Friends stamp set on Neenah Cardstock using
Detail Black Ink and coloured them using Zig Brush Markers. I have done very simple colouring, but you can make it as detailed as you would like - That's the beauty of these stamp sets! Later, I die cut them using the coordinating
die set.

To add some visual interest to the scene, I decided to add stamped houses and gift boxes. I stamped the houses from the
Our Home To Yours Stamp Set using
Ballet Slipper and
Sky Blue inks and then die cut them using the
coordinating dies. The gift boxes are from the
Sleigh Bells Ring Stamp set and were stamped using
Berrylicious and
Sunshine inks. I popped all of these images to my card panel using foam squares for dimension.
To bring the scene to life, I decided to create an ink blended galaxy sky. I took a piece of Neenah Classic Crest Solar White 110 LBS Cardstock and blended the panel using
Stargazer,
Sapphire, and
Summer Shower inks. I then flicked some water on the panel to create a bleached look. Once that was done, I die cut the panel using the
Diagonal Stitched Rectangles die set. I went ahead and die cut two others panel from Neenah Classic Crest Solar White Cardstock using the
Diagonal Stitched Rectangles die set. I layered these panels one on top of the other for a crisp look.
The sentiment is from the
Our Home To Yours Stamp Set and was stamped using
Berrylicious ink on a piece of White Cardstock. I die cut it using the coordinating
die set. To finish, I scattered some white
Jewels all over my panel. Lastly, I adhered the various card panels together to the white card base.
PRIZES
You also have the chance to win a $25 gift card sponsored by Pinkfresh Studio from my blog. All you have to do is leave a comment letting me know which card is your favourite. :)
All winners will be chosen and posted on the Pinkfresh Blog on Wednesday, September 24, 2020 - so make sure and check back to see if you were a winner! Winners must check the
Giveaway Page on the Pinkfresh Blog and claim their prize within 2 weeks.
SHIPPING PROMO
Pinkfresh Studio is offering FREE US shipping or discounted international shipping on orders over $50+. Offer valid from 9/17/2020 at 12:01 am EDT through 9/24/2020 at 11:59 pm CST. Be sure to stock up on your favorites from this release to lock in this special promo!
You can find all of the links to the full list of hop members below.
Thank you so much for stopping by today! Be sure to leave a comment before you leave and enjoy all of the inspiration on the rest of the hop!


