Showing posts with label Prima papers. Show all posts

Friday, November 14, 2014

Mr. & Mrs.

Hello everyone,
Today, I have another card to share with you all and I have created it for the Runway inspired challenge where we have to create a card based on the designer Oscar De La Renta's designs. He is a fabulous fashion designer and all his designed clothes are so gorgeous! Sadly though, he recently passed away. To honour his memory, the Runway challenge has asked us to choose from one of his Spring collection looks and create a card based on it. My card is inspired from the below picture :-

And here's my take on this inspiration :


Well as you can see, the first thing that attracted me to this look was the gorgeous lacy bottom half and I immediately had to recreate it ...At first my thought was to go for a die cut lace, but then I decided I wanted an stamped element on my card rather than a die cut one. I got out my  Justrite Floral fan Elements stamp set and picked out an border stamp from it and stamped and embossed it on vellum paper using Ranger Super Fine White Embossing powder and then fussy cut it and pleated the paper to create this look .
Then, I pulled out my Antique linen Distress Ink pad and smooshed it on my Craft Sheet and spritzed it with water liberally. I then ran my cream color cardstock in it. This gave a nice base color to my card and I went ahead and layered my embossed lace on the cardstock. On the upper half of the card,  I adhered a black card stock followed by a silver Washi tape. The frame is made from Mod Molds - Ornaments and painted using the Distress Spray Stain- Tarnished Brass and Platinum Stickles and I have adhered a Prima Zephyr paper on the back of it as I wanted to incorporate a little bit of the background from the inspiration picture in my card. I finished off my card with a die cut sentiment.
I'm also entering this card in the Pretty Paper Studio challenge where the theme this month is Embossing!

Here's a look at the stamp set I used for the lace :
 Hope this looong post has not put you to sleep :)

Supplies used :
Cardstock- Fabriano Elle Erre, Paper Accents- Vellum.
Dies- Memory Box Alphabet Soup die.
Stamps- JustRite Floral fan Elements stamp set.
Inks- Versamrk Dazzle Embossing ink pad, Distress ink- Antique Linen.
Ranger Super Fine White Embossing powder,  Prima Zephyr paper pad, Mod Molds - Ornaments, Distress Spray Stain- Tarnished Brass, Silver and Gold Glitter Washi tapes.

 I really hope you like my card ..Do drop in your comments about it ..Would love to hear from you regarding it :)
Have a nice day everyone!

Monday, October 20, 2014

Sparkle with Prima Lulupu Blog Hop!

Hello everyone!
Welcome to the Lulupu Sparkle with Prima blog hop!
You should have come here from the very talented, Nikita's blog.
If not, here's a link to follow the complete hop list starting from the Lulupu blog.

Today is the Day 8 of the Blog hop and I hope you all have been enjoying all the gorgeous inspiration that the Lulupu team and the Guest Designers have been sharing up to now. We also hope you're hopping along each of the blogs and leaving us some love as they are lot of prizes to be won this month! Not only that, we have a month long challenge this month where we are asking you to use your Prima products to create a 'sparkly' project for this festive season. We not only are giving prize to to the Winner, but also to do the Top 3 this time. You really don't want to miss this opportunity :)

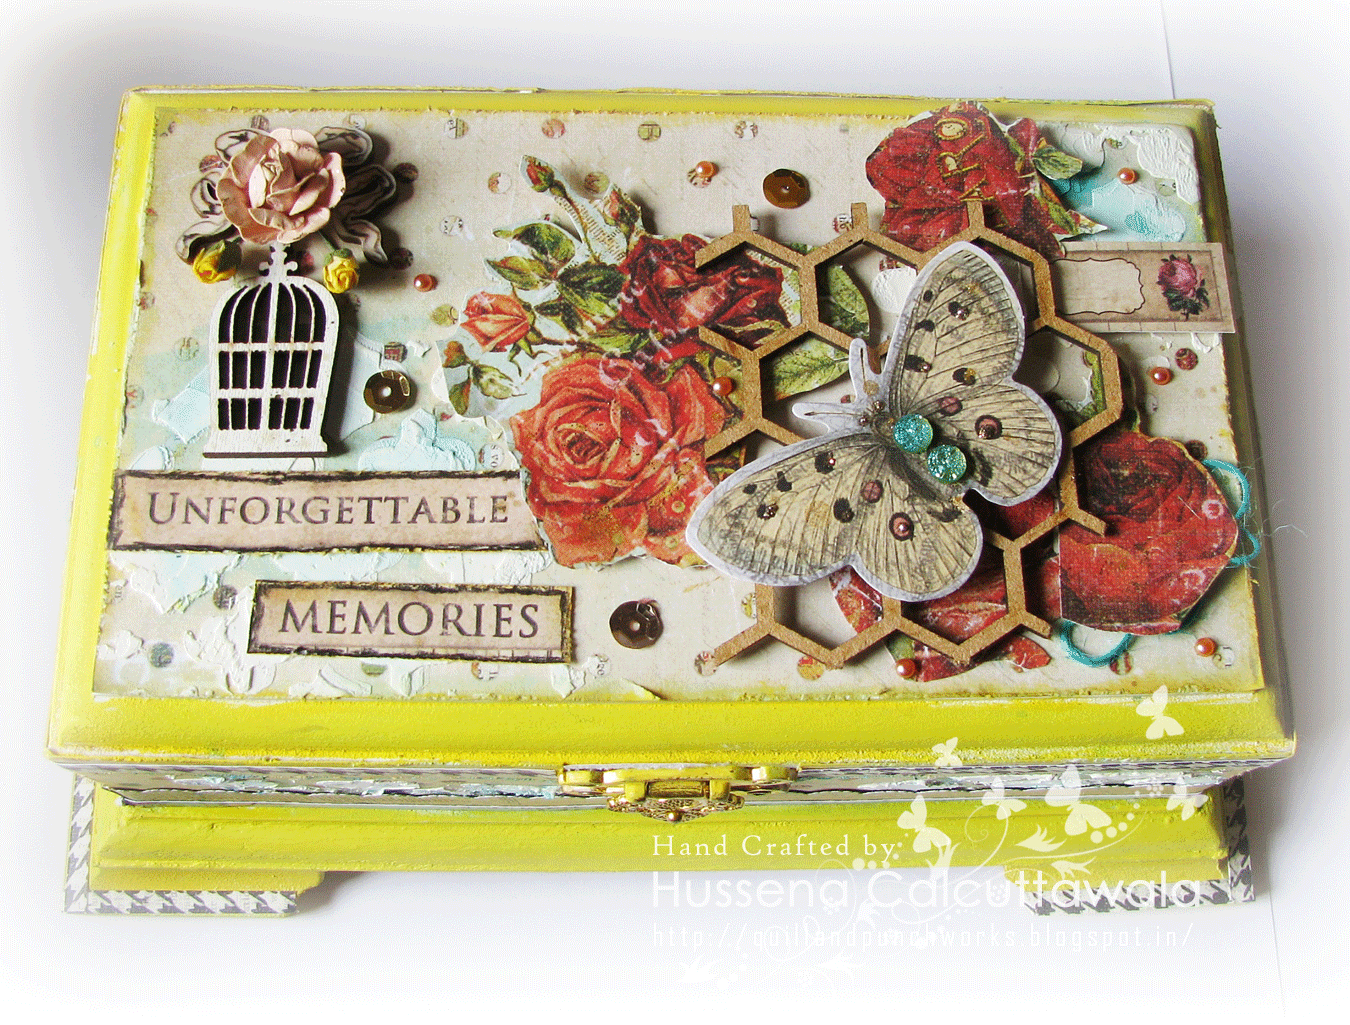
Now, coming to my project, I have an altered MDF box to share with a step-by-step tutorial. 


 The insides of the box which I have covered with a pattern paper from the Prima A4 Cigar Box paper pad.

Now, for the tutorial part :

Step 1- Paint the MDF box with White Gesso entirely. This will help in the paint coverage as Gesso gives tooth to your projects and so it takes colours very well.

 Step 2- Measure and cut the pattern papers you're going to use. I've used Prima A4 Cigar box paper collection entirely for my box right from the base paper to ALL the embellishments as well.
Distress your papers after cutting them either with a Distressing tool or with the help of a small pair of scissors and ink the edges using Distress inks of your choice. I have used Scattered Straw thought it is totally optional.

 Step 3- Before sticking the papers to your box, paint the box using paints of your choice. I have used Acrylic paints from Camlin- Chromium Yellow and Cobalt Blue.
Then, I have done stenciling using modelling paste from Sakura and a art knife and ofcourse a stencil of your choice.Mine is from My Favorite Things.

Step 4 - I've done stenciling on the top and all four sides. Then, added blue splatters using Heidi Swapp- Tropicana Teal mist and Heidi Swapp- Gold Lame mist. (This step is optional)

After these steps, I painted the insides of the box as well with Gesso and Blue paint and layered the Prima pattern paper inside as well. This is from the Prima Cigar Box paper pad too!
To embellish my box on the top, I've paper pieced the flowers from the Cigar Box paper pad again, mounted it on foam and adhered it to the top of the Honeycomb MDF piece.
The butterfly die-cut, the wooden cage and the bow are all from the Prima Epiphany collection- Wood icons and Ephemera pack.
I have used the Prima Coffee Break Crystals on the butterfly and also some gold sequins from the Epiphany Ephemera pack. The sentiment and the small tag n the right hand side are from a discontinued collection of Prima now, called Prima Romance Novel paper pad. I have liberally used Ranger Platinum Stickles on the butterfly and flowers though it does'nt seem to show in the photograph. :(

Hope you like my project. Do leave me your comments and views regarding it. 
You next stop on the hop is another incredible crafter, Mallika Kejriwal

Have a nice day everyone!

Sunday, February 23, 2014

An Accordion Fold card! :)

Hi friends,
Today, sharing with you all an Accordion fold card which I have made for my inspiration post at Lulupu where our current challenge #26 is 'Try something New' .I have tried this fold card for the very first time and here's how it looks :                                                            
Here is how it looks when it is opened fully :
A look at some of the inside pages :

I have made a co-ordinating box to keep this card in. Here's a look at it :

This card opens up to 4 inches by 18 inches and I have embellished the front of the card with handmade flowers made using Joy! Crafts flower dies and colored them using Distress inks. Have also used Spellbinder's dies to layer my die-cuts. The corner, the border die are all from Spellbinder's. Unfortunately, don't know the name for this die as it is now, discontinued :( My box measure 51/2 inches by 1/2 inches and there's ample space inside for the card and the ribbon bow on the side. I have created the window using Spellbinder's Square dies and then placed a acetate sheet below the scalloped square.
 I am entering this card in Brenda's 5th Blogoversary Celebration .I would like to mention here that my all time favorite craft items to work with are definitely my Distress inks and my flower dies. I almost always make my own flowers and color them using distress inks :)

Supplies used :
Pattern papers - Prime Rondelle Collection and Prime Romance Novel paper pad.
Embossing folder Provocraft/Cuttlebug Swiss Dots embossing folder.
Punches -Martha Stewart 3 in 1 Classic Butterfly Punch.
Dies  - Spellbinder's Fluer De lis Square die,  Sags Ironworks Motif Scalloped Squares die, Joy! Crafts Flower dies, Spellbinder's Leaf Foliage die, Cheery Lynn Olive Branches die.
Inks - Distress inks -Spun Sugar, Victorian Velvet, Peacock Feathers, Shabby Shutters, Peeled Paint.
Versafine Onyx Black ink pad.
Stamps - Inspired by Stamping Small Fancy Labels 18,  Micia Hello Girl stamp set.
Kaisercraft Pink flowers, Daisy flowers, Pearls.
                                                                      
Challenges entered :
PPS -All about Love
Itsy Bitsy -Say it with Roses
Allsorts -Ladies Day
Inkspirational Challenge -Bingo (Shaped card, Ribbon or lace, Punches or Dies)
The Card Concept -I have chosen the style Shabby Chic.
Inspired by Stamping Customer Gallery Contest - I have used the Inspired by Stamping Small Fancy Labels 18


Hope you all like my card. Please do leave me your comments/ suggestions. I love to hear from you! :)
Have a nice day everyone!
                                          

Tuesday, June 25, 2013

A gift set! :)


Hi friends,
I know its been very long since I updated my blog....As many of you know I have been on a vacation and just came back two weeks ago...But I have been sharing my posts at the Crafter's Corner blog just not here :(...I know I have missed many of your posts in the past few days,but I am hoping to catch up with it soon !...In the mean time I am sharing with you a mini bag and a tag set which I have made for my inspiration post at Crafter's Corner.


The details of how I made this set is shared on the Crafter's Corner blog..Please check it out HERE

Supplies used :
Base CS : Fabriano Elle Erre
Pattern Paper : Prima Rondelle Collection
Dies :
Cheery lynn Daisy strip ,Anastasia Border, Tropical Flourish.
Spellbinders Label 9 die
Stamps : IBS Creative tags set.
Inks : Distress Inks : Scattered straw,Spun sugar,Peeled paint and Memento Pear Tart,Versafine Onyx Black ink
Small white flower's from Crafter's Corner
Pearls : stash

Challenges entered :
For the love of crafting-Photo inspiration ( Made it to Top 3 )
IBS June blog hop -Shabby chic projects
IBS Customer Gallery-The sentiment in my tag is from the Creative tags set. 

Hope you like my bag and tag...Do leave me your comments/suggestions..Would love to hear from you!
Have a nice day everyone!