Showing posts with label Friendship cards. Show all posts

Monday, December 13, 2021

Spellbinders December 2021 Clear Stamp & Die of the Month | Color Outside the Lines


Hello, crafty friends!
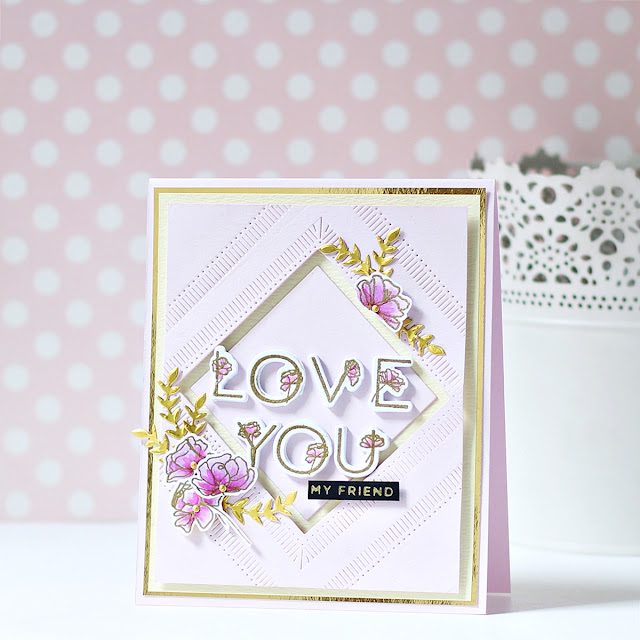
Happy December and welcome to the start of a fresh new week. I have a friendship card to share today made using the Spellbinders Clear Stamp & Die of the Month - Color Outside the Lines.

The Spellbinders Clear Stamp of the Month is all about florals and outside the line details. This is a 19-piece clear photopolymer 4 x 6 stamp set perfect for many cardmaking projects and lots of occasions. This “Color Outside the Lines” stamp set features made in the USA stamps from high-quality photo-polymer for clear, crisp impressions. 

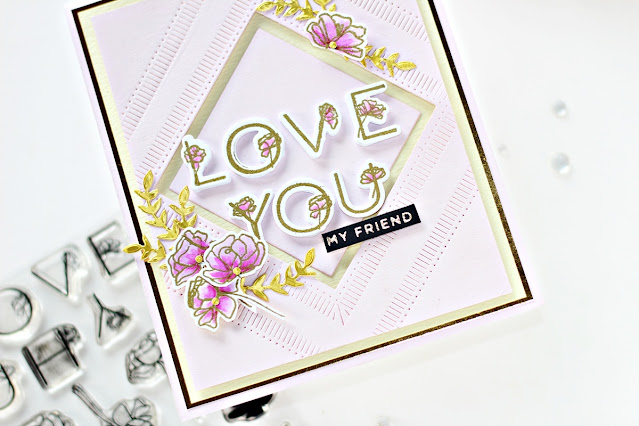
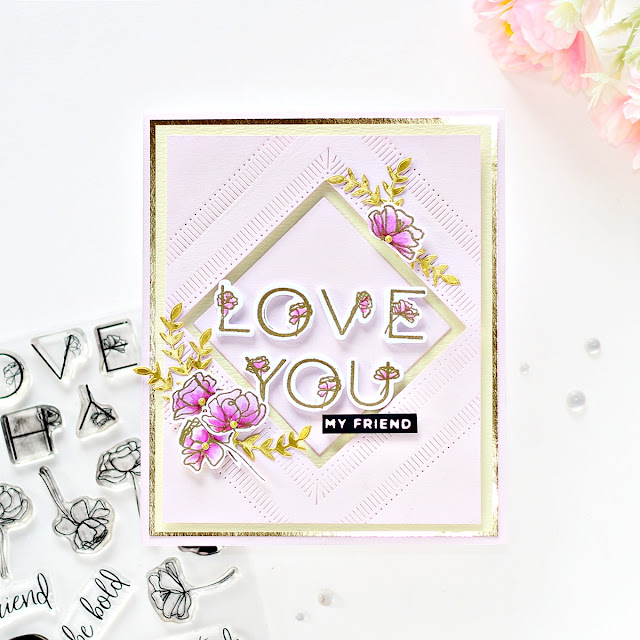
 The pretty layered flowers and elegant floral letters from the set inspired me to create this friendship-themed card. I used the Clear Stamp and coordinating dies from the set along with the Fluted Classics Square Etched Dies for my design.

To create my card, I began by stamping the floral letters in Versamark Embossing ink on a piece of Snowdrift Cardstock and heat embossed it using Super Fine Gold Embossing Powder, before die cutting it with the matching coordinating dies. Next, I stamped the outlined floral images included in the Color Outside the Lines Set using Versamark Embossing ink on another piece of Snowdrift Cardstock and heat embossed the images using Super Fine Gold Embossing Powder. I did some quick colouring using Copic Markers and then cut out the pieces with the matching coordinating dies.

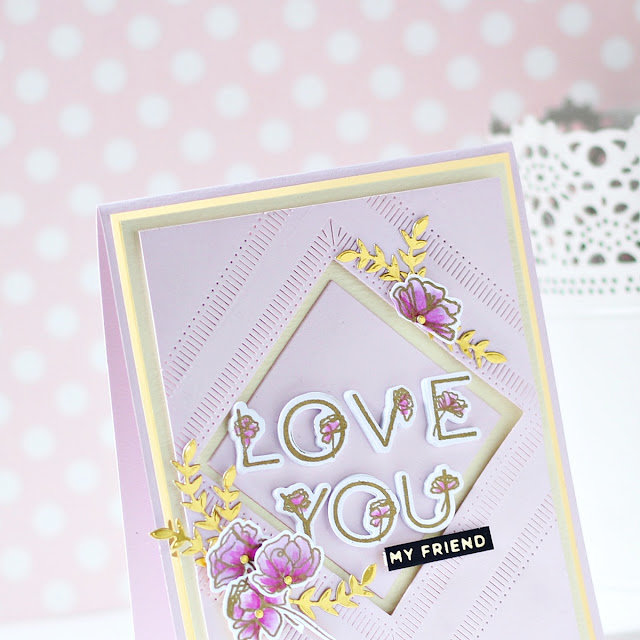
Next, I die cut Lilac Cardstock using the Large Outer Rim and Medium Outer Rim Dies from the Fluted Classics Square Etched Dies and foam mounted the die-cut panel to a piece of Lemon Yellow Cardstock. Once that was done, I die cut Lilac Cardstock using the Medium Outer Square and Inner Rim Dies from the same set and adhered the die-cut square piece to the centre of the panel using Liquid Glue. Then, I adhered each of the die cut letters down using foam squares in the center of the die-cut frame over the card panel to create the card sentiment.

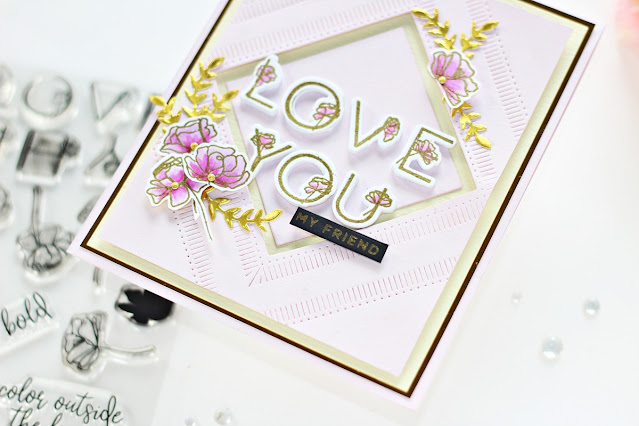
Next, I die cut Mirror Gold Cardstock using the leaf die included in the Simply Perfect Layered Blooms Die Set. I die cut a few leaves to go along with my floral stamped images and adhered all the pieces down on my panel using Liquid Glue. The, for my sentiment, I used Gold Hot Foil to foil Onyx Cardstock using one of the sentiments from the Mini Sincere Sentiments Glimmer Hot Foil Plate and cut it out using the coordinating die. I adhered the piece onto my panel using foam tape for a raised effect. Then, to complete, I mat my background panel with Mirror Gold Cardstock before adhering it to a top-folding lilac card base with tape runner.


I hope you liked my card and thank you so much for stopping by today. You can subscribe to any of the Spellbinders Clubs between the 1st - 24th of each month and never miss a fun kit like this again!
  

Merry Member Appreciation
Spellbinders are offering a free gift in December Clubs. Gifts vary by club. Total Package Members receive the best value as they will receive all the clubs and all the free gifts!
 

If you like what you've seen from me, please give me a follow over on my Instagram (@hussena_cal) and/or subscribe to my blog if you haven't already.
Wishing you a great day ahead!

Saturday, September 18, 2021

Spellbinders Add to Cart Collection by Becky Roberts


Hello, crafty friends!
I hope you are doing well. I am back today to share a couple of cards using the NEW Add to Cart Collection by Becky Roberts. This fun collection features a 3D Pop-up shopping cart and lots of goodies to "add to cart" including party supplies, shopping bags, and a Christmas tree!a 3D shopping cart. It is so cleverly designed and you can easily use these dies for creating cards for a variety of any occasions - Party, holiday, and girls’ night out are just some of the themes featured.


I made a set of two bright and dimensional cards using the 3D Shopping Cart Etched Dies, Shopping Bags Etched Dies, and the Shopping Cart Party On! Etched Dies. 

For my first card, I focused on the 3D Shopping Cart Etched Dies and the Shopping Bags Etched Dies. This card design is perfect for showering a loved one with birthday wishes.

I began by trimming a piece of Snowdrift Cardstock to size and then and secured the Sun Burst Stencil on the top of the panel to blend Squeezed Lemonade Distress ink with a blending brush. Next, I stamped a strip of road onto the panel with Moon Rock ink. 

Then, I die cut the components of the shopping cart out of PomegranateMirror Gold, and Onyx Cardstock using the 3D Shopping Cart Die Set and assembled it together using liquid glue. There are options to create both a narrow and wide cart, depending on what you’d like to fit inside. I chose to make a wide cart. I adhered the cart together, then added it to the card panel.

Next, I die cut three shopping bags out of Pink Sand, Waterfall, and patterned paper prints using the Shopping Bags Etched Die Set, and then adhered it together for a 3D look. Once that was done, I die cut balloons out of Teal Topaz, PersimmonPink Sand, Wild Berry, and Mirror Gold Cardstock using the Shopping Cart Party On! Etched Dies. I adhered them on to my panel using liquid glue. 

To finish, I die cut Snowdrift Cardstock using the tag die included in the Shopping Bags Etched Die Set. I colored the piece using Peacock Feathers Distress ink and stamped a sentiment onto it using Versafine Onyx Black ink. I tied a simple bow using some Gold Baker's Twine and attached it to the shopping cart using foam adhesive. I adhered the panel to a top-folding A2-sized white card base with tape runner.


My second Card features the Shopping Cart Party On! Etched Dies. This is a great set for a party, anniversary, birthday, and even New Year celebrations.

To create my card, I began by trimming a piece of Onyx Cardstock to size. Next, I die cut a circle towards the bottom half of the panel using the large circle die in the Standard Circles LG Etched Dies. Then, I adhered a piece of Ivory Metallic Cardstock behind the panel to help it pop out. Next, I added a scalloped circle frame cut out of Mirror Gold Cardstock using the Scalloped Circle Die Set. This helped create a window on my panel. 

Once that was done, I die cut the champagne bottles, flutes, and masks out of Pink Sand, Raindrop, Mirror Gold, Persimmon, and Wild Berry Cardstock using the Shopping Cart Party On! Die Set. I assembled the different pieces together and adhered them to my panel using a combination of foam adhesive and liquid glue.

Next, I die cut the party banners out of Pink Sand, Raindrop, Mirror Gold, Persimmon, and Wild Berry Cardstock using the Shopping Cart Party On! Die Set. I assembled the pieces together and then added it to my panel using liquid glue. Then, to complete, I heat embossed a sentiment in gold underneath this panel. I mounted my panel to a piece of Mirror Gold Cardstock before adhering it to a top-folding A2-sized black card base made out of Onyx Cardstock with tape runner.


I hope you liked this set of bright and fun cards and thanks so much for stopping by today. You can see the Add to Cart Collection by Becky Roberts on the Spellbinders website. It is truly fabulous and these die sets make creating so fun!

If you like what you've seen from me, please give me a follow over on my Instagram (@hussena_cal) and/or subscribe to my blog if you haven't already.
Wishing you a great day ahead!

Friday, July 23, 2021

Spellbinders Birdhouses Through the Seasons Collection


Hello everybody!
I hope you are keeping well. Today's post has been long overdue because the cards that I am sharing today were created and photographed back in May 2021. I got around editing the pictures today and am so happy to finally blog about my projects. 

My cards for today feature the Spellbinders Birdhouses Through the Seasons Collection by Vicky P. This whimsical and unique collection includes five die sets and a sentiment stamp set with which you can create bird and/or birdhouse-themed cards. You can use the products in a variety of different ways, no matter what the season!

My first card features the Build a Spring Birdhouse Etched Die Set. I used the different elements from the die set to create a sweet floral spring card for a friend. 

To begin, I die cut Pink Sand and Raindrop Cardstock with the birdhouse die from the Build a Spring Birdhouse Etched Die Set. Next, I die cut SnowdriftPink SandRaindrop, and Fern Cardstock with the flower and leaf dies from the Build a Spring Birdhouse Etched Die Set.  Once that was done, I die cut Oatmeal Cookie Cardstock with the birdhouse stand die and the nest die included in the set. Then, to complete the birdhouse, I die cut Snowdrift Cardstock with the picket fence die and the egg die from the same set. I die cut everything using my Spellbinders Platinum 6" Machine and then kept the die cuts aside to work on my card panel. 

I trimmed a piece of Snowdrift Cardstock to size and used a Cloud Stencil with Green Olive ink to give the illusion of green skies. I then die cut some blades of grass from Fern Cardstock and adhered them along the bottom of the card. Next, I stamped my sentiment from the Borders and Sentiments Clear Stamp onto the panel with black ink.

It was now time to assemble my card together. I adhered the roof, the birdhouse, and the birdhouse stand on to my card panel using foam squares. I then added the bird to the opening of the house along with the nest, the egg, and the picket fence. I embellished the house with the various die cut flowers and leaves. Next, I added mini die cut circles to the centre of the flowers for interest. 

To finish, I trimmed a piece of Raindrop Cardstock to size and adhered it a side-folding 5" X 7" white card base.


My second card for today features the Build a Summer Birdhouse Etched Die Set. I paired the lighthouse birdhouse die with the Sun Burst Stencil from the Liberty Collection to create a bright and cheery slimline card that is perfect for sending a sunny hello.

To begin, I trimmed a piece of Snowdrift Cardstock to 4" X 7" and secured the Sun Burst Stencil on the top of the panel to blend Squeezed Lemonade Distress ink with a blending brush. I then removed the stencil from the panel and secured a DIY Cloud Stencil on the top to blend Tumbled Glass Distress ink on the panel with a blending brush to give the illusion of blue skies. 

Next, I die cut a few valleys to create the landscape of a beach on my card. I die cut them from Oatmeal Cookie and Raindrop Cardstock and adhered them to my panel using liquid adhesive. I blended Tumbled Glass Distress ink along the edge of the slope with a sponge dauber to add some definition and interest. Once that was done, I stamped a sentiment from the Borders and Sentiments Clear Stamp onto the panel with black ink. 

It was now time to create focal for my card. I die cut Snowdrift, Comsic Blue, Pomegranate, Portbello, and Timber Cardstock with the birdhouse die and the coordinating elements from the Build a Summer Birdhouse Etched Die Set. I also die cut Snowdrift Cardstock with the shell, starfish, and gull dies. I used Nuvo Alcohol Marker Pens to colour the shells and the starfish. I then added a coat of Diamond Stickles for some sparkle and shine.

I assembled the different components of the lighthouse together and adhered it to my card panel using foam squares. I also adhered the seagulls to my card panel using foam adhesive. Next, I adhered the lighthouse stand, the starfish, the anchors, and the sea shells on to my panel using foam squares for dimension. Then, to finish, I adhered the background panel to a 4.25" X 7.25" side-folding white card base. 


I hope you enjoyed this duo of nature-inspired cards. You can see Birdhouses Through the Seasons by Vicky P. HERE. It is truly marvelous and these die sets make creating so fun!


Thank you so much for your stopping by and reading this blog post. I hope you liked my projects! 

If you like what you've seen from me, please give me a follow over on my Instagram (@hussena_cal) and/or subscribe to my blog if you haven't already.
Wishing you a great day ahead!

Thursday, August 15, 2013

Friend to Friend!

Hi everyone,
I am just dropping by to share a quick card which I have made especially for the BGC challenge which is
Celebrate your friend with a peepy-fruity twist...I had made a card earlier but failed to follow one of the rules which was to make a window and wanted to give it a second try...This is very last moment  and here's a look at My card :-                                                            
To make this card,I have first stamped the flowers,the leaves and then colored them using Distress Inks and a dauber...This was the fastest way to color them and the colors have come out really bright....I have tried out something new here...
 Tip : Do you see the 2 ribbon strips on the bottom...Those are created by coloring cardstock's  with Festive Berries Distress ink and cutting them in thin strips and then I have done Faux Stitching over them to give a Grosgrain kind of look...This idea was inspired by Tejal's card which she had shared over Swap Central India..Thank you so much Tejal  :)

Supplies used :-
Base CS -Campap
Embossing Folder - Provocraft Swiss Dots.
Dies :-
Itsy Bitsy Fancy Classic Panels.
Stamps :-
Lawn Fawn Flutter By
Unity-Sarah Hurley Stamp set.
Inks :-
Distress inks : Fired Brick,Ripe Permisson,Mustard Seed and Scattered Straw.
Memento Pear Tart dew drop ink.
Versafine Onyx Black.
Uniball Signo white gel pen.

Challenges Entered :-
Beyond Grey Challenges - Celebrate your friend with a peepy-fruity twist ! (For the fruit inspiration I have gone for Red Berries,Mango and Banana for the green leaves). ( Winner! :D )
Annabelle Stamps -Color Inspiration..( I have got all these colors on my card including the very tiny orange flowers on the right hand side :)                              
Top Tip Tuesday - Embossing.( Shared my top tip above)
Cuttlebug Mania -Anything goes-Embossing (I have used the Provocraft Swiss Dots embossing folder)
                                                   

Hope you all like my card...Please do leave me your comments/suggestions regarding this..Would love to hear from you!
Have a nice day everyone!

Thursday, August 1, 2013

Best friends -CASEing Deepti!

Hi friends,
So today I am back again to share with you a card I have made for my blogger friend Deepti's celebration challenge...She had challenged us to case any of her card for her celebration challenge and here's my take on her card :-

MY card :-                                                      
                                                                               
And a side view of my card :-                                              
And here is DEEPTI's card below :-                                                           
As soon as I had seen Deepti's this card I have been wanting to case it...There is something about the colors against the black background that really stood out for me...I really really love Deepti's card!
For my card,I have done a lot of paper-piecing using the Lawn fawn stamp sets on plain color cardstock...And the fussy-cutting was the most tedious part...My finger's  are still paining after cutting out those tiny itty-bitty leaves :P...But I am so happy with the end result that it was totally worth the effort !!

Supplies used :-
Black CS- Fabriano Elle Erre!
Stamps :
Lawn Fawn Flutter by,Blissful Botanicals.
TPC All occasions stamp set.
Dies :
I have used the Itsy Bitsy fancy classic die for de-bossing the sentiment panel.
Inks :
Versamark Embossing ink.
Versafine Onyx black.
Embossing powder- Zing!Opaque White.
Ribbon and Charm -Crafter's Corner.
Pealrs and bling.

Challenge Entered :
Catchy Crafts-CASEing Deepti's card.
BGC- Fruity + Twist ( I was inspired by the colors of the watermelon ).
SSS-Anything goes!

Hope you like my card...Do leave your comments/suggestions...I love to hear from you!
Have a nice day everyone!

Tuesday, July 10, 2012

Inspiration For The Love Of Crafting Challenge -8

Hi Friends,
Today sharing with you all My Card for this Time's For The Love Of Crafting Challenge -8 Where the Theme is Anything goes with a Twist: Use Brown Color ,Jute And optional Use A flower. So here's My Take on it :-
                                                 
And Another View of it {:- This One clicked in Natural Light } :-
                                   
       For This Time's Theme I made a card for Frienship Day...The Butterfly I have used over Here is a Digi- Printout {Taken From Pinterest }For the Flowers, I wanted To do Something Different Than my Usual Punch craft !! So,I Stamped the Friends Sentiment Repeatedly, On Red Paper and Punched out those Flowers and Layered them, With the Help of a Brad! So now that you have seen my inspiration Please Head Over To The  For The Love Of Crafting Blog Where this Time's Prize Package Is Sponsored By Shalini Mittal of Crafter's Corner And what a package its is 72 sheets of DCWV mat Stacks wow!!!isn't that generous!!!so please do play along with our challenge this time :)

Supplies Used :-
Base CS (White) -Campap
Red CS { For Flowers } -Local Buy !
PP-All About Scrapbooking in Full Bloom !!
Die Cut- Hand Drawn and Cut , Dots Stamp- Unity , Friends Sentiment stamp -Unity (Sarah .K. Collection)
Punches - Flower -Jef {Large} , Leaves- Punch Bunch Sprig
Orange Brad -Basic Grey ,Yellow Brads -MM
Jute Twine -Candy From Yvonne :D
Butterfly- Digital
Red Rhinestones and pearls- Anadhaa Stationery ~!

Challenges Entered :-
1.Hands 2 heart Challenges -Seed a Friendship
2.Sentimental Sundays -Bingo { Stamp ,Flowers, Pearls}
3.DYSU -Use Red
4.Pals Paper Art-Color Challenge{Daffodil delight,early Espresso,Cherry Cobbler }


Hope You all Like My Card...Please leave Me your Comments /Suggestions!
Have a good day Everyone!

Sunday, September 4, 2011

MY BLACK,WHITE AND RED KITE RUNNER.

HI friends how have you all been, it's been long since my last post and i am sorry to have been MIA for so long but now i am back again and this time want to show you a card which i was really very excited to have created.Have a look                     
      I made this card for this time's Cas-ual Friday challenge  where the theme is to make a card based on the colors red white and black and wait for this ....inspired by your favorite book or book cover ,when i read about it it was like a light bulb moment for me i just knew what i was going to make and it was a card   based on the novel THE KITE RUNNER by Khaled Hosseini   i don't know if any of you have read it or even for that matter have heard about it but trust me when i say this book is the best ever read,i really would recommend it very highly just loved this book.

     Ok this this the challenge logo ,and now for how i made the card i don't think it requires much explanation i first cut the silhoutte of the boy using an image which i got from my daughter 's art book and placed it on some dimension tape then cut the kite and made the banner the sentiment is a glitter sticker and i have added eyelets to the sentiment banner and distressed clouds with the help of an cloud cut out.
                 I am also entering this card in the following challenges:
1.http://theplaydatecafe.blogspot.com/  (black white and a splash of red
2. http://prairiefairyfridays.blogspot.com/ (inspired by a story book or cover)
3. http://craftingwhenwecanchallenges.blogspot.com/   (anything goes)         
    I am also putting up the PDCC LOGOand here it is:
                                                                   

Tuesday, July 26, 2011

A FRIENDSHIP CARD.

HI all i know i seem to be posting things every other day but this card of mine is a bit special as it was made  for a special person,a friend who is recovering from a major surgery and who loves my work and receiving cards from me too.so here is a peek at it.

    and now for the inside of the card take a look.
      okay i know this is so not my style as there's no quiiling in it but i have really fallen in love with stamping and when i won michelle's candy(i luv scrapping)   i got some lovely border stamps and a inkadinkadoo flower stamp, i put them to use right away  and created this card the center of the flower had an another sentiment and i replaced it with an favorite of mine from hobby ideas then to highlight it i used some glitter glue on it and also the center of the punched butterflies .i have decorated the insides of the card with a bit of stamping and layering with a black and pink cardstock.
                          hope u guys like my work and all your comments are highly appreciated so please leave a line.hope all of have a good day.
i am entering this card in the following challenges.
1. http://yyam.blogspot.com/2011/07/go-minimal-with-lynnda-hosni.html 
2.  http://craftyjc-challenge.blogspot.com/2011/07/craftyjc-challenge-8-friends-are.html.                                   

Monday, July 25, 2011

ALL CREATURES BIG AND SMALL.

HI friends today i am posting a card which is made for this time's ICR CHALLENGE and the theme is all creatures big and small but with a twist use one of each.I have done quilling this time too just have a look.
    I have kept the quiiling quite simple as wanted to highlight the humming bird and the butterfly more.The centre flower is made by joining two halves of an half circle coils and the grey flowers flowers are the open coil flowers the back ground paper is a DP from K&C company the scallops edge is hand cut with scallop scissors and the pearls are colored with chalk ink from inkadinkadoo.the butterfly is punched and covered with hobby ideas glitter.The sentiment is stamped and is a hobby ideas stamp.
i hope u guys like it and if u do please don't forget to leave me a comment.
i am entering this card in the following challenge:
1http://indianstampers.blogspot.com/2011/07/icr-challenge-7.html.(creatures big and small)
2.http://craftyjc-challenge.blogspot.com/2011/07/craftyjc-challenge-(friends forever friendship card)
3.http://www.gingerloftchallenge.blogspot.com/(use sparkle)
4.http://onestitchatatimechallenge.blogspot.com/.

Saturday, July 23, 2011

MY YELLOW FLOWER CARD.

HI friends today I am posting an Card which has been Inspired by this times MOXIE FAB TUESDAY TRIGGER.and here's my Card have a look.:
         The center yellow flower is made of punched flowers and i have made it by first rolling a piece of yellow paper into a ball and sticking it in the middle of the doily and then layering it with embossed sakura flowers it took upto 3 layers to make it this size hope this helps. I have used a medium Sakura punch from Carl to create this flower.The leaves are punched Birch and Fern and they are jef punches which I have colored using chalk inks from Inkadinkado..The sentiment is an Hobby Idea's stamp and the ribbons from my stash .oh not to forget the twine in the button is from Snehal's candy.just love it.and now a closer look at the flower.
      Hope  you  guys like my Card and if you do please don't forget to Comment.Thank you every one and have a Nice day.
I am entering this card to the following challenges:
1.    http://www.moxiefabworld.com/2011/07/tuesday-trigger-perty-flirty.html(inspired from the dress and the buttons.)
2. http://craftyjc-challenge.blogspot.com/2011/07/craftyjc-challenge-8-friends-are.html(friends forever used a  friendship sentiment.)
3. http://creativecraftchallenges2.blogspot.com/.(use 3d layering which in this card is the flower and the sentiment which are both layered.).
4.http://fussyandfancychallenge.blogspot.com/2011/07/challenge-41-summer.html(summer)

Sunday, July 3, 2011

A CARD WITH DOODLING.

HI Friends to day i am posting a card where i have done doodling for the first time and it's also a first time that i have made a window card,so here it is have a look.
    This is the front of the card and now here are the pictures showing only the front and also the inside of the card.
                                                                       
    Hope the pictures have done justice to my work because for the first time i am compelled to say that the card looks much more better in real life than in this picture.
                      Now something about how i made this card,i have hand cut the window and covered the enclosure with transparent plastic sheet (i found one in an old wedding card)  and because i wanted to give a window effect i thought of creating these paper curtains,i have done doodling inside the card using a fine tip black marker and faber color pencils then made the sky by distressing it with blue ink.I so loved this paticular sentiment that i had to use it in this card and have to add that i have stamped it using this cute rubber stamp i bought recently.The out side of the card is decorated with punch bunch sun flowers and i have used brads in the centre and the swirls are of course quilled,the butterfly are punched and then covered with dots using the red gel pen. That's about it i think.  
I am entering this card for the following challenge:
1. http://craftyjc-challenge.blogspot.com/2011/06/craftyjc-challenge-7-digi-or-doodle.html
 2.http://bythecuteandgirly.blogspot.com/2011/07/july-things-with-wings.html?showComment=1309702811807#c7344874789225673033
 3.http://sirstampalotchallenge.blogspot.com/2011/07/july-challenge.html?showComment=1309703217392#c2150991411814488511
4.http://reasonableribbon.blogspot.com/search/label/challenges
5. http://theplaydatecafe.blogspot.com/
      Okay everyone have a good day and let me know your reviews as i really like to know what u think about my work.Thanks for dropping by.              

Friday, May 27, 2011

A QUILLED SUNFLOWER.

HI friends Today I am posting  Another Card and again its a Quilled Card just have a look:

  This  is a Quilled Sunflower card and I am entering this card for Two Challenges, One is the ICR challenge where the Theme is Dhink Chak and I have derived the Inspiration for this Card from the Bright Flowers of this time theme,and for the hand made embellishment i have made this quilled flower, the Second challenge in which I am entering this card is Kavitha's Celebration challenge (4) where Anita has asked us to make a handmade flower which can be used on a card or scrapbook or a box.
Hope my card qualifies for both these challenges.In meantime here's a close up of the quilled flower.
       Hope u guys like this card and please don't forget to leave a review or your comments for this card .