Hello there, crafty friends!
I have a couple of cards to share today featuring the June Card Kit by Spellbinders - Life is a Party! If you haven't heard about the Monthly Card Kits by Spellbinders or don't know how to subscribe to one, you can go over to the Spellbinders website and/or blog and read more about them HERE.
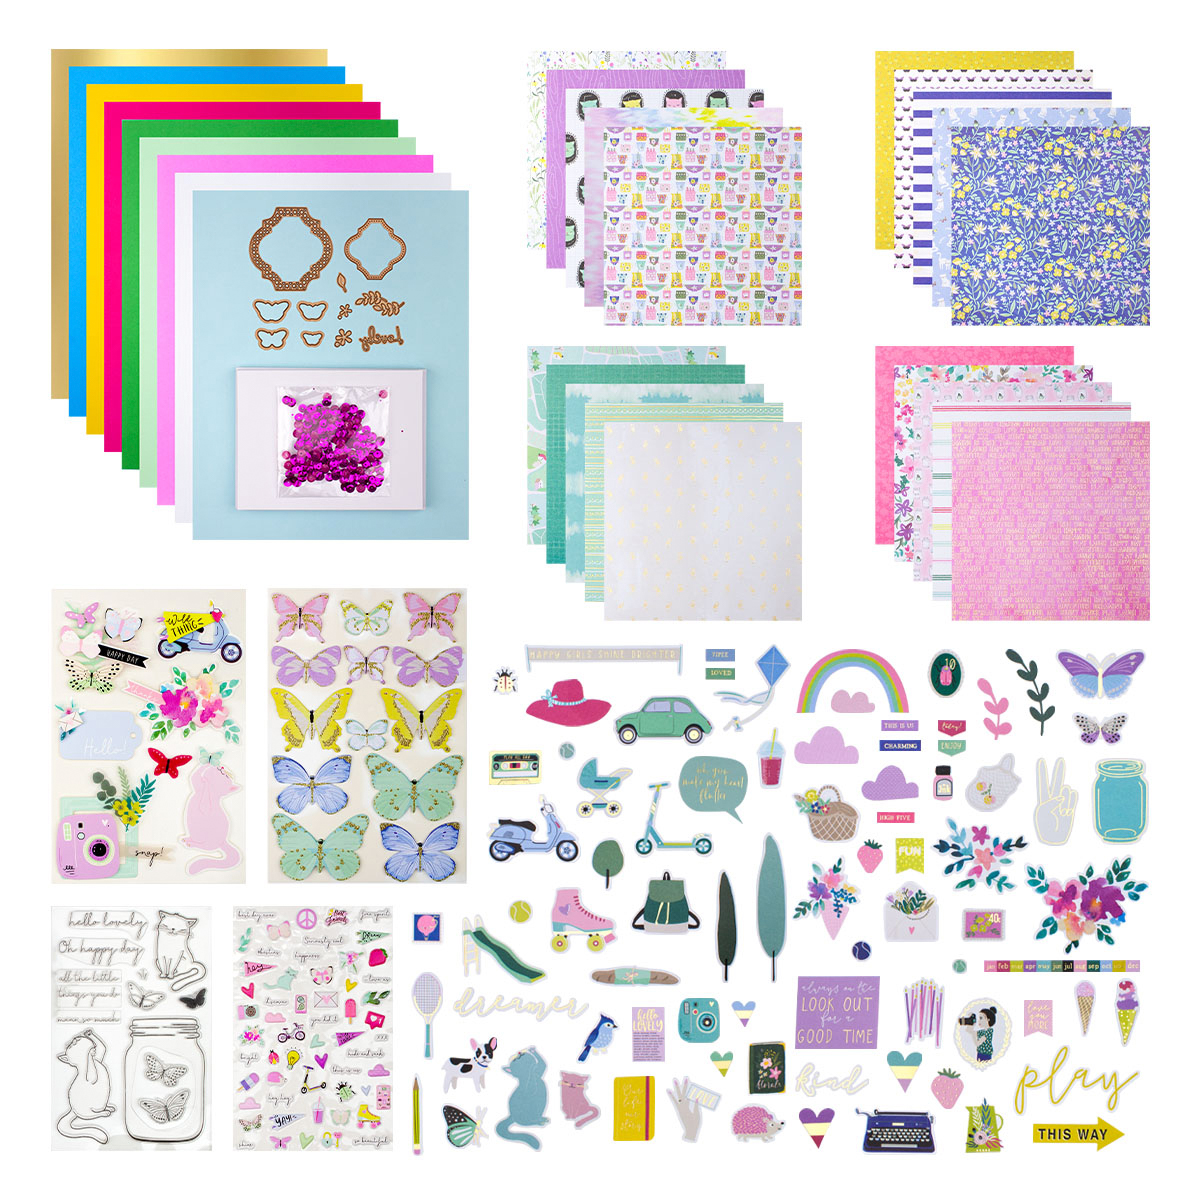
This "Life is a Party" Kit, like all their other Card Kits, gives you everything you need to create 10 unique cards and even more. You now also get better goodies, including a 40 sheet paper pad, clear stamps, an adorable die set, tons of embellishments, and more!

I have FIVE Card ideas to share with you today using this kit, so let's get started!

Card #1
My card uses the Life is a Party Paper Pad, Life is a Party Die Cut Shapes Set, Life is a Party Clear Stamp Set, Life is a Party Foam Alphabet Stickers, and the exclusive dies in this month's Card Kit.

To create this card, I pulled out one of the patterned papers included in the Life is a Party Paper Pad and trimmed it to fit my card panel. Then, I die cut the flowers and leaves using the dies included in the Card Kit from Color Splash Watercolor Sheets. This month's die set consists of 15 dies and has several layered flowers, leaves, and foliage. I love layering dies and this was such a pleasant surprise - I thoroughly enjoyed creating with it.

I coloured the die cut pieces using the Jane Davenport: Mermaid Markers which are again a favourite of mine. I adhered them on my panel using the Journey Craft Glue. To accentuate my card, I added a strip of patterned paper and Mirror Gold Cardstock, both of which came from the Card Kit. Finally to complete my card, I used the Foam Alphabet Stickers to create my sentiment.

Card #2
My card uses the Life is a Party Paper Pad, Life is a Party Die Cut Shapes Set, Life is a Party Clear Stamp Set, Life is a Party Chipboard Embellishments, and the exclusive dies in this month's Card Kit.

This card is my personal favourite of the lot. To make this one, I used one of the foil patterned papers from the Life is a Party Paper Pad for my card background. Next, I die cut a number of flowers, leave and foliage using the Card Kit Dies from Color Splash Watercolor Sheets and colored them using the Jane Davenport: Mermaid Markers. These watercolor brush markers are so easy to use and really help you to colour your die cuts in a quick and fuss-free manner.

To embellish my card front, I used a die cut frame from the and then adhered my florals and foliage around it. I used a Chipboard Sticker for my sentiment banner and stamped the other part of my sentiment using a stamp included in the Life is a Party Clear Stamp Set on White Cardstock, which I trimmed and popped on foam dots for dimension. The dies in this month's Card Kit are incredibly gorgeous and so versatile! I loved working with them for my cards.

Card #3
My card uses the Life is a Party Paper Pad, Life is a Party Die Cut Shapes Set, Life is a Party Clear Stamp Set, and the exclusive dies in this month's Card Kit.

To create this one, I first selected a patterned paper which would work well with the card design I had in mind. I decided to go with this bright and cheery background paper from the Life is a Party Paper Pad for my card background. Next, I die cut a rectangular frame using my Stitched Rectangle Nesting Dies. I love stretching my supplies and using them in various many ways other than the intended use, and to create this frame, all I did was die cut two successive Nesting Rectangle dies together and run it through my Platinum 6 Die Cutting and Embossing Machine.

At this point, I also went ahead and stamped my sentiment in the centre of the frame. I really like the mix of fonts in the Life is a Party Clear Stamp Set and used a couple of stamps from this set for my sentiment. Next, to embellish my card, I used two of these floral die cuts from the Life is a Party Die Cut Shapes Set and adhered them to my frame using foam dots. I also added some foliage and leaves die cut using the dies from the Card Kit, which were watercoloured using the Jane Davenport: Mermaid Markers. And that's it. My card was complete!

Card #4
My card uses the Life is a Party Paper Pad, and the Life is a Party Die Cut Shapes Set.

I have a crafty confession to share. I LOVE stamps, dies, and embellishments of any kind which consist of images of houses. I am particularly drawn towards them and always am in the look out for adding more of such in my stash.
I had a lot of fun making this card and do like how it turned out.

For this card, I again started off by selecting a patterned paper from the Life is a Party Paper Pad and die cutting a frame from it using my Stitched Rectangles Die Set. I adhered that to my card panel and also added a strip of coordinating patterned paper for added interest.

Then I pulled out some die cut shapes from the Life is a Party Die Cut Shapes Set which would complement the patterned paper and I adhered those to my panel using foam tape. The sentiment banners are also die cut pieces, and I must say here, that I really love the sheer variety of shapes offered in each month's Die Cut Shapes Set. They truly are great value for money!

Card #5
My card uses the Life is a Party Paper Pad, the Life is a Party Die Cut Shapes Set, and the Life is a Party Chipboard Embellishments.

For last card, I went with this really vibrant and fun multi colour striped paper for my card background. Then, I die cut a circle from White Cardstock using the Circle Around Die Set and adhered it to my panel using foam tape.

Then, like usual, I picked out a few die cuts from the Life is a Party Die Cut Shapes Set, which would work for my card design and arranged them on my panel. The llama die cuts were so adorable and I really wanted to incorporate them on one of my cards, so here it is. As a finishing touch, I added some hearts which came from the Life is a Party Chipboard Embellishments Set.

If you want to find out more about the Club – prices, how you sign up and what’s included, please look ——–> HERE.
The Card Kits for Spellbinders Monthly Clubs are exclusive to Spellbinders and you won't find them anywhere else, so be sure to gets yours before it gets sold out! If there are any leftovers, they are added to the Spellbinders store for sale at full price. You can see all of the past Card Kits HERE.
If you'd like to see some more project inspiration using the Card Kit, check out THIS super helpful YouTube video that has some awesome card ideas using the Card Kit.
That's it from me for today! I hope you liked my cards. Let me know if you have any favourite(s)! I would love to hear from you.
If you would like to see more of my work using Spellbinders, do follow my Instagram page - @hussena_cal
Thank you so much for your visit to my blog today!