Showing posts with label Vintage Card. Show all posts

Saturday, April 18, 2020

Spellbinders + Amazing Paper Grace Die of the Month | April 2020

Hello, crafty friends!
I have a Card to share today featuring the Spellbinders + Amazing Paper Grace April Die of the Month. This month's "Pop Up 3D Vignette Typewriter" Set is perfect for making exquisite cards and more. 

If you want to find out more about the Club – prices, how you sign up and what’s included, please look ——–> HERE. These dies are only available through the Club and are limited to the month of April, so hurry before they are sold out. There is also a super helpful YouTube video that you can see HERE which shows you how to assemble the die set.

Here's a look at my Card using the Die Set. This typewriter die is so elegant and I can't have enough of it!
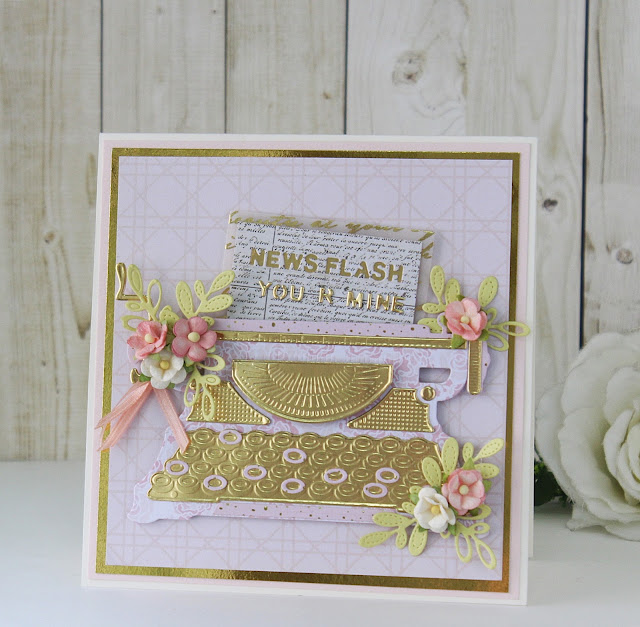
This card measures about 6" X 6" and is quite layered and happens to be one of my favourite cardmaking styles! To create my card, I first began by die cutting the Pop Up 3D Vignette Typewriter Die Set from Gold Mirror Cardstock as well as the DCWV Blush 12" X 12" Paper Pad. I used two different patterns along with the Gold Mirror Paper as I wanted the typewriter to have a stylish look. I layered and adhered the basic body of the typewriter, so that I could start working on the other elements of my card.
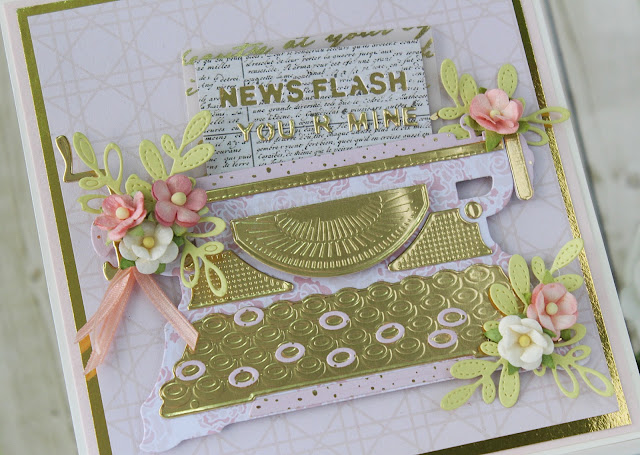
Next, I die cut the blank pages coming out of the typewriter from the Scripts & Music Notes 12" X 12" Paper Pad and the Blush Paper Pad, both from DCWV. I die cut the words 'News Flash' from patterned paper and then added a piece of Gold Mirror Cardstock at the back to give it an inlaid effect. Then, I die cut the words 'You R Mine' from Gold Mirror Cardstock and adhered them to the paper to form a complete sentiment. I did this just to add some interest to my card design. These word dies are included as a part of the Pop Up 3D Vignette Typewriter Die Set.

I wanted the typewriter to be the star of the card and hence kept the embellishing minimal. I used some Mulberry Retro Flowers and some die cut leaves to create floral clusters near the focal point. I also tucked in some strands of satin ribbon under one of the bunches form added interest.

To enhance the look of the typewriter, I adhered some pink oval rims to give it a more complete look. I like the way this turned out - I would love to know what you think of it!


 I  also made a Pop Up 3D Typewriter yesterday for the Spellbinders April 2020 Clubs Hop, which you can check out HERE for more inspiration!

If you are still on the fence about the Amazing Paper Grace Die of the Month Membership, do check out the project samples created using it on the Spellbinders blog. The dies are great value for money and the cost of the kit covers shipping cost within USA. So, what are you waiting for? Sign up as soon as possible!
Amazing Paper Grace Die of the Month Membership
That's it from me for today! I hope you liked my card.
If you would like to see more of my work using Spellbinders, do follow my Instagram page - @hussena_cal
Thank you so much for your visit to my blog today!

Friday, April 17, 2020

Spellbinders April 2020 Clubs Inspiration Blog Hop


Hello, crafty friends!
I'm super excited and honoured to be joining Spellbinders for the April 2020 Clubs Inspiration Blog Hop today. If you arrived here from, Alicia Havranek's Blog, then you are on the right track. If this is your first stop, then you will want to start at the beginning, the Spellbinders Blog. We've got tons of inspiration and giveaways for you on the hop today, so keep reading till the end of this post for more information.


I have made a Pop-Up 3D Vignette Typewriter using the Amazing Paper Grace - April Die of the Month. I absolutely LOVE this die set. It's so ingenious! 
The dies for Spellbinders Monthly Clubs are exclusive to Spellbinders and you won't find them anywhere else. If you want to find out more about the Club – prices, how you sign up and what’s included, please look ——–> HERE.
Amazing Paper Grace Die of the Month Membership

To create my 3D Typewriter, I followed the step by step Video Tutorial shared by Becca Feeken. It's very simple and easy to follow and will have you creating your very own one of a kind special typewriter in a few minutes! 

I wanted to create mine in soft, pastel colours , so I chose to use Buttercream Cardstock and Baby Pink Textured Cardstock. I die cut the basic structure of the typewriter from Buttercream Cardstock, while the add-on layers were die cut from Baby Pink Cardstock as well as Gold Mirror Cardstock. No project of mine seems to be complete without Gold Mirror Cardstock - LOL! It really adds that elegant touch!

Once I die cut all the different elements of the typewriter and adhered them together, it was time to embellish it.

I die cut the sheets of paper coming out from the typewriter from the DCWV 12" x 12" Scripts and Music Notes Cardstock Stack. Then, I added some die cut words on all three layers to give it a personalized touch. The die cut words 'Hello Friend' are from a previous Amazing Paper Grace Club Kit and I combined it with the sentiment die included in this month's kit. 

To embellish the typewriter, I created some mini handmade flowers which were die cut from Baby Pink Textured Cardstock. I embossed the petals using an Embsossing Ball Tool and added stamens to the centers to give it a more finished look. I also die cut some leaves and foliage from Sweet Pear Cardstock and arranged them near my flowers to give it a cohesive look.

I also die cut few oval key rims from Gold Mirror Cardstock to give it a more realistic touch. The attention to detail in this Pop-Up 3D Vignette Typewriter Die Set is simply amazing. Each and every little add-on accessory has been included as a part of the die set, and you don't need to invest in any extra Add-On Sets to create these beauties. Well worth the money, in my humble opinion. :-)

I repeated the same process for the back side of the typewriter as well in order to give it a finished look. This little piece now sits on my desk and I plan to create some more of these and mail them to my crafty friends. This would surely brighten their day!
I hope you liked my project and are inspired to create your own! I would love to know what you think of it! 

Affiliate Disclosure
All products in today's post are linked throughout the post.  These are my personal affiliate links which you can shop from at no cost to you! Thank you for your support!

Giveaway:
To celebrate this release, Spellbinder is giving away a $50 gift certificate to 3 lucky blog readers – selected from the comments on our blog. Hop along for additional chances to win. Giveaway closes on Sunday, April 26th, 11:59 pm EDT. The winner will be announced in the blog hop post the following Tuesday. The winner is responsible for shipping cost, duties and taxes.

Additional Giveaway:
The generous folks at Spellbinders have allowed me to giveaway a $25 gift certificate to ONE lucky winner! For your chance to win, leave a comment on this post by 26th April, 2020. Winner is responsible for shipping cost, duties and taxes.
Please note, store credit (gift certificate) cannot be applied to Club Subscriptions. Store credit can be applied to shop past Club products, Club extras and regular releases.

Blog Hop Order:
Next Stop on this Blog Hop is, Joy Baldwin's blog.
Just in case you lose your place along the way, here is the complete list of participants so that you can find your way back:
Blog Hop Order:
                          Hussena Calcuttawala (You are HERE)

Thank you so much for your stopping by and reading this blog post. I hope you liked my project! If you would like to see more of my work using Spellbinders, do follow my Instagram page - @hussena_cal
Wishing you a wonderful day ahead!

Tuesday, July 10, 2012

Inspiration For The Love Of Crafting Challenge -8

Hi Friends,
Today sharing with you all My Card for this Time's For The Love Of Crafting Challenge -8 Where the Theme is Anything goes with a Twist: Use Brown Color ,Jute And optional Use A flower. So here's My Take on it :-
                                                 
And Another View of it {:- This One clicked in Natural Light } :-
                                   
       For This Time's Theme I made a card for Frienship Day...The Butterfly I have used over Here is a Digi- Printout {Taken From Pinterest }For the Flowers, I wanted To do Something Different Than my Usual Punch craft !! So,I Stamped the Friends Sentiment Repeatedly, On Red Paper and Punched out those Flowers and Layered them, With the Help of a Brad! So now that you have seen my inspiration Please Head Over To The  For The Love Of Crafting Blog Where this Time's Prize Package Is Sponsored By Shalini Mittal of Crafter's Corner And what a package its is 72 sheets of DCWV mat Stacks wow!!!isn't that generous!!!so please do play along with our challenge this time :)

Supplies Used :-
Base CS (White) -Campap
Red CS { For Flowers } -Local Buy !
PP-All About Scrapbooking in Full Bloom !!
Die Cut- Hand Drawn and Cut , Dots Stamp- Unity , Friends Sentiment stamp -Unity (Sarah .K. Collection)
Punches - Flower -Jef {Large} , Leaves- Punch Bunch Sprig
Orange Brad -Basic Grey ,Yellow Brads -MM
Jute Twine -Candy From Yvonne :D
Butterfly- Digital
Red Rhinestones and pearls- Anadhaa Stationery ~!

Challenges Entered :-
1.Hands 2 heart Challenges -Seed a Friendship
2.Sentimental Sundays -Bingo { Stamp ,Flowers, Pearls}
3.DYSU -Use Red
4.Pals Paper Art-Color Challenge{Daffodil delight,early Espresso,Cherry Cobbler }


Hope You all Like My Card...Please leave Me your Comments /Suggestions!
Have a good day Everyone!

Monday, February 13, 2012

Non -Traditional Valentine

Hi Friends,
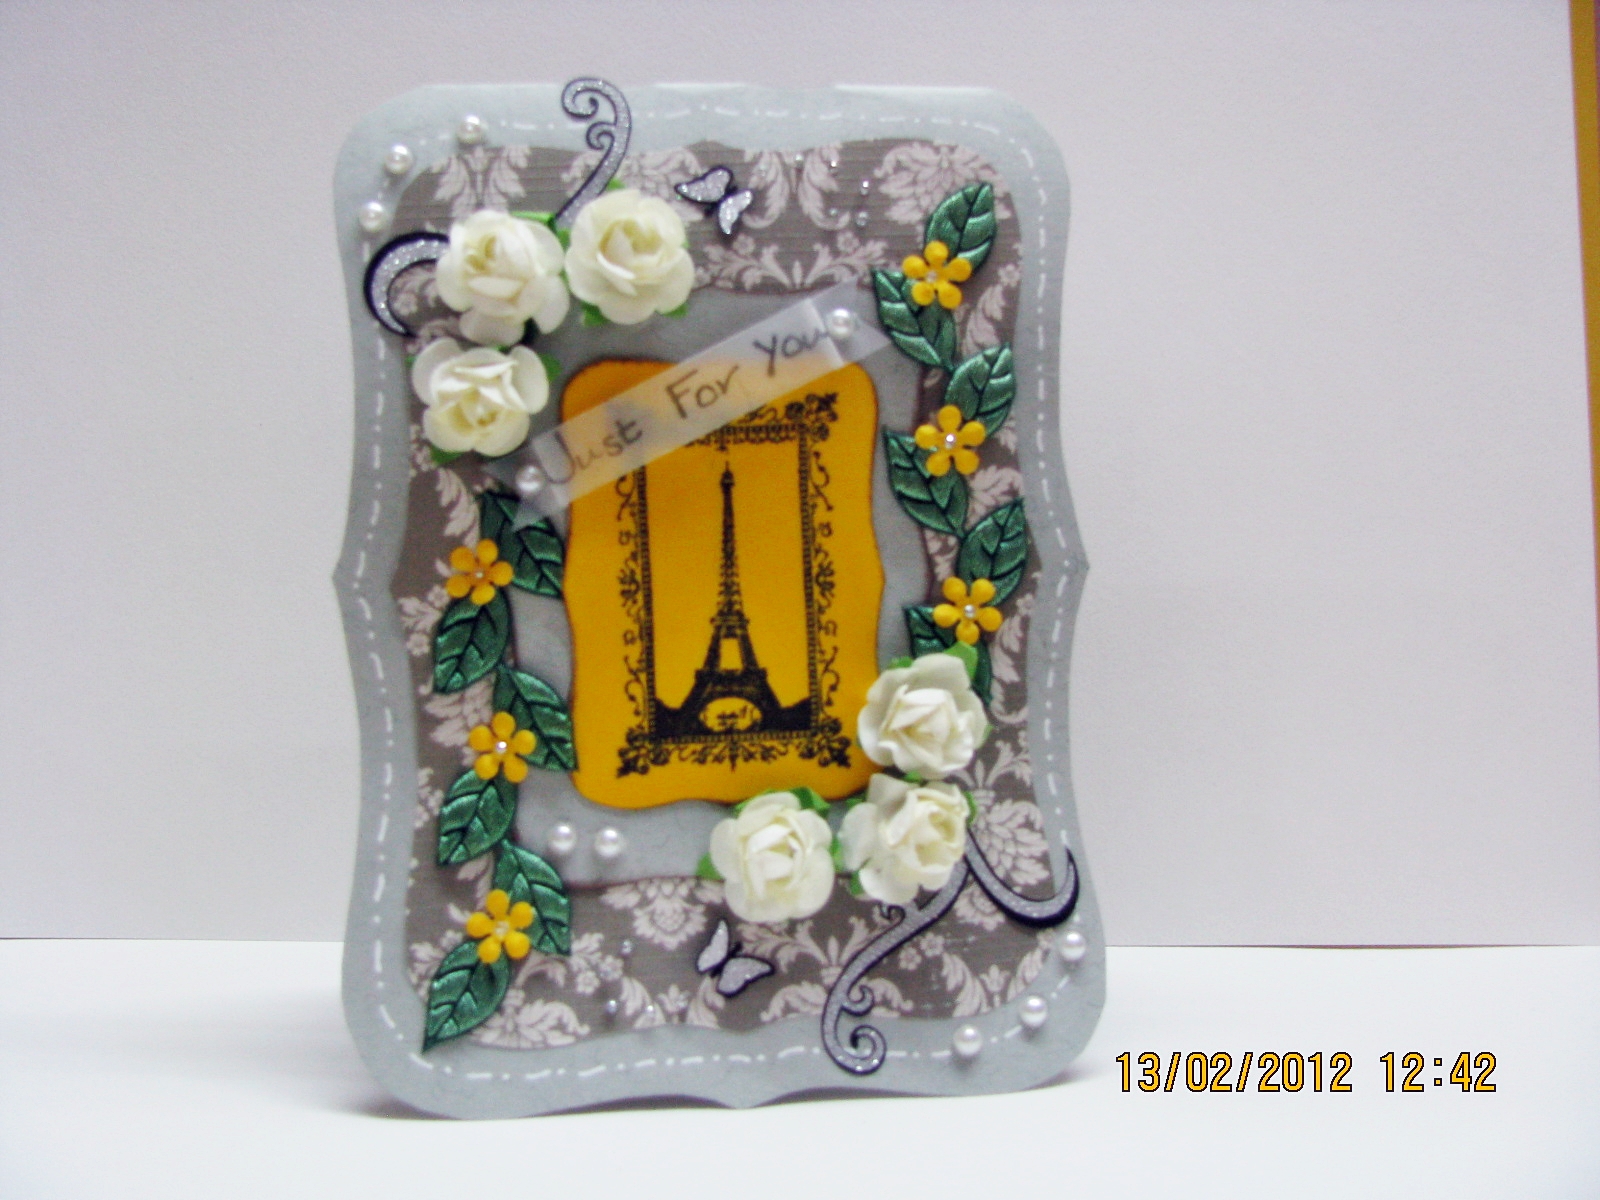
So I am back :) and I have a Card to share with you  ...Its  a Valentine /Anniversary Card using non traditional Colours..This was a tough one for Me!! as I always associated Valentine with Hearts and the Colour Red..But the Challenges at Beyond Grey and Crafty JC Asked for A non traditional Valentine  Card ..So here's a look at my Card first :
 Now a front View :-
                      As You all can see I have gone for a Vintage look for thus Card..I have tried a New  shaped Card

Supplies Used :-
 CS- Bought from Annanda Stationery.
 PP -Papermania Christmas Carol.
 Diecuts-Bought from Ujjwal.
 Stamp -TPC Studio (Jovi's Givewaway ) :) ; Sentiment-  Stamp from Hobby Ideas .
 Mulberry Roses- Snehal's Candy.
 Flowers- Jef Small Punch.
 Leaves- Ribbon from Stash.
Pie Lane Glitter Balls,Flourishes and Butterflies.
Self Adhesive Pearls-Bought from Annanda Stationery.


Challenges Entered :-

1.Crafty JC Challnege- Non Traditional Love Colours
2. Beyond Grey Challenges- Non traditional Love Colours
3.Pretty Paper Studios- Should use the Word "You"
4.Sentimental Sundays-Shaped Cards + Sentiment.
5.Stamptacular Sundays-Use pearls and  Laces
6.Truly Madly Crafty Challenge- Use ribbon and Bling.


I hope you all like my Card ..If you do, Please don't forget to Leave a Comment :)

Have a Nice Day everyone.


Monday, October 10, 2011

CASE-ING A CARD!!

HI Friends,
So  as my title suggest I have a cased card to show you all today ,This is based on the CASE STUDY challenge 60 where we are asked to make a card based on the Inspiration from their DT Niki Estes,so without further ado here's a peek at my Card
       And now a look at Nikki's Card from which I have taken the Inspiration:
    Itsn't her card just gorgeous,I loved it the moment I saw it and so with lot of courage and my finger's crossed I decided to case her card.I have used a lot of distressing in my card ,firstly I distressed a white Cardstock with  Memento (Cocoa) and then layered it with the  Stamped damask pattern Border stamp  which I had won from Michelle(I LUV SCRAPPING) as a blog candy the Damask paper is distressed with a yellow ink from Rubber Stampede  and then I layered the Bingo card which I had also got from Michelle  , I then used an MS border punch to make a Paper Lace and layered it with an paper strip which I have distressed with A LA MODE  ink (Blue color),the Scalloped circle is traced from die cut which I then hand cut and the circle is also hand cut the Butterfly is stamped with an Inkadinkadoo stamp and the sentiment is from The Paper Company .The flowers are from Itsy Bitsy and have added some Bling to it.  That's about all from me.
I am entering this card in the following challenges:
1.http://casestudychallenge.blogspot.com/2011/10/case-study-challenge-60.html
2.http://thecraftypad.blogspot.com/2011/10/challenge-142-vintage.html (Vintage)
3.http://flutterbywednesdays.blogspot.com/2011/10/flutter-by-wednesday-174.html (Include a Butterfly......)
4.http://audsentimentschallengeblog.blogspot.com/2011/09/challenge-38-and-winner-of-37.html (Happy birthday)
5.http://simonsaysstampandshow.blogspot.com/2011/10/simon-says-stamp-and-show-things-with.html (Things with wings)
I Hope you guys like my card any Review is welcome and so are your suggestion's so please don't forget to drop in a line.
Have a Good Day Everyone:)