Hello, crafty friends!
I hope you are doing well. I am back today to share a couple of cards using the NEW Add to Cart Collection by Becky Roberts. This fun collection features a 3D Pop-up shopping cart and lots of goodies to "add to cart" including party supplies, shopping bags, and a Christmas tree!a 3D shopping cart. It is so cleverly designed and you can easily use these dies for creating cards for a variety of any occasions - Party, holiday, and girls’ night out are just some of the themes featured.
I made a set of two bright and dimensional cards using the 3D Shopping Cart Etched Dies, Shopping Bags Etched Dies, and the Shopping Cart Party On! Etched Dies.
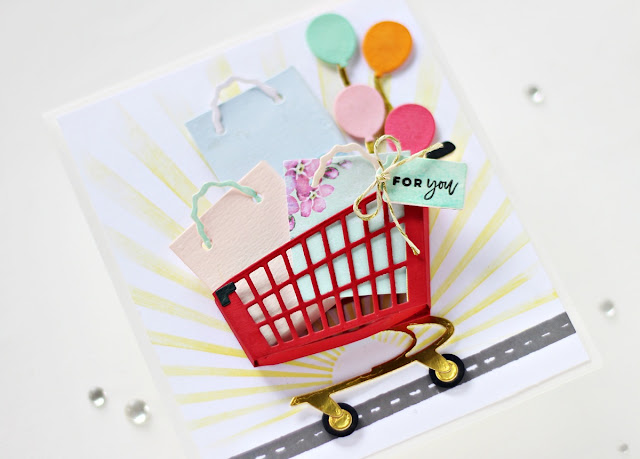
For my first card, I focused on the 3D Shopping Cart Etched Dies and the Shopping Bags Etched Dies. This card design is perfect for showering a loved one with birthday wishes.
I began by trimming a piece of Snowdrift Cardstock to size and then and secured the Sun Burst Stencil on the top of the panel to blend Squeezed Lemonade Distress ink with a blending brush. Next, I stamped a strip of road onto the panel with Moon Rock ink.
Then, I die cut the components of the shopping cart out of Pomegranate, Mirror Gold, and Onyx Cardstock using the 3D Shopping Cart Die Set and assembled it together using liquid glue. There are options to create both a narrow and wide cart, depending on what you’d like to fit inside. I chose to make a wide cart. I adhered the cart together, then added it to the card panel.
Next, I die cut three shopping bags out of Pink Sand, Waterfall, and patterned paper prints using the Shopping Bags Etched Die Set, and then adhered it together for a 3D look. Once that was done, I die cut balloons out of Teal Topaz, Persimmon, Pink Sand, Wild Berry, and Mirror Gold Cardstock using the Shopping Cart Party On! Etched Dies. I adhered them on to my panel using liquid glue.
To finish, I die cut Snowdrift Cardstock using the tag die included in the Shopping Bags Etched Die Set. I colored the piece using Peacock Feathers Distress ink and stamped a sentiment onto it using Versafine Onyx Black ink. I tied a simple bow using some Gold Baker's Twine and attached it to the shopping cart using foam adhesive. I adhered the panel to a top-folding A2-sized white card base with tape runner.
My second Card features the Shopping Cart Party On! Etched Dies. This is a great set for a party, anniversary, birthday, and even New Year celebrations.
To create my card, I began by trimming a piece of Onyx Cardstock to size. Next, I die cut a circle towards the bottom half of the panel using the large circle die in the Standard Circles LG Etched Dies. Then, I adhered a piece of Ivory Metallic Cardstock behind the panel to help it pop out. Next, I added a scalloped circle frame cut out of Mirror Gold Cardstock using the Scalloped Circle Die Set. This helped create a window on my panel.
Once that was done, I die cut the champagne bottles, flutes, and masks out of Pink Sand, Raindrop, Mirror Gold, Persimmon, and Wild Berry Cardstock using the Shopping Cart Party On! Die Set. I assembled the different pieces together and adhered them to my panel using a combination of foam adhesive and liquid glue.
Next, I die cut the party banners out of Pink Sand, Raindrop, Mirror Gold, Persimmon, and Wild Berry Cardstock using the Shopping Cart Party On! Die Set. I assembled the pieces together and then added it to my panel using liquid glue. Then, to complete, I heat embossed a sentiment in gold underneath this panel. I mounted my panel to a piece of Mirror Gold Cardstock before adhering it to a top-folding A2-sized black card base made out of Onyx Cardstock with tape runner.
I hope you liked this set of bright and fun cards and thanks so much for stopping by today. You can see the Add to Cart Collection by Becky Roberts on the Spellbinders website. It is truly fabulous and these die sets make creating so fun!
If you like what you've seen from me, please give me a follow over on my Instagram (@hussena_cal) and/or subscribe to my blog if you haven't already.
Wishing you a great day ahead!


No comments:
Post a Comment