Showing posts with label Nuvo Drops. Show all posts

Friday, January 10, 2020

Tonic Studios Guest Design Post | Susan's Garden Club

Hello, crafty friends!
Wishing you all a very Happy New Year!

I am so excited and honoured to share that I am a guest designer today for Tonic Studios! I have two projects to share using the range of NEW dies from Susan's Garden Club. I just adore making handmade flowers and Susan's dies are amazing to create realistic looking flowers with minimal effort. Without much ado, let's get right to my projects!


My first project is an elaborate floral Card featuring the Susan's Garden Club - Pom Pom Dahlia Die Set & the Susan's Garden Club - Holly & Berries Die Set.

To create my card, I first took a piece of Bright White Watercolor Paper and did some stenciling on the background to create a textured background for my flowers. Next, I started working on the main focal for my card, which are the flowers. I die cut the Susan's Garden Club - Pom Pom Dahlia Die Set from Watercolor Paper using my die cutting machine. I also cut a bunch of holly leaves and foliage using the Susan's Garden Club - Holly & Berries Die Set

Once they were all die cut, I used my Zig Brush Markers to colour the flowers. I did not colour them all perfectly - I just added colour to the centre and the sides of the petals and used a Watercolor Brush to spread the colour. I did this for all the flower die cuts, and once they were dry, I used Embossing Tools to shape my flowers. I repeated the same process for the leaves - I used Zig Markers to colour them along with a Watercolour Brush, and then slightly shaped them to give them a more realistic finish.  

For the foliage, I die cut it from the Susan's Garden Club - Holly & Berries Die Set using Watercolour Paper and then added yellow and peach dots to create berries using the Nuvo Crystal Drops - Dandelion Yellow and Nuvo - Jewel Drops - Rose Water. I arranged all the elements together to create my floral spray and then adhered them to my card panel. To finish off, I added a sentiment strip over the die cut circle window and mounted my panel to a a top folding White card base. 


My next project is a Gift Box created using the Susan's Garden Club - Columbine Die Set & the Susan's Garden Club - Holly & Berries Die Set.

I am a sucker for pretty packaging and totally love creating my own gift boxes, bags, tags, and more, so I decided to create a Gift Box and embellish it using flowers made from Susan's Garden Dies. I created the lid of the box using Patterned Paper while the base was made from White Cardstock. Then, I die cut several flowers and leaves from the Susan's Garden Club - Columbine Die Set using Watercolour Paper. I went with different colours this time, and kept the flowers in White and Peach.

 I used a mix of leaves from this die set and the Susan's Garden Club - Holly & Berries Die Set and coloured them using green dye inks. I arranged all of them on the box and added some additional foliage as well. The little peach berries that you see were created using the Nuvo - Jewel Drops - Rose Water. I added two inverted scalloped rectangle frames and sentiment strips to complete my project. I was quite pleased with the way this one turned out. I'd love to know what you think of it?

Thank you for visiting and checking out my post! I hope you liked my projects using these dies. If you did, I would love to hear from you!
Do follow me on Instagram @hussena_cal for upcoming projects using Susan's Gardens dies.

Tuesday, June 12, 2018

Guest Post for Spellbinders | Special Moments


Hello friends!
I am really excited and honoured to be guesting on the Spellbinders Paper Arts blog. I have a card to share today I made using several dies from the Special Moments collection by Marisa Job. This is a spectacular collection with a wide variety of gorgeous, intricate dies. I love how there a number of different dies in this collection, and there is something for everyone! Here's a look at my card:

To create my card, I first started by die cutting the largest die from the Vintage Stitched Squares Etched die set from a lilac patterned paper. I adhered this square piece on my card base.

To embellish my card, I die cut the lattice oval die from the Shapeabilities Floral Oval Etched die set. I used White 80 LBS cardstock for die cutting the oval. I also die cut the same die from some White Fun Foam so that I could pop the white die cut piece on the foam for added dimension. I lightly colored the frame using a light pink marker. I also added touches of purple ink here and there on the lattice frame so that it would highlight the pink.

I wanted this card to have a very light, fun, and whimsical look to it so I decided to create some simple handmade flowers to go with the frame! I used the flower crescent die from the Shapeabilities Floral Oval Etched die set to create the floral foliage around my frame. I die cut the flowers from White cardstock, colored the centers of each flower using different color markers, and added a black enamel dot to the centers. So simple yet pretty, isn't it?

The leaves were also lightly colored using green markers. I added some gold foiled buds here and there for added interest.

The Shapeabilities Floral Oval Etched die set also offers stand-alone flowers in case you don't want to use the entire flower crescent die, which I think is very thoughtful and well designed. I die cut the largest flower using the stand-alone piece and added it to the right side of my card to help balance my card design.

The Special Day sentiment comes from the Shapeabilities Special Day Frame Etched die set. I die cut it from black cardstock and popped it using white foam for dimension.

Here's a close up of the florals. I loved how this card turned out :) What do you think ?

Spellbinders supplies:
S5-374 Shapeabilities Special Day Frame Etched Dies
S5-378 Shapeabilities Floral Oval Etched Dies
S7-215 Shapeabilities Vintage Stitched Squares Etched Dies
T-001 Tool' N One
PE-100 Platinum 6 Die Cutting and Embossing Machine - 6" Platform


Other supplies used : Neenah Solar White 110 LB cardstock, White 80 LBS Cardstock Sheets, Gold Foil Cardstock, Papericious Whimsical 12" X 12" Patterned Paper, White Fun Foam; Stick It Double Sided Adhesive Sheets; Adhesive: 3D Foam Squares, Tombow Mono Multi Liquid Glue, Double Sided Foam Tape; Kuretake Zig Clean Color Real Brush Pens, Tombow Dual Brush Pen Set: 10 Pastel, Tonic Studios Nuvo Crystal Drops

Thank you so much, for taking out time and reading my post. If you liked my card, please do leave me a comment below. :)

Have a nice day everyone!

Wednesday, November 29, 2017

Hugs Dearest Friend | Card

Hello everyone!
I am blogging after a long break. Hope you all had a great Thanksgiving with friends and family :) I made this card recently using some new supplies from Altenew. Here's a look at my card :

To create this card, I first cut a card panel measuring 4 1/4 X 5 1/2 inches and die-cut it using the Stitched Rectangles die by Lil Inker Designs. Next, I took the large floral image from the Altenew Sketchy Floral set and partially stamped and heat-embossed it using White SuperFine Embossing powder. After the image was heat-set, I started colouring the image using Zig Clean Color Real Brush markers. 

I kept adding layers to the image till I was happy with the way it looked. I lightly watercoloured the background in grey and added few black and gold paint splatters. You can see them in the close-up shot below.

For my sentiment, I decided to use the Altenew Script Words die. I die-cut the word hugs twice, once from black cardstock and once from gold glitter paper. I off-set the glittery hugs word on the black die-cut to give it some interest. I also added few enamel dots in yellow and black which I made using Nuvo Crystal Drops.

I then added the sentiment 'dearest friend' which is from the Altenew Sketchy Floral set as well. I stamped it using black ink on white cardstock. Added a strip of black stripes below my sentiment to balance my design. I matted my card panel on to some yellow cardstock and then on white cardstock again. That completed my card.

My card is inspired by the colours from this time's Altenew Inspiration Challenge. I loved the warm colours and had to play along :)


I hope you liked my card. Do let me know if you did :) I would love to hear your views on it.

Thank you so much for stopping by! Hope you have a great day.

Sunday, October 15, 2017

Just For You | Card

Hello everyone,
I have a card to share today which I made solely with a stencil and watercolours. Here's a look at it :


To create this card, I first stenciled the design outline using the CrafTreat Poppy stencil on a piece of a watercolour paper using a black Microtip Pen. After I finished tracing the outline, I loosely watercoloured the poppies and the leaves using various shades of Distress inks.

I added this sentiment from the Altenew Label Love set. I also did some ink blending and added paint splatters to the background.

I added Nuvo drops in green, red and black to complete the card. I die-cut the card panel and popped it on a card base which was embossed using the Darice Woodgrain embossing folder and my card was done :)


I'm entering my card in the following challenges :


I hope you liked my card which I shared today. If you have queries regarding any of the techniques or the products used, please let me know in the comments below, I will get back to you.

Thank you so much for dropping by! Have a nice day everyone.

Friday, October 13, 2017

Just Saying Hello | Card

Hello everyone!
I know I'm on a blogging spree these days :D I have made a couple of cards specially for the WCMD challenges over at Winnie and Walter and so blogging about each, one by one. This is my second post for the day. Incase you missed my first post, you can check it out HERE.

For my card today, I used the CrafTreat Butterflies stencil. These butterflies are gorgeous when layered!

This one is very bright and colourful and to create this, I first embossed the insides of the butterflies using Versamark embossing ink and Super Fine White embossing powder by Ranger and heat-set it. Then I placed the outline of the butterfly and traced it using a stencil. I watercoloured the butterflies using two complimentary shades of Distress inks. I then fussy-cut them out and popped them over foam dots.

The colourful background was created by ink smooshing different colours of Distress inks on a piece of acetate, spraying water over the inks and then smooshing it on a watercolour card panel. I die-cut a rectangular frame and ink blended it using the same colours. The frame and the butterflies are adhered using foam tape.

I added strips of Black Washi Tape on the two sides and lots of Nuvo Drops. Then placed my sentiment strip which is also heat-embossed and my card was done!


I'm entering my card in the following challenges :


I hope you liked my cards which I shared today. If you have queries regarding any of the techniques or the products used, please let me know in the comments below, I will get back to you.

Thank you so much for dropping by! Have a nice day everyone.

Thursday, October 12, 2017

Guest Post | CrafTreat Stencils

Hello everyone,
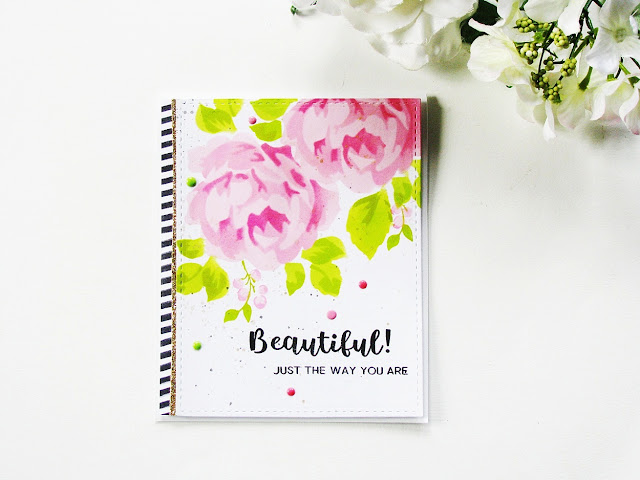
I have a card to share today which I made for my guest post over at the CrafTreat blog. They came up with some really beautiful stencils last month and Priya (the owner) very generously sent me few to try out :) Here is my first card I made using them.

This also happens to be my most favourite stencil from the release - the Layered Rose stencil. I have made a one-layer card and I masked the two roses so that they would look clustered together.

You can see the close-up of the layered rose.

I have used Altenew layering inks here in shades of pinks and greens to colour the flowers and leaves. I then added a strip of gold glitter paper and stamped black stripes on the left hand side of the card to balance the card design. Finally, stamped the sentiment which is from the Altenew Adore You stamp set and added enamel dots in various colours which were made using the Tonic Studios Nuvo Crystal Drops.

I also added some black paint and gold paint splatters to complete the look.

I hope you like my card. This was really easy to make and came together very quickly. I do have some more cards to share on the CrafTreat blog. You can check them all HERE.

I'm entering this card in a couple of WCMD challenges. I did not get a chance to craft on WCMD, but nonetheless, I will be sharing some more cards very soon I made specially for the various challenges.

I'm entering this one in the following challenges :
w & w Stenciled challenge with Kate
Simon Says Stamp WCMD Challenge
Paru's Card Making Challenges - A Touch of Gold ( I have used a strip of gold glitter paper as well as gold paint splatters on my card)
The Flower Challenge - Use Your Favorite Flower (mine are roses) If I win, I would like to go with The Ton voucher.


Thank you so much for stopping by my blog. I hope you like my card. If you did, please do let me know :) I would love to hear what you think of it.

Sunday, August 27, 2017

Hello Beautiful Card | Guest Post for Sindhu

Hello friends!
Today, I have this card to share with you which is totally hand stamped and watercoloured. This card is also a part of my dear friend, Sindhu's fifth blog anniversary celebrations. Do check it out HERE.

To create this card, I first stamped the flowers and leaves from the Altenew Golden Garden set on Canson Watercolor paper using Versamark Embossing ink. I heat-embossed all the images in gold and then fussy-cut them out. I colored the images using Zig Clean Color pens and then popped some of the flowers on foam dots for dimension. I also added a die-cut frame to balance the floral design. I then stamped, fussy-cut and coloured the butterfly from the Altenew Painted Butterflies set.


The background stripes were hand painted by masking with Washi Tape and diluting some Vintage Photo Distress ink with water and then creating broad paint strokes to give the watercoloured look. Finally added the sentiment which is from the Altenew Sweet Friend stamp set to the card front and few enamel dots using Nuvo Crystal Drops.


My card was inspired by the colours of this month's Inspiration Challenge over at the Altenew blog.


I hope you like my card. I would love to hear what you think about it :)

Thank you so much for dropping by!

Wednesday, March 29, 2017

Thanks for all that you have done!

Hello friends,
Today I have a card to share which I have made especially to play along with this time's Altenew Challenge. The colors this time are absolutely bright and gorgeous and I really wanted to work with them. Here's a look at what I created using them :


This one has lots of techniques involved. To start with, I used a piece of white cardstock measuring 4.5 inches X 5.25 inches and then ink blended it using my newest Distress Oxide Fossilized Amber ink & Squeezed Lemonade Distress ink. Love the beautiful ink blending we get with these Oxide inks! I embossed this piece using the WRMK Next Level - Geometric Embossing folders. Then for my focal I die-cut the Altenew Thanks die from some watercolour cardstock on which I had previously done some ink blending and water spritz and also die-cut the word once more from a black foam sheet. I then stamped, and fussy-cut the images from the Altenew Remember This stamp set. This set has some gorgeous florals and foliage. I colored the flowers using my Zig Clean Color Real Brush Pens. I then added strips of black striped Washi Tape to further enhance the card. I added a white heat-embossed sentiment from the Wplus9 Ranunculus set and I used my Nuvo Crystal Drops for the finishing touches.

I'm entering my card in the following challenges :
Simon Says Stamp - Anything Goes 


I hope you like my card. As always your comments and suggestions are welcome. Have a good day everyone!


Sunday, January 1, 2017

Guest Post | Paru's Card Making Challenges

Hello fellow crafters,
Wishing all of you a very Happy New Year 2017!
I'm so glad to be joining Paru's challenge as a Guest Designer today. It's an absolute honour to be invited. I love playing along with her challenges. They are always so interesting.


I have created a card and two tags for the challenge this month. I wanted them to look like a set, so I have used the same stamp set & colour combinations for all of them. I wanted the sentiments to be generic so as to be given as a gift set.


To create my card, I have used the Altenew Painted Flowers set. I also used Altenew inks for coloring. I stamped & die-cut the flowers and leaves using the coordinating dies. This made my work so much more easier. Then I die-cut a panel using a Paper Smooches Border die to create a frame. The sentiment comes from another Altenew set- Label Love. I added few black paint splatters & silver stars and sequins for the finishing touches.


To create my tags, I have used the Lawn Fawn - Tag You're It stamp & coordinating die set to stamp and die-cut the tags. I gold embossed the outline of one of the tags to add some extra interest. I used the Altenew Painted Flowers set for the flowers and the sentiment is from the same Lawn Fawn set. I added few Nuvo Crystal dots to embellish it a bit and tied some silver & gold mesh ribbon along with thin black ribbon to finish them off!


I'm entering my card in the Altenew Inspiration Challenge. I'm playing along with Amy's June Challenge.


Please visit Paru's blog and don't forget to play along her challenge. I would love to hear what you think about my card & tags! 

Thank you so much for dropping by!