Showing posts with label Stencil. Show all posts

Thursday, November 12, 2020

25 Days of Christmas Tags 2020 – Pinkfresh Studio


Hello, crafty friends!
I am so excited to be a part of the 25 Days of Christmas Tags event hosted by Tracey McNeely. I'm a big fan of this yearly event, so I'm thrilled to be participating today with some of the other Pinkfresh Studio designers! There are tons of inspiration during this event and also lots of prizes to win! You can find all the details on Tracey’s main post of the 25 Days of Christmas Tags!
Pinkfresh Studio is one of the sponsors this year and today the Pinkfresh team is sharing some Christmas Tags on Tracey McNeely’s blog to inspire you!


I have made FOUR Gift Tags for this event, so without further ado, let's dive right into it!

My first two tags were made using the same set of supplies, but I used two different colours for variation. To begin, I die cut the tags using the Essentials: Shaker Tags die set. Next, I used the Basic Plaid Layering Stencil Set to stencil on the tag backgrounds. This is a two-step layering stencil, but I used only one ink colour for both the layers. I first went in and lightly applied the Coral Reef Ink and then for the stencil second layer, I used the same ink pad, but added much more ink colour, to achieve a more saturated colour. This is a great way to stretch your supplies and get more from your ink pads! I did the same for the other tag and used Mint Ink for it.

Once the stenciling was done, I die cut some snowflakes from the Layered Snowflakes Die Set from Silver Glitter Cardstock and White Cardstock. I coloured the snowflakes using the same ink colours to match with the stenciled backgrounds of each tag. I then layered the snowflakes together and adhered them to the tags using white fun foam.

The sentiment is from the Merry and Bright Stamp Set. I stamped it on White Cardstock using Berrylicious Ink and then die cut it using the coordinating die. As the finishing touch, I added a die cut bow to the tag. I used the Artistic Bows Die Set for creating the bow from Vellum and Silver Glitter Cardstock. Don't you think it's just the perfect tag topper!?


Onto my next two tags! 
I used the same bunch of supplies for these too, but I changed the colour of the houses on the tags for more interest. I first die cut the tags from White Cardstock and then white heat embossed the little wintry accessories from the Our Home To Yours Stamp Set on the tags. I ink blended the circles using Sapphire ink, so that the white embossed elements would pop out. Next, I die cut some hill slopes from White Cardstock and stamped a couple of little Christmas trees, fences, and the trail from the Our Home To Yours Stamp Set for my card design. 

Next, I stamped the houses from the stamp set using Berrylicious and Mint and cut them using the coordinating dies. I popped them on my tag using foam squares for dimension. The sentiment is from the Tree Trimmings Stamp Set and I stamped it on the tags using Black Hybrid ink. 

I deliberately kept the design super simple, so that it can be easily re-created and mass-produced for the upcoming Holiday season. It would be wonderful to attach to gifts for friends and family and also can be created in a jiffy! Isn't that a win-win situation?!


That’s it from me! Hope I was able to inspire you with my tags! Please don’t forget to check out and participate in Tracey's 25 Days of Christmas Tags!

Pinkfresh Studio is giving away a $50 gift card to one lucky winner!

 If you like what you've seen from me, please give me a follow over on my Instagram (@hussena_cal) and/or conisder subscribing to my blog if you haven't already.

Thank you so much for stopping by!
Have a great day!

Wednesday, November 4, 2020

Pinkfresh Studio | Watercolored Floral Slimline Cards


Hello crafty friends!
It's my turn to post on the Pinkfresh Studio Card Blog today, and I have two Slimline Cards to share which I created using several products from the October 2020 Release by Pinkfresh Studio. I am so in love with the new slimline supplies and can't really have enough of them!

My first Card for today features the You Are My Favorite stamp and die set along with the Argyle Layering Stencil Set.

I have used the outline floral cluster from the You Are My Favorite stamp to create my card panel. The stamp set comes with three coordinating stencils to colour the different layers, but I heat embossed my flowers and foliage instead of using the stencils. 

To begin, I stamped the outline floral cluster using Clear Embossing Ink on a piece of Canson Montval Watercolor paper. I used Super Fine Gold Embossing Powder to heat set the image and then die cut the image using the coordinating You Are My Favorite Die. Once that was done, I watercolored the florals using Pinkfresh Studio Liquid Watercolours. I used Bubble Gum and Aquamarine to colour the flowers and Key Lime for the leaves. The watercolours are very concentrated in nature, so I diluted them with water for a soft, ethereal look. 

Next, I started working on my card background. I used the Argyle Layering Stencil Set to stencil on my panel using Pinkfresh inks. This is a two-step layering stencil, so I used Mint for the first layer and Misty Coast for the second layer. I love the end result as it looks really soft and dreamy! I adhered this ink blended piece to a panel of Gold Mirror Cardstock, and then to my white slimline card base.  

It was now time to assemble the card together. I fussy cut some of the smaller flowers and leaves from the watercolored image, so that I could play around with my card design. I arranged the different pieces to my panel and adhered them down using foam squares for dimension. Next, I die cut a square frame from White Cardstock using one of the window dies from the Essentials: Shaker Tags Die Set. I wanted it to fit in well with my card design, so I tweaked it a bit and then adhered it to my panel. I also die cut an outer frame from Gold Mirror Cardstock to give it a more defined look. 

Next, I stamped my sentiment in the centre of the panel. It is from the You Are My Favorite Stamp Set and was stamped using Detail Black Ink. The florals and leaves were then adhered around the sentiment piece. To finish, I added some White Jewels and Metallic Gold Paint Splatters on the card. 


My second Card for today features the You Are Amazing StampStencil Set, along with the Days of of Splendor Ephemera Pack and Leafy Squares Stencil

I started off by stamping the leafy outline illutration from the You Are Amazing Stamp using Fresh Pear on a piece of Canson Montval Watercolour Paper to do no-line colouring. I then used the coordinating three-piece Stencil Set to colour the stamped panel. I used Mint for the first layer, Fresh Pear for the second layer, and finally, Misty Coast for the third layer. I chose to use very light ink colours for a soft, watercolored look, but you can always use any colours you like. If you are someone who does not like to spend hours colouring things, then the Stencil Set is just the perfect thing for you. It can be used in multiple ways and always gives great results with minimum time and effort involved!

Next, for my card focal, I die cut a panel using the Diagonal Stitched Rectangles Die Set. I then placed the Leafy Squares Stencil on it and used Mint ink to create my background. Next, I die cut a circle from the centre of this piece using the Essentials: Braided Circle Die Set. I foam mounted this to my card panel for a raised look.

Then, to embellish my card front, I used a couple of die cut pieces from the Days of of Splendor Ephemera Pack. I used some floral pieces along with leaves and foliage to create my floral cluster. I went in and added some glitter accents using Stickles Diamond Glitter Glue on top of the flowers and leaves for added interest.

Next, I adhered the card background to a layer of Pearlescent Green Cardstock, and then onto my White slimline card base. The sentiment was cut using one of the dies from the Thin Words: Everyday Script Die Set, which is a set designed by Pinkfresh exclusively for Scrapbook.com. I cut it once from Red Cardstock and twice from White Fun Foam. I layered them all together and added it to the card using liquid adhesive. Finally, I added some Green Jewels to complete my card.


Hope you enjoyed looking at my cards today! I would love to hear what you think it!
Thank you so much for stopping by!

Monday, October 26, 2020

Pinkfresh Studio | Floral Slimline Cards


Hello crafty friends! 
I have two Slimline Cards to share today which I created using products from the October 2020 Release by Pinkfresh Studio. Have you seen the NEW stamps, dies, and stencils yet? They are simply amazing! 

My first Card for today features the You Are My Favorite stamp, die, and stencil set along with the Diamond Plaid Layering Stencil set.

To begin, I stamped the floral image from the You Are My Favorite stamp set using Detail Black ink on a piece of Neenah Classic Crest Solar White Cardstock (110 LBS). I coloured the flowers and foliage using the coordinating You Are My Favorite Stencils. I used Ocean Breeze and Summer Shower to stencil the flowers and Fresh Pear for the leaves.

 This is a 3 piece layering stencil set and you can mask and add more colors if you want your flowers to be different colors, but I decided to stick to two colors for the florals. Next, I die cut the floral cluster using the You Are My Favorite Die Set.

Once that was done, I started working on my card background. I used the Diamond Plaid Layering Stencil set to stencil on a piece of White Cardstock using Coral Reef and Passion Fruit inks. Then, I die cut the panel using one of the dies from the Slim Edgers Die Set. Next, I took another Slimline sized White Cardstock and die cut the edge of the panel using the Slim Edgers Die Set. I adhered the die cut panel to a white slimline card base and then my added ink blended panel over it. 

I snipped off certain parts of the floral cluster to create my card focal. I popped some of the images using foam dots, while for the others, I adhered them directly to the panel. The sentiment frame was die cut using the Pretty Frames 2 Die from White and Gold Foil Cardstock. I adhered them  to my panel using foam tape for more interest. Then, I stamped the sentiment (from the You Are My Favorite set) in the centre of the label using Detail Black ink. To finish, I added some light blue and pink Jewels.  


My second Card for today features the Be Courageous Stampcoordinating Die, and Stencil Set, along with the Leafy Squares Stencil

To create my card, I first stamped the floral image from the Be Courageous Stamp using my Memory MISTI Tool on a piece of Canson Montval Watercolor Paper using Detail Black ink. This stamp has a coordinating three-piece Stencil Set which you can use to colour your image like I did, or you can also watercolour the floral image instead of using the stencils. I love how ALL the stamp sets in this release offer such versatility.  

I colored the image using the Be Courageous Stencil Set with a variety of Pinkfresh inks and Liquid Watercolors. 
(Ocean BreezeSummer ShowerSparkling Rose, Raspberry Bliss, Sunshine, Ballet Slipper, Coral Reef, Sky Blue, Key Lime, Emerald City). The best part about these coordinating stencils is that you can simply color the image without having to individually mask each section. Once I was done colouring the image, I die cut the panel using the coordinating Be Courageous Die and then trimmed my panel to my card size.

Next, I started working on my card background. I wanted to include a soft pop of colour, so that it would add a little something to the card without distracting too much from the card focal, and so, I used the Leafy Squares Stencil to create my background. I used FIVE  different inks to colour the panel and love how it turned out. The ink colours I used are: Coral Reef, Ballet Slipper, Sky Blue, Meadow, and Fresh Pear. I trimmed this panel to size and adhered it to some Gold Mirror Cardstock for contrast. Then, I adhered it down to my white slimline card base.

I then foam mounted the die cut panel to my card background for dimension. For my sentiment, I used Lea's Ornate Lowercase Die Set. I die cut the letters to spell hello twice from White Cardstock and Gold Mirror Cardstock. I ink blended the letters using Coral Reef and Ballet Slipper and then added the gold outlines to them for visual interest. I foam mounted these letters to my card background. The accompanying stamped sentiments from the (). I stamped it using Detail Black ink on a strip of white cardstock and then adhered it to my panel using foam tape. As the finishing touch, I used a couple of White Jewels


Hope you enjoyed looking at my cards today! I would love to heat what you think it!
Have a great day ahead!

Friday, October 16, 2020

Pinkfresh Studio October 2020 Slimline Stamp, Die, and Stencil Release Blog Hop

Hello, crafty friends!
It's release day at Pinkfresh Studio and we have a FANTASTIC Blog Hop to celebrate Pinkfresh Studio's October 2020 Stamp and Die Release
This release is AMAZING, and there really is something for everyone! We've got slimline stencils, coordinating stamps, dies, and so much more. Pinkfresh' releases just seem to get better every time, and I really hope that you love all the new products too! 

You should’ve arrived here from the talented, Heather Hoffman's blog, if you’re following the blog hop order. In case you’re lost on the way or want to start over, please hop over to Pinkfresh Studio blog!
We've got TONS of inspiration and giveaways for you on the hop today, so keep reading till the end of this post for more information.

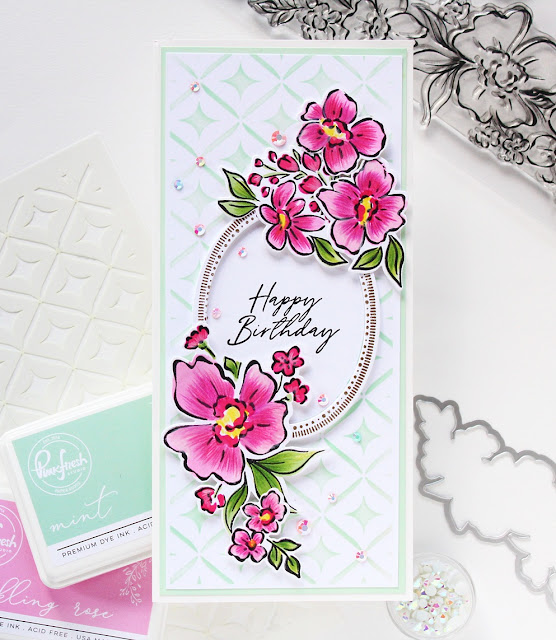
I have got TWO Cards to share today and have focused on the Floral Notes Stamp SetFloral Notes Die SetFloral Notes Stencil, and the Diamond Motif Stencil. Let's just get right into it all!


To begin, I took a piece of White Cardstock and trimmed it down to 9" X 4" to create my panel. Next, I used the Diamond Motif Stencil and Mint dye ink to stencil on the panel. Pinkfresh's inks are very high-quality and they blend like butter. I love using them as they always give such good results!

I stamped the oval frame from the Merry and Bright Stamp Set using Versamark Watermark ink on a piece of White Cardstock, heat-embossed it using Super Fine Gold Embossing Powder, and then die cut the frame using the coordinating Merry and Bright Die Set. Then, I stamped my sentiment in the centre of the oval using one of the sentiment stamps from the Floral Notes Stamp Set using Detail Black ink

Next, I used my Memory MISTI Stamping Platform to stamp the floral image from the Floral Notes Stamp Set using Detail Black ink. I used the coordinating Floral Notes Stencil to colour the petals and leaves using Pinkfresh inks in Sparkling Rose and Grassy Knoll respectively. Once I finished stenciling the entire piece, I went in and added some pencil highlights using Prismacolor Premier Colored Pencils to give the image more definition. I die cut it using the coordinating Floral Notes Die Set and then snipped parts of the design, so that I could arrange it around the oval frame. I used foam squares to adhere the pieces on my panel for dimension. 

I took another piece of White Cardstock and coloured the paper using Mint dye ink. I adhered my main card layer over this panel and then added it to my card base. To accentuate my card, I used some white and pink Iridescent Jewels


My next project is a Mixed Media style Card and features the Floral Notes Stamp SetFloral Notes Die Set, and Diamond Motif Stencil.

For this card, I started off by watercolouring a piece of Canson Montval Watercolor Paper using Sky Blue Liquid Watercolour. Next, I stenciled on this panel using the Diamond Motif Stencil and Texture Paste. I wanted to add a pop of colour in the background, so I added a few drops of the Licorice Liquid Watercolour to my White Texture Paste and then mixed them together to get this stone-grey colour paste. I often use this technique to customize colours of Texture Paste for my projects and it gives beautiful results every time!

Next, I stamped the floral cluster from the Floral Notes Stamp Set using Versamark Embossing Ink on a piece of Watercolour Paper. I heat embossed it using Super Fine Gold Embossing Powder and then die cut the piece using the coordinating Floral Notes Die Set. I coloured the flowers predominantly using two colours - Bubble Gum and Sapphire. I also used a little bit of Sky Blue to add some depth to the blue flowers. I used my Prismacolor Premier Pencils to add pencil highlights to the pink flowers. The smaller flowers and leaves were coloured using Bubble Gum and Key Lime. I also used Sunshine to add colour the centres of the flowers.

Once I was done, I adhered the floral piece to my stenciled background using foam squares for dimension. The sentiment is from the Floral Notes Stamp Set. I stamped it on a piece of White Cardstock using Detail Black ink. I layered this piece over some Gold Glitter Cardstock for interest. I popped the sentiment to my card panel using foam squares.

 I adhered the card panel to a piece of Sky Blue Cardstock, which was then adhered down to my card base. To finish, I used some White Iridescent Jewels to accentuate my card. I also went ahead and added some fine paint splatters using Black Acrylic Paint to add a pop of colour to the overall design. 


PRIZES
Pinkfresh Studio is giving away the ENTIRE release on their Pinkfresh blogInstagram Feed, & YouTube Channel.

You also have the chance to win a $25 gift card sponsored by Pinkfresh Studio from my blog. All you have to do is leave a comment letting me know which card is your favourite. :)

All winners will be chosen and posted on the Pinkfresh Blog on Friday, October 23, 2020 - so make sure and check back to see if you were a winner! Winners must check the Giveaway Page on the Pinkfresh Blog and claim their prize within 2 weeks.

SHIPPING PROMO
Pinkfresh Studio is offering FREE US shipping or discounted international shipping on orders over $50+. Offer valid from 10/16/2020 at 12:01 am EDT through 10/23/2020 at 11:59 pm CST. Be sure to stock up on your favorites from this release to lock in this special promo!

While supplies last, receive a FREE Thank You Die (pictured below) with all qualifying orders over $25. Subtotal amount must be met before any shipping fees/tax/customs. Not valid on prior purchases.


Special Promo from My Sweet Petunia 
Use code PINK to avail 20% off the Memory MISTI (perfect for larger size platform needed for You are Amazing and Be Courageous stamp sets). Offer valid while supplies last.
SHOP for the Memory MISTI on The Sweet Petunia website.


You can find all of the links to the full list of hop members below:

You are invited to the Inlinkz link party!
Click here to enter
Thank you so much for stopping by today! Be sure to leave a comment before you leave and enjoy all of the inspiration on the rest of the hop!

Thursday, April 2, 2020

Altenew 6th Anniversary Blog Hop Day 1 + Giveaway

Hello, crafty friends!
I'm happy and honoured to be joining Altenew for their 6th Anniversary Blog Hop today. Wow, six years already! Happy Anniversary to Altenew! I have always been a big fan of their products and amazed at what new products they come up with month after month.

If you arrived here from, Teri Wilson's Blog, then you are on the right track. If this is your first stop, then you will want to start at the beginning, the Altenew Card Blog.

I have TWO Cards to share for this hop, so let's get started!

My first Card features the Bride-To-Be Stamp SetBride-To-Be Die Set, and Beveled Squares Stencil.

For my card, I started by mixing some Embossing Paste and Citrus Burst Crisp Dye Ink to create my own colored paste. Then, I used this paste to stencil over my card panel using the Beveled Squares Stencil.

My next step was to pick a stamp set to use for my main card design. I really love the dainty elements in the Bride-To-Be Stamp Set and decided to use it for my card. I stamped a bunch of floral and foliage images from the Stamp Set on Neenah Classic Crest Solar White 110LBS Cardstock using a variety of inks: Peach PerfectMango Smoothie, Bamboo, and Dark Chocolate.

Once they were all stamped, I die cut the images using the coordinating Bride-To-Be Die Set. At this point, I felt, my background was missing something, so I added some strips of Cardstock which were coloured using the Chamomile Crisp Dye Ink and Marigold Crisp Dye Ink. Then I adhered all the stamped images on my panel using foam dots for dimension.

All that was needed to complete this card was a sentiment strip and some black paint splatters. I also went in and later added some orange splatters to tie in the colours together.


My second Card features the Virginia Rose 3D Die SetPattern Play: Diamond Stamp Set, and Watercolor Brush Markers - Tropical Fiesta Set.

I was happy to get a chance to finally use my Virginia Rose 3D Die Set which I have had in my stash for a while now. I generally do not tend to use such bright colours for my cards, so this was a nice change for me as well. To create my card, I die cut the various floral layers from Brustro Cold Pressed Watercolor Paper and coloured the individual petals and leaves using Purple Wine and Lime Watercolor Brush Markers from the Tropical Fiesta Set. I used these two colors predominantly for coloring all my die cuts. I also mixed in a bit of Sweet Leaf for the leaves to give them a more natural look.

I wanted my card background to be simple so as to not take away from the beauty of the layered florals. I took a piece of White Cardstock and watercolored it using the Evening Gray Watercolor Brush Marker. I diluted the colour with water to achieve a very light shade. Next, I took my Pattern Play: Diamond Stamp Set and stamped it on my card panel using Versamark Embossing ink, and then heat embossed it in White using the Pure White Crisp Embossing Powder. This was just to add a little bit of interest to my card design.

I stamped my sentiment on a strip of White Cardstock using the Altenew Obisidan Pigment Ink (which is my absolute fave) and mounted it on my card panel using foam tape. Lastly, I added loads of green paint splatters as the finishing touch for my card.


Special Offer
Enjoy FREE U.S. shipping with code HAPPY6TH or $5 OFF international shipping with code ANNIV20 at checkout. Offer valid from 4/2/2020 at 12:01 am EDT through 4/5/2020 at 11:59 pm EDT. Not valid on prior purchases. Cannot be combined with other promo codes. Shop here: https://altenew.com/

Prizes
Altenew is giving away a $50 gift certificate to 6 lucky winners and one Altenew Academy class to 10 lucky winners. There are also 14 awesome companies/crafty friends who are celebrating with us, and they are offering the following prizes:

Altenew: 6 $50 Altenew gift certificates
Altenew Academy: 10 class spots
Jennifer McGuire Ink: 1 $100 Altenew gift certificate & 5 Share Handmade Kindness goodie bags($20 each)
My Sweet Petunia: 1 prize bundle(Original MISTI, a set of Creative Corners, a Cut-Align and a bar magnet)
CiLi in Papers: $100 gift certificate
Craft Stash: £75 gift certificate
Online Card Classes: 3 class spots
Simon Says Stamp: $50 gift certificate
Scrapbook.com: $50 gift certificate
Michelle's Cards & Stamp: $50 gift certificate
Ellen Hutson LLC: $30 gift certificate
Butterfly Reflections Ink: $25 gift certificate
Scrapbook & Cards Today: 1 copy of Scrapbook & Cards Today Spring 2020 issue
Bumbleberry Papercrafts: £25 gift certificate
Seven Hills Crafts: £25 gift certificate

Be sure to leave comments by 4/12/2020 for a chance to win one of 37 prizes! To make the hop more exciting, start your comment with "Hi from (city or country where you're from)!". 37 winners will be chosen at random from the comments left on any of the blogs listed below and will be announced on the Altenew Card Blog on 4/18/2020.


Blog Hop Order
Day 1: April 2nd, 9:00 AM EDT
                          Hussena Calcuttawala (You are HERE)

Thank you so much for your stopping by and reading this blog post. I hope you liked my cards! If you would like to see more of my work using Altenew, do follow my Instagram page.
Thank you for stopping by, and wishing you a lovely day!