Showing posts with label Shaped card. Show all posts

Saturday, December 4, 2021

Spellbinders Guest Design Post | Fluted Classics Collection by Amazing Paper Grace


Hello, crafty friends!
I'm so honoured to be guest posting today on the Spellbinders blog! I'm sharing a set of four cards using dies from the new Fluted Classics Collection by Becca Feeken. The gorgeous classic nested design shapes can be used to create the perfect border for any background, sentiment, or focal image for a wide variety of projects.


My first card features the Fluted Classics Rectangles Etched Dies, Fluted Classics Ovals Etched Dies, and the Pop Up 3D Vignette Poinsettia Sleigh Die Set. The different nesting dies were simply perfect to create this pastel Christmas card. 

For my card, I first die cut Snowdrift Cardstock using the Large Rectangle Outer Rim and Insert Die together from the Fluted Classics Rectangles Etched Dies. Next, I die cut Alabaster Cardstock using the Medium Rectangle Outer Rim and Insert Dies from the same set. Then, I die cut Alabaster Cardstock using the Medium Oval Outer Rim, Insert, and Inner Rim Dies from the Fluted Classics Ovals Etched Dies. Once that was done, I die cut Pink Sand Cardstock using the Medium Oval Insert Die from the same set and stamped my sentiment on to the piece using Versafine Onyx Black ink

Next, I die cut Snowdrift Cardstock and Mirror Gold Cardstock using the Design Rim and Insert dies from the Flourished Fleurit Die Set together to add underneath my sentiment piece. I adhered the layers together using liquid glue, allowing a bit of the gold to show as a shadow. This card did involve a bit of die-cutting, but I think it was well worth it in the end! 

To embellish my card, I die cut Snowdrift Cardstock and Mirror Gold Cardstock using the poinsettia and evergreen leaf dies from the Pop Up 3D Vignette Poinsettia Sleigh Die Set. Next, I inked the centres of the flowers using Twisted Citron Distress ink with a sponge dauber. The petals were coloured very lightly using Picked Raspberry Distress ink and I lightly embossed the flower petals with a Ball Stylus. I then adhered the floral spray together using Liquid Glue and added a small sparkly rhinestone to the center of each flower.

I adhered down all the different die cut elements one on top of the other using foam adhesive and matted the entire panel with layers of Pink Sand and Mirror Gold Cardstock. Then, to finish, I adhered the card front to a top-folding white card base with tape runner. 


When you have a large focal image on your project, the Fluted Classics Collection is perfect for making elegant frames and background designs to draw attention to them. Here I combined the square and circle shapes to create a layered frame for these floral die-cut pieces.

To begin, I die cut Alabaster Cardstock using the Large Square Outer Rim and Insert Dies from the Fluted Classics Square Etched Dies. Next, I die cut Alabaster Cardstock using the Square Frame die from the Elegant Infinity Die Set. In order to highlight the intricate design, I matted the die cut panel with a piece of Mirror Gold Cardstock. Once that was done, I die cut Alabaster Cardstock and Mirror Gold Cardstock using the Large Circle Outer Rim, Insert, and Inner Rim Dies from the Fluted Classics Circle Etched Dies. I adhered the ivory die-cut piece on top of the gold die-cut with liquid glue, offsetting them a bit to form a shadow. Then, I die cut Alabaster Cardstock using the Medium Circle Outer Rim and Inner Rim Dies from the Fluted Classics Ovals Etched Dies. I adhered the pieces down on my panel using foam adhesive for dimension. 

Next, I stamped the sentiment from the Sending You stamp set onto Snowdrift Cardstock using Versamark Embossing ink, added Super Fine Gold Embossing Powder on top of the stamped images, and melted it with a Heat Tool. I cut out the stamped images using the coordinating dies and popped them on to my panel using foam adhesive for dimension. 

To create my floral spray, I die cut Snowdrift Cardstock using the small blossom and leaf dies from the Floral Potpourri Etched Dies. I coloured the die cut pieces using Mermaid Markers from Jane Davenport, shaped the individual pieces with a Ball Stylus, and added a small sparkly Styrofoam bud to the center of flower. I also die cut Snowdrift Cardstock using the floral accessory dies included in the Flourished Fleurit Die Set and coloured them using Mermaid Markers to add to my foliage. To complete my floral arrangement, I die cut Mirror Gold Cardstock using the decorative flourish die included in the Mini 3D Vignette Floral Mason Jar Die Set.

It was now time to assemble the card together. I adhered down the die cut pieces using a mix of foam adhesive and Liquid Glue. I arranged the flowers and leaves around the sentiment panel and adhered them down with strong Liquid Glue. Then, I matted the card background panel with Mirror Gold Cardstock and adhered it down to a top-folding white square card base with tape runner. To finish, I popped the die cut sentiment pieces on my panel using foam adhesive for dimension. 


My next card includes lots of die-cutting and a touch of stamping. I chose a color scheme that would work for most seasons so that I could send this friendship card any time of year.

To create my card, I first die cut Alabaster Cardstock using the Large Rectangle Outer Rim and Insert Dies from the Fluted Classics Rectangle Etched Dies. Next, I die cut Pink Sand Cardstock using the Medium Rim and Insert Dies from the Victorian Splendor Slimline Etched Die Set and adhered it down to my card panel using  Liquid Glue. Then, I die cut Alabaster Cardstock using the Medium Circle Outer Rim, Insert, and Inner Rim Dies from the Fluted Classics Circles Etched Dies and adhered it down to my background panel using foam adhesive. 

Then, to embellish my card front, I die cut Snowdrift Cardstock using the Oriental Lily and Wellies and Plumeria Etched Dies from Susan's Garden. I used Copic markers to colour the centres of the flowers and lightly shaped the petals using the Ball Stylus from Susan’s Garden Ultimate Tool Kit. I added a pink pearl to the centre of each flower for interest. Next, I die cut Snowdrift Cardstock using the large leaf, medium leaf, small leaf, and stem die from the Plumeria Etched Dies from Susan's Garden. I blended Peeled Paint and Twisted Citron Distress inks over the die cut pieces for depth. I went with 2D flowers this time and really like how they have turned out. 

Next, I die cut Snowdrift Cardstock and Mirror Gold Cardstock using the 'Hello' die from the Sweet Sayings Notecard Sentiments Etched Dies. I adhered the white die-cut sentiment on top of the gold die-cut with liquid glue, offsetting them a bit to form a shadow. I then ink blended Picked Raspberry ink to the top three-quarters of the sentiment die-cut piece for more depth. Once that was done, I adhered the piece down to my panel using foam adhesive. Then, I stamped a sentiment from the I'm Here for You Sentiments Clear Stamp & Die Set on to a strip of Snowdrift Cardstock using Versafine Onyx Black ink and popped it on to my panel using foam adhesive. I arranged the flowers and leaves around the sentiment panel and adhered them down with strong Liquid Glue. To assemble the card together, I matted the card panel with Pink Sand Cardstock before adhering it to a top-folding A2-sized ivory card base. I adhered pink pearls all over the intricate background panel as a finishing touch. 


I love creating Shaped Cards and the Fluted Classics Ovals Etched Die Set was just perfect for creating one. I always love when I can stretch my dies and use them to create new designs. I added a few handmade flowers for a simple congratulations card. 

To create my card, I first scored and folded Waterfall Cardstock in half and placed the Large Oval Insert Die included in the Fluted Classics Ovals Die Set along the fold of the card, so the cutting edges of the die are just above the fold. I then ran it through my Spellbinders Platinum 6" Machine machine. This helped me create a folded card base that matches the shape of the card. I then die cut Alabaster and Pink Sand Cardstock using the Large Oval Insert Outer Rim and Insert Dies from the same set. I adhered the ivory die-cut piece on top of the gold die-cut with liquid glue, offsetting them a bit to form a shadow. 

Next, I die cut Mirror Gold Cardstock using the Small Oval Outer Rim, Insert, and the Small Oval Inner Rim Dies included in the Fluted Classics Ovals Die Set. Once that was done, I adhered a solid oval cut using Snowdrift Cardstock inside the outline die cut piece with Liquid Glue. Next, I die cut Waterfall and Mirror Gold Cardstock using the sentiment die from the Elegant Infinity Die Set. I adhered the blue die-cut sentiment on top of the gold die-cut with liquid glue, offsetting them a bit to form a shadow. Next, I die cut Snowdrift Cardstock using the Plumeria Etched Dies from Susan's Garden. I lightly coloured the pieces using Mermaid Markers and shaped the petals using the Ball Stylus and Tweezers from Susan’s Garden Ultimate Tool Kit

Then, I die cut Snowdrift Cardstock using the leaf dies included in the Floral Potpourri Etched Dies. I coloured the individual die cut pieces using Mermaid Markers and embossed them using the Small Ball Tip and Tweezers from the Ultimate Tool Kit by Susan's Garden. I added sparkly styrofoam buds to the centre of each of the flowers for more dimension. To finish, I assembled the different card layers together and adhered them down using a mix of Liquid Glue and foam adhesive. 


SPELLBINDERS SUPPLIES:
CS-005, CS-017, CS-024, CS-027, SCS-118, SDS-167, S3-420, S3-428, S4-1148, S4-1150,  S4-1151, S5-474, S5-475, S5-478, DOMAPG-NOV20, DOMAPG-MAR21, DOMAPG-JUN21, JD-041, PCGO4E, PE-100, T-021

OTHER SUPPLIES:
Neenah Solar White Cardstock, Copic Markers, Peeled Paint, Picked Raspberry, Twisted Citron Distress Inks, Versafine Onyx Black Ink, Versamark Embossing Ink, Super Fine Gold Embossing Powder, Blending Tool, Sponge Daubers, Heat Tool, MISTI Stamping Tool, Tape Runner, Foam Adhesive, Crystal Jewels, Styrofoam Buds, Microfine Glitter Powder, Rhinestones, White Fun Foam Sheets

I hope you enjoyed this set of layered floral cards featuring the Fluted Classics Collection and are inspired to give it a try. Thank you so much for stopping by today!
You can find more inspiration over at my Instagram page

Sunday, October 10, 2021

Spellbinders & Amazing Paper Grace Die of the Month | October 2021


Hello, crafty friends! 
Happy Sunday! I have a Shaped Card to share today featuring the Spellbinders & Amazing Paper Grace October 2021 Die of the Month Set. This month's "Flourished Fleurit" Set is perfect for making gorgeous layered cards, boxes, gift baskets, and more. This die set features 9 dies.


The Flourished Fleurit Set has several strategic snipping points that make sizing it down very easy and simple. It cuts a gorgeous 5″ x 7” card background, but also includes inserts and floral accessory dies that can be used on smaller projects. Everything you need to make a complete card can be derived from this one die set and I had such a wonderful time creating with it!

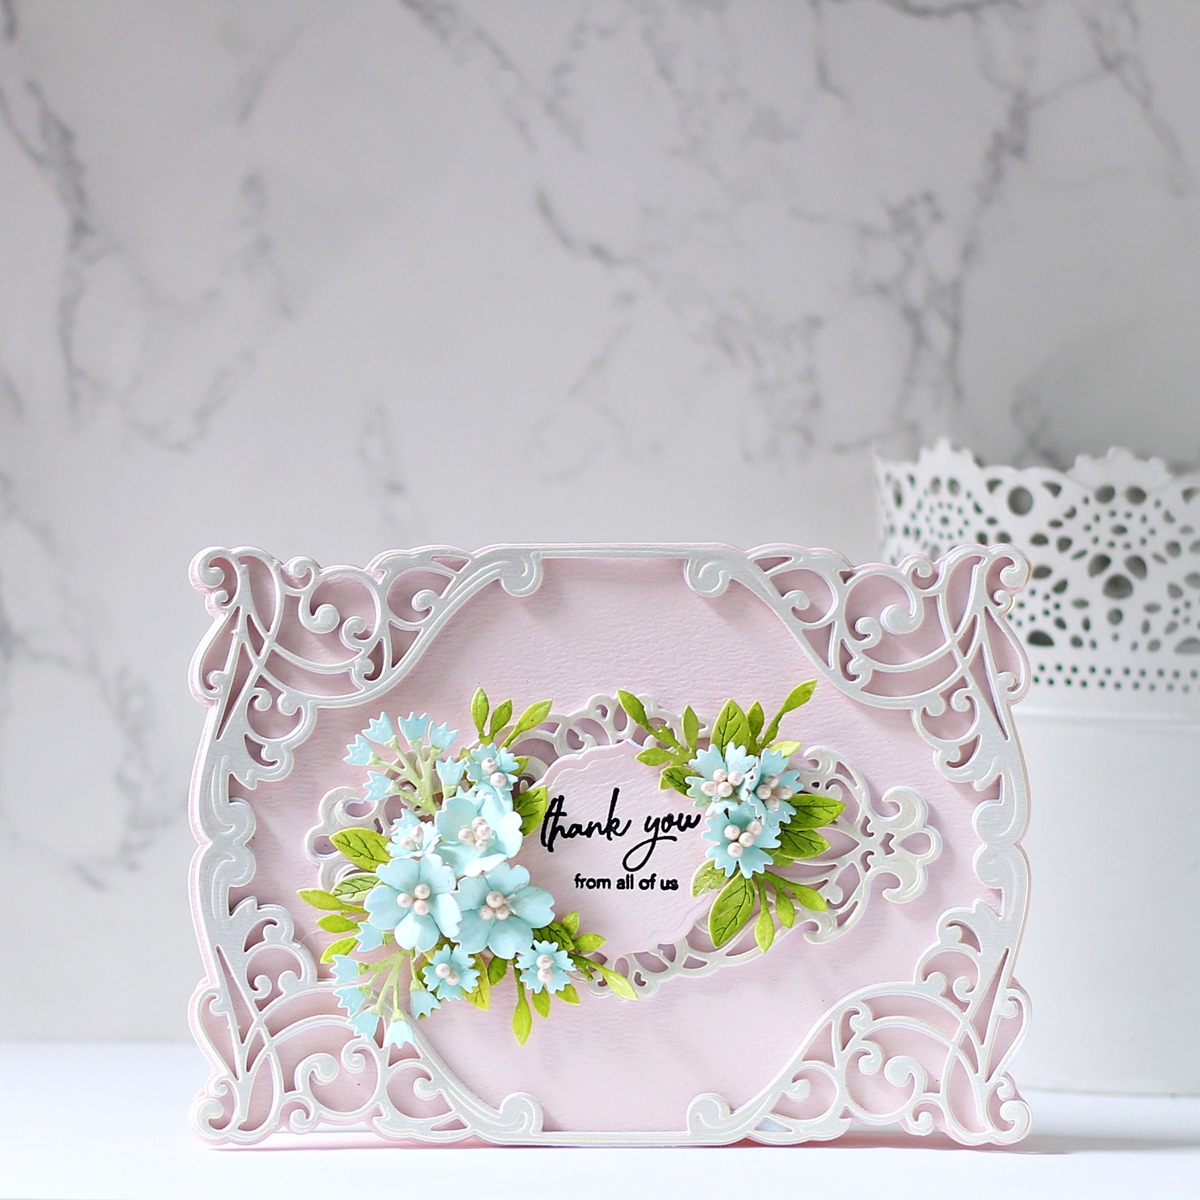
I have created an Ornate Shaped Card using this month's Flourished Fleurit Die Set. I particularly love the Flourished Fleurit motif in this month's set. It can be used for so many projects and is so versatile!

To create my card, I first scored and folded Pink Sand Cardstock in half and placed the shadow outline die included in the Flourished Fleurit Die Set along the fold of the card, so the cutting edges of the die are just above the fold. I then ran it through my Spellbinders Platinum 6" Machine machine. This helped me create a folded card base that matches the shape of the card.

Next, I taped together the decorative frame die and the inner rim die from the Flourished Fleurit Die Set and die cut it from Metallic Ivory Cardstock. I made sure that the inner die is centered, so that it would cut out the thin side borders. Once it was die cut, I lined up and adhered the intricate frame down to my card base using the Bearly Art Precision Craft Glue

Next, I die cut Metallic Ivory Cardstock using the inner design rim and insert together to create the centerpiece for my card. I adhered the piece down to my card panel using the Bearly Art Precision Craft Glue. Once that was done, I die cut Waterfall Cardstock and Rainforest Cardstock using the little floral accessory dies that are included in the set. These are so beautiful and versatile - You’ll certainly find me using them on a lot of my projects! I cut out a bunch of flowers and leaves and embossed each of the pieces using the small ball tip from the Ultimate Tool Kit by Susan's Garden. Then, I added pearl finish pollens to the flower centres for definition and interest. 


Next, I die cut Pink Sand Cardstock using the Label 5 Die from the Curvy Labels Set. I stamped my sentiment in the centre of the die cut using Black Licorice ink and attached it to my panel using foam squares. Then, to finish, I adhered down the flowers and leaves around my sentiment using the Bearly Art Precision Craft Glue. This card came together in no time! and was such a pleasure to create!     `


The Amazing Paper Grace Die of the Month is available exclusively at Spellbinders Paper Arts during October 2021. You can get the Flourished Fleurit Set at the special Cub Kit price, along with other membership perks.

If you'd like to see some more project inspiration using the Amazing Paper Grace Die of the Month, check out the Spellbinders Blog where Becca shares some stunning project samples using it.  
 

Don't miss out on the BIG Scary Good Sale going on now with up to 40% off select Dies, Stamps, Embossing Folders, Glimmer Plates, and more through October 10th, 2021 at Midnight PST.

That’s it for me today! I hope you liked my take on the die set! If you like what you've seen from me, please give me a follow over on my Instagram (@hussena_cal) and/or subscribe to my blog if you haven't already.

Sunday, September 12, 2021

Spellbinders & Amazing Paper Grace Die of the Month | September 2021


Hello, crafty friends!
Hope you are doing well and staying safe!
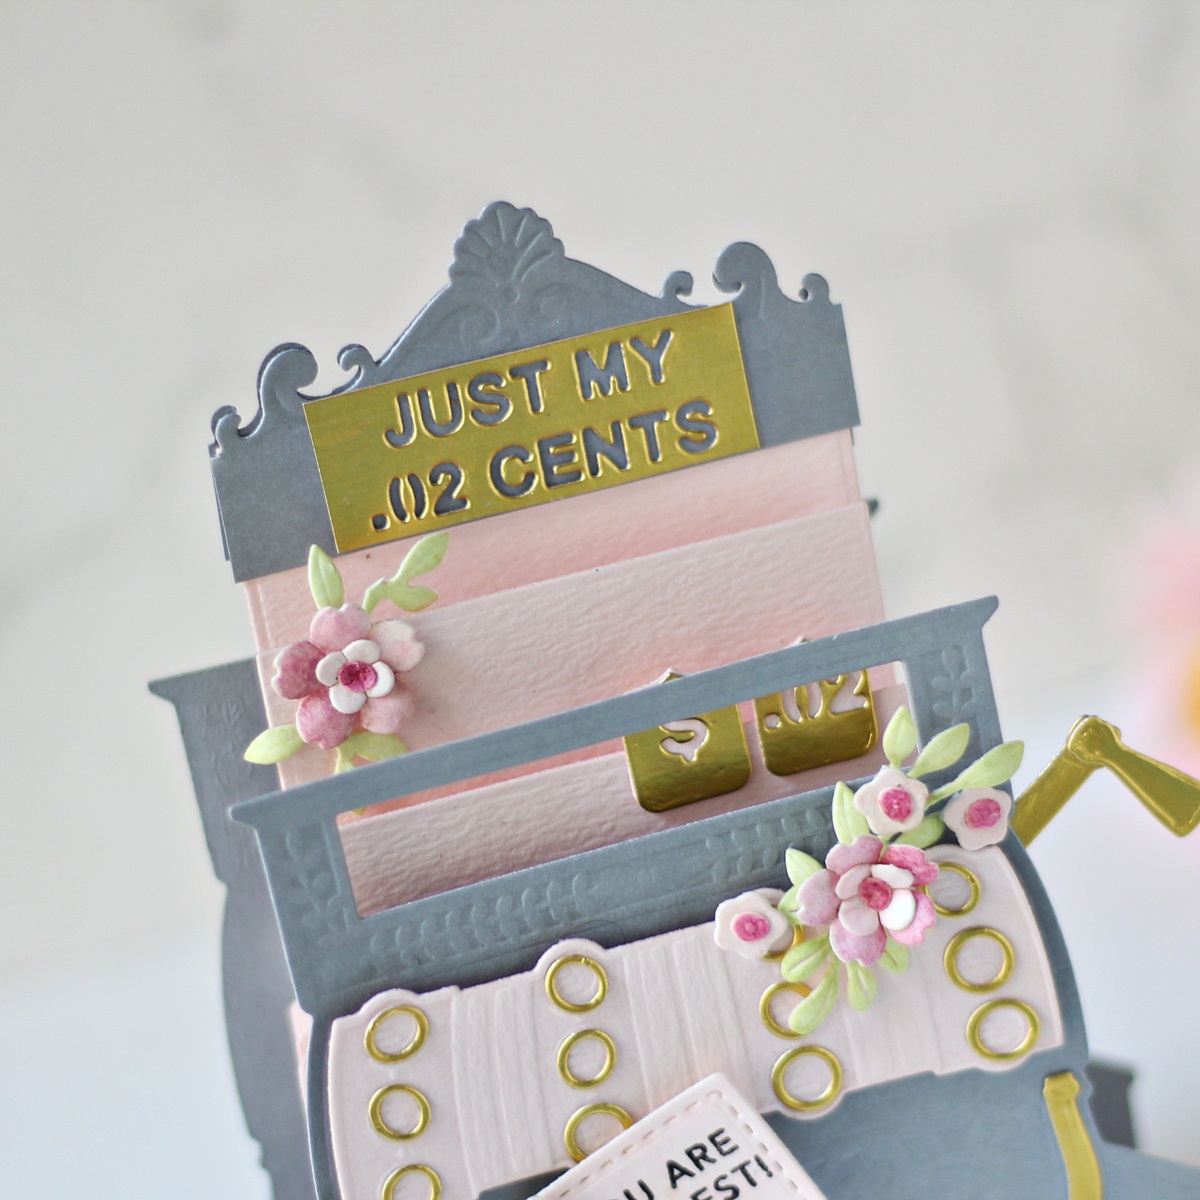
I have a 3D Vignette Card to share today featuring the Spellbinders & Amazing Paper Grace September 2021 Die of the Month Set. This month's "Pop Up 3D Vignette Vintage Cash Register" Set is perfect for making gorgeous cards, a gift card caddy, a card to hold cash bills, or can be just a sweet way to tell someone how valuable they are to you! This die set features 16 dies.

The Pop Up 3D Vignette Vintage Cash Register is a very unique and magnificent Die Set and I LOVE all the cute embellishments, markings, and sentiments that make it a showpiece. I had oodles of fun creating with it! 

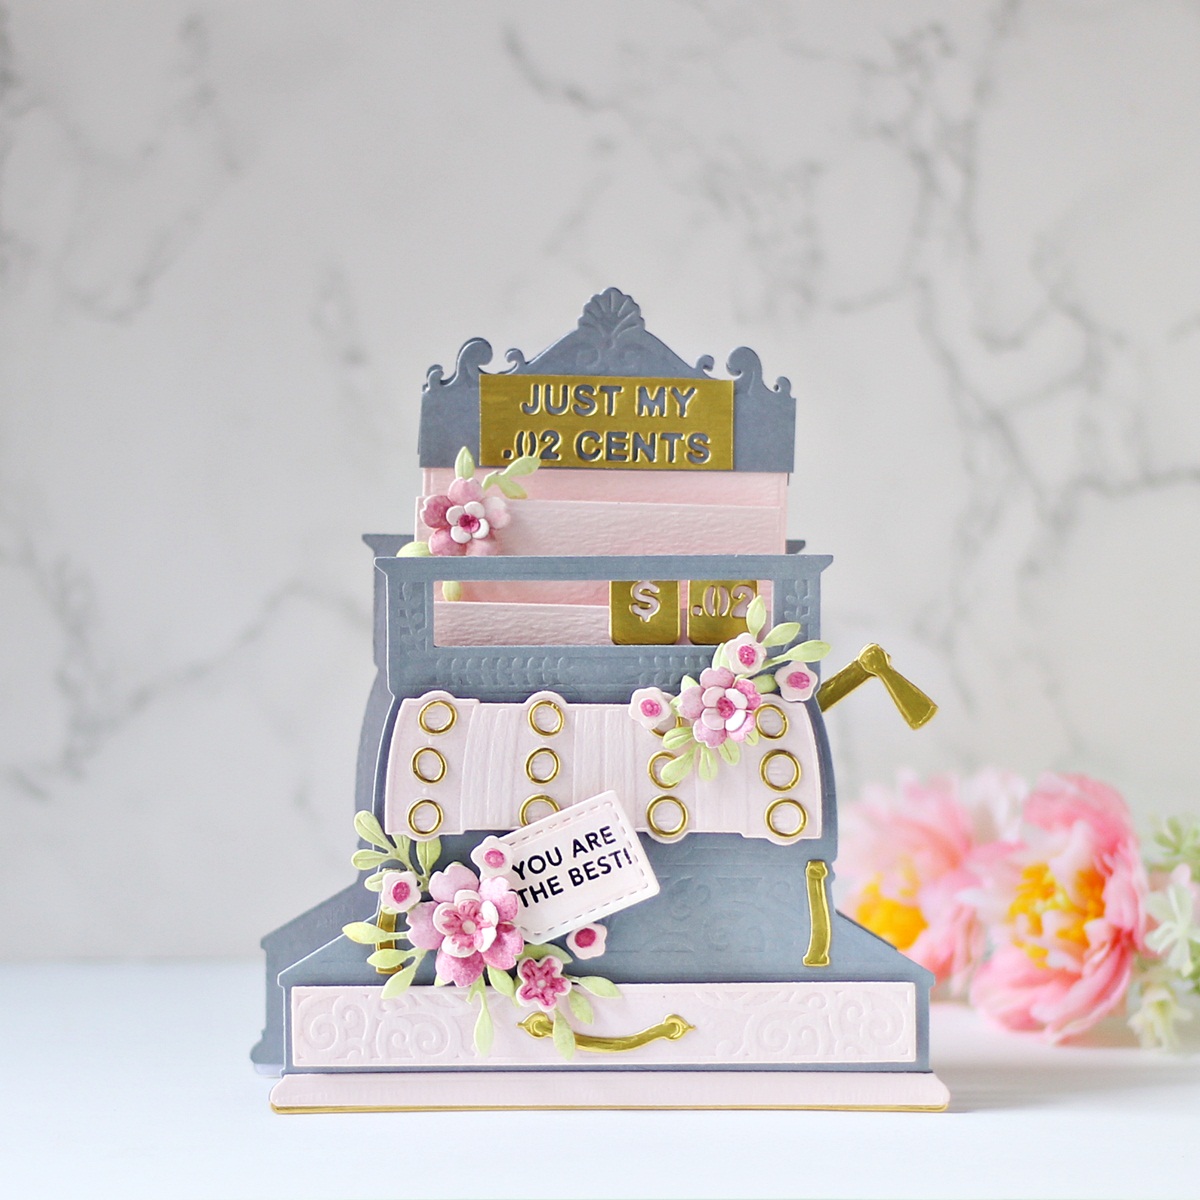
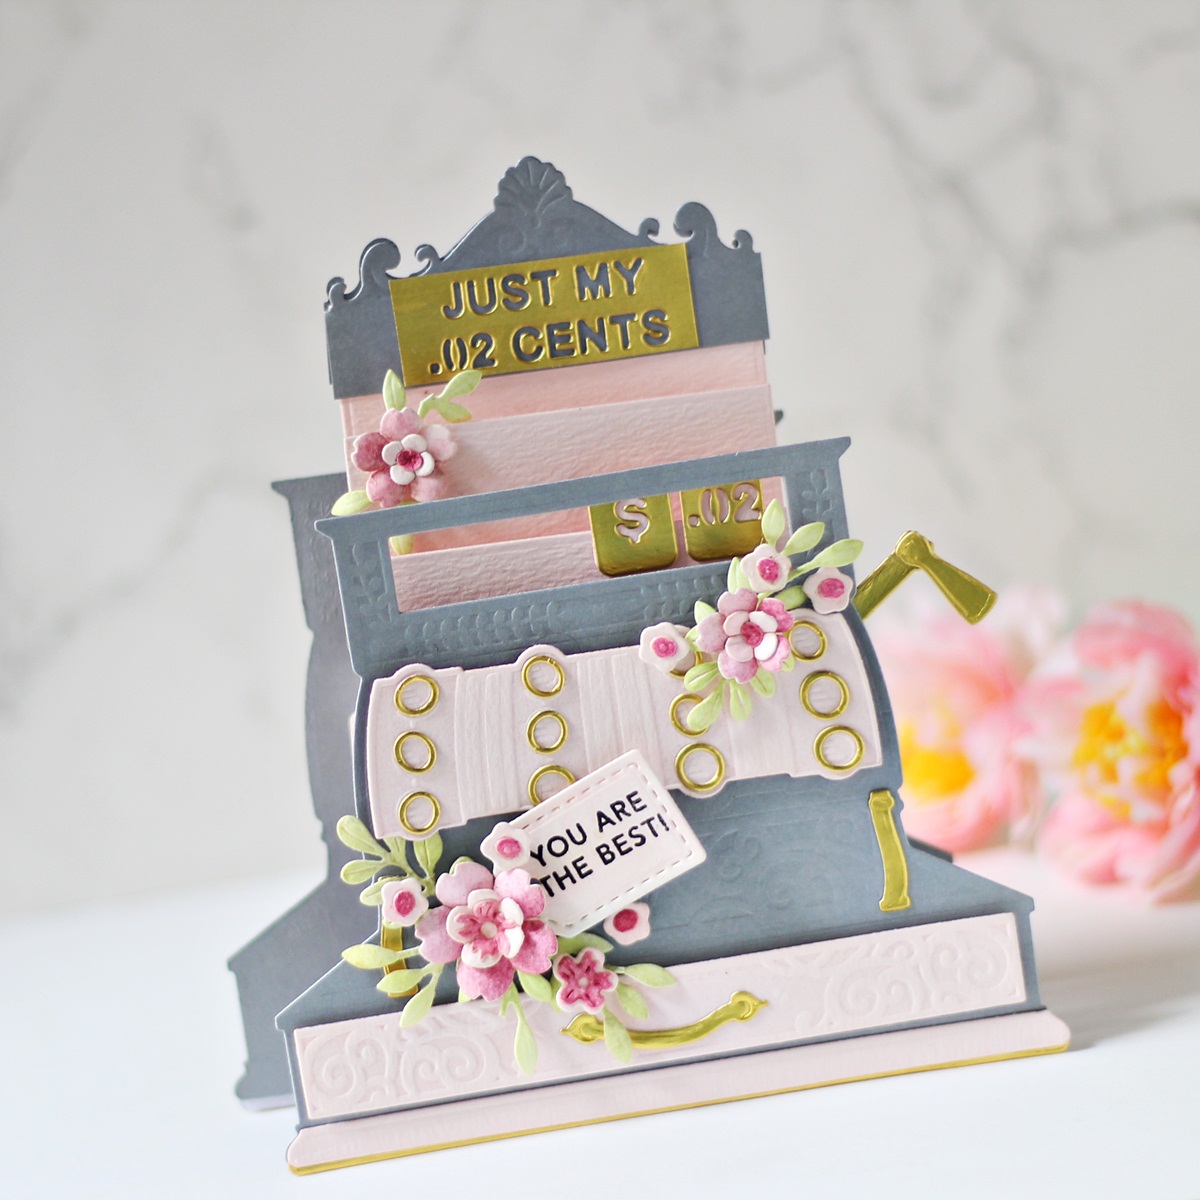
One of the things I really like about Becca's 3D Vignettes die range is that they fold flat for mailing. Imagine the recipient's delight on receiving such a handmade card in the mail. It's sure to intrigue them! I created a 3D Vignette Card for my post today using the Vintage Cash Register Set. 

For my card, I started by die cutting Pink Sand and Silver Brushed Cardstock using the various die pieces included in the Vintage Cash Register in my Spellbinders Platinum 6" Machine. Then, I die cut Gold Mirror Cardstock using the keys, the drawer handle, and the crank diesOnce I had everything die-cut, I assembled the pieces together following Becca Fekeen’s Video Tutorial. I highly recommend following her tutorials when making your 3D Vignettes projects as she breaks down the process for you in a very simple manner!

Next, I die cut Pink Sand Cardstock using the three sets of tab dies included in the Vignette Inserts that allow for different heights in the cash register. I applied liquid adhesive to the 2 wings of the Vignette Side Pieces, folded the wings, and placed the Vignette Inserts as seen. 

Once that was done, I die cut Silver Brushed Cardstock and Gold Mirror Cardstock using the decorative register top and the sentiment dies. There are four different sentiment pieces included in the set, so you can pick and choose whichever one you like best for your project. I went with "Just my 0.02 Cents" for my project. I adhered the pieces together using liquid adhesive, ensuring that the decorative piece is adhered along the top of the Vignette Insert. I also adhered some die cut pieces in between the Vignette Inserts for interest. Them, I attached the Vignette side pieces to the front and back of the cash register. 

It was now time to embellish the cash register, which also happens to be my most favourite part ever when creating any project. I die cut Snowdrift and Pink Sand Cardstock using the various blossom dies included in the Petite Floral Potpourri Etched Dies. I coloured the pieces using dye inks  and embossed the centres using the 2mm ball stylus tip from Susan's Garden Ultimate Tool Kit. The leaves were die cut from Snowdrift Cardstock as well and then coloured using Shabby Shutters Distress ink. I arranged the different pieces together on my project and then adhered them down using liquid glue. I love the soft, feminine touch it gives to the project. What do you think?! 

I also die cut Pink Sand Cardstock using the tag die from the Mini 3D Vignette Floral Mason Jar Set. I stamped a sentiment on to the die cut piece using Versafine Onyx Black ink and then attached it to my project using foam squares. I had such a wonderful time playing with this die set and coming up with my card. I'd also like to mention that if you want, you can highlight the several embossed sections on the piece using Gilding Wax or lightly sand the raised edges of the die cut pieces to distress it. This will help make those details pop! I skipped this step as I already had a lot of dimension layers on my card, but you can most definitely include it if you so wish. 


The Amazing Paper Grace Die of the Month is available exclusively at Spellbinders Paper Arts during September 2021. You can get the Pop Up 3D Vignette Vintage Cash Register Set at the special Cub Kit price, along with other membership perks.

If you'd like to see some more project inspiration using the Amazing Paper Grace Die of the Month, check out the Spellbinders Blog where Becca shares some stunning project samples using it.  
 

Don't miss out on the marvelous Bi-Annual Warehouse Sale going on now at Spellbinders. This sale features incredible deals starting from just $1. This is one of Spellbinders' biggest sales of the year with a HUGE product offering and will run until Sunday, September 19th!

That’s it for me today! I hope you liked my take on the die set! If you like what you've seen from me, please give me a follow over on my Instagram (@hussena_cal) and/or subscribe to my blog if you haven't already.

Sunday, August 8, 2021

Spellbinders & Amazing Paper Grace Die of the Month | August 2021


Hello, crafty friends!
Hope you are doing well and staying safe!
I have a card to share today featuring the Spellbinders & Amazing Paper Grace August 2021 Die of the Month Set. This month's "Lattice Petal Foldover" Set is perfect for making gorgeous cards, gift boxes, note-card sets, and more in no time! This die set features 14 dies.

I have a couple of projects to share today featuring the Lattice Petal Foldover Set. The latticework is truly gorgeous and I loved creating with the different elements included in the die set. Becca's die designs are always so ingenious and this is yet another remarkable die set to have in your stash. I truly can't have enough of it!  

My first project is a Shaped Card created using the foldover outline die, foldover inserts, and the inner square die with rim, and the filigree corners from the Lattice Petal Foldover Set. 

I didn't have to do much to create this card because the dies all the work for me. To begin, I die cut Metallic Ivory Cardstock using the foldover outline die in the Lattice Petal Foldover Set using my Spellbinders Platinum 6" Machine. Next, I die cut Alabaster Cardstock using the foldover outline die and used the partial die-cutting technique to create a hinged card base. If you don't know how to create one, you can check out Becca Feeken's tutorial HERE where she demonstrates how to create it in a lucid manner.  Once my card base was die cut, scored, and folded, I adhered the foldover insert dies to the wings of the outline die cut with removable tape and ran it through my die cut machine to die cut the intricate lattice framework.

Next, I die cut the filigree corner die four times out of Gold Mirror Cardstock to tuck in beneath the square motif die cut. Then, I die cut Alabaster Cardstock using the inner square die to create the centerpiece for my card. Once that was done, I die cut Alabaster Cardstock using the smallest square piece included in the die set for my sentiment piece. I stamped my sentiment in the centre of the die cut using Black Licorice ink and attached it to my panel using foam squares.

Next, I die cut Snowdrift Cardstock with the mini flower and leaf sprig dies from the Petite Floral Potpourri Etched Dies. I coloured each of the floral die cut pieces using Picked Raspberry and Worn Lipstick Distress inks and embossed them using the small ball tip from the Ultimate Tool Kit by Susan's Garden. This is my go-to tool kit for flower shaping and embossing and I do recommend getting it if you are an avid flower maker or enthusiast. Once I had embossed the pieces, I added some pollens to the centres of the flowers for a realistic look. Similarly, the leaves were coloured using Twisted Citron and Mowed Lawn Distress inks. I shaped the tips of the leaves using the medium ball tip from the Ultimate Tool Kit. Then, to complete the floral bunch, I adhered a shaded mulberry flower, the coordinating filler flowers, die cut leaves, and a pink satin ribbon bow.

I adhered the latticework die cut to my card base with foam adhesive. I then popped the square motif onto the card panel using foam adhesive. I simply love the delicate and lacey look of the die cuts! What do you think?!


My next project is a handmade Gift Box with a set of two note-cards. This is the most darling thing ever!

Becca's die designs are always very versatile and they lend themselves so well to a consortium of papercrafting projects! I used the dies included in the Lattice Petal Foldover Set to create the lid of the box. This box measures. 4.5 inches X 4.5 inches and is 2.25 inches deep. I trimmed a piece of Pink Sand Cardstock to 9 X 9 inches and scored the paper on all four sides at 2.25 inches to create the lid for my box. Similarly, for the base, I trimmed a piece of Alabaster Cardstock to 8 3/4 inch X 8 3/4 inch and scored at 2.25 inches on all four sides. I adhered the flaps together using Red Liner Tape to create the base of the box.

I then used the domed lattice arch die from the Lattice Petal Foldover Set to die cut an aperture in the centre of the lid of the box. I also die cut the arches from Gold Mirror Cardstock and slightly offset the two pieces to create the illusion of depth without an excessive amount of bulk.  

Once that was done, I scored, folded and adhered the flaps together to create the finished lid. I adhered a piece of pink satin ribbon in between the two domed lattice arch pieces to give it a more finished look. Next, I die cut Snowdrift Cardstock with the mini flower dies from the Petite Floral Potpourri Etched Dies. I coloured the centres of the die cut pieces using Picked Raspberry Distress ink and embossed them using the small ball tip from the Ultimate Tool Kit by Susan's Garden. Once I had embossed the pieces, I added some pollens to the centres of the flowers. Similarly, the leaves were coloured using Twisted Citron Distress ink. I shaped the tips of the leaves using the small ball tip from the Ultimate Tool Kit

I arranged the flowers and leaves together to create a cluster and added them to the box using glue dots. Then, as the finishing touch, I die cut Alabaster Cardstock and Gold Mirror Cardstock using the corner filigree die and slightly offset the pieces to create the shadow layer. I die cut four set of corners to attach to all four sides of the box. Then, as the finishing touch, I adhered white pearls to the corner filigree pieces and domed lattice arch pieces. 


I also created a set of two note cards and a romantic little envelope to go with my box. I die cut Alabaster Cardstock using the foldover outline die to create the outline layer for the envelope. I then adhered the foldover insert dies to the wings of the outline die cut with removable tape and ran it through my die cut machine to die cut the intricate lattice framework. Once it was die cut, I scored and folded the flaps to create the finished envelope. I then trimmed a piece of Pink Sand Cardstock to size to fit inside the envelope. 

Next, I die cut Pink Foamiran using the mini flower die included in the set. I wanted to create a cluster of three roses, so I die cut the flower die thrice in my die cutting machine. I used a slotted quilling tool to roll the mini flowers and then adhered them to the envelope using a hot glue gun. The leaves and sprig from the Petite Floral Potpourri Etched Dies were die cut from paper and also adhered using a glue gun. I die cut Alabaster Cardstock and Gold Mirror Cardstock using the fastener die from the set and offset the two pieces to make it all come together!

The note-cards came together very quickly as well! I just used different colours on both of them for contrast and interest. I die cut Alabaster Cardstock and Gold Mirror Cardstock using the inner square frame die and offset the two pieces to create an illusion of depth. I then die cut Alabaster Cardstock using the smallest square die included in the set and stamped my sentiment on it using Black Licorice ink. 

Next, I die cut Pink Sand Cardstock using the flower die included in the Lattice Petal Foldover Set. I die cut the flower pieces thrice using my die cutting machine and used a slotted quilling tool to create the coiled roses. The coordinating flowers, leaves, and sprig pieces are from the Petite Floral Potpourri Etched Dies. I colored the mini flowers using alcohol markers and adhered them to my panel using liquid adhesive. The leaves were die cut from Limeade Splash Cardstock and adhered using liquid adhesive. To assemble, I matted the die cut background panel with layers of Pink Sand and Alabaster Cardstock before adhering it to a top-folding card base made using Pink Sand Cardstock. 

I repeated the process for the other note-card as well, but simply changed the colour of the flowers from pink to blue. I also die cut the sentiment piece from Pink Sand Cardstock instead of Alabaster Cardstock and used a different sentiment on this card. I really love how they turned out! I would love to hear what you think of them!


The Amazing Paper Grace Die of the Month is available exclusively at Spellbinders Paper Arts during January 2021. You can get the Lattice Petal Foldover Set at the special Cub Kit price, along with other membership perks.

If you'd like to see some more project inspiration using the Amazing Paper Grace Die of the Month, check out the Spellbinders Blog where Becca shares some stunning project samples using it.  
 

That’s it for me today! I hope you liked my take on the die set! If you like what you've seen from me, please give me a follow over on my Instagram (@hussena_cal) and/or subscribe to my blog if you haven't already.