Showing posts with label Altenew Washi Tapes. Show all posts

Thursday, May 12, 2022

Altenew Craft Your Life Project Kit: Florescence Release Blog Hop + Giveaway ($300 in total prizes)


Hello, crafty friends!
I'm ecstatic to be joining Altenew for the Florescence Release Blog Hop today showcasing the next installment in their monthly Craft Your Life Project Kit. If you are finding these kits irresistible month after month, you can always subscribe to ensure that you get first dibs on them when they’re released and, bonus, you get them at a discount with your subscription. Check out the details HERE.

If you arrived here from Daniel Diaz's Blog, then you are on the right track. If this is your first stop, then you will want to start at the beginning, the Altenew Card Blog. We've got tons of inspiration and giveaways for you on the hop today, so keep reading till the end of this post for more information.

The Craft Your Life Project Kit, is an exciting monthly package that is sure to get the creative juices flowing! Featuring a 6x8 stamp set, coordinating die set, as well as a stencil set and embossing folder to fit the theme, this project kit has almost everything you need to start crafting. Just add ink and cardstock, and you'll be good to go!

This Project Kit contains the following exclusive products:

  • One 6" x 8" Clear Stamp Set containing 18 stamps made in the USA from high-quality photopolymer
  • Coordinating Die Set with 1 Coordinating Die
  • One simple Coloring/Mask Stencil Set containing 4 Stencils which coordinate with the Stamp Set
  • One 6x6 3D Embossing Folder

Note: These products are NOT sold separately. The stencils coordinate with the embossing folder.


Enjoy floral florescence with stunning flowering blooms with the Florescence Stamp Set. Stamp the two elaborate clusters of poppies, chrysanthemums, and daisies to bring floral beauty to your projects. They are perfect to fill card backgrounds or frame your scrapbook layouts. You can color the floral intricacies with watercolor or brush markers for a vibrant touch. Finally, stamp any of the uplifting sentiments or quotes to brighten a loved one's day. 

I created two cards for today's hop using the Craft Your Life Project Kit: Florescence, so let's dive deep into it! 

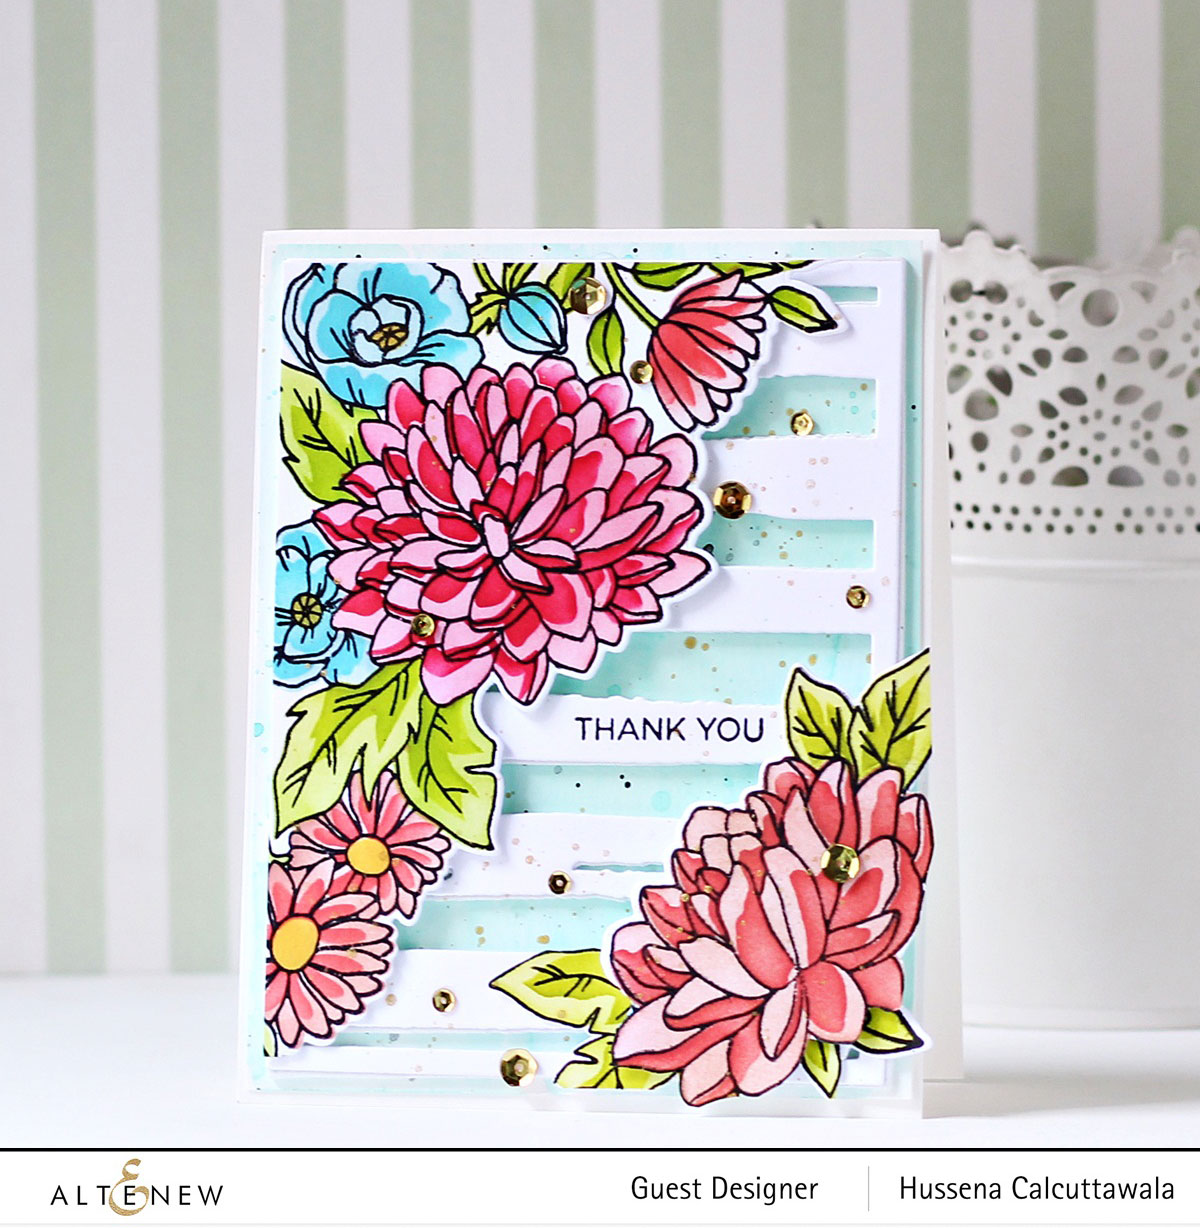
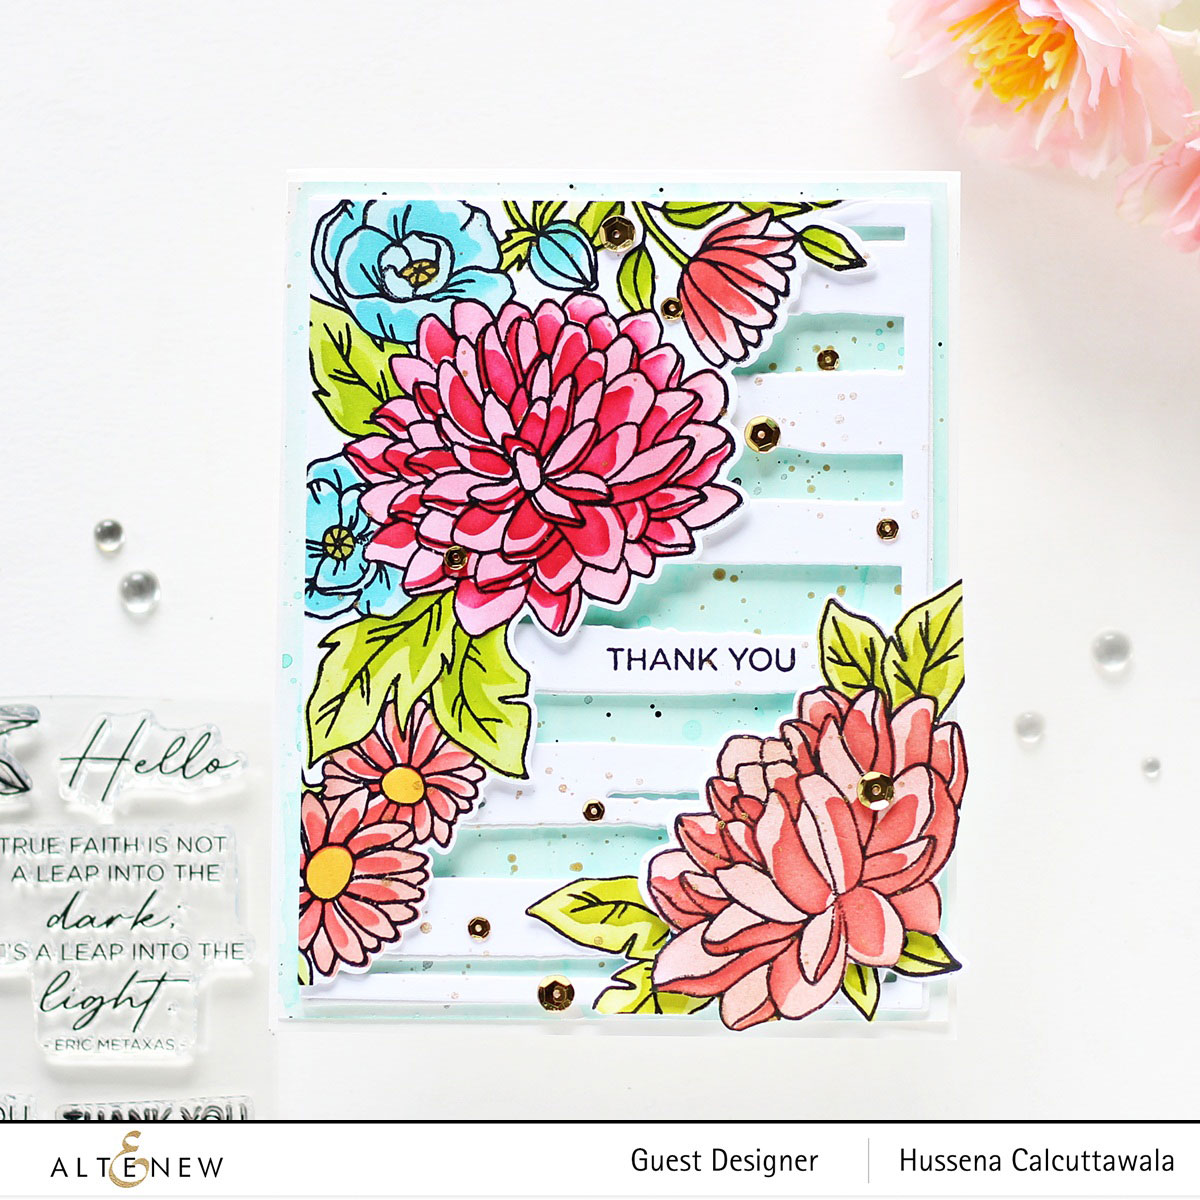
For my first card, I began by stamping one of the floral corners from the Craft Your Life Project Kit: Florescence Stamp Set onto a panel of Neenah Classic Crest Solar White Cardstock using Obsidian Pigment Ink. I then used the coordinating layering stencils, included in the kit, and used Rouge, Coral Bliss, Vineyard Berry, Autumn Blaze, Orange Cream, and Sunkissed inks for the flowers, Parrot and Bamboo inks for the foliage. I die cut the floral spray with the coordinating die. The Simple Coloring Stencil included in this kit makes it super easy to color this fun image! 

Next, I die cut Neenah Classic Crest Solar White Cardstock and White Foam using the Watercolor Stripes Cover Die and adhered the layers together using  Craft Glue for dimension. Next, I trimmed a piece of Watercolor Paper to 4.25" X 5.25", wet my watercolor panel, and used Lagoon and Mountain Mist Paints to create a soft, watercolored background. I let the panel dry and then splattered the card front with Enchanted Gold and Aquamarine paints from the Metallic Watercolor Set for a fun, artsy look. I also used the Jet Black Ink Spray to add some more splatters on the background.

Next, I stamped my sentiment from the the Florescence Stamp Set onto the die-cut panel using Obsidian Pigment Ink. Once that was done, I assembled the different elements on my panel and adhered down the pieces using foam squares. Then, to finish, I adhered the panels together with Craft Glue, before adhering it to a top-folding A2-sized white card base using tape runner. I added a few Antique Gold - Sequins to help add some sparkle to the card front.


My second card features the Florescence Embossing Folder and the Hello and Hugs Die Set.

For the second card, I used the super-detailed 3D Embossing Folder included in the Craft Your Life Project Kit:Florescence with some White Cardstock. I ran the embossing folder with the White Cardstock panel through my die-cutting machine to create the raised image. You could very easily leave it like this, but I pulled out my Watercolor 36 Pan Set and did some loose watercoloring to highlight the absolutely stunning detail in the Embossing Folder. I did do some subtle washes of color on the background in coordinating colors. I think the effect is quite dream-like and ethereal. Once it had dried completely (you can use a heat gun if you're in a rush), I splattered the card front with Enchanted Gold, Aquamarine, Prasiolite paints from the Metallic Watercolor Set to add some extra metallic shine. I also used the Jet Black Ink Spray to add some more splatters on the background.

Next, I die-cut Citrine Cardstock and White Foam using the Circled Greetings: Hugs Die. I cut around the outer edge to use the positive image as an accent on my project and adhered the pieces together with Craft Glue. Then, I stamped my sentiment onto a strip of White Cardstock using Obsidian Ink and affixed it to my panel using foam adhesive

Next, I added a die-cut frame to the centre of the panel cut using the Fine Frames Rectangles dies and some White Cardstock. I coloured the frame in the same colors as the card background and adhered it to the panel using foam adhesive. Then, to complete, I adhered down the panel to a top-folding A2-size white card base using tape runner. I finished the design with some sparkling Antique Gold - Sequins around the sentiment to embellish.


Giveaway Prizes:
$300 in total prizes! To celebrate this release, Altenew is giving away a $50 gift certificate to 2 lucky winners and a $25 gift certificate to 8 winners! Please leave a comment on the Altenew Card Blog and/or each designer’s blog post on the blog hop list below by 05/18/2022 for a chance to win. Altenew will draw 10 random winners from the comments left on each stop of this blog hop and announce the winners on the Altenew Winners Page on 05/20/2022.

Blog Hop Order:
Next Stop on this Blog Hop is, Natasha Davies's blog. Just in case you lose your place along the way, here is the complete list of participants so that you can find your way back:

Natasha Davies


Well, that’s all for my projects today! Thanks so much for stopping by and reading. I hope you have a wonderful day!

If you like what you've seen from me, please give me a follow over on my Instagram (@hussena_cal) and/or subscribe to my blog if you haven't already.

Tuesday, April 12, 2022

Altenew Craft Your Life Project Kit: Fragrant Florals Release Blog Hop + Giveaway ($300 in total prizes)

Hello, crafty friends!
I'm so happy and honoured to be joining Altenew for the Fragrant Florals Release Blog Hop today showcasing the next installment in their monthly Craft Your Life Project Kit: Fragrant Florals! Craft-Your-Life is a monthly subscription plan for their Fragrant Florals Project Kit. When signed up, you are guaranteed a spot in their monthly Project Kit releases and will receive a kit each month - at a specially discounted price! ($59.99 →$49.99)

If you arrived here from Eva Bussom's Blog, then you are on the right track. If this is your first stop, then you will want to start at the beginning, the Altenew Card Blog. We've got tons of inspiration and giveaways for you on the hop today, so keep reading till the end of this post for more information.


The Craft Your Life Project Kit, is an exciting monthly package that is sure to get the creative juices flowing! Featuring a 6x8 stamp set, coordinating die set, as well as a stencil set and embossing folder to fit the theme, this project kit has almost everything you need to start crafting. Just add ink and cardstock, and you'll be good to go!

This Project Kit contains the following exclusive products:

  • One 6" x 8" Clear Stamp Set containing 18 stamps made in the USA from high-quality photopolymer
  • Coordinating Die Set with 1 Coordinating Die
  • One simple Coloring/Mask Stencil Set containing 4 Stencils which coordinate with the Stamp Set
  • One 6x6 3D Embossing Folder

Note: These products are NOT sold separately. The stencils coordinate with the embossing folder.
The Fragrant Florals Stamp Set features a beautiful arrangement of anemones. The large stamp size makes it quite versatile, as you will be able to stamp it off of your card base at different angles and proportions to get different looks. It is a lovely image to color or use stamped as is. There are also some heartfelt sentiments included in bold fonts to contrast the delicate nature of the flowers.

I created two cards for today's hop, so let's dive deep into it! Both projects feature a soft, cool blue and yellow tones from the Martian Terrain ink pad quartet and Delectable Delights ink pad quartet, but both have a completely different aesthetic to them!

My first card uses the Fragrant Florals Stamp Set and coordinating Fragrant Florals Die Set. It is gorgeous, and I couldn’t wait to color all of these different blooms.  The design can fill the entire background of a slimline card, but I trimmed my down to fit on an A2-sized for something different. I added layers of flowers and even a foiled frame to this card perfect for sending to a friend or a family member.

To start, I stamped the large floral image from the Fragrant Florals Stamp Set onto Altenew’s Watercolor Paper with Embossing Ink and heat embossed it using White Super Fine Embossing Powder to create a pearlescent look. I watercolored the entire image with the Altenew Watercolor 36 Pan Set and a Fine Watercolor Brush.  I love all of the incredibly different looks you can achieve with this one stamp just by changing up the color scheme! Then, I die cut the watercolored image using the included coordinating die.

After I had finished watercoloring the main image, I used my MISTI to do some more heat embossing. I placed the anemone cluster from the Fragrant Florals Stamp Set onto Altenew’s Watercolor Paper with Embossing Ink and heat embossed it using Gold Super Fine Embossing Powder this time. I watercolored the leaves and foliage using Bamboo and Frayed Leaf from the Altenew Watercolor 36 Pan Set with a Fine Watercolor Brush and cut it out with the coordinating die. 

For the card background, I used Mountain Mist from the Altenew Watercolor 36 Pan Set to add a wash of very diluted blue to the entire background, going back with dabs of more concentrated color in random spots, but keeping the overall feel very light. Then, I used the Antique Gold Metallic Spray and Jet Black Ink Spray to add some shiny, shimmery gold splatters to the background to make it extra artsy. Next, I simply laid a strip of the Gold String Washi Tape over a a piece of Neenah Classic Crest Solar White Cardstock and adhered it. Once that was done, I die-cut the panel using the Rectangle Shape Extra Large Pattern Die and Rectangle Shape Large Pattern Die from the Nestabilities Essential Rectangles Etched Dies and adhered it to my card panel using foam tape for a raised effect.

Next, I die-cut Citrine Cardstock using the coordinating Fragrant Florals Die Set and snipped off some of the leaves to add to my floral spray. Next, I assembled the watercolored pieces onto my panel using a combination of Craft Glue and foam adhesive for dimension and interest. Then, I stamped a sentiment from the Fragrant Florals Stamp Set onto the panel using Obsidian Ink. Lastly, to finish, I adhered the panel to a top-folding A2-sized white card base using tape runner. I added a few Antique Gold - Sequins for some sparkle!


I love the range of beautiful new 3D embossing folders by Altenew including the one I’ve used for today’s project: Fragrant Florals. Let’s get started with the details!

I love the effect of watercoloring on the super detailed, textured embossed backgrounds, so I began my project by embossing the Fragrant Florals Embossing Folder on some of Altenew’s Watercolor Paper. This lightly textured paper looks beautiful when embossed alone, almost like super fancy letterpress! The huge embossed image covers the majority of the A2 card front. Next, I used the Altenew Watercolor 36 Pan Set to add some watercolor to each of the petals. Once the watercolored image had dried completely, I added a bit of subtle shading to the centre of the flowers to give it a more realistic finish. I then fussy-cut around the image using a pair of scissors. 

Then, just like my previous card, I used Mountain Mist from the Altenew Watercolor 36 Pan Set to add a wash of very diluted blue to the entire background. Next, I used the Antique Gold Metallic Spray and Jet Black Ink Spray to add some splatters to the background to make it shimmer. Next, I die-cut Neenah Classic Crest Solar White CardstockCitrine Cardstock, and White Foam using the Circled Greetings: Hugs Die. I cut around the outer edge to use the positive image as an accent on my project and adhered the pieces together with Craft Glue. I then ink-blended Rubellite ink into a nice ombré to add some visual interest to the sentiment. Then, I stamped my sentiment onto a strip of White Cardstock using Obsidian Ink and affixed it to my panel using foam adhesive. Next, I split the embossed image into two pieces and adhered it down to my card panel using  foam adhesive


To complete, I adhered the panel to a top-folding A2-sized white card base using tape runner. I added a few Antique Gold - Sequins for some sparkle!


Giveaway Prizes:
$300 in total prizes! To celebrate this release, Altenew is giving away a $50 gift certificate to 2 lucky winners and a $25 gift certificate to 8 winners! Please leave a comment on the Altenew Card Blog and/or each designer’s blog post on the blog hop list below by 04/18/2022 for a chance to win. Altenew will draw 10 random winners from the comments left on each stop of this blog hop and announce the winners on the Altenew Winners Page on 04/20/2022.


Blog Hop Order:

I am the last stop on the hop. If this is your first stop, then you will want to start at the beginning, the Altenew Card Blog.

Altenew Card Blog

Jennifer McGuire

Michelle Short

Cheryl Espie

Jenny Colacicco

Colleen Balija

Erum Tasneem

LauraJane

Jaycee Gaspar

Katrina Howe

Laurie Willison

Preeti Chandran

Nathalie DeSousa

Mindy Eggen

Emily Midgett

Rosie Neustaedter

Tenia Nelson

Nenette S. Madero

Terri Koszler

Linda Westfall

Virginia Lu

Maryam Perez

Norine Borys

 Reiko Tsuchida ***Note: Due to strict regulations in Japan, you might not be able to leave a comment on her blog post. 

SathyaKala Sankaran

Teresa Litchfield

Sande Woodson

Ann Taylor

Susan Stagno

Amy Hill

Bridget Casey

Daniel Diaz

Eva Bussom

                      Hussena Calcuttawala (You are HERE)


Well, that’s all for my projects today! Thanks so much for stopping by and reading. I hope you have a wonderful day!

If you like what you've seen from me, please give me a follow over on my Instagram (@hussena_cal) and/or subscribe to my blog if you haven't already.

Friday, August 2, 2019

Guest Post using CrafTreat Stencils


Hello, everyone!
I have some projects to share today I created using stencils from CrafTreat's April 2019 Release. Without further ado, let's get started!

My first card features the Round Dot Mandala Stencil. I have never worked with Mandala stamps or stencils before, so I was thrilled when I saw this design. To create my card background, I used Prima Marketing's Light Paste mixed with different shades of dye inks to achieve the colour hues I wanted for my card design. Once that was done, I used Papericious' Twinkling Spark Glitter Powder to sprinkle glitter all over the stenciled mandala design. This gave a really subtle yet pretty shimmer to the card. 

To complete my card, I fussy cut a couple of flowers and leaves from Altenew's Botanical Rhapsody Washi Tape and adhered them to my panel using foam dots for added dimension. 

Here's a look at the gorgeous shimmer and texture. I honestly am in love with the sherbet colours. These are my all-time favourites!

To complete the card, I added a sentiment to the centre and matted it on some grey textured cardstock. This was then adhered to an A2 sized top folding card base. 
  

My next card is different from my usual style and is created using the Flower Fusion Positive Dots & Flower Fusion Negative Dots Stencils. This is something really new from CrafTreat and I was really excited to give it a try!

For my card, I wanted to use some fresh and bold colours reminiscent of spring. I started by stenciling my card panel using the Checkered Rose Stencil and Altenew's Modelling Paste. Once that was dry, I lightly watercolored the background.

For my card focal, I stenciled the flowers and leaves from the Flower Fusion Positive Dots & Flower Fusion Negative Dots Stencils. I sketched the outline of both the flowers and leaves using a Black Microtip Pen to add some definition to the design. I fussy cut these out and arranged them on my card panel. I also stamped my sentiment on a banner and popped it up on my card panel.

To accentuate my card design, I added a strip of Gold Mirror Cardstock and Papericious' Monochrome Patterned Paper along the right side of my card. I also added some gold sequins and black paint splatters to finish off my card. 


My third card for today is even more different from my regular cards. The Flower Fusion 2 Step Stencils were quite challenging for me to use and this is my take on them!

For my card, I used the Flower Fusion Step 1 Stencil to stencil the lovely tile design using Altenew Limestone Dye ink. My next step was to stencil the flowers over this background. I would like to say this here, that it is absolutely not necessary to use both these stencils together, you may just stop at one step or use both. That's the beauty of them! I went ahead with the Step 2 stencil and coloured the flowers and leaves using Prismacolor Pencils. 

I didn't want to take the focus away from the amazing background so I kept the rest of the card simple. I stamped the first half my sentiment on a banner and the other directly on the panel. I added some clear sequins for the finishing touches. I matted this panel onto some Gold Mirror Cardstock which was then adhered finally to an A2 sized top folding card base.

There are various ways you could use these Flower Fusion stencils! I really love that tile background and can see myself using it on a lot of projects. By the way, I am sorry that the Gold Mirror Cardstock is not reflecting in this picture. It's not a dark brown cardstock. :)


Now, I have some Gift Tags to share with you using the Flower Fusion Triangles Stencil. I have masked and used only a small portion of the stencil on the tags, but it adds so much to the design. Here's a look at them:

 I used the Flower Fusion Triangles Stencil and Altenew's Limestone Dye ink for stenciling on the bottom of the tags. Once that was done, I die cut and coloured the flowers and leaves and added them to the gift tags. All that was need to complete them was a sentiment, and that's it. They were done! 

These were really simple to put together and are great for mass producing or creating in bulk.


My final project for today is a Money Wrap. I love creating them and wanted to do something slightly different on this one, so I combined stenciling with Foamiran flowers. I used the Beaded Flourish Stencil for creating that flourish design on the patterned paper. Then, I embellished my wrap with a handmade Foamiran rose and some filler flowers and foliage. 

I tend to create very elaborate designs, but if you don't want to do that, you can make it simple by cutting down on the number of filler flowers and foliage. The stenciled design makes for a great background for envelopes and you can use it in different ways to achieve different results!

That brings me to the end of this post! I hope I gave you some ideas to use these stencils. I would like to thank Priya and her team for inviting me to guest design on the CrafTreat blog. This post was supposed to go live back in April, but I couldn't send it across at that time, so I am finally sharing these projects now. I hope you liked them! :)

Supplies Used:


If you have any questions regarding any of the projects or the supplies used, please don't hesitate to ask me in the comments section below. I would be happy to help you out.

Have a lovely day, you all!