Monday, November 18, 2019

Altenew + The Daily Marker Color Therapy Blog Hop & Giveaway

Hello, crafty friends!
I'm happy and honoured to be joining Altenew for the Color Therapy Blog Hop today. Altenew is collaborating with the amazing Kathy Racoosin from The Daily Marker to inspire crafters to find joy through coloring. Kathy is celebrating her 14th 30 Day Coloring Challenge until the end of November 2019. 

If you arrived here from the super talented, Gayatri Murali's Blog, then you are on the right track. If this is your first stop, then you will want to start at the beginning, the Altenew Card Blog.


I have created a Card for this hop which features the Altenew Perfectly Perfect Stamp set, Dotted Scales Debossing Cover DieVirginia Rose 3D Die Set, Layered Floral Elements Die Set, and Sketchy Florals Stamp set. 

For my card, I started by stamping the flowers from the Altenew Perfectly Perfect Stamp set using Antique Linen Distress ink on Art Essentials 300 GSM Watercolor Paper. Next, I used the Purple Wine and Lime Brush Markers from the Tropical Fiesta Set to watercolour my flowers. I went in with about two to three layers of colour till I was happy with the way it looked. Then, I fussy cut the flowers and kept them aside.

For my card foliage, I die cut some leaves and filler flowers from the Virginia Rose 3D Die Set, and Layered Floral Elements Die Set and coloured the die cuts using the Purple Wine and Lime Brush Markers from the Tropical Fiesta Brush Markers Set

I used the Dotted Scales Debossing Cover Die to die cut a background panel for my card. Then, I die cut a circle from the centre of this panel and adhered my flowers and die cut leaves and foliage over it.

I used a sentiment from the  Sketchy Florals Stamp set which was stamped using the Altenew Obsidian Pigment ink. I then added some enamel dots as the finishing touch for my card. Finally, I adhered my card panel to an A2 top folding white card base. 


Prizes:
Altenew is giving away a $30 gift certificate to 5 lucky winners and Kathy from The Daily Maker is also giving away her original 5”x7” watercolor artwork (including a custom frame). Please leave a comment on the Altenew Card Blog by 11/22/2019 for a chance to win.

Additional Giveaway:
Altenew will also draw a winner to receive a $15 gift certificate from the comments left on each designer’s blog on the blog hop list below. All winners will be announced on the Altenew blogs on 11/24/2019.

Special Offer:
Receive a FREE brand new Like Family Stamp Set ($4.99 value) with every order from 11/18/2019 at 12:01 am EST until 11/29/2019 at 11:59 pm EST. The free gift will be added to cart automatically. While supplies last. Shop here -> https://altenew.com/collections/all-altenew-products


Blog Hop Order:
Next Stop on this Blog Hop is, Keeway Tsao's blog.
Just in case you lose your place along the way, here is the complete list of participants so that you can find your way back:
                          Hussena Calcuttawala (You are HERE)


I hope this inspires you to colour something today! Anyone can participate in the 30 Day Coloring Challenge by coloring something and sharing it on social media using the hashtag #thedailymarker30day. I hope you find your 'Me Time' and enjoy the benefits of colouring through this challenge.

Thank you so much for your stopping by and reading this blog post. I hope you liked my card! If you would like to see more of my work using Altenew, do follow my Instagram page.
Thank you for stopping by, and wishing you a lovely day!

Friday, November 15, 2019

CrafTreat Floral Layering Stencils | Guest Post

Hello, everybody!
 I am guesting today on the CrafTreat Blog. I have a bunch of cards and other projects to share with you using CrafTreat's August Release - Layered Floral Stencils

Without further ado, let's dive right into my projects. It's going to be a long post, so please bear with me. :)


The big, bold anemone was one of my favourite stencils from this release! For my card, I first began by die cutting a 4" x 5.225"card panel using the Pinkfresh Studio Essentials: Diagonal Stitched Rectangles die set. I cut a circle from this panel using another die from Pinkfresh Studio called Essentials: Braided Circles die set. Next, I started working on the focal for my card which were the stenciled florals. I used various inks from Altenew to stencil the anemone on a piece of Neenah Classic Crest Solar White 110 LBS Cardstock. I also used the Layered Cosmos stencil for the smaller cosmos flowers and Altenew inks again for them. 

I used a mix of die cut leaves and foliage and stenciled leaves from the Layered Anemone stencil. I added some tiny inked flowers to add interest to my design. I then stamped a sentiment from the Spellbinders Express Yourself Clear Stamp Set in the centre of the circle to complete my card.  


My second card features the Layered Rose 3 Stencil.

I really love the spectacular look of this stencil. It almost looks like it's been stamped, which is just awesome! For my card, I started by stamping the Diamond Tile Background by The Stamp Market on a piece of 4 1/4" X 5 1/2' Neenah Classic Crest Solar White Cardstock. Next, I used the Altenew Tea Party Dye inks with the Layered Rose 3 stencil to create that gorgeous rose. For the leaves, I used Altenew's Parrot & Bamboo Dye inks. 

I adhered some mini stamped filler flowers to accentuate my card design. Next, I added a frame to the centre of my card which was die cut from Gold Foil Cardstock. I used the Spellbinders Express Yourself Clear Stamp Set for my card sentiment and this card was done!


My third card features the Layered Peony 2 Stencil. 

For this card, I started by die cutting a card panel from the Lil Inkers' Stitched Mats: Rectangles die set. Then, I die cut a card background using the Elizabeth Crafts Abstract Background die from the Papericious 'The Wedding' Patterned Paper Pack.

My next step was to work on the flowers for my card. I used a different combination of inks this time for the peony and was happy with the way it turned out. I used the same Parrot & Bamboo Dye inks from Altenew for the leaves. The floral foliage on the top was created using Altenew's Artist Markers and foliage dies. 
I added a sentiment strip to my card and black paint splatters as the finishing touch.


My fourth card features the Layered Rose 2Layered Cosmos Stencil. 

This was an interesting card to make because I chose to use bold colours for this one. I started by die cutting a card panel from the Art Essential 300 GSM Watercolor Cardstock. Next, I used Picked Raspberry & Squeezed Lemonade Distress Oxide inks to watercolour the panel. I wanted a gradient effect and kept the central portion mostly light yellow so that it would add some balance to the whole card design.

Then, I used the Pocketful of Sunshine Dye inks from Altenew to stencil the large rose from the Layered Rose 2 Stencil. I used the same inks for the cosmos flower on the right side as well. The leaves were made using a mix of stencils and stamps. I added some foliage to my floral arrangement using the Altenew Hope Stamp set to balance the card design. The sentiment also comes from the same set, while the 'hope' was die cut using the coordinating die set. I added some black ink splatters as the finishing touch for my card. 


My next project is a gift bag which I'm very excited about as this is the first time I have tried out something like this! This project features the Peony Bloom Stencil.

To start with, I first die cut a bag using Fun Stampers Journey Card Carrier Die Set. This helped me create this fabulous gift bag in a jiffy. Then, I die cut a panel using the Pinkfresh Studio Essentials: Diagonal Stitched Rectangles die set from Art Essential 300 GSM Watercolor Cardstock. Next, I used Altenew's White Modelling Paste mixed with Limestone dye ink and Leaf Pattern Background to stencil on the panel.

 I loved the soft finish of the stenciled design and then started working on my floral cluster. I used the Peony Bloom Stencil with Altenew inks to create the flower. The leaves are also from the same stencil and I tucked in few extra die cut leaves and foliage to complete my arrangement.

 The sentiment is from the Pinkfresh Studio Essentials: Classic Words die set and Clearly Besotted Floral Fancy stamp set. 


My final project for today is a gift tag featuring the Layered Cosmos stencil.

I die cut the base of my tag using the Honey Bee Stitched Scallop Circles die set. I die cut two such scallop circles to create the front and back of the tag. The cosmos flower was created using the Layered Cosmos stencil and I used Altenew inks for it. The leaves are from different Altenew die sets. I stamped my sentiment in the centre using Versafine Onyx Black ink and added some pink ribbon to finish it off.


I hope you liked my projects! If you did, please leave a comment below letting me know if you have any favourites!
 If you would like to see more of my work using CrafTreat products, do follow my Instagram page.

Thank you for your visit today, and wishing you a lovely day ahead!

Wednesday, November 13, 2019

Spellbinders + Amazing Paper Grace Die of the Month | November 2019


Hello, crafty friends!
I have a card to share today featuring the Spellbinders + Amazing Paper Grace November Die of the Month. This month's "Winter’s Solstice Snowflake" is perfect for making gorgeous cards, bags, and more. 

If you want to find out more about the Club – prices, how you sign up and what’s included, please look ——–> HERE. These dies are only available through the Club and are limited to the month of November, so hurry before they are sold out. There is also an inspirational PDF that you can download HERE that shows you many ways to use the die.

I have created a Card using this die set, and while this is more of a Holiday die set, I decided to create my card in spring colours to show how it is not limited to only Christmas cards, and be used all round the year!

To create my card, I first die cut the outline frame, decorative frame, and all the other inlay pieces from Whip Cream Cardstock. Then, I adhered all the layers together to create the base frame for my card. I also coloured the decorative frame using Worn Lipstick Distress Oxide to add a pop of colour to my card. 

If you see my card design closely, youl'll notice that the snowflake die is a little raised from the rest of the die cuts. I did this to add some interest to my design. I am a sucker for foam tape and can't do without it for any of my projects!

My floral spray comprises of handmade flowers and leaves, which are from the Shapeabilities Candlewick Rosebud Etched Dies. I also added some white flowers and additional foliage from the Vintage Burst Paper Flowers, Leaves & Vines. The sentiment stamp set that I have used for my card is from a previous Spellbinders Club Kit. I mounted my panel to the card base and my card was complete!


If you are still on the fence about the Amazing Paper Grace Die of the Month Membership, do check out the project samples created using it on the Spellbinders blog. The dies are great value for money and the cost of the kit covers shipping cost within USA. So, what are you waiting for? Sign up as soon as possible!

That's it from me for today! I hope you liked my card. If you did, please do let me know in the comments below. I always love hearing from you.
Thank you so much for your visit to my blog today!

Monday, November 11, 2019

Spellbinders November Card Kit of the Month | Christmas Wishes


Hello there, crafty friends!
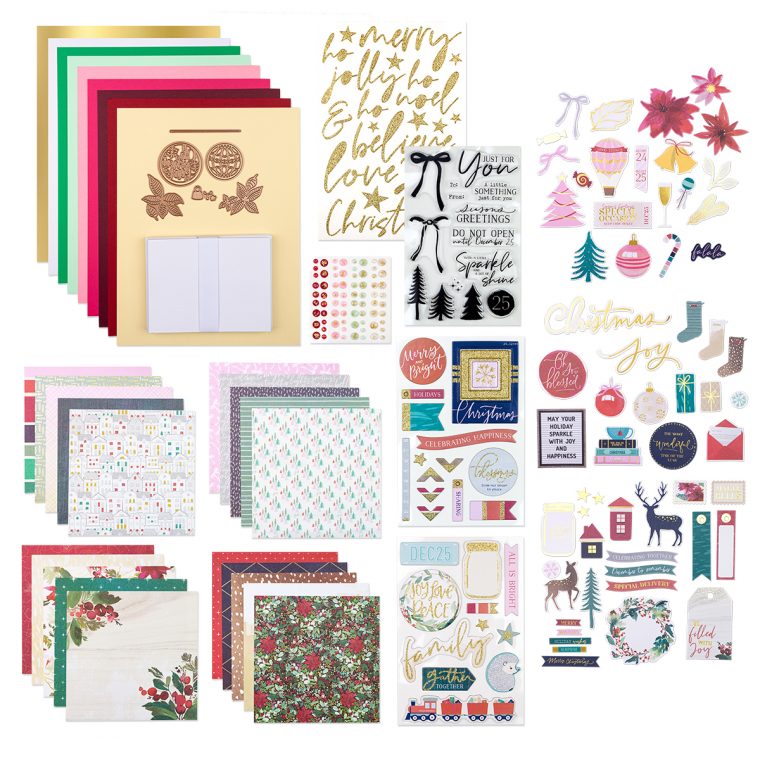
I have a couple of cards to share today featuring the November Card Kit by Spellbinders - Christmas Wishes. If you haven't heard about the Monthly Card Kits by Spellbinders or don't know how to subscribe to one, you can go over to the Spellbinders website and/or blog and read more about them HERE

This "Christmas Wishes" Kit, like all their other Card Kits, gives you everything you need to create 10 unique cards and even more. You now also get better goodies, including a 40 sheet paper pad, clear stamps, an adorable die set, tons of embellishments, and more!
November 2019 Card Kit of the Month is Here – Christmas Wishes

I have FIVE Cards to share with you today using this kit, so let's get started!

My first card features the Christmas Wishes Paper Pad, Christmas Wishes Die Cut Shapes SetChristmas Wishes Chipboard Sticker Pack, along with the stamp set included in the kit.

For my card, I started by selecting a patterned paper design from the Christmas Wishes Paper Pad and die cut a circle in the centre of this paper using the Nestabilities Standard Circles LG die set. I took another piece of White Cardstock and created a mini scene using different stamps included in the Christmas Wishes Stamp set included from the kit. I incorporated some ink blending and masking in this scene to make it look a bit more realistic. 

I used a layer of White Fun Foam between the patterned paper and the stamped scene to make the top panel pop a bit. I also adhered a die cut from the Christmas Wishes Die Cut Shapes Set and a sentiment banner from the Christmas Wishes Chipboard Sticker Pack. I also added a couple of stars and photo corners from the same chipboard set to complete my card. 


My next card features the Christmas Wishes Paper PadChristmas Wishes Die Cut Shapes Set, and the dies included in the kit.

To create my card, I started by die cutting the ornament die included in the kit from Gold Mirror Cardstock and some foiled patterned paper. I also die cut the strings and the little accessories for the ornament from Gold Mirror Cardstock.

Once that was done, I did the assembly for it, and picked out two ornament die cuts from the Christmas Wishes Die Cut Shapes Set. I adhered these three over a patterned paper from the Christmas Wishes Paper Pad. I also added a sentiment banner from the Christmas Wishes Die Cut Shapes Set and some gemstones for the finishing touch.


My next card is made entirely using the flower and leaf dies from the kit.

I took a piece of A2 Navy Blue Cardstock and die cut a couple of poinsettia flowers and leaves all over this panel to create my own background piece. Then, I die cut several of these poinsettias from Red Cardstock and leaves from Green Cardstock and used the inlay technique to adhere them over the previously die cut panel. I also added the centres of the flowers which were die cut from Gold Mirror Cardstock.

My panel was almost done and I decided to die cut a circle from Vellum using the Nestabilities Hemstitch Circles Dies. I topped this up with another circle die cut from the Christmas Wishes Die Cut Shapes Set.


My fourth card features the Christmas Wishes Paper Pad, and the Christmas Wishes Die Cut Shapes Set along with the dies from the kit.
For my card, I first picked out a patterned paper from the Christmas Wishes Paper Pad which would go well with the design of my card. Once I did that, I die cut some poinsettias and leaves using Red and Green Cardstock respectively, and adhered them over a watercolored wreath die cut from the  Christmas Wishes Die Cut Shapes Set. I also added some punched sprig leaves and flower centres to the poinsettias.

I stamped two bows using two different ink colours and fussy cut them to place them over the wreath.  I also added a white gemstone to the centre of the bow and die cut pieces in the centre of the wreath for my card sentiment. 


This is my favourite from the lot because I love the way it turned out. To start with, I picked out two different patterned papers from the Christmas Wishes Paper Pad. I adhered one directly on to my card panel, while I die cut from the other to create hills for my scene. Once they were die cut, I adhered these panels in a way that one would overlap over the other to create the illusion of a hill.

I used lots of die cuts from the Christmas Wishes Die Cut Shapes Set to create the entire scene for my card. I adhered few directly, while some were popped up using foam tape. The sentiment banner is also from the same set. 


If you want to find out more about the Club – prices, how you sign up and what’s included, please look ——–> HERE.
I know that I say this every month, but this kit is amazing and so worth the cost! You get everything you need to create AT LEAST ten cards. How awesome is that?!

That's it from me today! I hope you liked my cards using the Spellbinders November Card Kit. If you have a favourite, please do let me know. I would love to hear from you! :)
Thank you so much for stopping by!

Wednesday, November 6, 2019

Spellbinders Guest Post | Candlewick Classics Collection by Becca Feeken

Hello, everyone!
I am excited and honoured to be guest designing on the Spellbinders blog today! I am here to share some projects that I’ve made with the absolutely delightful Candlewick Classics Collection by Becca Feeken.

The Candlewick Classics Collection is a perfect addition to the Candlewick Sampler Collection by Becca Feeken. Mix and match between the two for an amazing collaboration! The inspiration comes from the Candlewick embroidery design, a type of elegant white-on-white embroidery with its hints of dotted motifs and knots. Add them to your etched die collection! 

I have three cards to share with you today using the Candlewick Classics collection, so let's get started!


The gorgeous doily was my inspiration behind creating this card. I wanted to design my card in such a way that the doily remains the highlight of my design. I die cut the Nestabilities Doily Round Etched Dies using my  
Platinum 6 Die Cutting and Embossing Machine from White Cardstock. I did not pierce out all the intricate bits from the doily and let them be as is because I found the doily looked pretty even this way. I adhered this doily on a circle die cut from patterned paper.

The doily added a nice, feminine touch to my card, and I did not want to use too many embellishments which would cover up the design, so I simply die cut a circle from the Nestabilities Candlewick Circles Etched Dies and adhered it over the doily using foam dots for dimension. I stamped my sentiment in the centre of this circle and added white pearls all around the circle frame for added interest. 

For embellishing my card, I used a pink poppy flower along with coordinating rose buds, mini roses, and fillers. I used the Candlewick Rosebud Etched Dies to add foliage to my card. 

I added some bows of white satin ribbon to this arrangement and mounted the panel to a foiled patterned paper, which was then adhered to a top-folding card base made from Pearlescent White Cardstock. 


The doily border is such an elegant die design and I decided to use it to create the background for my card. I die cut the Shapeabilities Doily Border Etched Dies twice from Gold Mirror Cardstock and twice from White Cardstock. I adhered them all on my card panel using the Journey Craft Glue.  Next, I die cut the delicate squares from the Nestabilities Candlewick Squares Etched Dies from White Cardstock and layered them to create a frame. 

I stamped my sentiment on another square die cut to create the focal for my card. I created a rose using the Candlewick Rosebud Etched Dies and also die cut the leaves and foliage from the same die set. The flower petals were coloured using the Bubble Gum True Color Fusion Ink Pad while the leaves were coloured using the Sweet Pear True Color Fusion Ink Pad. I added some additional flowers and fillers to complete my arrangement. I mounted this panel to a top-folding blush card base. 


This card has tons of layering and I really enjoyed creating it. I started by die cutting the rounded corners from Gold Mirror Cardstock and Cream Cardstock along with White Fun Foam. I adhered the die cuts in a way that the gold would peek through from the sides giving it a regal look. Then, I die cut a circle from another piece of Cream Cardstock using the Nestabilities Candlewick Circles Etched Dies. I adhered another die cut in the centre to create the focal for my card. 

Once the basic framework of the card was done, I started working on the embellishments for my card. I added a pink anemone and several small filler flowers and foliage to create my floral cluster. I also tucked in some die cut vines, mini roses, and rose buds to complete my arrangement. I added a small sentiment tag below this arrangement and popped it on the panel using foam dots.

I matted this panel to another panel of Gold Mirror Cardstock, then a patterned paper, and lastly, Cream Cardstock. This was then adhered to a top-folding card base.

Other Supplies: 
Neenah Solar White 110 LB cardstock, Cream Linen Textured 12 x 12 Cardstock, Light Pink 12 X 12 Cardstock, White Pearlescent 12 X 12 Cardstock, Iris 270 GSM Cardstock, White Fun Foam; Pattern Papers: Papericious 'The Wedding' Collection, DCWV Blush Collection; Inks: Versafine Onyx Black Ink Pad; Adhesive: Scrapbook Adhesives 3D Foam Squares, Tombow Mono Multi Liquid Glue, Double Sided Foam Tape, Mini Glue Gun; McGill Inc. Paper Blossoms Tool kit, Micro Roses, Pollens, Rose Buds, White Satin Ribbon, Pearls.


I hope you loved the Candlewick Classics Collection and my cards using them! These dies are truly exquisite and a must have in your stash. If you would like to see more of my work using Spellbinders dies, do follow my Instagram page.
Thank you for stopping by, and wishing you a lovely day!