Friday, February 12, 2021

Spellbinders February'21 Blog Hop + Giveaway!


Hello, crafty friends!
I'm ecstatic to be joining Spellbinders for the February 2021 Clubs Inspiration Blog Hop today. Spellbinders is celebrating all their Club Kits in shop for February 2021.

If you arrived here from, Jenny Colacicco's Blog, then you are on the right track. If this is your first stop, then you will want to start at the beginning, the Spellbinders Blog. We've got tons of inspiration and giveaways for you on the hop today, so keep reading till the end of this post for more information.


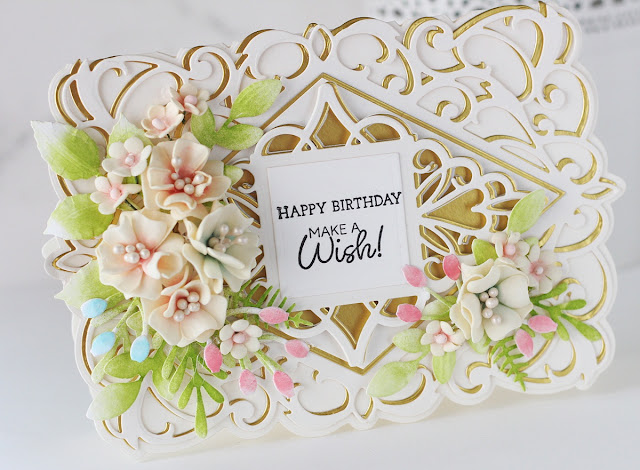
I have a Layered Floral Card to share for the hop today using the Amazing Paper Grace – February 2021 Die of the Month Set. In case you missed, it I shared a Card on my blog few days ago using this month's "Bella Diamante" Set, which you can check out HERE.
Bella Diamante is a 5 x 7 card front, with several element layers and rims to use as inlays. These multiple rims and elements will allow for both A2 and A7 cards. The elegant die design gives you the the ability to create shaped cards,  framed cards, or little gift boxes.

For my card today, I die cut the large decorative die cut from Buttercream Cardstock and Gold Mirror Cardstock using my Platinum Die Cutting Machine. I slightly offset the two frames to create the illusion of depth without an excessive amount of bulk. Then, I die cut the large diamond die included in the set from Banana Cream Cardstock, and adhered it to the panel using Craft Glue

Next, I taped the diamond decorative insert and square dies to interior diamond outline and die cut it from Tin Pail Cardstock and Gold Mirror Cardstock. I adhered the detailed die cuts one on top of the other, slightly offsetting them, for visual interest. I stamped my sentiment on the square die cut piece and popped it on the panel using foam squares

To embellish my card, I die cut some blooms using the flower dies included in the Bella Diamante Set and the Cinch and Go V Etched Die Set. I die cut them from White Cardstock and colored them using a combination of Fun Stampers Journey Inks and Distress inks. I coloured the pink flowers using Picked Raspberry Distress Ink and Bubble Gum Fusion Ink Pad, while the daisies were coloured using Lemon Drop Fusion Ink. I individually embossed the petals using Embossing Ball Tools and added gold glitter balls to the centres for interest. The leaves are from the Cinch and Go III Etched Dies and an older die set by Amazing Paper Grace, which is now discontinued. I die cut them from White Cardstock too, and coloured them using Electric Lime Ink Pad. I also added some embossed details to the leaves for a more realistic look.  


I adhered the flowers and foliage to my card panel using a Hot Glue Gun. This panel was mounted to a piece of Gold Mirror Cardstock, which was then adhered to a side-folding card base created from Buttercream Cardstock. This card was fairly simple to put together and I hope you like it! 


Giveaway:
To celebrate this release, Spellbinders are giving away a $50 gift certificate to 3 lucky blog readers – selected from the comments on our blog. Giveaway closes on Sunday, February 14th, 11:59 pm MST. The winner will be announced in this blog hop post the following Tuesday. The winner is responsible for shipping cost, duties and taxes.

Please note, store credit (gift certificate) cannot be applied to Club Subscriptions. Store credit can be applied to shop past Club products, Club extras and regular releases.

Blog Hop Order
Next Stop on this Blog Hop is, Mindy Eggen's blog.
Just in case you lose your place along the way, here is the complete list of participants so that you can find your way back:

Thank you so much for your stopping by and reading this blog post. I hope you liked my project! 

If you like what you've seen from me, please give me a follow over on my Instagram (@hussena_cal) and/or subscribe to my blog if you haven't already.
Wishing you a great day ahead!

Wednesday, February 10, 2021

Spellbinders February 2021 Clear Stamp of the Month | Trefoil Florals & Sentiments


Hello, crafty friends!
I have a Card to share today featuring the Spellbinders Clear Stamp Set of the Month - Trefoil Florals & Sentiments. If you haven't heard about the Clear Stamp of the Month Club by Spellbinders, you can go over to the Spellbinders blog and read more about it HERE

The Spellbinders Clear Stamp for February includes 18 different stamps, four of which have floral images, and a number of coordinating sentiments, which you can tile into the background panel. The stamp set coordinates with the Spellbinders Small Die of the Month, so you can mix and match your supplies to create different projects. This “Trefoil Florals & Sentiments” stamp set features made in the USA stamps from high-quality photo-polymer for clear, crisp impressions. 
For my card, I stamped the four floral tile images onto Watercolour Paper with Memento Black ink using my MISTI Tool. I colored the images using the Watercolors Sets - Bright and then die cut them using the coordinating Trefoil Frame Dies from the Spellbinders Small Die of the Month Set. I also die cut the frames from Black Cardstock so that I could layer the tile pieces together. 

Next, I die cut four squares pieces using the Amazing Paper Grace Die of the Month - Bella Diamante from Light Pink Cardstock. For my card background, I used the Bella Diamanate Die Set to emboss a panel of White Cardstock using the Spellbinders Tan Mat in my Platinum Die Cutting Machine. This is a great way to get more out of your supplies! I love the subtle dimension of the dry embossed background. 

I adhered this panel to a piece of Light Pink Cardstock, then onto a piece of Mirror Gold Cardstock to create my background panel. Then, I adhered it to an A2 sized top-folding white card base using White Liner tape.
I arranged the tiles on my card panel and adhered them down using Craft Glue

The sentiment from the Trefoil Florals & Sentiments Stamp Set was stamped using Black Licorice Ink on a strip of White Cardstock. Then, I added a strip of Gold Mirror Cardstock to mat the white piece, which was foam mounted to the panel using. I finished off the cards with a few clear sequins. 


The Trefoil Florals & Sentiments Set is available exclusively at Spellbinders Paper Arts during February 2021. You can get the Clear Stamp of the Month at the special Cub Kit price, along with other membership perks.

I hope you enjoyed looking at my card today! I would love to hear what you think of it. 
 If you like what you've seen from me, please give me a follow over on my Instagram (@hussena_cal) and/or subscribe to my blog if you haven't already.
Thank you so much for stopping by!

Monday, February 8, 2021

Spellbinders & Amazing Paper Grace Die of the Month | February 2021


Hello, crafty friends!
I have a Card to share today featuring the Spellbinders + Amazing Paper Grace February 2021 Die of the Month Set. This month's "Bella Diamante" Set is perfect for making gorgeous layered cards, gift boxes, and more in no time! This die set features 7 dies.

I created a shaped landscape-oriented card using the Bella Diamante Set. This A7 sized medley of dies is full of rims and smaller A2 sized pieces so that you can create elegant and timeless projects.

To create my card, I first took a sheet of Buttercream Cardstock and die cut the outer frame die from the Bella Diamante Set using my Spellbinders Platinum Die Cutting and Embossing Machine. I used the partial die-cutting technique here to create a hinged card base. If you don't know how to create one, you can check out Becca Feeken's tutorial HERE where she shows you how to create one.

I die cut the large decorative frame from Buttercream Cardstock and Gold Mirror Cardstock and slightly offset the two frames to create the illusion of depth without an excessive amount of bulk. I did the same for the diamond die, and the decorative diamond insert and the square dies to create the filigree centerpiece. I love how these pieces look all layered together. I adhered them down to my card base using White Liner tape. The sentiment in the centre of the square frame was stamped using Black Licorice Ink.

Becca's Bella Diamante Set also includes two flower dies, perfect for creating little embellishments. I die cut the flower dies from Cream Foamiran and coloured the centres using Rustic Rose and Pool Play inks. Then, I added some pearl pollens to the centres for interest. The leaves and foliage are from the Cinch and Go III Etched Dies and Life is a Party Card Kit. I cut them from White Cardstock and coloured them using Mowed Lawn, Peeled Paint, and Twisted Citron Distress inks. The tiny flowers were die cut using the Cinch and Go Flowers Etched Dies from Cream Foamiran. I embossed the petals and added a wire pollen in the centre for definition. I adhered everything to my card front using a hot glue gun. 


The Amazing Paper Grace Die of the Month is available exclusively at Spellbinders Paper Arts during January 2021. You can get the Bella Diamante Set at the special Cub Kit price, along with other membership perks.

If you'd like to see some more project inspiration using the Amazing Paper Grace Die of the Month, check out the Spellbinders Blog where Becca shares some stunning project samples using it.  

Amazing Paper Grace Die of the Month Membership


That’s it for me today! I hope you liked my take on the die set! If you like what you've seen from me, please give me a follow over on my Instagram (@hussena_cal) and/or subscribe to my blog if you haven't already.

Thank you so much for your visit to my blog today!

Saturday, February 6, 2021

Spellbinders Celestial Zodiacs Collection | Cards


Hello, crafty friends!
I have a card set to share today using a few of the new products from the Spellbinders Celestial Zodiacs Collection. This is such a wonderful collection with twinkling star patterns, a magnificent moon image, awesome sentiments, and even an embossing folder. Stargazers and Zodiac fans alike will enjoy the Celestial Zodiacs Collection with unique motifs in each set to use in their creations! 

The twelve zodiac foil plate sets in the collection are perfect for creating a variety of projects. I created a birthday card for a stargazing friend using the Glimmer Hot Foil Plates from the collection.

For my card, I foiled the constellation from the Scorpio Set on a piece of Canson Montval Watercolor Paper using Gold Hot Foil in my Glimmer Hot Foil Machine. I also foiled the name, date, and traits plate from the Scorpio Set on a piece of Black Cardstock using Gold Hot Foil. I then cut them into two different strips to foam mount on my card panel. 

Once my foiling was complete, I watercolored the card panel using Chipped Sapphire Distress ink. I dabbed the ink pad onto my Craft Mat and used a Blending Brush to colour the entire panel. I let it dry for a while and then loosely painted some deodar trees on the bottom of the card panel using Black Acrylic Paint. Then, I added some paint splatters across the panel in white, blue, and black to add some interest.

 I affixed the foiled sentiment strips using foam squares and added a stitched rectangular frame die cut from Gold Mirror Cardstock on the panel to complete the card. To finish, I adhered the panel to a piece of Black Cardstock to mat a side-folding A2-sized white card base.


I used the Starstruck Sentiments Clear Stamp Set for my next card along with the Aquarius Glimmer Hot Foil Plate.
The stamp set has stars and heart designs, and five unique phrases which will can be used for so many occasions!

For my second card, I foiled the constellation from the Aquarius Glimmer Hot Foil Plate on a piece of White Cardstock using Gold Hot Foil in my Glimmer Hot Foil Machine. Then, I ink blended Chipped Sapphire and Cracked Pistachio Distress inks on the panel using a Foam Blending Tool. For variation, I added some blue paint splatters to the panel.

I ink blended another piece of White Cardstock using Cracked Pistachio Distress ink and then die cut a circle from the panel using the Nestabilities Standard Circles LG Etched Dies. Next, I took a piece of White Cardstock and stamped and heat embossed the stars from the Starstruck Sentiments Clear Stamp Set in gold. I ink blended this panel using Chipped Sapphire, Peacock Feathers, and Cracked Pistachio Distress inks to create the look of a night sky. 

I foiled the name and date plate from the Aquarius Glimmer Hot Foil Plate on a piece of Black Cardstock using Gold Hot Foil in my Glimmer Hot Foil Machine. I trimmed it to size and then added it over my heat embossed panel. The sentiments from the Starstruck Sentiments Clear Stamp Set were stamped using Black Licorice Ink directly on to the panel.

I adhered this panel over the previously ink blended panel using foam tape. I affixed the foiled constellation panel behind it to mat the panel with Gold Mirror Cardstock. To complete, I adhered the panel to the front of a top-folding A2-sized white card base with White Liner tape.


I had so much fun creating these cards and I hope they inspire you as you create with these wonderful new products. I love the Celestial Zodiacs collection and think it’s a really cool idea to make custom cards for friends and loved ones based on their zodiac sign and coordinating constellation. What do you think?!

 If you like what you've seen from me, please give me a follow over on my Instagram (@hussena_cal) and/or subscribe to my blog if you haven't already.
Have a great day ahead!

Thursday, February 4, 2021

Spellbinders February 2021 Small Die of the Month | Trefoil Tile & Panel Card Creator


Hello, crafty friends!
It's the start of a new month which means it's time for a new Club Kit from Spellbinders! Today I'm sharing two cards which I created using the Spellbinders Small Die of the Month SetTrefoil Tile & Panel Card Creator. The die set coordinates with the Clear Stamp of the Month and is perfect for creating a variety of papercrafting projects! You can find more details about the Club on the Spellbinders website. Click HERE to read all about it.

The Small Die of the Month Kit, "Trefoil Tile & Panel Card Creator", contains 10 dies that cut an ornate background panel and six different tile inserts (3 sentiment and 3 decorative tiles). 

I have two cards to share using the Small Die of the Month, so without much ado, let's dive in!

My first card features dies from the Small Die of the Month Kit and Amazing Paper Grace Die of the Month Set. I combined them both to come up with my card design. 

I die cut the main panel for my card using the diamond die included in the Amazing Paper Grace Die of the Month Set. using my Spellbinders Platinum Machine from light blue and green cardstock. Once the two diamonds were die cut, I cut them in half and added them to alternate ends of my card base to create my panel. I trimmed them to size and adhered them using White Liner tape.


I then die cut another diamond from White Cardstock and added it over my panel. Next, I used the interior diamond outline die to cut a decorative diamond piece from light green cardstock and white fun foam for a little dimension. I adhered them to my panel using Craft Glue. The layered tiles were die cut from kraft and light blue cardstock and layered one on top of the other. I popped the pieces on my panel using foam squares for dimension and interest. 

I absolutely love the fine details of this die set and really didn't think I need to embellish it much, so I kept it quite clean and simple. I added a circle cut from Gold Glitter Cardstock followed by a slightly smaller stitched circle cut from pastel green cardstock to the centre of the panel to fill up the negative space. I also die cut the sentiment from the Small Die of the Month Set from light blue cardstock and white fun foam and adhered it down to my panel using Craft Glue. To finish, I adhered my card front to a piece of light grey cardstock to mat a top-folding A2-sized white card base.


Moving on to my second card for today which again features the Small Die of the Month Kit.

I die cut the trefoil tile from Kraft Cardstock and added a piece of Gold Mirror Cardstock to back up the piece. I adhered this to a a panel of Navy Blue Cardstock for contrast and then adhered it down to a top-folding A2-sized kraft card base.

Next, to create the focal for my card, I die cut the three layered tiles from Navy Blue and Light Pink Cardstock, which were then adhered into the openings of the panel with foam tape. I stamped the sentiment from the Clear Stamp of the Month in Black Licorice Ink on a strip of White Cardstock. Then, I added a strip of Gold Mirror Cardstock to mat the white piece. I finished off the card with two paper strips on either side of the card cut from Light Pink and Gold Mirror Cardstock.


If you want to find out more about the Club – prices, how you sign up, and what’s included, please look HERE

 Spellbinders has a new exclusive offer available to the club members: Club members can buy Past Club Kits for Buy One, Get One Free until Sunday, February 7th! The offer is now live and will be available until Sunday 2/7/2021. 


I hope you liked my cards and thanks so much for stopping by today. 
 If you like what you've seen from me, please give me a follow over on my Instagram (@hussena_cal) and/or subscribe to my blog if you haven't already.
Have a great day ahead!