Showing posts with label Foil. Show all posts

Wednesday, February 10, 2021

Spellbinders February 2021 Clear Stamp of the Month | Trefoil Florals & Sentiments


Hello, crafty friends!
I have a Card to share today featuring the Spellbinders Clear Stamp Set of the Month - Trefoil Florals & Sentiments. If you haven't heard about the Clear Stamp of the Month Club by Spellbinders, you can go over to the Spellbinders blog and read more about it HERE

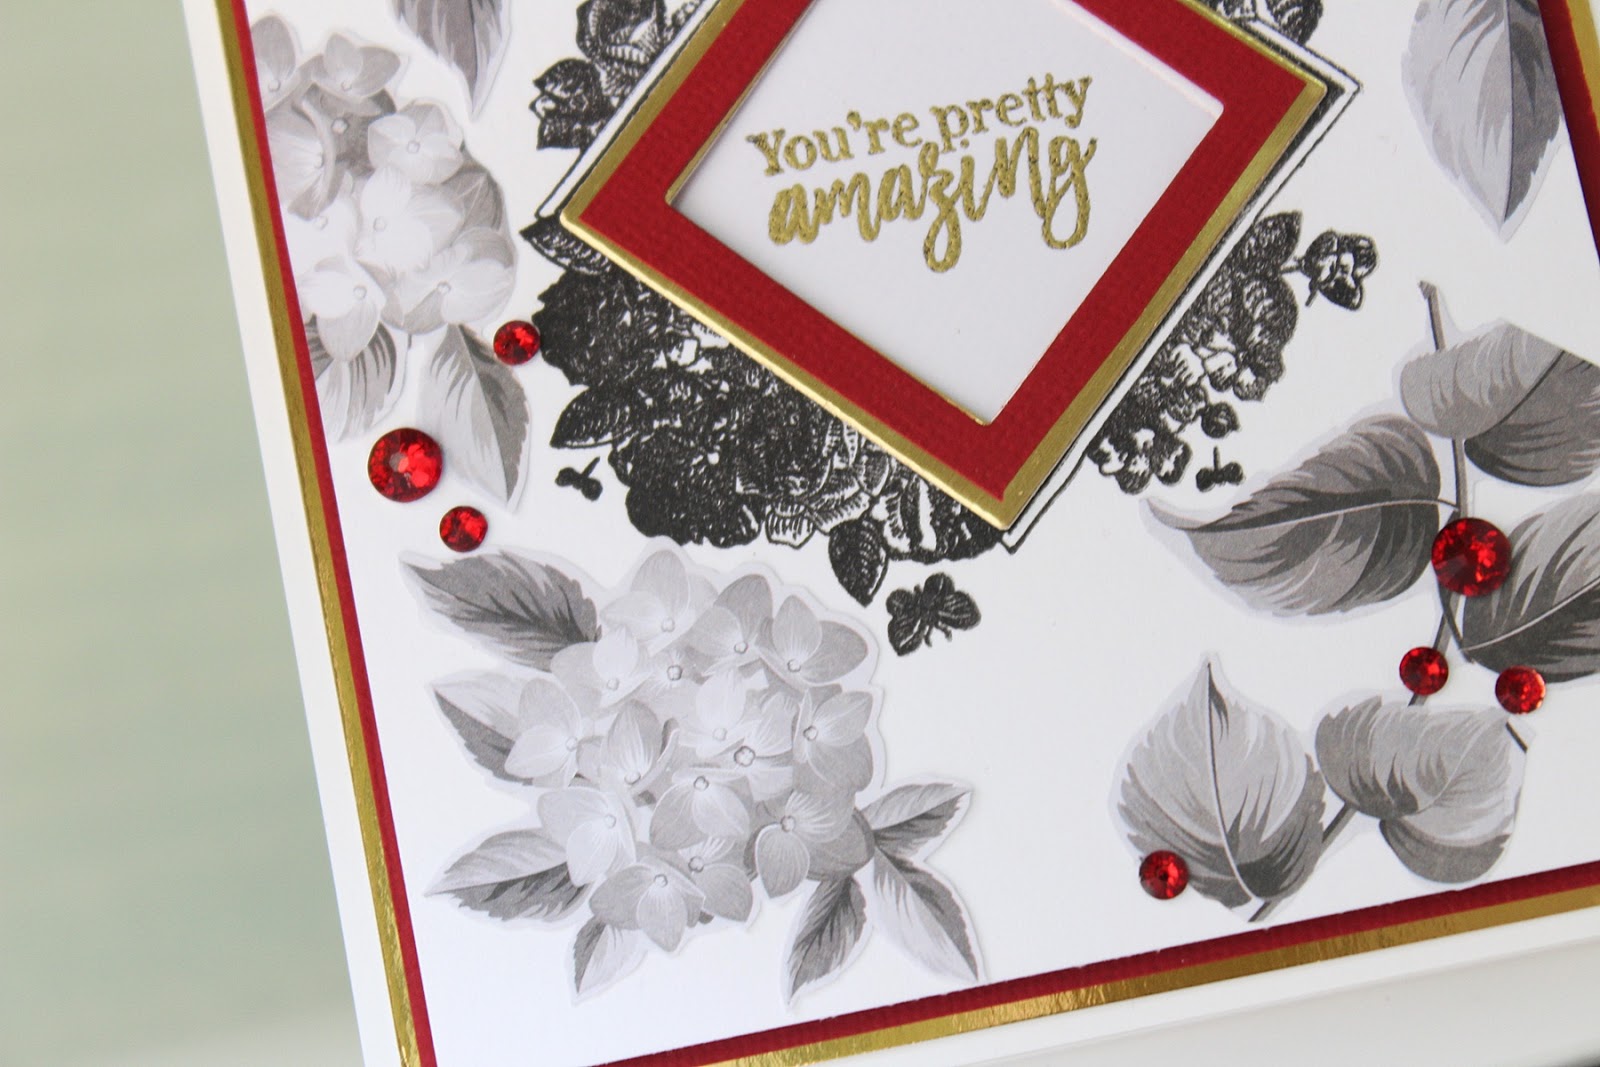
The Spellbinders Clear Stamp for February includes 18 different stamps, four of which have floral images, and a number of coordinating sentiments, which you can tile into the background panel. The stamp set coordinates with the Spellbinders Small Die of the Month, so you can mix and match your supplies to create different projects. This “Trefoil Florals & Sentiments” stamp set features made in the USA stamps from high-quality photo-polymer for clear, crisp impressions. 
For my card, I stamped the four floral tile images onto Watercolour Paper with Memento Black ink using my MISTI Tool. I colored the images using the Watercolors Sets - Bright and then die cut them using the coordinating Trefoil Frame Dies from the Spellbinders Small Die of the Month Set. I also die cut the frames from Black Cardstock so that I could layer the tile pieces together. 

Next, I die cut four squares pieces using the Amazing Paper Grace Die of the Month - Bella Diamante from Light Pink Cardstock. For my card background, I used the Bella Diamanate Die Set to emboss a panel of White Cardstock using the Spellbinders Tan Mat in my Platinum Die Cutting Machine. This is a great way to get more out of your supplies! I love the subtle dimension of the dry embossed background. 

I adhered this panel to a piece of Light Pink Cardstock, then onto a piece of Mirror Gold Cardstock to create my background panel. Then, I adhered it to an A2 sized top-folding white card base using White Liner tape.
I arranged the tiles on my card panel and adhered them down using Craft Glue

The sentiment from the Trefoil Florals & Sentiments Stamp Set was stamped using Black Licorice Ink on a strip of White Cardstock. Then, I added a strip of Gold Mirror Cardstock to mat the white piece, which was foam mounted to the panel using. I finished off the cards with a few clear sequins. 


The Trefoil Florals & Sentiments Set is available exclusively at Spellbinders Paper Arts during February 2021. You can get the Clear Stamp of the Month at the special Cub Kit price, along with other membership perks.

I hope you enjoyed looking at my card today! I would love to hear what you think of it. 
 If you like what you've seen from me, please give me a follow over on my Instagram (@hussena_cal) and/or subscribe to my blog if you haven't already.
Thank you so much for stopping by!

Monday, March 30, 2020

Spellbinders March Card Kit of the Month | Feeling Hoppy

Hello there, crafty friends!
I have a couple of cards to share today featuring the March Card Kit by Spellbinders - Feeling Hoppy. If you haven't heard about the Monthly Card Kits by Spellbinders or don't know how to subscribe to one, you can go over to the Spellbinders website and/or blog and read more about them HERE

This "Feeling Hoppy" Kit, like all their other Card Kits, gives you everything you need to create 10 unique cards and even more. You now also get better goodies, including a 40 sheet paper pad, clear stamps, an adorable die set, tons of embellishments, and more!
Card Kit of the Month Membership

I have FOUR Card ideas to share with you today using this kit, so let's get started!

My first Card features the Feeling Hoppy Paper PadFeeling Hoppy Die Cut Shapes Set, and the Dies from the Kit.

To create my card, I first picked out a patterned paper for my card background from the Feeling Hoppy Paper Pad. Next, I die cut a scalloped oval from White Cardstock and the ears of the bunny from Gold Mirror Cardstock. Both of these dies are included in the Feeling Hoppy Card Kit

To embellish my card, I used several die cuts from the Feeling Hoppy Die Cut Shapes Set. I also added some mini purple flowers for my foliage. This foliage die is so pretty and has become a recent favourite! :) I also picked out a sentiment tile from the Feeling Hoppy Die Cut Shapes Set and popped it on my card panel. This card was so quick and easy to put together!

 My second Card features the Feeling Hoppy Paper Pad, Love Stripes Embossing Folder, and the Feeling Hoppy Die Cut Shapes Set.

For this card, I first took a piece of White Cardstock and embossed it using the Fun Stampers Journey Love Stripes Embossing Folder and trimmed it. Next, I picked out a patterned paper design from the Feeling Hoppy Paper Pad and trimmed it to fit on my card panel. I cut it at a diagonal to add some interest to the design.

I took out my Feeling Hoppy Die Cut Shapes Set and picked out several die cut images which would work for my card. I adhered these pieces together to form my focal. Finally, I added a sentiment banner to complete my card which was also from the Feeling Hoppy Die Cut Shapes Set.


My third card features the Feeling Hoppy Paper PadFeeling Hoppy Die Cut Shapes Set, and the Stamp set from the Kit.

This one is a bit different from my other two cards as I have used stamped images for my design. To create this one, I first stamped the bunnies and carrots from the Feeling Hoppy Stamp Set using Versafine Onyx Black Ink on Whip Cream Cardstock. I coloured the images, fussy cut them, and kept them aside. Next, I pulled out two patterned papers from the Feeling Hoppy Paper Pad. I adhered the striped patterned paper design to my card panel. Then, I die cut two circles using the Nestabilities Standard Circles SM Etched Dies from the other patterned paper to create a window to stamp the bunnies.

Next, I stamped two bunnies on Whip Cream Cardstock using Versafine Onyx Black Ink, which I later trimmed to fit my card base. Next, I adhered the die cut patterned paper over it. I also stamped some hearts and coloured them. To complete my card, I added a sentiment tab which was from the Feeling Hoppy Die Cut Shapes Set.


My last card features the Feeling Hoppy Paper PadFeeling Hoppy Die Cut Shapes Set, and the Dies from the Kit.

This one was again simple to put together. The adorable bunnies on this card are actually stickers which are a part of the Card Kit. I really loved them and wanted to use them on one of my cards! The background flowers are die cuts from the Feeling Hoppy Die Cut Shapes Set. I also added some small flowers which were die cut using the mini foliage die included in the Card Kit.

I also used a patterned paper from the Feeling Hoppy Paper Pad and adhered it to the bottom of my card. To complete my card, I used a die cut sentiment banner from the Feeling Hoppy Die Cut Shapes Set. And that's it. This card was done!

If you want to find out more about the Club – prices, how you sign up and what’s included, please look ——–> HERE.
I know that I say this every month, but this kit is amazing and so worth the cost! You get everything you need to create atleast TEN cards. How awesome is that?!

That's it from me today! I hope you liked my cards using the Spellbinders March Card Kit. If you have a favourite, please do let me know. I would love to hear from you! :)
Thank you so much for stopping by!

Saturday, January 18, 2020

Spellbinders + Amazing Paper Grace Die of the Month | January 2020


Hello, crafty friends!
I have a card to share today featuring the Spellbinders + Amazing Paper Grace January Die of the Month. This month's "Pop Up 3D Vignette Bouquet" is perfect for making gorgeous 3D cards and more. 

If you want to find out more about the Club – prices, how you sign up and what’s included, please look ——–> HERE. These dies are only available through the Club and are limited to the month of January, so hurry before they are sold out. There is also an inspirational PDF that you can download HERE that shows you how to use the die.

I created a Pop Up 3D Vignette Bouquet using the dies from this month's set. Here's a look at my project:

This die set is a great addition to Becca's 3D Vignettes Collection. One of the specialities of these dies is that they fold down flat to fit into an envelope. I went for a soft, watercolored look with this bouquet and had a lot of fun creating it!

I used 250 GSM Cold Press Watercolour Paper to die cut the flowers and foliage. I coloured all the die cut pieces using various dye inks. Then I adhered the elements using foam dots for added dimension.

I die cut the stems and the basket holder for the bouquet using White Cardstock as well as Gold Mirror Cardstock. I off-set the two when adhering so that the gold would peek through between the gaps.  I also added white pearls all along the border to give it a more dainty look.

I die cut the sentiment piece again from White Cardstock & Gold Mirror Cardstock. I inlay the pieces and added a red die cut heart to complete the look. I also added some ribbon and a flower on top to add some interest to the design. This is such a sweet project and is sure to bring a smile on the recipient's face.


If you are still on the fence about the Amazing Paper Grace Die of the Month Membership, do check out the project samples created using it on the Spellbinders blog. The dies are great value for money and the cost of the kit covers shipping cost within USA. So, what are you waiting for? Sign up as soon as possible!

That's it from me for today! I hope you liked my card. If you did, please do let me know in the comments below. I always love hearing from you.
Thank you so much for your visit to my blog today!

Friday, January 17, 2020

Spellbinders January Card Kit of the Month | Love The Moment


Hello there, crafty friends!
I have a couple of cards to share today featuring the January Card Kit by Spellbinders - Love The Moment. If you haven't heard about the Monthly Card Kits by Spellbinders or don't know how to subscribe to one, you can go over to the Spellbinders website and/or blog and read more about them HERE

This "Love The Moment" Kit, like all their other Card Kits, gives you everything you need to create 10 unique cards and even more. You now also get better goodies, including a 40 sheet paper pad, clear stamps, an adorable die set, tons of embellishments, and more!
Card Kit of the Month Membership

I have FIVE Cards to share with you today using this kit, so let's get started!

My first card features the Love the Moment Paper Pad, and the Love the Moment Die Cut Shapes Set.

This month's Card Kit is super gorgeous and I had a ball working with the floral images. To create this card, I picked out a patterned paper from the Love the Moment Paper Pad and adhered it on the right side of my card. Next, I used a couple of floral die cuts from the Love the Moment Die Cut Shapes Set and arranged them together in a cluster to create my focal.

I added a strip of Mirror Gold Cardstock to add some pizzazz to the design. Then, I added a sentiment piece and a butterfly from the Love the Moment Die Cut Shapes Set to complete my card design. I also adhered some pink rhinstones as the finishing touch for my card.


My next card is my favourite of the lot. I LOVE Vintage Cars and this month's "Love The Moment" Kit includes a fabulous die set to create your own customized cars. It is just perfect for creating Masculine Cards!
 My card features the Love the Moment Paper Pad, and the Love the Moment Die Cut Shapes Set, along with the Club Die Set.

I used the Cardstock sheets given in the Card Kit to create my car. Once I die cut and assembled it together, I started working on the background of my card. I pulled out a foiled patterned paper from the Love the Moment Paper Pad and adhered it to the bottom of my card. I also adhered a contrasting background patterned paper which would work well with the rest of my card. Next, I grouped some die cuts from the Love the Moment Die Cut Shapes Set together to create the backdrop for my car. I wanted all the die cuts to be circular in shape, so I die cut certain die cut shapes using the Nestabilities Standard Circles SM Etched Dies and popped them on my card panel using foam dots.

This card was very fun to create and I really enjoyed the process. I always struggle with Masculine Cards and the Die Set in the Card Kit die set offers some great possibilities! 


My third card is made using the Stamp Set included in the kit. I also used the Love the Moment Paper Pad on this card.

The background panel of my card features fussy cut floral motifs from a particular patterned paper design from the Love the Moment Paper Pad. I adhered these images all over my card panel and then trimmed it. Next, I die cut a frame in the centre using the Nestabilities Classic Squares SM Etched Dies. I then adhered two other frames over it to enhance the card design. I used the stamp set included in the Card Kit to stamp on the patterned paper to create the focal for my card.

I heat embossed the sentiment in gold to add some glam to my design. My card was almost done here - I simply added some red rhinestones as the finishing touch to my card.


My fourth card features the Love the Moment Paper Pad, and the Love the Moment Die Cut Shapes Set, and the Love the Moment 3 Sheet Sticker Pack.

This card was simple to put together. I again used a foiled patterned paper from the Love the Moment Paper Pad for my card background. Next, I used a 3D sticker from the Love the Moment 3 Sheet Sticker Pack and a couple of other stickers from the same pack to create my card focal. I combined the stickers with some die cuts from the Love the Moment Die Cut Shapes Set to create my design.

I also used gold shimmer leaves included in the Card Kit to add some sparkle and shine to my design. I love how this one turned out!


My last card for today features the Love the Moment Paper Pad, the Love the Moment Die Cut Shapes Set, and the Love the Moment 3 Sheet Sticker Pack.

For this card, I started by embossing a piece of White Cardstock using the Fun Stampers Journey Love Stripes Embossing Folder. Then, I adhered a patterned paper from the Love the Moment Paper Pad on the bottom of my card and a strip of Mirror Gold Cardstock in the centre. I used a number of floral die cut pieces from the Love the Moment Die Cut Shapes Set to create the floral cluster for my card. I also incorporated some gold shimmer paper leaves to balance the card design.

The sentiment was a die cut which was popped on foam dots. I backed the die cut with a gold scalloped circle to add some interest. I also added some sparkly rhinestones to complete my card design.


If you want to find out more about the Club – prices, how you sign up and what’s included, please look ——–> HERE.
I know that I say this every month, but this kit is amazing and so worth the cost! You get everything you need to create AT LEAST ten cards. How awesome is that?!

That's it from me today! I hope you liked my cards using the Spellbinders January Card Kit. If you have a favourite, please do let me know. I would love to hear from you! :)
Thank you so much for stopping by!

Wednesday, August 21, 2019

Spellbinders Guest Post | Holiday 3D Holiday Vignettes by Becca Feeken


Hello everyone! 
I am absolutely thrilled and honoured to be guest designing on the Spellbinders Blog today! I have three cards to share that showcase the 3D Holiday Vignettes by Becca Feeken

3D Holiday Vignettes Collection brings the holiday spirit to life with layers and dimension to make your projects special. This collection can be mix and matched with the Shadowbox and 3D Vignette Collections for more elegant designing options.

My first card for today uses the Grand Snow Globe Etched Dies, the Santa Claus Layering Set Etched Dies. I wanted to create a 3D Vignette Card for my first card using traditional Christmas colours.

I die cut the outer frame, the inlay pattern and the side panel frame dies, all from the Grand Snow Globe Etched Dies from Cream Cardstock. I wanted to create a festive scene on my card, so I went ahead and also die cut the circle frame with the image of Santa Claus and the circle inserts from the Santa Claus Layering Set Etched Dies  from White Cardstock and Gold Mirror Cardstock respectively. I coloured the Santa Claus die cut pieces and the tree using a mix of Alcohol Markers & Zig Clean Clear Brush Markers. I added some Crystal Clear Glitter to add some shimmer to the beard, gloves, and belt, for added interest! I also added red pearls to the Christmas tree.

It was time to assemble all the panels together. I wanted the sentiment to be one of the main design elements of my card, so I die cut it and adhered it to the front of the card panel instead of adding it to the panel inside. I die cut it twice, once from White Cardstock, and once from Gold Mirror Cardstock, so that it would give the effect of a shadow. I die cut them using the sentiment frame insert die from the Grand Snow Globe Etched Dies. I also die cut some poinsettias from the same die set using Red Cardstock. The leaves are from an older die set by Becca, and I die cut them from White Cardstock and coloured them using Alcohol Markers. I also added some gold pollens for the poinsettia centres to give them a fuller look.

Here's a picture showing you the overall dimension. The best part about these 3D Holiday Vignettes, is that they can be folded flat for mailing. Isn't that so cool?!


My next card features the Christmas Damask Jubilee Glimmer Hot Foil PlateCinch and Go Poinsettia Etched Dies Etched Dies, and the Glimmer Hot Foil Roll - Gold. I wanted to use these plates for a non-traditional Christmas card and hence came up with this card. 

For this card, I started by foiling the Christmas Damask Jubilee Glimmer Hot Foil Plate on a piece of Neenah Classic Crest Solar White 110 LBS Cardstock using the Glimmer Hot Foil Machine. I used the Glimmer Hot Foil Roll - Gold for foiling the plates. I was very happy with the end result as it gives such an elegant look to the card.

I used the 'Seasons Greetings' Glimmer Plate included in the Christmas Damask Jubilee Glimmer Hot Foil Plate for the sentiment. Next, I die cut a fishtail banner and inked the edges using FSJ Gold Pigment Ink. I added three pearls on the banner for added interest. At this point, the card felt a little too CAS for my taste, so I went ahead and die cut a bunch of poinsettias using the Cinch and Go Poinsettia Etched Dies Etched Dies from Cream Cardstock. I embossed the petals and added gold pollens in the centres. The leaves are die cut from the Cinch and Go Flowers III Etched Dies

I love this damask design and can't wait to use it for some more projects! 


My third card again features traditional Christmas colours, albeit I have used the 3D Holiday Vignettes dies here to create a simple, layered card. This card showcases the Grand Holiday Cabinet Etched DiesReindeer Prance Layering Set Etched Dies, and the Grand Snow Globe Etched Dies. 

This card has loads of layering which is one of my favourite styles of card making. To start with, I die cut the Grand Holiday Cabinet Etched Dies twice from White Cardstock and then again from White Fun Foam. I did this so that I could adhere the cardstock die cut panels over the Fun Foam to get a raised effect on my card. 

Next, I die cut the sentiment insert from the Grand Holiday Cabinet Etched Die Set using Gold Mirror Cardstock. I also wanted to add a backdrop to the sentiment piece, so I die cut one of the frames from the Reindeer Prance Layering Set Etched Dies using White Cardstock. Then, I partially coloured the reindeer since the rest of the design would be covered by the sentiment. 

The poinsettias were created using the poinsettia die included in the Grand Snow Globe Etched Dies. I die cut them from White Cardstock, coloured them using Distress inks, embossed the petals and added gold pollens for the centres. The holly leaves are also from the same die set. I die cut them from White Cardstock as well and coloured them lightly using Distress inks. Finally, I added a White Satin bow and placed a poinsettia and holly leaves as the finishing touch. 

Other Supplies: 
Neenah Solar White 110 LB cardstock, Cream Linen Textured 12 x 12 Cardstock, Gold Mirror Cardstock, White Fun Foam; Inks: Festive Berries Distress ink, Fired Brick Distress ink, Twisted Citron Distress ink, Shabby Shutters Distress ink; Adhesive: Scrapbook Adhesives 3D Foam Squares, Tombow Mono Multi Liquid Glue, Double Sided Foam Tape, Mini Glue Gun; McGill Inc. Paper Blossoms Tool kit, Gold Pollens.

I hope you liked the cards I shared today. I had so much playing with die sets from the 3D Holiday Vignettes by Becca Feeken. I can't wait to make some more projects using them!

Thank you so much for visiting! If you would like to see more of my work using Spellbinders dies, do visit my blog and follow my Instagram page.
Have an amazing day!