Showing posts with label Anniversary Cards. Show all posts

Saturday, March 16, 2019

Amazing Paper Grace Die of the Month | March 2019

Hello, everyone!
I have a card to share today I made using the Amazing Paper Grace March Die of the Month Kit. If you missed seeing my projects using last month's kit, you can check them out HERE.

This month's Spun Blessing Oval Die Set is very detailed and gorgeous, as always, and has some spectacular elements to help you make ornate cards, bags, boxes, and more. Here's a look at the kit itself:
What I really loved about the die set is , that you can use them all together to create a gorgeous panel or use all the elements separately to add different accents to your projects like an oval, a circle frame, and more. Another plus point about this set is that it is designed to fit regular A2 cards too, which makes it really versatile and can be used on a number of projects. 

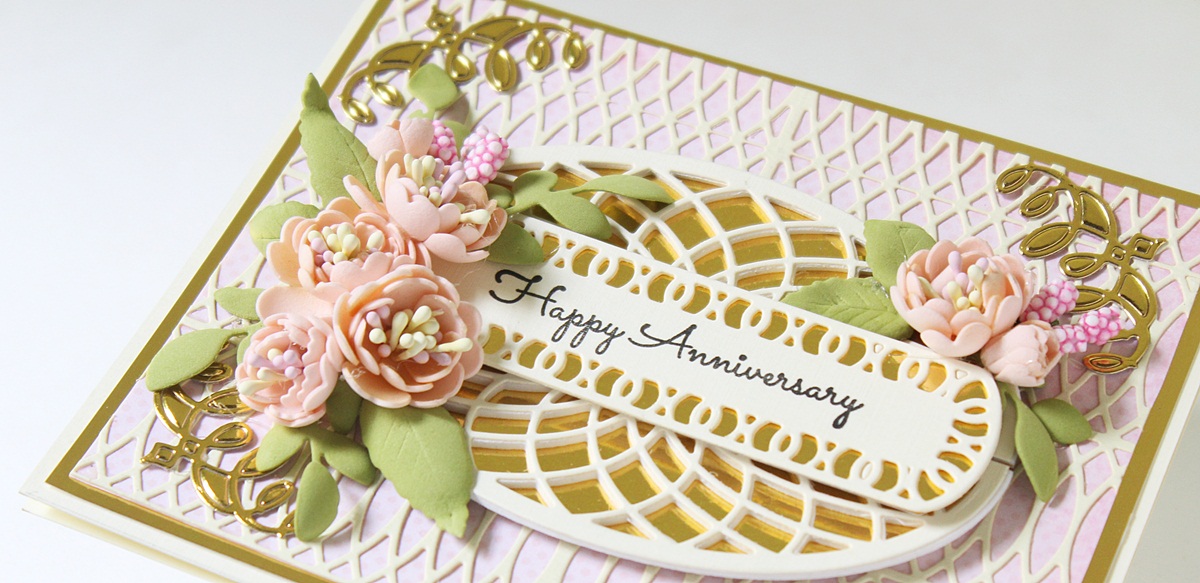
I made a layered card using this set and here is a look at my card:

To create my card, I first started by die cutting the lattice square pieces from cream cardstock. I die cut it six times so that I could adhere them together to create a full background for my card panel. Once the background was in place, I started working on the focal of my card. I die cut the intricate oval frames and then added gold foil cardstock behind them, so that it could help highlight the gorgeous design. 

The pretty floral bunches that you see on either side of the card are handmade using peach Foamiran. I really love making my own Foamiran flowers as embellishments for all my projects. I used the Cinch and Go Flowers III Etched Dies to create them and added cream thread pollens to give them some structure and shape. The leaves were die cut from green Foamiran and I added some foliage to complete the look.

Next, I die cut the sentiment tab using the dies included in this kit to create my sentiment banner. Then, I stamped a sentiment from the Vintage Elegance Giving Occasions Stamp and Die Set to finish off my card. I also added four corners die cut from the Swirl Tags Etched Dies using gold foil cardstock as the finishing accents. 
If you would like to get your hands on this die set, please go over to the Spellbinders website and subscribe to the APG Die of the Month Club. These dies are exclusively for Club members and are a definite value for money!

 If you liked my card, please do leave me a comment below. I always look forward to hearing from you. 
Thank you for stopping by!
Have a great day.

Friday, March 8, 2019

Guest Post for Spellbinders | The Gilded Age by Amazing Paper Grace


Hello, crafty friends!
I am so excited and thrilled to share that I am a guest blogger on the Spellbinders blog. I am showcasing the The Gilded Age Line by Becca Feeken in my projects today.

I started working with the Spellbinders Glimmer Hot Foil System about two weeks ago, and have been really enjoying experimenting and working with it. I love incorporating foil in all my cards and having this machine makes it all the more fun! Today, I have THREE cards to share with you using the Spellbinders Glimmer Hot Foil System and The Gilded Age Line by Becca Feeken.

This card might look really complicated to put together, but it absolutely isn't! To create this card, I first started by foiling the Gilded Vines Glimmer Hot Foil Plate using Blush Foil onto Cream cardstock.

Once that was done, I started working on the background of the card. I used Amazing Paper Grace February Die of the Month Kit to die cut two borders for my card out of some gold foil cardstock. These borders were popped up on foam to give them some dimension. I also die cut four corners to adhere to the foiled backdrop from the Shapeabilities Swirl Tags Etched Dies. I die cut from gold foil cardstock again and adhered them to the foiled panel.

The flowers were made using Pink Foamiran sheets. I added a bunch of three flowers along with a satin double-looped bow to embellish my card. The sentiment is a gold foiled sentiment sticker matted on to cardstock to give it some sturdiness.

I also added some cream cardstock corners on the card base which were die cut using the corner dies from Amazing Paper Grace February Die of the Month Kit. Didn't I say it was super simple to put together!


My second card combines my love for foil and Foamiran flowers. To create this card, I started by foiling the Gilded Leaves Shaped Panel Glimmer Hot Foil Plate using Silver Hot Foil. I foiled the vines on baby pink cardstock and then cut them out using the coordinating die included in the set. Once those were ready, I started working on the focal of my card.

I die cut intricate background frames from pink and silver foil cardstock using the Shapeabilities Swirl Booklet Insert Etched Dies. I layered them on top of each other to give it some interest. The sentiment label was die cut from the Shapeabilities Swirl Tags Etched Dies. I die cut them gain from pink and silver foil cardstock respectively. Then, I stamped my sentiment on the pink panel and adhered it over the die cut background.

For my floral arrangement, I die cut the flowers and leaves from Foamiran sheets using flower dies from the Card Creator A2 Corner Cotillion Etched Dies. I added some complimentary pink pollens to the centres to give them a more fuller look. The rose buds and other fillers are from my stash.

You can see the dimension on the sentiment label below. I love how the silver foil compliments the pink so perfectly!


My last card comprises majorly of foiled elements. To create this card, I first foiled the Gilded Nested Rectangle Glimmer Set Glimmer Hot Foil Plate using Starburst Hot Foil. Next, I die cut this rectangle using the coordinating die from the Gilded Nested Rectangle Die Set Etched Dies. I die cut and foiled another rectangle, slightly smaller than the previous one, so that I could mat one on top of the other. The smaller rectangle was foiled on some patterned paper to give it extra interest.

I die cut an oval frame from the Shapeabilities Lisette Oval Shadowbox Frame Etched Dies using gold foil cardstock and adhered it over the foiled rectangle pieces. Next, I die cut and foiled the label from the Gilded Leaves Shaped Panel Glimmer Hot Foil Plate. I used the Rose Gold Foil to foil this label. The picture below perfectly captures the colour. It's really very pretty!

I also foiled some vines using the Gilded Leaves Shaped Panel Glimmer Hot Foil Plate. I used Starburst Hot Foil to foil them and die cut them using the coordinating dies. I adhered them to the two corners of my card.

The sentiment is a sticker which I have adhered over the rose gold label. I added some micro roses and fillers to the right side to embellish my card.

And here is another look at the card.

Spellbinders Supplies:

Other Supplies: Neenah Solar White 110 LB cardstock, Cream Linen Textured 12 x 12 Cardstock, American Crafts Colored 12×12 cardstock, Gold Foil Cardstock, White Fun Foam; Adhesive: Scrapbook Adhesives 3D Foam Squares, Tombow Mono Multi Liquid Glue, Double Sided Foam Tape, Glue Gun; Stamps: Inspired by Stamping Small Fancy Labels 18; Foamiran Sheets (Light Yellow, Green, and Pink), McGill Inc. Paper Blossoms Tool kit, Pollens, Micro Rose Buds, Ribbon.


I absolutely loved working with these Spellbinders products and can't wait to share more projects using it very soon. If you liked my cards today, please do leave me a comment. I love hearing from you! 

Thank you so much for stopping by!
Have a great day!

Saturday, January 24, 2015

A Layered, Shabby Card !!

Hi bloggy pals,
I have a card to share today which I have created for this week's Cheery Lynn Designs challenge where the theme is 'Sweethearts'. For my card, this time I decided to play with some texture and layering so I created the background of my card using patterned papers from Kaisercraft and Graphic 45. These papers are so gorgeous!! I had a tough time cutting into them. Here's a look at what I've created :


To add some texture to my card, I die cut some corrugated cardboard paper from my heart dies and added some Gesso and Picket Fence Distress Spray Stain on it and die cut another scalloped heart from a watercolored paper and colored it lightly using Worn Lipstick Distress Stain. I added a few drops of the Heidi Swapp Gold Lame Color Shine mist. I even misted the upper half of the card using it.
The flowers are made from the Tea Rose Medium die by Cheery Lynn and colored using Worn Lipstick Distress Stain again and I painted Picket fence Distress Spray on the flowers using a brush! The leaves are also from this die and colored using Evergreen Bough and Mowed Lawn Distress Stains . The foliage was made using Tropical Flourish die by Cheery Lynn and layered the Sophie's heart Mini Doily die cut behind my hearts. The tiny flowers are die cut from the BAF Embellishments #3 die set by Cheery Lynn to which I have added some pollens.

Supplies used :
Cardstock Base- Campap.
Pattern papers- Kaisercraft Tea Break paper pad, graphic 45 Kraft Reflections pad, Chickaniddy Crafts Date Night paper pad.
Dies
Cheery Lynn Tea Rose Medium die, Cheery Lynn Tropical Flourish die,  Cheery Lynn BAF Embellishments #3 die, Cheery Lynn Sophie's Heart Mini Doily die, Nellie Snellen heart dies.
Inks- Distress Stain Evergreen Bough, Distress Stain Mowed Lawn, Distress Stain Worn Lipstick, Distress Spray Stain Picket Fence, Heidi Swapp Gold Lame Mist.
Clear rhinestones and Pollens.

 
Challenges entered :
Cheery Lynn- Sweethearts
Create Something Catchy Challenges- Use the word' Happy'. ( Made it to the Top 4 )
C.R.A.F.T - Recycle (The corrugated paper is from packaging which I have die cut and used ). ( Made it to the Top 3 )
SSS- Incorporate a Heart.
IBSIC - I have chosen the inspiration picture of Hearts.

I hope you like my card. I would love to hear your thoughts on it.
Have a nice day everyone!

Friday, November 14, 2014

Mr. & Mrs.

Hello everyone,
Today, I have another card to share with you all and I have created it for the Runway inspired challenge where we have to create a card based on the designer Oscar De La Renta's designs. He is a fabulous fashion designer and all his designed clothes are so gorgeous! Sadly though, he recently passed away. To honour his memory, the Runway challenge has asked us to choose from one of his Spring collection looks and create a card based on it. My card is inspired from the below picture :-

And here's my take on this inspiration :


Well as you can see, the first thing that attracted me to this look was the gorgeous lacy bottom half and I immediately had to recreate it ...At first my thought was to go for a die cut lace, but then I decided I wanted an stamped element on my card rather than a die cut one. I got out my  Justrite Floral fan Elements stamp set and picked out an border stamp from it and stamped and embossed it on vellum paper using Ranger Super Fine White Embossing powder and then fussy cut it and pleated the paper to create this look .
Then, I pulled out my Antique linen Distress Ink pad and smooshed it on my Craft Sheet and spritzed it with water liberally. I then ran my cream color cardstock in it. This gave a nice base color to my card and I went ahead and layered my embossed lace on the cardstock. On the upper half of the card,  I adhered a black card stock followed by a silver Washi tape. The frame is made from Mod Molds - Ornaments and painted using the Distress Spray Stain- Tarnished Brass and Platinum Stickles and I have adhered a Prima Zephyr paper on the back of it as I wanted to incorporate a little bit of the background from the inspiration picture in my card. I finished off my card with a die cut sentiment.
I'm also entering this card in the Pretty Paper Studio challenge where the theme this month is Embossing!

Here's a look at the stamp set I used for the lace :
 Hope this looong post has not put you to sleep :)

Supplies used :
Cardstock- Fabriano Elle Erre, Paper Accents- Vellum.
Dies- Memory Box Alphabet Soup die.
Stamps- JustRite Floral fan Elements stamp set.
Inks- Versamrk Dazzle Embossing ink pad, Distress ink- Antique Linen.
Ranger Super Fine White Embossing powder,  Prima Zephyr paper pad, Mod Molds - Ornaments, Distress Spray Stain- Tarnished Brass, Silver and Gold Glitter Washi tapes.

 I really hope you like my card ..Do drop in your comments about it ..Would love to hear from you regarding it :)
Have a nice day everyone!

Wednesday, January 8, 2014

White on White!

Hi Friends,
Today I am sharing with you, an all white card. This is the second time, I have attempted this White On White card, the first time around I did not own a die cutting machine and dies, so my card was created entirely with punches, but I knew that when I had some dies to play with I would definitely give this "WOW" card technique a try again :) So, here's my card which I have made using only dies especially the Cheery Lynn dies.                                                                                          
                                                                 
 And here's a another look   :
                                                                 
                                                                                               
 And a look at the inside of my card :                                                  
  For the bottom half  of my card, I have used the Anastasia Border die from Cheery Lynn and pleated it and created the 3 layers to give an effect of frills and layers in a gown, as essentially this card is for a wedding anniversary, and for the inside of the card, I have first embossed an panel using the Provocraft/Cuttlebug Swiss Dots Embossing folder and then de-bossed it by running through the two big shot plates hence flattening the embossing while still retaining the design! The small flowers that you see on the right-hand corner, are also from the Cheery Lynn Daisy Strip die but I have hand-cut them in a small 'V' to give it a new shape. The foliage are all from Cheery Lynn dies too. 

Supplies Used :
Base cardstock -Campap
Embossing folders and Dies : Provocraft Swiss Dots Embossing folder, Cheery Lynn Daisy Strip die, Cheery Lynn Olive Branches, Cheery Lynn Fanciful Flourish, Cheery Lynn 3 in 1 exotic Butterflies (Small) , Ironwork Motifs Scalloped ovals die, Ironwork Motifs oval die.
Stamp : Inkadinkadoo Wedding Stamp set.        
Inks : Versafine Onyx Black ink pad.              
Lace and Pearls.          

Challenges entered :
Cheery Lynn Designs -Winter Whites.
613 Avenue Create - Anything goes with optional twist -Color,Sights and Sounds of Winter.
Make my Monday -Embossing

Hope you all like my card. Please do leave me your comments/suggestions. I would love to hear from you :)
Have a nice day everyone!

Saturday, December 24, 2011

An Anniversary Card. ......And some shares!!!

Hi Friends and Fellow Bloggers,
Wish you all a Very Merry Christmas !!!!! My Today's Post is An Anniversary Card for a very Dear Friend:) My this Card will reach Her a little Late...Due to My Mistake..But hopefully She will like  my Card and forgive My mistake:(
This  is a Quilling  Card again with lots of Layers ...So without further ado Here's My Card:-

                                                         
Now a Different View :-

         And a Look at the Matching Envelope:-        

 And a look at the Flap Side :-
          The Idea for the   Window Trellis is inspired from  the Box From Priya's Blog.  The Idea for the envelope is also inspired from Her.

Supplies used:-   (Card)
Red Cs-Hobby Ideas
Dotted PP-Bought  from Kavitha's Store
Punched Lace-Ms Daisy punch
Glitter Strip-Priya's Candy
Sentiment-Itsy Bitsy
Frame-Itsy Bitsy
Quilled Strips-Handcut
Flowers -Itsy Bitsy
Glitter Glue-Hobby Ideas(White)
Faux stitching-Uniball Signo(Silver)
Pearls-Stash

Supplies Used:-(Envelope)
Handmade Batik Printed Paper
Flowers and Butterfly- Itsy Bitsy
Punched Lace-Ms Daisy Punch
Hobby Ideas glitter Glue(White)

I  am Entering this Card in the Following: :-
1.Daring Cardmakers ( Spots and Stripes)
2.Polka Doodles(Through the Window)
3.The Perfect Sentiment (Anniversary Sentiment +Used the Trellis and the  flowers for inspiration)
4. LadybugCrafts Ink Tlt Challenge (Flowers,Ribbon Punches/Diecuts)
5.The Crafty Pad(Anything But a Christmas Card)
6.Scrappy Frog Challenge(Faux Stitching)

And now for some  Goodies that I Have Received :-
First up Is Karuna's Lil Giveaway Which I had Won For Being the 700th Like On her Fb page
  Crafting Queen
And here's A look at the Gorgeous Card and the goodies She sent Me :-


                     And Now A   Beautiful Christmas Card Which Ujjwal sent Me With my Order    :-
                                And Now a cute Stamp Which  I got from Priya Sivaraj On Being one of the Winners In her Blogerversary Celebration   :-

              Thank You So So  much Karuna,Ujjwal And Priya For your generosity.
              I loved all of your Gifts   and Cards.

     Hop e you guys  Like My Card ... Do Let me Know through your Valuable Comments   :) Have A Great Day Everyone!!!!

