Hello, crafty friends!
I'm delighted and honoured to be joining Altenew for the Dreamy Bouquet Fabric Bundle Blog Hop today. Altenew is releasing their FIRST-EVER Fabric Bundle and I am so thrilled to have had the opportunity to create a few projects using it! The bundle contains 5 pieces of 18"x22" fabric (fat quarter - common size for quilters) featuring Altenew motifs. The fabric is quilting weight cotton making it a versatile choice for crafting, quilting, and more!
If you arrived here from the incredible Michelle Short's Blog, then you are on the right track. If this is your first stop, then you will want to start at the beginning, the Altenew Card Blog. We've got tons of inspiration and giveaways for you on the hop today, so keep reading till the end of this post for more information.


My first project for today is a Slimline Card created using the Dreamy Bouquet Fabric Bundle. I combined a few stamp and die sets from Altenew to create this thank-you card for a friend. If you enjoy making your own home décor or sewing/quilting, these designs really give you a lot of bang for your buck because you can use them in so many different projects. The prints and colours are super pretty too and there's so much you can do with them!
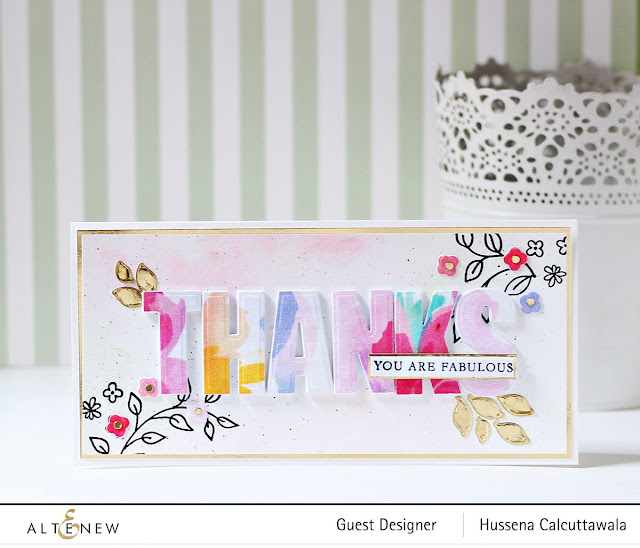
To create my card, I first die-cut the Dreamy Bouquet Fabric Bundle using the Caps Bold Alphabet Die Set to spell the word 'Thanks'. I love that with the Caps Bold Alphabet Die Set, I can create my own fun custom sentiments! Next, I die cut Neenah Classic Crest Solar White Cardstock and White Foam using the alphabet dies and adhered the pieces one on top of the other for dimension. The fabric prints were such a delight to die cut and I thoroughly enjoyed working with them.

Next, I trimmed a piece of Neenah Classic Crest Solar White Cardstock to 3" x 8" and used the Altenew Watercolor 36 Pan Set to do a light watercolor wash on my panel. I wet my card panel with water and used Cotton Candy and Coral Berry paints with a Water Brush in a dabbing motion, allowing the colors to mix slightly. I let the panel dry and then added some black and metallic gold paint splatters for interest. Next, I stamped the hand-drawn foliage foliage and mini flower elements from the Doodle Blooms Stamp Set in opposite corners of the panel using Obsidian Ink. This set is such an oldie, but a goldie. I still reach for it very often in my stash. :-)

Next, I die cut the Dreamy Bouquet Fabric Bundle and Gold Mirror Cardstock using the mini bloom and leaf dies included in the Doodle Blooms Die Set. I assembled the pieces on my card panel and adhered them down using the 2 in 1 Precision Glue Pen. Next, I stamped my sentiment from the Just Because Stamp Set on to some Neenah Classic Crest Solar White Cardstock Cardstock with Versafine Onyx Black ink and cut out the piece using a banner die. Then, I die-cut the banner from Gold Mirror Cardstock to mat the sentiment piece and affixed it down on my panel using foam adhesive. To finish, I mat my card panel with Gold Mirror Cardstock before adhering it down to a top-folding white slimline card base using tape runner.

My next card features the Dreamy Bouquet along with the Fantasy Florals 3D Die Set. This is one of my favorite die sets from Altenew and I was so thrilled to have the opportunity to play with it again.

For my card, I first die cut Neenah Classic Crest Solar White Cardstock using the Dotted Scales Deobssing Cover Die. (This die is currently on sale, so it's a good time to snag it! I have incorporated this cover die in so many projects in the past and still reach for it every now and then. It's super versatile and easily one of my favorite dies of all time!) Next, I wet my card panel with water and used Warm Sunshine paint to create a nice watercolored background. I applied the paint around the centre of the panel and drug the color out loosely with water. Then, I let the panel dry and then added some black and grey paint splatters for interest.

Next, I die cut Gradient Cardstock Set - Red Cosmos and Green Meadows using the various flower and leaf dies from the Fantasy Florals 3D Die Set. I assembled the pieces together using Craft Glue and adhered the die cut pieces down on my panel to create a bouquet. Then, in order to complement the floral spray, I die cut the Dreamy Bouquet Fabric Bundle using the Halftone Circles Nesting Die Set and popped them on my panel using foam adhesive for dimension. I love the hint of colour and texture provided by these circles! I wanted to add a bit of sparkle and shine to the bouquet, so I die cut Glitter Cardstock Set - Dazzling Diamond using the foliage dies included in the Create-A-Wreath Die Set and adhered down the pieces to my floral arrangement using Craft Glue.

Next, I stamped my sentiment from the Just Because Stamp Set on to some Neenah Classic Crest Solar White Cardstock with Versafine Onyx Black ink and cut out the piece using a banner die. Then, for interest, I trimmed a strip of Dazzling Diamond Cardstock and adhered it down on the sentiment banner using Craft Glue and popped the piece on my panel using foam adhesive.
Then, to complete, I mat my card panel with a layer of Dazzling Diamond Cardstock before adhering it down to a top-folding A2-size white card base using tape runner. I finished the design with some sparkling silver sequins around the bouquet to embellish.

Giveaway Prizes:
$300 in total prizes! To celebrate this release, Altenew is giving away a $50 gift certificate to 2 lucky winners and a $25 gift certificate to 8 winners! Please leave a comment on the Altenew Card Blog and/or each designer’s blog post on the blog hop list below by 02/23/2022 for a chance to win. Altenew will draw 10 random winners from the comments left on each stop of this blog hop and announce the winners on the Altenew Winners Page on 02/25/2022.

Blog Hop Order:
Next Stop on this Blog Hop is the incredibly talented, Jaycee Gaspar's blog. Just in case you lose your place along the way, here is the complete list of participants so that you can find your way back:
Hussena Calcuttawala (You are HERE)
Well, that’s all for my projects today! I’ve been busy creating a few more projects that I’ll share in a few days. In the meantime, I hope you’ll take a peek at the February 2022 All Things Handmade Release! Thanks so much for reading, and have a marvelous day!
If you like what you've seen from me, please give me a follow over on my Instagram (@hussena_cal) and/or subscribe to my blog if you haven't already


You made fabulous cards with Altenew's new fabric! I love the texture that the fabric adds to the cards. Thank you for the inspiration.
ReplyDeleteGorgeous!!! I love the fabric on the "Thanks"!!
ReplyDeleteBrilliant to use fabric in your cardmaking! TFS your inspiration and talent.
ReplyDeleteYour creativity is amazing!
ReplyDeleteCute projects!
ReplyDeleteBoth cards are really gorgeous!
ReplyDeleteWell that's just smashing! I thought at first these fabrics were for sewing only -- but you can use them with regular Altenew dies??? Mind blown.
ReplyDeleteAdding dimension is always a great way to make a card stunning. So nice of you to share
ReplyDeleteAdding dimension is always a show stopper. Thanks for sharing
ReplyDeleteLove this fabric! I LOVE it on cards!
ReplyDeleteNice project shares. I like the idea for making the letters with the material.
ReplyDeleteBoth of your cards are beautiful. I have never tried to cut fabric with dies! Can't wait to try!
ReplyDeleteBeautiful projects!
ReplyDeleteI just welcomed 2 great nephews! The letters are beautiful! Instead of thanks, I will do their names. Thanks for the idea!
ReplyDeleteGorgeous, I especially love the first card!
ReplyDeleteLove your cards, especially the second one. The Fantasy Florals 3D Die Set is one of my favorites, too, and I use the Dotted Scales background die often!
ReplyDeleteLove your projects and the fabric is so beautiful.
ReplyDeleteSuch pretty cards! Love the first one best.
ReplyDeleteLove the way you used the fabric on your cards.
ReplyDeleteYour cards are beautiful! I love the way you used the fabric on your cards! I've never die cut fabric before!
ReplyDeleteLove how you used the fabric in your beautiful cards!
ReplyDeleteSo cute and inspiring love the use of the fabric
ReplyDeleteGorgeous cards, especially seeing how you used the fabric. So inspiring!
ReplyDeleteBeautiful cards...love the Second card so much...
ReplyDeleteSuch beautiful cards, and I would never have thought to try die-cutting fabric. Thanks for the inspiration.
ReplyDelete