Showing posts with label Christmas Card. Show all posts

Wednesday, November 10, 2021

Spellbinders November 2021 Clear Stamp & Die of the Month | Around The Holidays

Hello, crafty friends!
Happy Wednesday! I have a Christmas Card to share today made using the Spellbinders Clear Stamp & Die of the Month - Around The Holidays.

The Spellbinders Clear Stamp of the Month is a 9 piece stamp set containing decorative holiday details on a curved line with curved sentiments too. This stamp set is perfect for lots of Holiday occasions and can be used in a variety of ways. The Stamp Set coordinates with this month's Large Die of the Month and Glimmer Die of the Month Sets, so you can mix and match your supplies to create different projects. This “Around The Holidays” stamp set features made in the USA stamps from high-quality photo-polymer for clear, crisp impressions. 

I used the curved borders from the kit along with the coordinating dies to create my card.

For my card, I started by cutting a piece of Snowdrift Cardstock with the border die included in the Clear Stamp and Die of the Month Kit. Next, I stamped the snowflake border in Versamark Embossing ink on Snowdrift Cardstock and heat embossed it using Super Fine Gold Embossing Powder before die cutting it with the matching border die. Then I cut Mirror Gold Cardstock using one of the borders from the Clear Stamp and Die of the Month Kit and adhered the layer underneath the front card panel to add a gold border to it. 

Once that was done, I stamped the presents border on to Snowdrift Cardstock using Versamark Clear Embossing ink and heat-embossed it using Super Fine Gold Embossing Powder to make painting such small images a bit easier by providing a slightly raised edge to contain the pigment. I coloured the images using Copic Markers and then die cut each of the presents using the coordinating dies included in the Clear Stamp and Die of the Month Kit.

I assembled the different components of the card front together, then backed it with a piece of foiled patterned paper from a previous Spellbinders Card Kit of the Month Paper Pad. Once that was done, I stamped one of the sentiments in the stamp set, positioning it to follow the arc of the die cut card front using Versafine Onyx Black ink. Then I placed the die cut presents along the die cut edge and popped them on to my panel using foam squares

Next, I die cut Snowdrift Cardstock using the Holiday Word Blocks Etched Dies (I snipped off the holly leaves from the Ho Ho Ho piece to use for my card design) and coloured the pieces using Copic Markers. Then I matted my card front to a piece of Pomegranate Cardstock before adhering it to a top-folding white card base using the Bearly Art Precision Craft Glue. Lastly, I added custom-coloured Crystal Jewels to the die-cut leaves to embellish my card. 


I hope you liked my Christmas card and thank you so much for stopping by today. You can subscribe to any of the Spellbinders Clubs between the 1st - 24th of each month and never miss a fun kit like this again!
  

Don't miss out on the BIG Pre Holiday Clearance Sale going on now with a HUGE assortment of newly clearanced products. The offer is now live and available through November 11th, 2021 at Midnight PST.

If you like what you've seen from me, please give me a follow over on my Instagram (@hussena_cal) and/or subscribe to my blog if you haven't already.
Wishing you a great day ahead!

Monday, August 17, 2020

Spellbinders Sparkling Christmas Collection | 'Tis The Season Card

Hello, crafty friends!
I have a Card to share today featuring dies and Glimmer Plates from the Spellbinders Sparkling Chirstmas Collection. I created a bunch of holiday projects recently using this collection and can't wait to share them all here. I don't know if it is too early to start on Christmas cards, but I thoroughly enjoyed creating them.

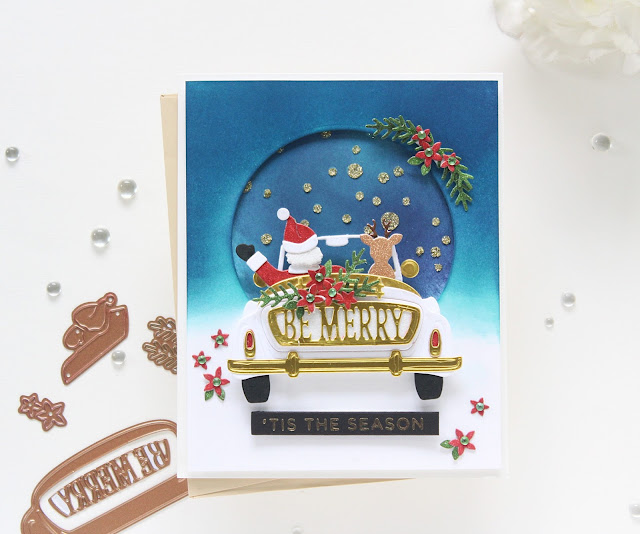
My Card for today features the Sunday Drive with Santa Etched Dies and the sentiment Glimmer Plates from the Holiday Sentiments Series 2 Glimmer Hot Foil Plate & Die Set.

When I saw the Sunday Drive with Santa Etched Dies, I immediately knew that I wanted to create a scene-based card using it. To start, I die cut the different components of the car from the Shapeabilities Sunday Drive Etched Dies using my Spellbinders Platinum 6" Die Cut Machine. The Sunday Drive with Santa Etched Dies is designed to work with the previously released Sunday Drive Die Set. If you have that set already, this is a must-have add-on! 

I die cut the pieces of the car from Whip Cream CardstockGold Mirror Cardstock, Cranberry Bliss Cardstock, and Black Licorice Cardstock. I assembled it together and then kept it aside. Next, I die cut the figure of Santa and Rudolph from the Sunday Drive with Santa Etched Dies from the Brights Glitter Cardstock Stack by DCWV. I love the sparkly finish and think it really adds that little something to the card! I also die cut the number plate frame 'Be Merry' from Gold Mirror Cardstock and added it to my car.

Once this was done, I started working on my card background. I took a piece of Neenah Classic Crest Solar White Cardstock, and ink blended the background using Chipped Sapphire, Blueprint Sketch, and Broken China Distress inks.  Once I was happy with the way it looked, I die cut a circle from the centre of the panel using the Nestabilities Standard Circles LG Etched Dies. Next, I took another panel and ink blended the background using Chipped Sapphire and Stormy Sky Distress inks. Once that was done, I stenciled the background using an old Heidi Swapp Stencil and Gold Glimmer Paste. I love the contrast of the gold against the blue. I think it looks quite striking! 

Next I die cut some little poinsettia flowers and fern leaves from the Sunday Drive with Santa Etched Dies from Glitter Cardstock. I adhered them over my car and on a few places on my card panel. 

For the sentiment, I chose one of the Glimmer Plates in the Holiday Sentiments Series 2 Glimmer Hot Foil Plate & Die Set. I used Gold Foil to glimmer the sentiment onto a strip of Black Licorice Cardstock. I trimmed it and adhered it to my panel using foam squares. Lastly, I added some green jewels to the centres of the flowers and adhered my panel to my card base to finish. 

Thanks for joining me today to take a look at the new Christmas Collections from Spellbinders. I would love to hear what you think of my card. :)

If you would like to see more of my work using Spellbinders, do follow my Instagram page - @hussena_cal
Thank you so much for your visit to my blog today!

Friday, September 14, 2018

Spellbinders September 14th 2018 Blog Hop

Hello everyone,
I am so thrilled and honoured to be joining Spellbinders for their 14th September Blog Hop today. I am sharing a layered Christmas card with handmade flowers made using the exquisite dies from the A Charming Christmas Collection by Becca Feeken.

You should have arrived from the incredibly talented, Becca Feeken's blog. If not, I do have the full blog hop list at the end of the post. Today, we are featuring the following four collections: A Sweet Christmas by Sharyn Sowell, Zenspired Holidays by Joanne Fink, A Charming Christmas by Becca Feeken & Holiday Die D-Lites.

If you would like to see some more inspiration using the A Charming Christmas Collection, then you can check out my posts at the Spellbinders blog HERE, HERE, and HERE.

Here's my card using the A Charming Christmas collection:

My card measures 7" X 5" and is a top-folding one. To create this card, I started by die cutting the large elegant frame from the Holly Jolly Christmas Etched Die set from Neenah Classic Crest Solar White 80 LBS cardstock. Next, I die cut a coordinating frame from the same collection using gold foil cardstock. I adhered the gold frame using foam tape so that it would have some dimension.

I wanted the sentiment to be the main focus of my card, hence I decided to use the 'Merry Christmas' Word die from the Holly Jolly Christmas Etched Die set for my card. I die cut it twice, once from bright red cardstock and the other from white fun foam. I adhered the red die-cut over the white fun foam and glued this piece to the center of my card.

I used the Cinch and Go Poinsettia die set to create the flower clusters on both sides of my card. I die cut the Poinsettias from White Foamiran and inked the centers using a pink Zig Clean Colour Brush Marker. I added some ink to the center of the die-cut and spread it around using my fingers. 

I also added a bunch of thread pollens to the flower centers in order to give them some dimension and structure. The leaves were die cut from Olive Foamiran using the same die I used for creating the flower.

At this point, I felt the card was still missing something, so I die cut few holly leaves using the tiny three-leaf holly cluster die included in the Holly Jolly Christmas Etched Die set from Neenah Classic Crest Solar White 80 LBS cardstock. I coloured the berries and leaves using my Zig Clean Colour Brush Markers. 

If you see my card closely, you will notice that I have coloured some leaves and berries directly on the large white frame as well. I tried to strike a balance so that the card design would not get very cluttered

And here's a final look at my card for today. Hope you enjoyed seeing it!


Giveaways:
To celebrate this release, Spellbinders is giving away a $50 gift certificate to one lucky blog reader - selected from the comments across all of the blogs in the hop. Giveaway closes on Sunday, September 23rd at 11:59 pm EDT. The winner will be announced in the blog hop post the following Monday. Winner is responsible for shipping cost, duties and taxes.


Your next stop on the hop is the wonderful, Kittie Caracciolo!


Blog Hop Order:
                           Hussena Calcuttawala  (You are HERE!)


I would love to hear what you think of my card :) Thank you so much for stopping by my blog. Have a great day!

Sunday, December 16, 2012

Guest Designing at Sunshine Creations :)

Hi Friends,
Today I am very happy to share with  you a card I have made for my GD spot at Sunshine Creations blog  run by a very talented young  Crafter Anushka ...She is only 11 years old and  her work is simply amazing ...I have come to admire  her so much for her ability to multi task so well at such an young age.... She seems to so effortlessly manage school ,crafting ,blogging and now even running her own challenges!! And I am quite proud to be selected as a guest designer at her blog  for this time's challenge which is Season's Greetings..And here's my take on this challenge :

         I have to add here that I am not very good at making cards without floral embellishments in any form and this theme  was a challenge for me ...But luckily the beautiful Pattern papers from the Webster's- A Botanical christmas  came to my rescue:)...Love the beautiful designs and die cuts in this collection....I just cut out the door and added a few pearls on the wreath plus some on the cream lace below to jazz it up ...And for the first time got to play with some Hero Arts stamp and Distress inks with which I have created the background design !!
Oh and I have to tell you guys that since I was also selected the random winner along with GD for Anushka's last challenge(fall /Thanksgiving ) ...I won some cute & lovely Inkadinkadoo stamps for it ...But the ever generous Piali also sent me some utterly gorgeous paper's,  ribbons & alphas too ...Thank you so much Anushka and Piali for your Generosity.. ...I simply Loved it :)
And I wanted to link up my this card  to Annette's My  Clever Creation Blog where she has a celebration on with a link up party ..Annette is a dear blogger friend and I Love her cute, adorable and of course clever work very much  :)

Supplies Used
Base CS : Campap
Design paper :Rak from Piali
Stamp :Hero Arts Swirls
Ink : Distress ink - Fired Brick
Pattern paper : Webster's - A botanical christmas
Sentiment : Webster's botanical collection
Small red pearls :Webster's
Lace :Red :Crafter's Corner,Creame : Stash
 Uniball Signo Golden gel pen  used to color the door knob.

Challenges Entered :
Really Reasonable Ribbon: Anything goes with ribbon .
Charisma Challenge :Christmas Makes
Craft Us Crazy :Christmas
The Sister hood of Crafter's :christmas +stamped Background
Perfect Sentiment :Anything goes with christmas
Do you stack up :christmas
Addicted to stamp :bingo (Pearls ,Ribbon ,Red )
Papelitos Challenge :A touch of Red