Hello, crafty friends!
I am back today to share a set of four projects made with the new
Sweet Serenade Notecards Collection by Becca Feeken. The delicate lace-like edge and stylish scrollwork designs in this collection of dies inspired me to create a set of sweet and dimensional floral note cards, which would be perfect for a variety of occasions.
Everything in this collection coordinates together from the card base to the embellishments to the stamps to make wonderful notecard creations! One of my favourite dies from this collection is the
Scalloped Symphony Notecard Die Set, which is a set of 10 dies that can be used to create either a slimline card front or a 4″ square card when you add the score line insert die. Isn't that simply fantastic?
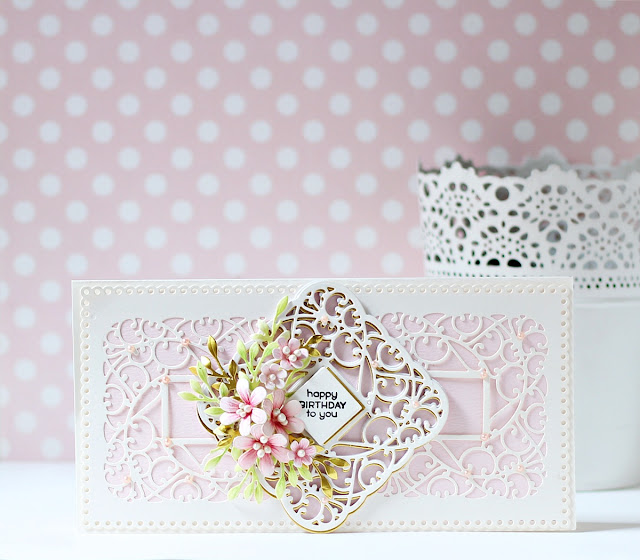
To create my card, I first die cut
Alabaster Cardstock using the Scalloped Notecard Die from the
Scalloped Symphony Notecard Die Set. Next, I die cut the scalloped panel using the Large Square Outline Die from the
Scalloped Symphony Notecard Die Set. I cut the die twice, on either edge of the panel, to create a continuous slimline background. This is a great way to get more out of your die designs and maximizing your stash. Once my panel was die-cut I trimmed a piece of
Pink Sand Cardstock to 8” x 3.5” to adhere behind my panel as a mat layer for the intricate background design.


To embellish my card, I die cut
Snowdrift,
Peridot, and
Mirror Gold Cardstock using a bunch of flower and leaf dies from the
Petite Floral Potpourri Etched Die Set. Next, I used a light pink Copic Marker to flick some colour out from the center to add some quick colour to the flowers. I shaped the petals and the leaves using the Ball Stylus from
Susan’s Garden Ultimate Tool Kit. Then, to complete my floral arrangement, I added iridescent pollens to the centre of each flower for interest and adhered everything down on to my panel using a combination of Hot Glue and
Liquid Glue. I mounted my card panel to a top-folding ivory card base measuring 9” x 4” with tape runner. Lastly, to finish, I adhered pink pearls all across my panel for visual interest.


I kept the rest of my cardlet really simple, so that the intricate accent piece shines through. I die cut
Snowdrift,
Mirror Gold Cardstock, and
White Foam using the 'Hello' die from the
Sweet Sayings Notecard Sentiments Etched Dies. I adhered them together with liquid glue, allowing the gold layer to peek out from behind the white layer a bit. I then ink blended Picked Raspberry Distress ink to the top three-quarters of the sentiment die-cut piece for more depth. Next, I die cut
Pink Sand and
Peridot Cardstock using the flower and leaf dies from the
Petite Floral Potpourri Etched Die Set. Once I had them all die-cut, I used a light pink Copic Marker to flick some colour out from the center to add some quick colour to the petals. I shaped the flowers and the leaves using the Ball Stylus from
Susan’s Garden Ultimate Tool Kit and adhered them down on my panel using liquid glue. I also added some light yellow pearls to the flower centres for interest. Finally, I folded the panel at the score line and burnished the crease well to form my 4″ square card base.


Then, I die cut
Snowdrift,
Mirror Gold Cardstock, and
White Foam using the 'Hello' die from the
Sweet Sayings Notecard Sentiments Etched Dies. I adhered them together with liquid glue, allowing the gold layer to peek out from behind the white layer a bit. I then ink blended Faded Jeans and Tumbled Glass Distress inks to the top three-quarters of the sentiment die-cut piece for more depth. Next, I die cut
Raindrop and
Peridot Cardstock using the flower and leaf dies from the
Petite Floral Potpourri Etched Die Set. Once I had them all die-cut, I used a medium blue Copic Marker to flick some colour out from the center to add some quick colour to the petals. I shaped the flowers and the leaves using the Ball Stylus from
Susan’s Garden Ultimate Tool Kit and adhered them down on my panel using liquid glue. I also added some light yellow pearls to the flower centres for interest. Finally, I folded the panel at the score line and burnished the crease well to form my 4″ square card base.

For my note card, I started off my die cutting Lemon Yellow Cardstock using the Notecard Insert and Score Line Insert Dies from the
Flourished Sonata Notecard Etched Dies. Next, I die cut
Snowdrift and
White Foam using the Decorative Frame Rim and the Decorative Frame Top from the
Flourished Sonata Notecard Etched Dies. I adhered them together with liquid glue and lightly blended Tumbled Glass Distress ink over the white die-cut piece to give it a shabby chic look. Next, I die cut
Pink Sand Cardstock using the Decorative Frame Rim die and adhered it to the back of the die-cut card panel with liquid glue. Then, I die cut the sentiment using the Decorative Inner Frame Die from the
Flourished Sonata Notecard Etched Dies and adhered it down on my panel using liquid glue.

I kept the embellishing very simple on this card, so that the focus remains on the sentiment. I die cut Pink Foamiran and
Snowdrift Cardstock using the flower and leaf dies from the
Petite Floral Potpourri Etched Die Set. I heated the petals with the help of an iron and shaped them using the Ball Stylus from
Susan’s Garden Ultimate Tool Kit. Next, I added iridescent pollens to the centre of each flower for interest. The leaves were coloured using Bundled Sage Distress ink and then shaped with the help of a Ball Stylus and Tweezers from
Susan’s Garden Ultimate Tool Kit. I adhered them down on my panel using Hot Glue and then assembled the rest of my card together. I die cut
Snowdrift Cardstock using the Outer Rim Die from the the
Flourished Sonata Notecard Etched Dies and adhered it behind my main card panel using liquid glue. Finally, to complete, I folded the panel at the score line and burnished the crease well to form my 4″ square card base.

I hope you enjoyed this set of layered floral projects featuring the
Sweet Serenade Notecards Collection and are inspired to give it a try. Thank you so much for stopping by today!
Don’t miss out on the
Black Friday Blowout Sale that is currently going on at
Spellbinders with up to 50% off on a wide range of gorgeous dies, stamps, glimmer plates, tools, and more! There are so many AMAZING deals that you definitely shouldn't miss!
If you like what you've seen from me, please give me a follow over on my Instagram (
@hussena_cal) and/or subscribe to my blog if you haven't already.
Wishing you a great day ahead!


