Saturday, February 5, 2022

Guest Post using Spellbinders Classically Becca Collection


Hello everyone!
I am so thrilled to share that I am guest designing on the Spellbinders blog today. I have three projects to share, highlighting the NEW Classically Becca Collection by Becca Feeken of Amazing Paper Grace. This STUNNING Collection features an array of intricate and elegant motifs that Amazing Paper Grace by Becca Feeken is known for.


My first card features the With Love Regalia Card Builder Etched Dies, along with the Cinch and Go Blossoms Etched Dies, Circle Meets Square Etched Dies, and Scalloped Symphony Notecard Etched Dies. I simply love the intricate Card Builder Inserts included in the With Love Regalia Card Builder Etched Dies and had to create a tall Slimline Card using it. It looks so rich and elegant! 

To create my card, I first die cut Barely Peach Cardstock using the Scalloped Notecard Die included in the Scalloped Symphony Notecard Etched Dies. Next, I die cut Snowdrift Cardstock and Mirror Gold Cardstock using the Card Builder Card Builder Rims and Insert Die from the With Love Regalia Card Builder Etched Dies.  I cut the die twice, on either edge of the panel, to create a continuous slimline background. Then, I adhered them together with the Bearly Art Original Precision Craft Glue, allowing the gold layer to peek out from behind the ivory layer a bit. 
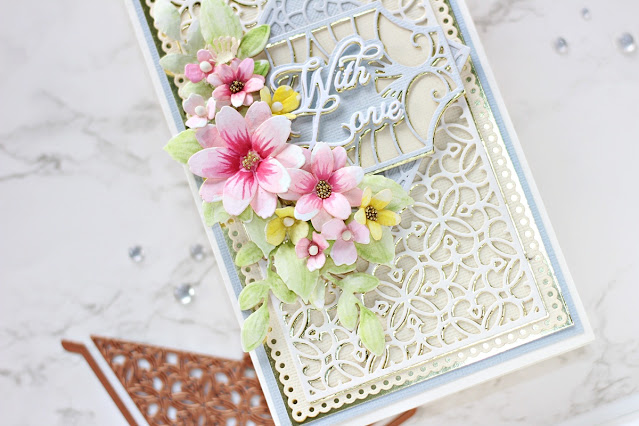
Next, I die cut Brushed Silver Cardstock using the Square Rim and Insert Die in the Circle Meets Square Etched Dies. I  layered them together with Craft Glue, and then attached it to my panel using foam squares for a raised effect. Next, I die cut Brushed Silver and Mirror Gold Cardstock using the Sentiment Rim and Insert Die included in the With Love Regalia Card Builder Etched Die Set and adhered it to the die-cut card panel with Craft Glue, slightly offsetting the die-cuts so that a gold shadow forms. Once that was done, I die cut Snowdrift Cardstock, Mirror Gold Cardstock, and White Foam using the 'With Love' die from the same die set. I adhered them together with liquid glue, allowing the gold layer to peek out from behind the white layer a bit. 
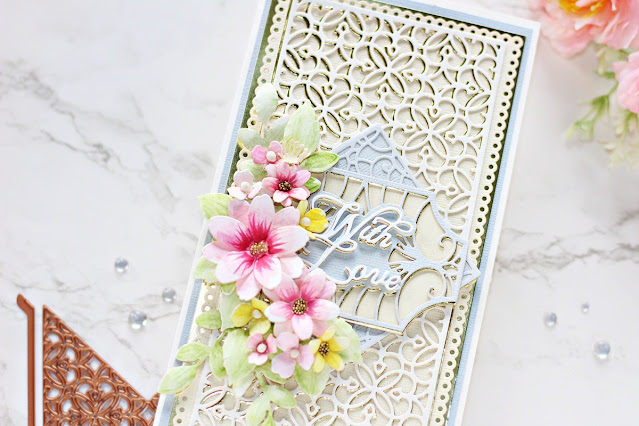
I die cut Snowdrift Cardstock using the flower and leaf dies in the Cinch and Go Blossoms Etched Die Set and Cinch and Go - III Die Set. I used Watercolor Pans to colour the flowers and leaves and then used a dark pink Copic Marker to flick some colour out from the center to add some quick colour to the petals. Then, I embossed each petal and leaf with a Ball Stylus and added micro-fine gold glitter balls and white wire pollens to the flower centres for a bit of pizzazz. 

I then adhered the layers together with Craft Glue before arranging them around the sentiment panel. To finish, I matted the background panel with layers of with Mirror Gold Cardstock and Brushed Silver Cardstock before adhering it a side-folding 3.5” x 8.5” ivory card base. This was such a labour of love, but I truly enjoyed working on every bit of it!


As you can tell, I am a fan of Slimline Cards and just can't create enough of them. I used the Adoring Fleurette Card Builder Etched Dies for this card and paired it with the Scalloped Symphony Notecard Etched Dies to create a soft springtime card.

I started by die-cutting Raindrop Cardstock using the  Scalloped Notecard Die included in the Scalloped Symphony Notecard Etched Dies. Next, I die cut Snowdrift Cardstock and White Foam using the Card Builder Rims and Insert Dies from the Adoring Fleurette Card Builder Etched Dies.  I cut the die twice, on either edge of the panel, to create a continuous slimline background. Then, I adhered them together with the Bearly Art Original Precision Craft Glue on my background panel. 

Next, I die cut Snowdrift Cardstock and White Foam using the Square Rim Die included in the Circle Meets Square Etched Dies and adhered it down on my panel using Craft Glue. Then, I die cut Raindrop, Snowdrift Cardstock and White Foam using the Sentiment Rim and Insert Dies included in the Adoring Fleurette Card Builder Etched Dies and layered them together using liquid glue. Next, I die cut Mirror Gold Cardstock using the 'Adoring You' die from the set and adhered it down on my panel using Craft Glue

Once that was done, I die cut Snowdrift Cardstock using the flower and stem dies in the Adoring Fleurette Card Builder Etched Die Set. I did some quick colouring on the die cut pieces using Copic Markers and then arranged them around my sentiment panel using Craft Glue. I also flicked some colour with a medium pink Copic marker out from the center to add some highlights to the flower die-cuts. 

Then, to complete, I adhered the background panel to a top-folding 3.5” x 8.5” white card base made out of Snowdrift Cardstock using tape runner. I love how simple and easy this card was to put together. The elegant die cut pieces did all the work for me!


I loved the large Corner Frame in the A2 Filigree Marquis Etched Dies and thought it would be the perfect background to pair with the flowers in the Cinch and Go Blossoms Etched Die Set  and Adoring Fleurette Card Builder Etched Dies for this A2-sized friendship card.

To create my card, I started by die-cutting Beeswax Cardstock and White Foam using the Large Corner Frame Insert and Insert Rim Dies in theA2 Filigree Marquis Etched Dies. Next, I die cut Barely Peach Cardstock using the the Filigree Oval Outline Die from the same set. Once that was done, I die cut Snowdrift Cardstock and Mirror Gold Cardstock using the Filigree Oval Insert Die and layered the pieces together using liquid glueslightly offsetting the die-cuts so that a gold shadow forms. Then, I die cut Snowdrift Cardstock and Mirror Gold Cardstock using the Oval Inner Rim Die from the same set. I stamped a sentiment from the I'm Here for You Sentiments Clear Stamp in the centre of the die-cut piece using Versafine Onyx Black ink iand adhered the layers together using liquid glue, allowing a bit of the gold to show as a shadow. I then popped it on the die-cut panel using foam adhesive for dimension. 

I die cut Snowdrift Cardstock using the flower and vine dies from the Cinch and Go Blossoms Etched Die Set  and Adoring Fleurette Card Builder Etched Dies and coloured the pieces using Watercolor half-pans. Once the flower die cuts had dried, I used a Red Copic Marker to add some highlights to the pieces. Then, I embossed each petal and leaf with a Ball Stylus and added ivory thread pollens to the flower centres for interest. I then adhered the layers together with Craft Glue before arranging them around the sentiment panel. To finish, I matted the background panel with layers of with  Snowdrift Cardstock and Mirror Gold Cardstock before adhering it a top-folding A2 white card base with tape runner. I love how each die set contains all the elements and layers required to complete a design from start to finish. 


 SPELLBINDERS SUPPLIES:
CS-007, CS-010, CS-019, CS-027, SCS-117, SCS-118, SCS-160, SDS-167, S4-1163, S4-1164, S5-491, S5-492, S5-493, S6-177, PCGO4E, PE-100, T-021, AD-0084

OTHER SUPPLIES:
Neenah Solar White Cardstock, Copic Markers, Versafine Onyx Black Ink, Heat Tool, MISTI Stamping Tool, Gold Glitter Balls, Ivory Thread Pollens, Groove Golf Tools, Tape Runner.

I hope you enjoyed this set of layered floral cards and have been inspired to create with these gorgeous dies from the Classically Becca Collection. Thank you so much for stopping by!
You can find more inspiration over at my Instagram page.

Saturday, January 22, 2022

Spellbinders January 2022 Clear Stamp & Die of the Month | One Love, One Heart


Hello, crafty friends!
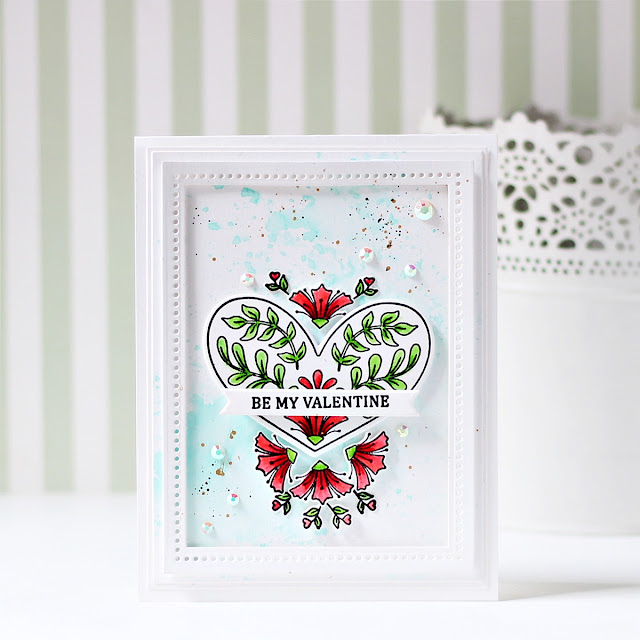
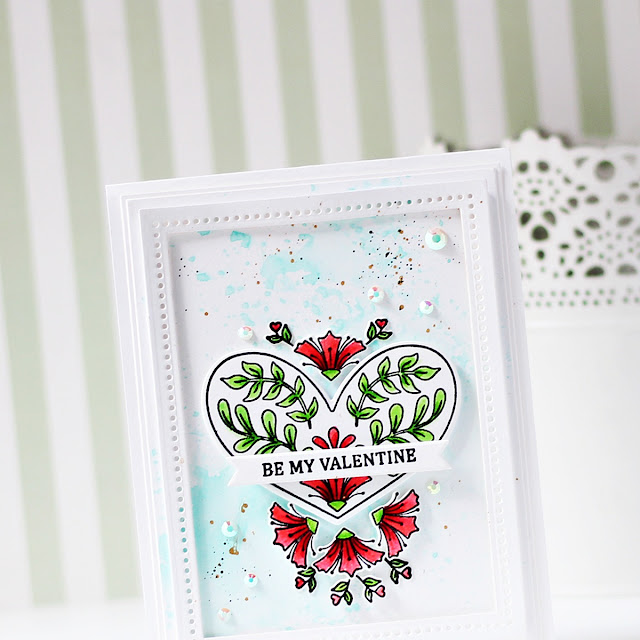
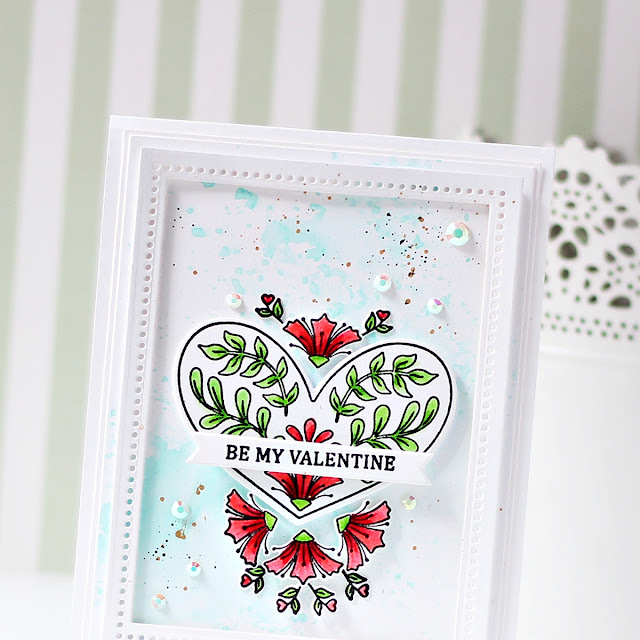
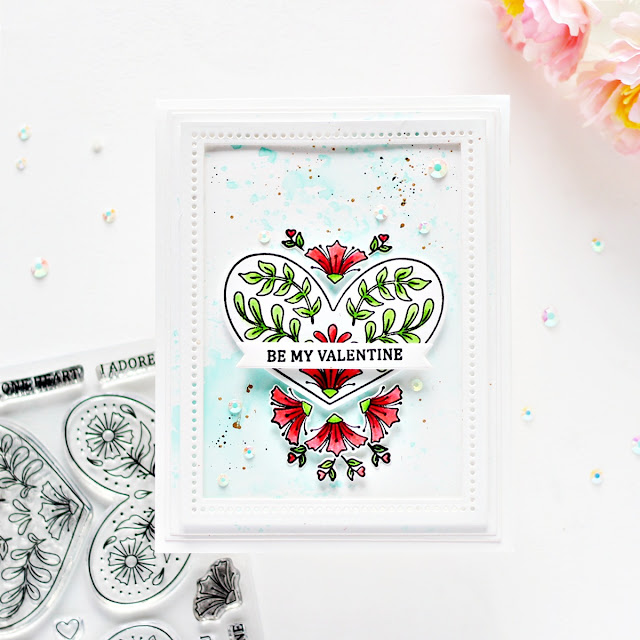
Hope your weekend is off to a great start! I have a Valentine's Day Card to share today made using the Spellbinders Clear Stamp & Die of the Month  One Love, One Heart.

The Spellbinders Clear Stamp of the Month features three wonderful hearts with stamped details inside and beautiful sentiments, which you can mix and match with the other Club Kits for January Kits for endless possibilities! This is a 12-piece clear photopolymer 4 x 6 stamp set perfect for many cardmaking projects and lots of occasions. This “One Love, One Heart” stamp set features made in the USA stamps from high-quality photo-polymer for clear, crisp impressions. 

There is also a Spellbinders Clear Stamp Club Kit without the die set, which you can opt for if you don't wish to receive the coordinating dies.

 The pretty heart designs from the set inspired me to create this love-themed card, which would just perfect to gift to a loved one this Valentine's Day. I used the Clear Stamp and coordinating dies from the set along with the Nestabilities Hemstitch Rectangles Etched Dies for my design.

For my card, I started by trimming a piece of Snowdrift Cardstock to 4″ x 5.25″ and created the background pattern using the 'Ink Smooshing' technique. I just pressed Tumbled Glass and Salty Ocean Distress Inks onto different areas of my craft mat and spritzed them with water until they beaded up. I then pressed my piece of cardstock into the droplets and dried it with a Heat Gun. I continued pressing the cardstock into the ink droplets until I had look that I liked and was happy with.

Next, I I stamped one of the heart designs and the individual floral images from the One Love, One Heart Stamp Set onto Snowdrift Cardstock using Versafine Onyx Black Ink. I coloured the images using Zig Clean Colour Real Brush Markers and then cut them out with the coordinating dies (included if you subscribe to the Clear Stamp & Die of the Month Kit) and popped them up in the middle of the card using foam adhesive. Next, I stamped a sentiment from the same set onto a strip of Snowdrift Cardstock using Versafine Onyx Black Ink and used one of the banner dies included in the Kit to cut out the card sentiment and popped it down on my panel using  foam adhesive.

To accentuate my design, I die-cut Snowdrift Cardstock and White Fun Foam using the Extra Large Hemstitch Die from the Nestabilities Hemstitch Rectangles Etched Dies. I adhered down the frame to my panel using liquid adhesive and then mat the card panel with  Snowdrift Cardstock. Then, to finish, I adhered it to a top-folding A2-sized white card base with liquid adhesive. Lastly, I adhered a few Iridescent Crystal Gems around my stamped design to add some sparkle and shine to the panel. 


I hope you liked my card and thank you so much for stopping by today. You can subscribe to any of the Spellbinders Clubs between the 1st - 24th of each month and never miss a fun kit like this again!
  

Don't miss out on the Feel The Love Sale that is currently going on at Spellbinders with up to 40% off on a wide range of gorgeous dies, stamps, glimmer plates, tools, and more! There are so many AMAZING deals that you definitely shouldn't miss! 
 

 If you like what you've seen from me, please give me a follow over on my Instagram (@hussena_cal) and/or subscribe to my blog if you haven't already.
Wishing you a great day ahead!

Thursday, January 20, 2022

Amazing Paper Grace Die of the Month | January 2022


Hello, crafty friends!
I have a sweet friendship card to share today featuring the Spellbinders & Amazing Paper Grace January 2022 Die of the Month Set. This month's "Pop Up Vignette Coffee Tea or Me" Set is perfect for making gorgeous layered cards, tags, gift boxes, gift baskets, gift card holders, mini albums, and more. This die set features 21 dies.

The Pop Up Vignette Coffee Tea or Me Die of the Month Set is a new addition to the Amazing Paper Grace 3D Vignettes Collection and features a cup that can be cut as a solid or filigree along with mirrored cup handles that look good from both sides. The cups also come with a rounded top that lets you see the back dimension and even a die that when cut from a different color makes it look like your cup is full of liquid.  I also includes a number of embellishments – There are regular flowers as well as heart flowers with stems.  Lastly, there are a host of words, and words can be made from the individual letter dropouts. As with other Vignettes, you can make a 3D item or use it flat on a card.

This month's die set is truly one-of-a-kind and I love that it was designed to accommodate both tea and coffee drinkers! I used the intricate layered teacup die to create the centrepiece for my card and embellished it with the flowers and the tea-bag die included in the set to create an ornate Friendship/Encouragement Card.

To create my card, I started by die-cutting Alabaster, Mirror Gold Cardstockand White Fun Foam using the tea-cup, cup handles, and the rounded top die in the Pop Up Vignette Coffee Tea or Me Set. Next, I adhered the detailed die cut layers together, offsetting the mirror gold to create a shadow using liquid adhesive. Next, I die-cut Alabaster, Mirror Gold, and Pink Sand Cardstock using the large triangular flower petal and leaf dies in the set. I used a medium Pink Copic Marker to flick some colour on the base of the petals to add some quick colour to the pieces, while the leaves were coloured using Mermaid Markers. Once that was done, I staggered the petals together using using liquid adhesive

Then, I die-cut Snowdrift Cardstock using the small rounded petal flower and leaf dies in the set. I used a medium Pink Copic Marker to add some quick colour to the petals and then used a stylus tool to cup the petals. I coloured the leaves using Mermaid Markers and adhered the pieces together using liquid adhesive, staggering the petals and added pearl adhesives as flower centers.  Next, I die-cut Pink Sand and Mirror Gold Cardstock using the sentiment strip dies in the set and adhered the pieces one on top of the other using liquid glue. Once that was done, I tucked in a white satin ribbon bow near the tea-cup handle for interest.

Next, I die-cut Snowdrift Cardstock using the tea bag die in the set and stamped a sentiment on the piece using Versafine Onyx Black ink. Next, I blended Abandoned Coral Distress ink over the bottom of the piece using a blending brush for a hint of colour and then used some Gold Baker's Twine to attach it to the front of the tea-cup with some foam adhesive. Then, for my card background, I trimmed a piece of  Snowdrift Cardstock to size and and ink blended the bottom three-quarters of the panel using Worn Lipstick and Abandoned Coral Distress inks, concentrating the darker shade towards the bottom. I then flicked some leftover paint from my palette to the panel using a paint brush for a fun splatter effect. Next, I matted my panel with a piece of Mirror Gold Cardstock and adhered the panel to a side-folding A5-sized white card base with tape runner.


The Amazing Paper Grace Die of the Month is available exclusively at Spellbinders Paper Arts during December 2021. You can get the Pop Up Vignette Coffee Tea or Me Die Set at the special Cub Kit price, along with other membership perks.

If you'd like to see some more project inspiration using the Amazing Paper Grace Die of the Month, check out the Spellbinders Blog where Becca shares some stunning project samples using it.  
 

Limited Period Offer
Get a FREE Pen Gift Set will all qualifying orders of $100+ at the Spellbinders store. Offer valid till supplies last. No code needed.
 

That’s it for me today! I hope you liked my take on the die set! If you like what you've seen from me, please give me a follow over on my Instagram (@hussena_cal) and/or subscribe to my blog if you haven't already.

Tuesday, January 18, 2022

Spellbinders Guest Design Post | Precision Layering Basics Collection

Hello, crafty friends!
 I’m so thrilled to be guest designing on the Spellbinders blog using the new Precision Layering Basics Collection. Basic nesting dies are a staple in every crafter's stash and there are so many things one can do with them. The dies in the Precision Layering Basics Collection are designed to cut perfectly spaced layers of 1/8-inch, and when combined with the B Sets, help you achieve a 1/16-inch border. This means no more measuring, as the work is done for you. I used the various dies in this collection to create three easy and fun cards for a variety of occasions. 


My first card features the Precision Layering A2 A Etched DiesPrecision Layering A2 B Etched Dies, and the Precision Layering Mini Slimline A Etched DiesPrecision Layering Mini Slimline B Etched Dies. I kept this card simple to go with the modern look of the die set. I used various colors of cardstock from my stash to make the colour block background and adhered bunches of pink and blue flowers around the sentiment.

To create my card, I first cut Snowdrift, Pink Sand, and Brushed Silver Cardstock using different layering dies from the Precision Layering A2 A Etched Die Set and arranged the pieces together to create my background. This is a great technique to use existing scraps in your stash and utilizing them for creating card backgrounds! Next, I die cut Brush Gold Cardstock using the Layer 1 Die from the Precision Layering A2 A Etched Dies and adhered it down using liquid adhesive to my background panel. I then matted the card panel with Pink Sand Cardstock and attached it to an top-folding white card base using tape runner. 

Next, I die cut Brush Gold Cardstock and White Fun Foam using the Layer 3 and Layer 4 Dies from the Precision Layering Mini Slimline A Etched Dies to create a die cut frame for my card front. I used two different nesting dies to create the frame, but you can stick to one if you'd like. I adhered the pieces one on top of the other using liquid adhesive

Next, I die cut Snowdrift Cardstock using various flowers and foliage dies from the Mini Blooms and Sprigs Etched Dies and Layered Blooms Etched Dies. I coloured the die cut pieces using Jane Davenport's Watercolour Brush Markers and then foam-mounted them to the panel for dimension. Once that was done, I used Gold Hot Foil to foil Onyx Cardstock using one of the sentiments from the Mini Sincere Sentiments Glimmer Hot Foil Plate and cut it out using the coordinating die. Then, to finish, I adhered the pieces onto my panel using foam tape for a raised effect. 


My second card features the Precision Layering Mini Slimline A Etched DiesPrecision Layering Mini Slimline B Etched Dies, and the Primrose Heart Façade Etched Dies. I have long been a fan of Slimline cards, so I was absolutely thrilled to know that Spellbinders now offers Mini Slimline dies as well. These are such a fun alternative to standard A2-sized cards and I love working with this size. The idea for this card was to create a floral design on a dark background, surrounding a foiled sentiment frame and the Precision Layering Mini Slimline A Etched Dies made it such a breeze to create my card design. 

To create my card, I first die cut Brush Gold Cardstock using the Layer 1 Die from the Precision Layering Mini Slimline A Etched Dies to create a die-cut frame for my card front. Next, I die cut Navy Blue Cardstock using the coordinating Layer 2 Die from the Precision Layering Mini Slimline B Etched Dies. Then, I die cut Brush Gold Cardstock using the the Layer 4 Die from the Precision Layering Mini Slimline A Etched Dies. I adhered the layers together using liquid adhesive to create my background panel.

Next, I die-cut Snowdrift Cardstock using various flower and foliage dies from the Mini Blooms and Sprigs Etched Dies and Layered Blooms Etched Dies. I used a combination of Jane Davenport's Watercolour Brush Markers and Copic Markers to colour and shade the die-cut pieces, but you can also cut out the pieces from colored cardstock and assemble them together, or use any colouring medium of your choice. 

Next, I die cut Brush Gold and Snowdrift Cardstock using the Layer 11 Dies from the Precision Layering Mini Slimline A Etched Dies and Precision Layering Mini Slimline B Etched Dies. I stamped my sentiment from the All Occasion Sentiments Stamp and Die Set in Versafine Onyx Black ink and adhered the layers together using liquid glue and then foam-mounted them to the panel for dimension. Then, to finish, I attached my card background to an top-folding navy card base using tape runner. I really liked working with a dark background for this card, I think it helps the pale pink and coral flowers pop. 


My final card for today features the Precision Layering A2 A Etched DiesPrecision Layering A2 B Etched Dies, and the Butterfly Bliss Garden Shutters 5 x 7" Card Base Etched Dies. I love stretching my supplies to get more out of them and the background for this card was so fun to create using just nesting dies. With a few butterflies and a big, pretty sentiment, this card came together easily.

To make my card, I first die cut a piece of Brush Gold Cardstock using the Layer 1 Die from the Precision Layering A2 B Etched Dies and Snowdrift Cardstock using the coordinating Layer 2 Die from the Precision Layering A2 A Etched Dies. I mat the white panel with the foiled card panel using tape runner and then attached it to a top-folding white card base made from Snowdrift Cardstock.

Next, I die cut Snowdrift and Gold Glitter Cardstock using various nesting dies included in the Precision Layering A2 A Etched Dies. I coloured the pieces using Copic markers, but you can use Distress Oxides or inks as well if you like. Next, I assembled the pieces down on my panel and adhered them using liquid adhesive. I trimmed the overhanging pieces using a paper trimmer and used the leftover die-cut pieces on the other side of the panel to create a continuous background design. This is a great technique to get more out of your basic shape dies. One can create a multitude of die cut or embossed background for your cards using simple techniques like such. 

Then, to embellish my card, front I die cut Snowdrift Cardstock using the butterfly dies from the Butterfly Bliss Garden Shutters 5 x 7" Card Base Etched Die Set. I used Copic Markers to colour and shade the die-cut pieces, but you can also cut out the pieces from colored cardstock and assemble them together. I also die cut the body of the butterflies from Gold Glitter Cardstock for interest. Next, I stamped the sentiment from Sending You stamp set in Versafine Onyx Black ink onto Snowdrift Cardstock and cut out with one of the coordinating dies. I popped in on to my panel using foam adhesive for dimension. Once that was done, I stamped the accompanying sentiment from the same stamp set on to a strip of Snowdrift Cardstock using Versafine Onyx Black ink and popped it on to my panel using foam adhesive too. I really love how easy and fun this was to make!


SPELLBINDERS SUPPLIES:
CS-005, CS-024, CS-027, CS-030, SCS-116,  SCS-160, SDS-166, SDS-167, S2-314, S4-1091, S4-1158, S4-1166,  S5-484, S5-487, S5-494, S6-183, CSOM-OCT21, GLF-014, GLP-288, GLS-003CW, JD-041, PCGO4E, PE-100, T-021

OTHER SUPPLIES:
Neenah Solar White Cardstock, Navy Blue Cardstock, Copic Markers, Versafine Onyx Black Ink, MISTI Stamping Tool, Tape Runner, Foam Adhesive, Gold Glitter Cardstock.

I hope you enjoyed this trio of floral cards featuring the Precision Layering Basics Collection. The dies in the collection are truly versatile and would be a great addition to your craft room! Thank you so much for stopping by today! You can find more inspiration over at my Instagram page

Thursday, January 13, 2022

Spellbinders January 13th Clubs Blog Hop + Giveaway


Hello, crafty friends!
I'm delighted to be joining Spellbinders for the January 2022 Clubs Inspiration Blog Hop today. Spellbinders is celebrating all their Club Kits in shop for January 2022.

If you arrived here from Deborah Jenkins' Blog, then you are on the right track. If this is your first stop, then you will want to start at the beginning, the Spellbinders Blog. We've got tons of inspiration and giveaways for you on the hop today, so keep reading till the end of this post for more information.

I have an A2 Shaped Note Card cum Pocket to share for the hop today using the Spellbinders  – January 2022 Die of the Month Set. This month’s Large Die of the Month Kit, “A Pocket Full of Love“, is a large set of 11 dies that cuts a beautifully ornate pocket as well as a fun shaped note card to insert.  You can add the pocket to your cards and scrapbook pages or use it on its own for a gorgeous and unique love letter like I’ve done here. It all fits in an A2 envelope, which is perfect for Valentine’s Day, but could totally be used for other occasions throughout the year!

To create my card, I first Alabaster Cardstock using the Pocket Tab Dies from the A Pocket Full of Love Die Set. I die cut the layers twice, and then adhered them together using Craft Glue to create the pocket for my note-card. Next, I die-cut Alabaster Cardstock and White Foam using the Decorative Pocket Die from the set and layered the pieces atop the pocket using Craft Glue. Next, I die-cut Wild BerryPink SandRainforest, Fern, Gold Glitter Cardstock, and White Foam using the Flower die included in the set. I layered the pieces together and adhered it down my pocket using Craft Glue for a strong hold. 


Once that was done, I die-cut Beeswax and Glacier Cardstock using the Note Card Insert Die in the A Pocket Full of Love Die Set. Next, I die-cut Alabaster Cardstock, Gold Glitter Cardstock, and White Foam Sheets using the Pull-Out Decorative Heart Die from the set and adhered the layers together with Craft Glue for a strong hold. I adhered the ivory die-cut piece on top of the gold glitter die-cut with liquid glue, offsetting them a bit to form a shadow. I also die-cut Wild Berry Cardstock and  White Foam using the Tiny Flower Die from the Set and layered them together for a raised effect. Next, I stamped a sentiment from the "One Heart, One Love" Clear Stamp of the Month Set on to a strip of Snowdrift Cardstock using Versafine Onyx Black and popped it on to my panel using foam squares for dimension.


Once that was done, I embossed Glacier Cardstock using the NEW "Spreading Love" Embossing Folder from Spellbinders. This Club has sold out for the month, but you can check back later in the 'Past Clubs' section on the website to get your hands on it.  Be sure to sign up for the Spellbinders Clubs right away on the 1st of the month not to miss out on any future designs! I trimmed the embossed panel to size to fit on my card base and then adhered down my card elements on it with liquid glue. Then, to finish, I mat my card panel with Mirror Gold Cardstock before adhering it a side-folding A2 Alabaster card base with tape runner. I didn't stamp a sentiment in the pocket letter, but if you wish, you could do that to personalize your card even further.


Giveaway:
To celebrate this release, Spellbinders is giving away a $50 gift certificate to 3 lucky blog readers – selected from the comments on our blog. Giveaway closes on Sunday, January 16th, 11:59 pm MST. The winners will be announced in this blog hop post the following Wednesday. The winner is responsible for shipping cost, duties and taxes.

Please note, store credit (gift certificate) cannot be applied to Club Subscriptions. Store credit can be applied to shop past Club products, Club extras and regular releases.

Blog Hop Order
Next Stop on this Blog Hop is, Jeanne Bobish's blog.
Just in case you lose your place along the way, here is the complete list of participants so that you can find your way back:

                           Hussena Calcuttawala (You are HERE)

Thank you so much for your stopping by and reading this blog post. I hope you liked my project! 

If you like what you've seen from me, please give me a follow over on my Instagram (@hussena_cal) and/or subscribe to my blog if you haven't already.
Wishing you a great day ahead!